在图像中寻找轮廓
例程
教程的代码在下面给出. 你也可以从 这里 下载
#include "opencv2/highgui/highgui.hpp"
#include "opencv2/imgproc/imgproc.hpp"
#include <iostream>
#include <stdio.h>
#include <stdlib.h>

using namespace cv;
using namespace std;

Mat src; Mat src_gray;
int thresh = 100;
int max_thresh = 255;
RNG rng(12345);

/// Function header
void thresh_callback(int, void* );

/** @function main */
int main( int argc, char** argv )
{
  /// 加载源图像
  src = imread( argv[1], 1 );

  /// 转成灰度并模糊化降噪
  cvtColor( src, src_gray, CV_BGR2GRAY );
  blur( src_gray, src_gray, Size(3,3) );

  /// 创建窗体
  char* source_window = "Source";
  namedWindow( source_window, CV_WINDOW_AUTOSIZE );
  imshow( source_window, src );

  createTrackbar( " Canny thresh:", "Source", &thresh, max_thresh, thresh_callback );
  thresh_callback( 0, 0 );

  waitKey(0);
  return(0);
}

/** @function thresh_callback */
void thresh_callback(int, void* )
{
  Mat canny_output;
  vector<vector<Point> > contours;
  vector<Vec4i> hierarchy;

  /// 用Canny算子检测边缘
  Canny( src_gray, canny_output, thresh, thresh*2, 3 );
  /// 寻找轮廓
  findContours( canny_output, contours, hierarchy, CV_RETR_TREE, CV_CHAIN_APPROX_SIMPLE, Point(0, 0) );

  /// 绘出轮廓
  Mat drawing = Mat::zeros( canny_output.size(), CV_8UC3 );
  for( int i = 0; i< contours.size(); i++ )
     {
       Scalar color = Scalar( rng.uniform(0, 255), rng.uniform(0,255), rng.uniform(0,255) );
       drawContours( drawing, contours, i, color, 2, 8, hierarchy, 0, Point() );
     }

  /// 在窗体中显示结果
  namedWindow( "Contours", CV_WINDOW_AUTOSIZE );
  imshow( "Contours", drawing );
}
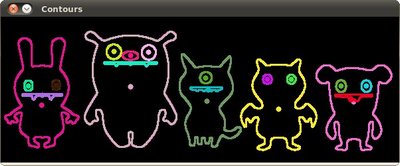
例程说明
结果
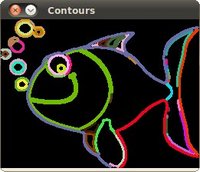
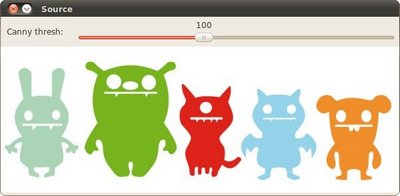
原图和检测到的轮廓如下:

计算物体的凸包
例程
教程的代码在下面给出. 你也可以从 这里 下载
 #include "opencv2/highgui/highgui.hpp"
 #include "opencv2/imgproc/imgproc.hpp"
 #include <iostream>
 #include <stdio.h>
 #include <stdlib.h>

 using namespace cv;
 using namespace std;

 Mat src; Mat src_gray;
 int thresh = 100;
 int max_thresh = 255;
 RNG rng(12345);

 /// Function header
 void thresh_callback(int, void* );

/** @function main */
int main( int argc, char** argv )
 {
   /// 加载源图像
   src = imread( argv[1], 1 );

   /// 转成灰度图并进行模糊降噪
   cvtColor( src, src_gray, CV_BGR2GRAY );
   blur( src_gray, src_gray, Size(3,3) );

   /// 创建窗体
   char* source_window = "Source";
   namedWindow( source_window, CV_WINDOW_AUTOSIZE );
   imshow( source_window, src );

   createTrackbar( " Threshold:", "Source", &thresh, max_thresh, thresh_callback );
   thresh_callback( 0, 0 );

   waitKey(0);
   return(0);
 }

 /** @function thresh_callback */
 void thresh_callback(int, void* )
 {
   Mat src_copy = src.clone();
   Mat threshold_output;
   vector<vector<Point> > contours;
   vector<Vec4i> hierarchy;

   /// 对图像进行二值化
   threshold( src_gray, threshold_output, thresh, 255, THRESH_BINARY );

   /// 寻找轮廓
   findContours( threshold_output, contours, hierarchy, CV_RETR_TREE, CV_CHAIN_APPROX_SIMPLE, Point(0, 0) );

   /// 对每个轮廓计算其凸包
   vector<vector<Point> >hull( contours.size() );
   for( int i = 0; i < contours.size(); i++ )
      {  convexHull( Mat(contours[i]), hull[i], false ); }

   /// 绘出轮廓及其凸包
   Mat drawing = Mat::zeros( threshold_output.size(), CV_8UC3 );
   for( int i = 0; i< contours.size(); i++ )
      {
        Scalar color = Scalar( rng.uniform(0, 255), rng.uniform(0,255), rng.uniform(0,255) );
        drawContours( drawing, contours, i, color, 1, 8, vector<Vec4i>(), 0, Point() );
        drawContours( drawing, hull, i, color, 1, 8, vector<Vec4i>(), 0, Point() );
      }

   /// 把结果显示在窗体
   namedWindow( "Hull demo", CV_WINDOW_AUTOSIZE );
   imshow( "Hull demo", drawing );
 }
创建包围轮廓的矩形和圆形边界框
代码
下面是本节教程源码. 你也可以从 这里 下载.
#include "opencv2/highgui/highgui.hpp"
#include "opencv2/imgproc/imgproc.hpp"
#include <iostream>
#include <stdio.h>
#include <stdlib.h>

using namespace cv;
using namespace std;

Mat src; Mat src_gray;
int thresh = 100;
int max_thresh = 255;
RNG rng(12345);

/// 函数声明
void thresh_callback(int, void* );

/** @主函数 */
int main( int argc, char** argv )
{
  /// 载入原图像, 返回3通道图像
  src = imread( argv[1], 1 );

  /// 转化成灰度图像并进行平滑
  cvtColor( src, src_gray, CV_BGR2GRAY );
  blur( src_gray, src_gray, Size(3,3) );

  /// 创建窗口
  char* source_window = "Source";
  namedWindow( source_window, CV_WINDOW_AUTOSIZE );
  imshow( source_window, src );

  createTrackbar( " Threshold:", "Source", &thresh, max_thresh, thresh_callback );
  thresh_callback( 0, 0 );

  waitKey(0);
  return(0);
}

/** @thresh_callback 函数 */
void thresh_callback(int, void* )
{
  Mat threshold_output;
  vector<vector<Point> > contours;
  vector<Vec4i> hierarchy;

  /// 使用Threshold检测边缘
  threshold( src_gray, threshold_output, thresh, 255, THRESH_BINARY );
  /// 找到轮廓
  findContours( threshold_output, contours, hierarchy, CV_RETR_TREE, CV_CHAIN_APPROX_SIMPLE, Point(0, 0) );

  /// 多边形逼近轮廓 + 获取矩形和圆形边界框
  vector<vector<Point> > contours_poly( contours.size() );
  vector<Rect> boundRect( contours.size() );
  vector<Point2f>center( contours.size() );
  vector<float>radius( contours.size() );

  for( int i = 0; i < contours.size(); i++ )
     { approxPolyDP( Mat(contours[i]), contours_poly[i], 3, true );
       boundRect[i] = boundingRect( Mat(contours_poly[i]) );
       minEnclosingCircle( contours_poly[i], center[i], radius[i] );
     }


  /// 画多边形轮廓 + 包围的矩形框 + 圆形框
  Mat drawing = Mat::zeros( threshold_output.size(), CV_8UC3 );
  for( int i = 0; i< contours.size(); i++ )
     {
       Scalar color = Scalar( rng.uniform(0, 255), rng.uniform(0,255), rng.uniform(0,255) );
       drawContours( drawing, contours_poly, i, color, 1, 8, vector<Vec4i>(), 0, Point() );
       rectangle( drawing, boundRect[i].tl(), boundRect[i].br(), color, 2, 8, 0 );
       circle( drawing, center[i], (int)radius[i], color, 2, 8, 0 );
     }

  /// 显示在一个窗口
  namedWindow( "Contours", CV_WINDOW_AUTOSIZE );
  imshow( "Contours", drawing );
}

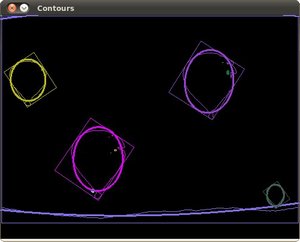
为轮廓创建可倾斜的边界框和椭圆
例程
例程的代码在下面显示. 你也可以从 这里 下载
#include "opencv2/highgui/highgui.hpp"
#include "opencv2/imgproc/imgproc.hpp"
#include <iostream>
#include <stdio.h>
#include <stdlib.h>

using namespace cv;
using namespace std;

Mat src; Mat src_gray;
int thresh = 100;
int max_thresh = 255;
RNG rng(12345);

/// Function header
void thresh_callback(int, void* );

/** @function main */
int main( int argc, char** argv )
{
  /// 加载源图像
  src = imread( argv[1], 1 );

  /// 转为灰度图并模糊化
  cvtColor( src, src_gray, CV_BGR2GRAY );
  blur( src_gray, src_gray, Size(3,3) );

  /// 创建窗体
  char* source_window = "Source";
  namedWindow( source_window, CV_WINDOW_AUTOSIZE );
  imshow( source_window, src );

  createTrackbar( " Threshold:", "Source", &thresh, max_thresh, thresh_callback );
  thresh_callback( 0, 0 );

  waitKey(0);
  return(0);
}

/** @function thresh_callback */
void thresh_callback(int, void* )
{
  Mat threshold_output;
  vector<vector<Point> > contours;
  vector<Vec4i> hierarchy;

  /// 阈值化检测边界
  threshold( src_gray, threshold_output, thresh, 255, THRESH_BINARY );
  /// 寻找轮廓
  findContours( threshold_output, contours, hierarchy, CV_RETR_TREE, CV_CHAIN_APPROX_SIMPLE, Point(0, 0) );

  /// 对每个找到的轮廓创建可倾斜的边界框和椭圆
  vector<RotatedRect> minRect( contours.size() );
  vector<RotatedRect> minEllipse( contours.size() );

  for( int i = 0; i < contours.size(); i++ )
     { minRect[i] = minAreaRect( Mat(contours[i]) );
       if( contours[i].size() > 5 )
         { minEllipse[i] = fitEllipse( Mat(contours[i]) ); }
     }

  /// 绘出轮廓及其可倾斜的边界框和边界椭圆
  Mat drawing = Mat::zeros( threshold_output.size(), CV_8UC3 );
  for( int i = 0; i< contours.size(); i++ )
     {
       Scalar color = Scalar( rng.uniform(0, 255), rng.uniform(0,255), rng.uniform(0,255) );
       // contour
       drawContours( drawing, contours, i, color, 1, 8, vector<Vec4i>(), 0, Point() );
       // ellipse
       ellipse( drawing, minEllipse[i], color, 2, 8 );
       // rotated rectangle
       Point2f rect_points[4]; minRect[i].points( rect_points );
       for( int j = 0; j < 4; j++ )
          line( drawing, rect_points[j], rect_points[(j+1)%4], color, 1, 8 );
     }

  /// 结果在窗体中显示
  namedWindow( "Contours", CV_WINDOW_AUTOSIZE );
  imshow( "Contours", drawing );
}

轮廓矩
目标
在这节教程中您将学到:
- 使用OpenCV函数 moments 计算图像所有的矩(最高到3阶)
- 使用OpenCV函数 contourArea 来计算轮廓面积
- 使用OpenCV函数 arcLength 来计算轮廓或曲线长度
代码
下面是本节教程源码. 你也可以从 这里 下载.
#include "opencv2/highgui/highgui.hpp"
#include "opencv2/imgproc/imgproc.hpp"
#include <iostream>
#include <stdio.h>
#include <stdlib.h>

using namespace cv;
using namespace std;

Mat src; Mat src_gray;
int thresh = 100;
int max_thresh = 255;
RNG rng(12345);

/// 函数声明
void thresh_callback(int, void* );

/** @主函数 */
int main( int argc, char** argv )
{
  /// 读入原图像, 返回3通道图像数据
  src = imread( argv[1], 1 );

  /// 把原图像转化成灰度图像并进行平滑
  cvtColor( src, src_gray, CV_BGR2GRAY );
  blur( src_gray, src_gray, Size(3,3) );

  /// 创建新窗口
  char* source_window = "Source";
  namedWindow( source_window, CV_WINDOW_AUTOSIZE );
  imshow( source_window, src );

  createTrackbar( " Canny thresh:", "Source", &thresh, max_thresh, thresh_callback );
  thresh_callback( 0, 0 );

  waitKey(0);
  return(0);
}

/** @thresh_callback 函数 */
void thresh_callback(int, void* )
{
  Mat canny_output;
  vector<vector<Point> > contours;
  vector<Vec4i> hierarchy;

  /// 使用Canndy检测边缘
  Canny( src_gray, canny_output, thresh, thresh*2, 3 );
  /// 找到轮廓
  findContours( canny_output, contours, hierarchy, CV_RETR_TREE, CV_CHAIN_APPROX_SIMPLE, Point(0, 0) );

  /// 计算矩
  vector<Moments> mu(contours.size() );
  for( int i = 0; i < contours.size(); i++ )
     { mu[i] = moments( contours[i], false ); }

  ///  计算中心矩:
  vector<Point2f> mc( contours.size() );
  for( int i = 0; i < contours.size(); i++ )
     { mc[i] = Point2f( mu[i].m10/mu[i].m00 , mu[i].m01/mu[i].m00 ); }

  /// 绘制轮廓
  Mat drawing = Mat::zeros( canny_output.size(), CV_8UC3 );
  for( int i = 0; i< contours.size(); i++ )
     {
       Scalar color = Scalar( rng.uniform(0, 255), rng.uniform(0,255), rng.uniform(0,255) );
       drawContours( drawing, contours, i, color, 2, 8, hierarchy, 0, Point() );
       circle( drawing, mc[i], 4, color, -1, 8, 0 );
     }

  /// 显示到窗口中
  namedWindow( "Contours", CV_WINDOW_AUTOSIZE );
  imshow( "Contours", drawing );

  /// 通过m00计算轮廓面积并且和OpenCV函数比较
  printf("\t Info: Area and Contour Length \n");
  for( int i = 0; i< contours.size(); i++ )
     {
       printf(" * Contour[%d] - Area (M_00) = %.2f - Area OpenCV: %.2f - Length: %.2f \n", i, mu[i].m00, contourArea(contours[i]), arcLength( contours[i], true ) );
       Scalar color = Scalar( rng.uniform(0, 255), rng.uniform(0,255), rng.uniform(0,255) );
       drawContours( drawing, contours, i, color, 2, 8, hierarchy, 0, Point() );
       circle( drawing, mc[i], 4, color, -1, 8, 0 );
     }
}

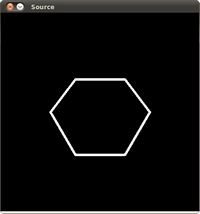
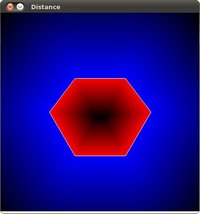
多边形测试
代码
本教程代码如下所示. 用户也可以点击 这里下载
#include "opencv2/highgui/highgui.hpp"
#include "opencv2/imgproc/imgproc.hpp"
#include <iostream>
#include <stdio.h>
#include <stdlib.h>

using namespace cv;
using namespace std;

/** @function main */
int main( int argc, char** argv )
{
  /// 创建一个图形     const int r = 100;
  Mat src = Mat::zeros( Size( 4*r, 4*r ), CV_8UC1 );

  /// 绘制一系列点创建一个轮廓:
  vector<Point2f> vert(6);

  vert[0] = Point( 1.5*r, 1.34*r );
  vert[1] = Point( 1*r, 2*r );
  vert[2] = Point( 1.5*r, 2.866*r );
  vert[3] = Point( 2.5*r, 2.866*r );
  vert[4] = Point( 3*r, 2*r );
  vert[5] = Point( 2.5*r, 1.34*r );

  /// 在src内部绘制
  for( int j = 0; j < 6; j++ )
     { line( src, vert[j],  vert[(j+1)%6], Scalar( 255 ), 3, 8 ); }

  /// 得到轮廓
  vector<vector<Point> > contours; vector<Vec4i> hierarchy;
  Mat src_copy = src.clone();

  findContours( src_copy, contours, hierarchy, RETR_TREE, CHAIN_APPROX_SIMPLE);

  /// 计算到轮廓的距离
  Mat raw_dist( src.size(), CV_32FC1 );

  for( int j = 0; j < src.rows; j++ )
     { for( int i = 0; i < src.cols; i++ )
          { raw_dist.at<float>(j,i) = pointPolygonTest( contours[0], Point2f(i,j), true ); }
     }

  double minVal; double maxVal;
  minMaxLoc( raw_dist, &minVal, &maxVal, 0, 0, Mat() );
  minVal = abs(minVal); maxVal = abs(maxVal);

  /// 图形化的显示距离
  Mat drawing = Mat::zeros( src.size(), CV_8UC3 );

  for( int j = 0; j < src.rows; j++ )
     { for( int i = 0; i < src.cols; i++ )
          {
            if( raw_dist.at<float>(j,i) < 0 )
              { drawing.at<Vec3b>(j,i)[0] = 255 - (int) abs(raw_dist.at<float>(j,i))*255/minVal; }
            else if( raw_dist.at<float>(j,i) > 0 )
              { drawing.at<Vec3b>(j,i)[2] = 255 - (int) raw_dist.at<float>(j,i)*255/maxVal; }
            else
              { drawing.at<Vec3b>(j,i)[0] = 255; drawing.at<Vec3b>(j,i)[1] = 255; drawing.at<Vec3b>(j,i)[2] = 255; }
          }
     }

  /// 创建窗口显示结果
  char* source_window = "Source";
  namedWindow( source_window, CV_WINDOW_AUTOSIZE );
  imshow( source_window, src );
  namedWindow( "Distance", CV_WINDOW_AUTOSIZE );
  imshow( "Distance", drawing );

  waitKey(0);
  return(0);
}
解释
from: http://www.opencv.org.cn/opencvdoc/2.3.2/html/doc/tutorials/imgproc/table_of_content_imgproc/table_of_content_imgproc.html#table-of-content-imgproc