Vue
项目中路由和组件的应用及存在问题
- 创建一个springboot项目
- 引入
<!--引入bootstrap核心css-->
<link rel="stylesheet" href="https://cdn.jsdelivr.net/npm/[email protected]/dist/css/bootstrap.min.css" integrity="sha384-BVYiiSIFeK1dGmJRAkycuHAHRg32OmUcww7on3RYdg4Va+PmSTsz/K68vbdEjh4u" crossorigin="anonymous">
<!--引入vue-->
<script src="https://cdn.jsdelivr.net/npm/vue/dist/vue.js"></script>
<!--引入axios js-->
<script src="https://unpkg.com/axios/dist/axios.min.js"></script>
<!--引入vue-router-->
<script src="https://unpkg.com/vue-router/dist/vue-router.js"></script>
后端简单搭建:
- UserController
@RestController
@RequestMapping("/user")
@CrossOrigin //解决跨域问题
public class UserController {


    @GetMapping("/findAll")
    public List<User> findAll(){


        System.out.println("查询所有。。。。。。");
        List<User> list = Arrays.asList(
                new User("21","阿昌昌昌",23,new Date()),
                new User("22","PePe",21,new Date()),
                new User("23","Oni",34,new Date())
        );
        return list;
    }
}
- User
@Data
@AllArgsConstructor
@NoArgsConstructor
@ToString
@Accessors(chain = true) //链式调用
public class User {


    private String id;
    private String name;
    private Integer age;

    @JsonFormat(pattern = "yyyy-MM-dd") //设置日期格式
    private Date bir;
}
- 测试
访问: http://localhost:8080/user/findAll
![[外链图片转存失败,源站可能有防盗链机制,建议将图片保存下来直接上传(img-4vV6Snvv-1613744404131)(C:\Users\PePe\AppData\Roaming\Typora\typora-user-images\image-20210219140938663.png)]](https://img-blog.csdnimg.cn/20210219222018372.png?x-oss-process=image/watermark,type_ZmFuZ3poZW5naGVpdGk,shadow_10,text_aHR0cHM6Ly9ibG9nLmNzZG4ubmV0L3FxXzQzMjg0NDY5,size_16,color_FFFFFF,t_70)
前端页面:
<!DOCTYPE html>
<html lang="en">
<head>
    <meta charset="UTF-8">
    <title>01-使用路由开发页面</title>
    <!--引入bootstrap核心css-->
    <link rel="stylesheet" href="https://cdn.jsdelivr.net/npm/[email protected]/dist/css/bootstrap.min.css" integrity="sha384-BVYiiSIFeK1dGmJRAkycuHAHRg32OmUcww7on3RYdg4Va+PmSTsz/K68vbdEjh4u" crossorigin="anonymous">

</head>
<body>

<div id="app">

    <div class="container">
        <div class="row" style="margin-top: 70px">
            <div class="col-md-10 col-md-offset-1">

                <!--导航-->
                <ul class="nav nav-pills nav-justified">
                    <!--通过:class=showActive,将其绑定给vue实例的showActive变量-->
                    <li role="presentation" :class="showActive=='index'?'active':''" @click="changeActive('index')"><a href="#/index">主页</a></li>
                    <li role="presentation" :class="showActive=='user'?'active':''" @click="changeActive('user')"><a href="#/user">用户管理</a></li>
                    <li role="presentation" :class="showActive=='student'?'active':''" @click="changeActive('student')"><a href="#/student">学生管理</a></li>
                </ul>

            </div>
        </div>

        <div class="row">
            <div class="col-md-10 col-md-offset-1">
                <!--显示路由组件内容-->
                <router-view></router-view>
            </div>
        </div>
    </div>

</div>

<!--组件必有容器来承装-->
<!--index组件-->
<template id="index">
    <div>
        <div class="jumbotron" style="margin-top: 30px">
            <h1>Hello, world!</h1>
            <p>This is a simple hero unit, a simple jumbotron-style component for calling extra attention to featured content or information.</p>
            <p><a class="btn btn-primary btn-lg" href="#" role="button">Learn more</a></p>
        </div>
    </div>
</template>

<!--user组件-->
<template id="user">
    <div>
        <table class="table table-striped table-bordered" style="margin-top: 30px">
            <tr>
                <th>id</th>
                <th>姓名</th>
                <th>年龄</th>
                <th>生日</th>
                <th>操作</th>
            </tr>
            <!--遍历users-->
            <tr v-for="user in users">
                <th>{

   {user.id}}</th>
                <th>{

   {user.name}}</th>
                <th>{

   {user.age}}</th>
                <th>{

   {user.bir}}</th>
                <th>
                    <a href="" class="btn btn-default">修改</a>
                    <a href="" class="btn btn-danger">删除</a>
                </th>
            </tr>
        </table>
    </div>
</template>

<!--student组件-->
<template id="student">
    <div>
        <table class="table table-striped table-bordered" style="margin-top: 30px">
            <tr>
                <th>id</th>
                <th>学生姓名</th>
                <th>学历</th>
                <th>邮箱</th>
                <th>操作</th>
            </tr>
            <tr>
                <th>1</th>
                <th>阿昌</th>
                <th>博士</th>
                <th>[email protected]</th>
                <th>
                    <a href="" class="btn btn-default">修改</a>
                    <a href="" class="btn btn-danger">删除</a>
                </th>
            </tr>
        </table>
    </div>
</template>


<!--引入vue-->
<script src="https://cdn.jsdelivr.net/npm/vue/dist/vue.js"></script>
<!--引入axios js-->
<script src="https://unpkg.com/axios/dist/axios.min.js"></script>
<!--引入vue-router-->
<script src="https://unpkg.com/vue-router/dist/vue-router.js"></script>

<script>

    //1、【主页】组件配置对象
    const index = {


        template:"#index"
    }
    //2、【用户管理】组件配置对象
    const user = {


        template:"#user",
        data(){


            return{


                users:[],
            }
        },
        methods:{

     },
        created(){


            let _this = this;
            //发送查询所有用户信息
            axios.get("http://localhost:8080/user/findAll").then(function (resp) {


                console.log(resp.data);
                _this.users = resp.data;
            })
        }
    }
    //3、【学生管理】组件配置对象
    const student = {


        template:"#student"
    }

    //4、使用路由
    const router = new VueRouter({


        routes:[
            {

     path:'/',redirect:'/index'},//设置默认路由
            {

     path:'/index',component:index},
            {

     path:'/user',component:user},
            {

     path:'/student',component:student}
        ]
    });

    //vue实例
    const app = new Vue({


        el: "#app",
        data: {


            showActive:'home',
        },
        methods: {


            changeActive(value){


                this.showActive=value
            }
        },
        components: {

     },
        //注册路由对象
        router
    });
</script>

</body>
</html>
效果:
- 默认访问"/index"
![[外链图片转存失败,源站可能有防盗链机制,建议将图片保存下来直接上传(img-nX4RaKHS-1613744404140)(C:\Users\PePe\AppData\Roaming\Typora\typora-user-images\image-20210219152428077.png)]](https://img-blog.csdnimg.cn/20210219222030612.png?x-oss-process=image/watermark,type_ZmFuZ3poZW5naGVpdGk,shadow_10,text_aHR0cHM6Ly9ibG9nLmNzZG4ubmV0L3FxXzQzMjg0NDY5,size_16,color_FFFFFF,t_70)
- 点击主页按钮
![[外链图片转存失败,源站可能有防盗链机制,建议将图片保存下来直接上传(img-OriX0XXH-1613744404142)(C:\Users\PePe\AppData\Roaming\Typora\typora-user-images\image-20210219152440307.png)]](https://img-blog.csdnimg.cn/20210219222036889.png?x-oss-process=image/watermark,type_ZmFuZ3poZW5naGVpdGk,shadow_10,text_aHR0cHM6Ly9ibG9nLmNzZG4ubmV0L3FxXzQzMjg0NDY5,size_16,color_FFFFFF,t_70)
- 点击用户管理按钮
![[外链图片转存失败,源站可能有防盗链机制,建议将图片保存下来直接上传(img-QiNXgzsv-1613744404146)(C:\Users\PePe\AppData\Roaming\Typora\typora-user-images\image-20210219152508461.png)]](https://img-blog.csdnimg.cn/20210219222041435.png?x-oss-process=image/watermark,type_ZmFuZ3poZW5naGVpdGk,shadow_10,text_aHR0cHM6Ly9ibG9nLmNzZG4ubmV0L3FxXzQzMjg0NDY5,size_16,color_FFFFFF,t_70)
- 学生管理
![[外链图片转存失败,源站可能有防盗链机制,建议将图片保存下来直接上传(img-EyscL28D-1613744404149)(C:\Users\PePe\AppData\Roaming\Typora\typora-user-images\image-20210219152548862.png)]](https://img-blog.csdnimg.cn/2021021922204661.png?x-oss-process=image/watermark,type_ZmFuZ3poZW5naGVpdGk,shadow_10,text_aHR0cHM6Ly9ibG9nLmNzZG4ubmV0L3FxXzQzMjg0NDY5,size_16,color_FFFFFF,t_70)
存在的问题:
1、代码冗余
2、维护开发不灵活
14. Vue CLI 脚手架
14.1 什么是CLI
命令行界面(英语:command-line interface,缩写:CLI)是在图形用户界面得到普及之前使用最为广泛的用户界面,它通常不支持鼠标,用户通过键盘输入指令,计算机接收到指令后,予以执行。也有人称之为字符用户界面(CUI)
14.2 什么是Vue CLI
Vue CLI 是一个基于 Vue.js 进行快速开发的完整系统。使用Vue 脚手架之后我们开发的页面将是一个完整系统(项目)。
14.3 Vue CLI优势
- 通过
vue-cli搭建交互式的项目脚手架。bootstrap css js jquery js 通过执行命令方式下载相关依赖 - 通过
@vue/cli+@vue/cli-service-global快速开始零配置原型开发 vue页面 vuejs vuerouter axios(一条命令) - 一个运行时依赖 (
@vue/cli-service),该依赖:- 可升级; 一条命令
- 基于 webpack 构建,并带有合理的默认配置; webpack 项目打包方式 编译好的项目源码===>部署到服务器上直接使用
- 可以通过项目内的配置文件进行配置; 默认配置文件,通过修改默认配置文件达到自己想要的项目环境
- 可以通过插件进行扩展。 vue v-charts elementui
- 一个丰富的官方插件集合,集成了前端生态中最好的工具。Nodejs(tomcat) Vue VueRouter webpack yarn
- 一套完全图形化的创建和管理 Vue.js 项目的用户界面
14.4 Vue CLI安装
1. 环境准备
# 1.下载nodejs
	http://nodejs.cn/download/
		windows系统:   .msi  安装包(exe)指定安装位置   .zip(压缩包)直接解压缩指定目录
		mac os 系统:   .pkg  安装包格式自动配置环境变量  .tar.gz(压缩包)解压缩安装到指定名

# 2.配置nodejs环境变量
	【windows系统】
		计算上右键属性---->  高级属性 ---->环境变量 添加如下配置:
				NODE_HOME=  nodejs安装目录
        PATH    = xxxx;%NODE_HOME%

    【macos系统】
    		推荐使用.pkg安装直接配置node环境

# 3.验证nodejs环境是否成功
		node -v

# 4.npm介绍
	(node package mangager) ==>【nodejs包管理工具】       前端主流技术  npm 进行统一管理
		- maven 管理java后端依赖   远程仓库(中心仓库)      阿里云镜像
		- npm   管理前端系统依赖    远程仓库(中心仓库)      配置淘宝镜像

# 5.配置淘宝镜像
	  npm config set registry https://registry.npm.taobao.org
	  npm config get registry 【验证配置是否成功】

# 6.配置npm下载依赖位置
	 windows:
		npm config set cache "D:\Program Files\npm-cache"
		npm config set prefix "D:\Program Files\npm_global"
	 mac os:
	 	npm config set cache "/Users/chenyannan/dev/nodereps"
		npm config set prefix "/Users/chenyannan/dev/nodereps"

# 7.验证nodejs环境配置
	npm config ls

    ; userconfig C:\Users\PePe\.npmrc
    cache = "D:\\Program Files\\npm-cache"
    prefix = "D:\\Program Files\\npm_global"
    registry = "https://registry.npm.taobao.org/"
![[外链图片转存失败,源站可能有防盗链机制,建议将图片保存下来直接上传(img-TEYG1w4b-1613744404151)(C:\Users\PePe\AppData\Roaming\Typora\typora-user-images\image-20210219164300855.png)]](https://img-blog.csdnimg.cn/20210219222103394.png?x-oss-process=image/watermark,type_ZmFuZ3poZW5naGVpdGk,shadow_10,text_aHR0cHM6Ly9ibG9nLmNzZG4ubmV0L3FxXzQzMjg0NDY5,size_16,color_FFFFFF,t_70)
2.安装脚手架
# 0.卸载脚手架
	npm uninstall -g @vue/cli  //卸载3.x版本脚手架
	npm uninstall -g vue-cli  //卸载2.x版本脚手架

# 1.Vue Cli官方网站
		https://cli.vuejs.org/zh/guide/

# 2.安装vue Cli
		npm install -g vue-cli

# 3.配置vue环境变量
		D:\Program Files\npm_global\
![[外链图片转存失败,源站可能有防盗链机制,建议将图片保存下来直接上传(img-aNbyclis-1613744404152)(C:\Users\PePe\AppData\Roaming\Typora\typora-user-images\image-20210219175018573.png)]](https://img-blog.csdnimg.cn/20210219222111745.png?x-oss-process=image/watermark,type_ZmFuZ3poZW5naGVpdGk,shadow_10,text_aHR0cHM6Ly9ibG9nLmNzZG4ubmV0L3FxXzQzMjg0NDY5,size_16,color_FFFFFF,t_70)
3.第一个vue脚手架项目
# 0.安装模板
	npm install -g 【模板名】
	npm install -g webpack

# 1.创建vue脚手架第一个项目
	vue init webpack 【项目名】
	vue init webpack hello

# 2.创建第一个项目
	hello     ------------->项目名
    -build  ------------->用来使用webpack打包使用build依赖
    -config ------------->用来做整个项目配置目录
    -node_modules  ------>用来管理项目中使用依赖
    -src					 ------>用来书写vue的源代码【重点】
          assets      ------>用来存放静态资源 【重点】
          components   ------>用来书写Vue组件 【重点】
          router			 ------>用来配置项目中路由【重点】
          App.vue      ------>项目中根组件【重点】
          main.js      ------>项目中主入口【重点】
    -static        ------>其它静态
    -.babelrc      ------> 将es6语法转为es5运行
    -.editorconfig ------> 项目编辑配置
    -.gitignore    ------> git版本控制忽略文件
    -.postcssrc.js ------> 源码相关js
    -index.html    ------> 项目主页
    -package.json  ------> 类似与pom.xml 依赖管理  jquery 不建议手动修改
    -package-lock.json ----> 对package.json加锁
    -README.md         ----> 项目说明文件

# 3.如何运行在项目的根目录中执行
		npm start 运行前端系统

# 4.如何访问项目
		http://localhost:8080

# 5.Vue Cli中项目开发方式
	 注意: 一切皆组件
	 一个组件中:
         【
		 js代码
         html代码
         css样式
         】

	 1. VueCli开发方式是在项目中开发一个一个组件对应一个业务功能模块,日后可以将多个组件组合到一起形成一个前端系统
	 2. 日后在使用vue Cli进行开发时不再书写html,编写的是一个个组件(组件后缀.vue结尾的文件),日后打包时vue cli会将组件编译成运行的html文件
![[外链图片转存失败,源站可能有防盗链机制,建议将图片保存下来直接上传(img-uSJxNTDN-1613744404153)(C:\Users\PePe\AppData\Roaming\Typora\typora-user-images\image-20210219175943582.png)]](https://img-blog.csdnimg.cn/20210219222120684.png?x-oss-process=image/watermark,type_ZmFuZ3poZW5naGVpdGk,shadow_10,text_aHR0cHM6Ly9ibG9nLmNzZG4ubmV0L3FxXzQzMjg0NDY5,size_16,color_FFFFFF,t_70)
![[外链图片转存失败,源站可能有防盗链机制,建议将图片保存下来直接上传(img-caIErUZH-1613744404154)(C:\Users\PePe\AppData\Roaming\Typora\typora-user-images\image-20210219180029163.png)]](https://img-blog.csdnimg.cn/20210219222125562.png)
![[外链图片转存失败,源站可能有防盗链机制,建议将图片保存下来直接上传(img-NV9W117K-1613744404156)(C:\Users\PePe\AppData\Roaming\Typora\typora-user-images\image-20210219180430836.png)]](https://img-blog.csdnimg.cn/20210219222130311.png?x-oss-process=image/watermark,type_ZmFuZ3poZW5naGVpdGk,shadow_10,text_aHR0cHM6Ly9ibG9nLmNzZG4ubmV0L3FxXzQzMjg0NDY5,size_16,color_FFFFFF,t_70)
访问http://localhost:8080/
![[外链图片转存失败,源站可能有防盗链机制,建议将图片保存下来直接上传(img-Rn9YcfKr-1613744404157)(C:\Users\PePe\AppData\Roaming\Typora\typora-user-images\image-20210219180527393.png)]](https://img-blog.csdnimg.cn/20210219222134948.png?x-oss-process=image/watermark,type_ZmFuZ3poZW5naGVpdGk,shadow_10,text_aHR0cHM6Ly9ibG9nLmNzZG4ubmV0L3FxXzQzMjg0NDY5,size_16,color_FFFFFF,t_70)
4.如何开发Vue脚手架
注意:在Vue cli 中一切皆组件
![[外链图片转存失败,源站可能有防盗链机制,建议将图片保存下来直接上传(img-2JwJkPTp-1613744404158)(C:\Users\PePe\AppData\Roaming\Typora\typora-user-images\image-20210219201452436.png)]](https://img-blog.csdnimg.cn/20210219222139891.png?x-oss-process=image/watermark,type_ZmFuZ3poZW5naGVpdGk,shadow_10,text_aHR0cHM6Ly9ibG9nLmNzZG4ubmV0L3FxXzQzMjg0NDY5,size_16,color_FFFFFF,t_70)
- components文件夹下 存放组件
![[外链图片转存失败,源站可能有防盗链机制,建议将图片保存下来直接上传(img-DBcS1fcB-1613744404159)(C:\Users\PePe\AppData\Roaming\Typora\typora-user-images\image-20210219201612209.png)]](https://img-blog.csdnimg.cn/20210219222144527.png)
Footer.vue:↓↓↓
<template>
    <div>
        <h4>我是页脚 @阿昌学Vue 我是阿昌</h4>
    </div>
</template>

<script>
export default {


    name:'Footer' //暴露组件名称,供别处引入使用
}
</script>

<style>
</style>
Home.vue:↓↓↓
<template>
    <div>
        <h1>主页组件</h1>

        <div style="width: 100%;height: 300px;background:red;">
            内容
        </div>

        <!-- 3、使用组件 -->
        <Footer></Footer>

    </div>
</template>

<script>

import Footer from './Footer.vue' //1、引入别的组件

export default {


  components: {

      Footer },
    name:"Home", //暴露组件名称,供别处引入使用
    component:{


        Footer, //2、注册组件
    }

}
</script>

<style>
</style>
Student.vue:↓↓↓
<template>
   <div>
      <h1>学生模块</h1>
         <img src="../assets/logo.png">

         <table border="1">
            <tr>
                <td>id</td>
                <td>name</td>
                <td>age</td>
                <td>操作</td>
            </tr>
            <tr v-for="student in students">
                <td>{

   {student.id}}</td>
                <td>{

   {student.name}}</td>
                <td>{

   {student.age}}</td>
                <td>
                    <a href="">删除</a>
                    <a href="">修改</a>
                </td>
            </tr>
        </table>

          <!-- 3、使用组件 -->
        <Footer></Footer>
   </div>

</template>

<script>
import Footer from './Footer.vue'//1、引入别的组件
export default {


    name:"Student", //暴露组件名称,供别处引入使用
        component:{


        Footer //2、注册组件
    },
    data(){


       return{


            students:[
                {

     id:"1",name:"学生1",age:"21"},
                {

     id:"2",name:"学生2",age:"21"},
            ]
       }
    }
}
</script>

<style></style>
User.vue:↓↓↓
<template>
    <div>
        <h1>用户模块</h1>

        <table border="1">
            <tr>
                <td>id</td>
                <td>name</td>
                <td>age</td>
                <td>操作</td>
            </tr>
            <tr v-for="user in users">
                <td>{

   {user.id}}</td>
                <td>{

   {user.name}}</td>
                <td>{

   {user.age}}</td>
                <td>
                    <a href="">删除</a>
                    <a href="">修改</a>
                </td>
            </tr>
        </table>

        <!-- 3、使用组件 -->
        <Footer></Footer>
    </div>
</template>

<script>
import Footer from './Footer.vue'//1、引入别的组件
export default {


  components: {

      Footer },
    name:"User", //暴露组件名称,供别处引入使用
    component:{


        Footer //2、注册组件
    },
    data(){


        return{


            users:[
                {

     id:"1",name:"阿昌",age:"21"},
                {

     id:"2",name:"PePe",age:"21"},
            ]
        }
    },
    created(){


        //axios
    }
}
</script>

<style></style>
- router/index.js 设置路由
import Vue from 'vue' //引入组件
import Router from 'vue-router' //引入组件
import Home from "../components/Home" //引入组件
import User from "../components/User" //引入组件
import Stduent from '../components/Student' //引入组件

Vue.use(Router)

export default new Router({


  routes: [
    {

    path: '/',redirect:"/home"}, //默认路由
    {

    path:'/user',component: User},
    {

    path:'/home',component: Home},
    {

    path:'/student',component: Stduent}

  ]
})
- App.vue 主页面的展示
<template>
  <div id="app">
    <a href="#/user">用户模块</a>
    <a href="#/home">主页模块</a>
    <a href="#/student">学生模块</a>

    <!--用来展示路由组件-->
    <router-view/>
  </div>
</template>

<script>
export default {

      //es6暴露当前组件对象
  name: 'App',
}
</script>

<style>
  .aa{


    background-color: red;
  }
</style>
- main.js
import Vue from 'vue' //在页面中引入vue.js
import App from './App' //引入自定义组件
import router from './router' //引入vue route js

Vue.config.productionTip = false

new Vue({

     //vue全局实例
  el: '#app', //绑定Vue实例全局作用范围
  router,     //注册路由对象
  components: {

     App }, //注册App组件
  template: '<App/>'
})
- 效果
![[外链图片转存失败,源站可能有防盗链机制,建议将图片保存下来直接上传(img-DFZNkO0B-1613744404161)(C:\Users\PePe\AppData\Roaming\Typora\typora-user-images\image-20210219202000296.png)]](https://img-blog.csdnimg.cn/20210219222156854.png?x-oss-process=image/watermark,type_ZmFuZ3poZW5naGVpdGk,shadow_10,text_aHR0cHM6Ly9ibG9nLmNzZG4ubmV0L3FxXzQzMjg0NDY5,size_16,color_FFFFFF,t_70)
![[外链图片转存失败,源站可能有防盗链机制,建议将图片保存下来直接上传(img-UamrRQY2-1613744404162)(C:\Users\PePe\AppData\Roaming\Typora\typora-user-images\image-20210219202008804.png)]](https://img-blog.csdnimg.cn/20210219222201778.png?x-oss-process=image/watermark,type_ZmFuZ3poZW5naGVpdGk,shadow_10,text_aHR0cHM6Ly9ibG9nLmNzZG4ubmV0L3FxXzQzMjg0NDY5,size_16,color_FFFFFF,t_70)
![[外链图片转存失败,源站可能有防盗链机制,建议将图片保存下来直接上传(img-DpWz2IJZ-1613744404163)(C:\Users\PePe\AppData\Roaming\Typora\typora-user-images\image-20210219202018889.png)]](https://img-blog.csdnimg.cn/20210219222206380.png?x-oss-process=image/watermark,type_ZmFuZ3poZW5naGVpdGk,shadow_10,text_aHR0cHM6Ly9ibG9nLmNzZG4ubmV0L3FxXzQzMjg0NDY5,size_16,color_FFFFFF,t_70)
以后一个页面算是一个组件了
15.在脚手架中使用axios
15.1 安装axios
# 1.安装axios
	npm install axios --save-dev

# 2.配置main.js中引入axios
	import axios from 'axios';

	Vue.prototype.$http=axios; //修改内部的$http为axios

# 3.使用axios
	在需要发送异步请求的位置:
        this.$http.get("url").then((res)=>{})
        this.$http.post("url").then((res)=>{})

        this.$http.get("url").then(function(resp){})
        this.$http.post("url").then(function(resp){})
![[外链图片转存失败,源站可能有防盗链机制,建议将图片保存下来直接上传(img-wgtUkM9I-1613744404164)(C:\Users\PePe\AppData\Roaming\Typora\typora-user-images\image-20210219212725600.png)]](https://img-blog.csdnimg.cn/2021021922221498.png)
![[外链图片转存失败,源站可能有防盗链机制,建议将图片保存下来直接上传(img-xO0QIMeR-1613744404165)(C:\Users\PePe\AppData\Roaming\Typora\typora-user-images\image-20210219213033891.png)]](https://img-blog.csdnimg.cn/20210219222219426.png?x-oss-process=image/watermark,type_ZmFuZ3poZW5naGVpdGk,shadow_10,text_aHR0cHM6Ly9ibG9nLmNzZG4ubmV0L3FxXzQzMjg0NDY5,size_16,color_FFFFFF,t_70)
老师推荐了一个接口简单生成测试的网址:
http://rap2.taobao.org/
注册-登录-创建一个仓库
下面的这个模拟请求的地址为http://rap2api.taobao.org/app/mock/277648/user/findAll
![[外链图片转存失败,源站可能有防盗链机制,建议将图片保存下来直接上传(img-lpiIvnCb-1613744404166)(C:\Users\PePe\AppData\Roaming\Typora\typora-user-images\image-20210219214924788.png)]](https://img-blog.csdnimg.cn/20210219222252442.png?x-oss-process=image/watermark,type_ZmFuZ3poZW5naGVpdGk,shadow_10,text_aHR0cHM6Ly9ibG9nLmNzZG4ubmV0L3FxXzQzMjg0NDY5,size_16,color_FFFFFF,t_70)
![[外链图片转存失败,源站可能有防盗链机制,建议将图片保存下来直接上传(img-Vk2R9swQ-1613744404168)(C:\Users\PePe\AppData\Roaming\Typora\typora-user-images\image-20210219215102254.png)]](https://img-blog.csdnimg.cn/20210219222314188.png?x-oss-process=image/watermark,type_ZmFuZ3poZW5naGVpdGk,shadow_10,text_aHR0cHM6Ly9ibG9nLmNzZG4ubmV0L3FxXzQzMjg0NDY5,size_16,color_FFFFFF,t_70)
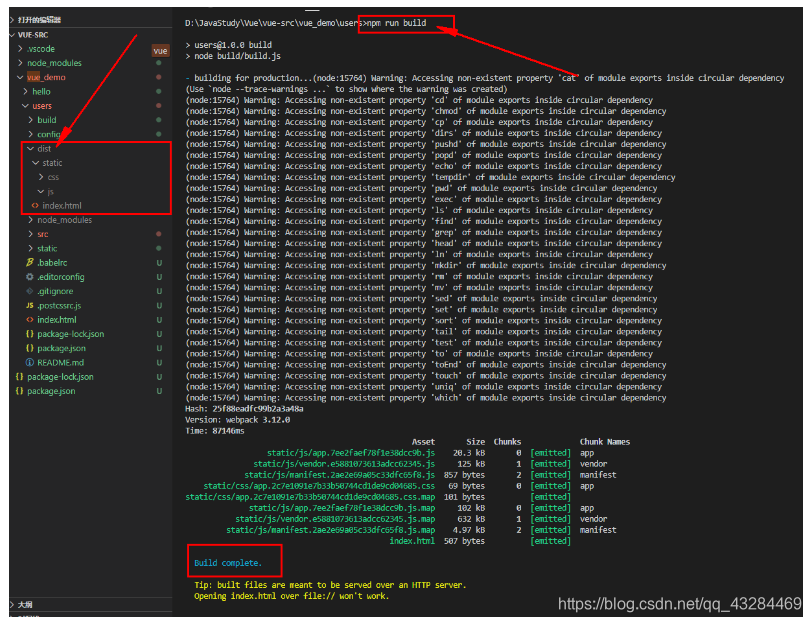
16.Vue Cli脚手架项目打包和部署
# 1.在项目根目录中执行如下命令:
	  vue run build

		注意:vue脚手架打包的项目必须在服务器上运行不能直接双击运行

# 2.打包之后当前项目中变化
	 	在打包之后项目中出现dist目录,dist目录就是vue脚手架项目生产目录或者说是直接部署目录
package.json所在目录为项目根目录:
![[外链图片转存失败,源站可能有防盗链机制,建议将图片保存下来直接上传(img-Xh1UrxAF-1613819977949)(../../../../../AppData/Roaming/Typora/typora-user-images/image-20210220183404925.png)]](https://img-blog.csdnimg.cn/20210220191951427.png)
打包命令:npm run build
- 将dist文件夹CV到IDEA的static文件夹中
![[外链图片转存失败,源站可能有防盗链机制,建议将图片保存下来直接上传(img-7BfqtJYa-1613819977958)(../../../../../AppData/Roaming/Typora/typora-user-images/image-20210220184208522.png)]](https://img-blog.csdnimg.cn/20210220192127830.png?x-oss-process=image/watermark,type_ZmFuZ3poZW5naGVpdGk,shadow_10,text_aHR0cHM6Ly9ibG9nLmNzZG4ubmV0L3FxXzQzMjg0NDY5,size_16,color_FFFFFF,t_70)
-
启动springboot主程序,【】代表可选
-
访问:
localhost:端口号/【项目名】/dist/index.html
问题:发现页面白屏访问不了
- 去resources/static/dist/index.html
按Ctrl+shift+alt+L 格式化
![[外链图片转存失败,源站可能有防盗链机制,建议将图片保存下来直接上传(img-ip3GFqj1-1613819977963)(../../../../../AppData/Roaming/Typora/typora-user-images/image-20210220191227388.png)]](https://img-blog.csdnimg.cn/20210220192137204.png?x-oss-process=image/watermark,type_ZmFuZ3poZW5naGVpdGk,shadow_10,text_aHR0cHM6Ly9ibG9nLmNzZG4ubmV0L3FxXzQzMjg0NDY5,size_16,color_FFFFFF,t_70)