一、申请 Camera 权限
首先,新建名为 CametaXApp 的项目,项目github代码详见
- 打开 CameraXApp.app 模块的 build.gradle 文件,并添加 CameraX 依赖项:
dependencies {
  def camerax_version = "1.2.0-alpha04"
  implementation "androidx.camera:camera-core:${camerax_version}"
  implementation "androidx.camera:camera-camera2:${camerax_version}"
  implementation "androidx.camera:camera-lifecycle:${camerax_version}"
  implementation "androidx.camera:camera-video:${camerax_version}"

  implementation "androidx.camera:camera-view:${camerax_version}"
  implementation "androidx.camera:camera-extensions:${camerax_version}"
}
- 使用 ViewBinding,因此请使用以下代码(在 android{} 代码块末尾)启用它:
android {
	buildFeatures {
	   viewBinding true
	}
}
然后,在 res/layout/activity.xml 中 添加如下布局:
<?xml version="1.0" encoding="utf-8"?>
<androidx.constraintlayout.widget.ConstraintLayout xmlns:android="http://schemas.android.com/apk/res/android"
    xmlns:app="http://schemas.android.com/apk/res-auto"
    xmlns:tools="http://schemas.android.com/tools"
    android:layout_width="match_parent"
    android:layout_height="match_parent"
    tools:context=".MainActivity">

    <androidx.camera.view.PreviewView
        android:id="@+id/viewFinder"
        android:layout_width="match_parent"
        android:layout_height="match_parent" />

    <Button
        android:id="@+id/image_capture_button"
        android:layout_width="110dp"
        android:layout_height="110dp"
        android:layout_marginEnd="50dp"
        android:layout_marginBottom="50dp"
        android:elevation="2dp"
        android:text="@string/take_photo"
        app:layout_constraintBottom_toBottomOf="parent"
        app:layout_constraintEnd_toStartOf="@id/vertical_centerline" />

    <Button
        android:id="@+id/video_capture_button"
        android:layout_width="110dp"
        android:layout_height="110dp"
        android:layout_marginStart="50dp"
        android:layout_marginBottom="50dp"
        android:elevation="2dp"
        android:text="@string/start_capture"
        app:layout_constraintBottom_toBottomOf="parent"
        app:layout_constraintStart_toEndOf="@id/vertical_centerline" />

    <androidx.constraintlayout.widget.Guideline
        android:id="@+id/vertical_centerline"
        android:layout_width="wrap_content"
        android:layout_height="wrap_content"
        android:orientation="vertical"
        app:layout_constraintGuide_percent=".50" />

</androidx.constraintlayout.widget.ConstraintLayout>
布局效果如下:

因为 build.gradle 中设置了 viewBinding = true,所以会为每个布局都生成对应的绑定类(即 activity_main.xml 自动生成 ActivityMainBinding 类)。
在 MainActivity.kt 中设置检查相机权限,设置 Button 的响应事件,效果如下:
package com.bignerdranch.android.cameraxapp

import android.Manifest
import android.content.pm.PackageManager
import android.os.Bundle
import androidx.appcompat.app.AppCompatActivity
import androidx.camera.core.ImageCapture
import androidx.camera.video.Recorder
import androidx.camera.video.Recording
import androidx.camera.video.VideoCapture
import androidx.core.app.ActivityCompat
import androidx.core.content.ContextCompat
import com.bignerdranch.android.cameraxapp.databinding.ActivityMainBinding
import java.util.concurrent.ExecutorService
import java.util.concurrent.Executors

typealias LumaListener = (luma: Double) -> Unit

class MainActivity : AppCompatActivity() {


    private lateinit var viewBinding: ActivityMainBinding

    private var imageCapture: ImageCapture? = null

    private var videoCapture: VideoCapture<Recorder>? = null
    private var recording: Recording? = null

    private lateinit var cameraExecutor: ExecutorService

    override fun onCreate(savedInstanceState: Bundle?) {


        super.onCreate(savedInstanceState)
        viewBinding = ActivityMainBinding.inflate(layoutInflater)
        setContentView(viewBinding.root)

        // Request camera permissions
        if (allPermissionsGranted()) {


            startCamera()
        } else {


            ActivityCompat.requestPermissions(this, REQUIRED_PERMISSIONS, REQUEST_CODE_PERMISSIONS)
        }

        // Set up the listeners for take photo and video capture buttons
        viewBinding.imageCaptureButton.setOnClickListener {

     takePhoto() }
        viewBinding.videoCaptureButton.setOnClickListener {

     captureVideo() }
        cameraExecutor = Executors.newSingleThreadExecutor()
    }

    private fun takePhoto() {

    }

    private fun captureVideo() {

    }

    private fun startCamera() {

    }

    private fun allPermissionsGranted() = REQUIRED_PERMISSIONS.all {


        ContextCompat.checkSelfPermission(baseContext, it) == PackageManager.PERMISSION_GRANTED
    }

    override fun onDestroy() {


        super.onDestroy()
        cameraExecutor.shutdown()
    }

    companion object {


        private const val TAG = "CameraXApp"
        private const val FILENAME_FORMAT = "yyyy-MM-dd-HH-mm-ss-SSS"
        private const val REQUEST_CODE_PERMISSIONS = 10
        private val REQUIRED_PERMISSIONS =
            mutableListOf(Manifest.permission.CAMERA, Manifest.permission.RECORD_AUDIO).apply {

     }.toTypedArray()
    }
}
在 AndroidManifest.xml 中申请摄像头权限,其中 android.hardware.camera.any 可确保设备配有相机。指定 .any 表示它可以是前置摄像头,也可以是后置摄像头。配置如下:
<uses-feature android:name="android.hardware.camera.any" />
<uses-permission android:name="android.permission.CAMERA" />
<uses-permission android:name="android.permission.RECORD_AUDIO" />
<uses-permission android:name="android.permission.WRITE_EXTERNAL_STORAGE"
   android:maxSdkVersion="28" />
在 MainActivity 添加如下函数,会根据用户批准的权限,执行对应的回调函数,代码如下:
    override fun onRequestPermissionsResult(requestCode: Int, permissions: Array<out String>, grantResults: IntArray) {


        super.onRequestPermissionsResult(requestCode, permissions, grantResults)
        if (requestCode == REQUEST_CODE_PERMISSIONS) {


            if (allPermissionsGranted()) {


                startCamera()
            } else {


                Toast.makeText(this, "Permissions not granted by the user", Toast.LENGTH_SHORT).show()
                finish()
            }
        }
    }
运行后,会请求用户权限,效果如下:
二、用 Preview 预览摄像头
在 MainActivity 中实现 startCamera() 函数,代码如下:
    private fun startCamera() {


        // 用于将相机的生命周期绑定到生命周期所有者(MainActivity)。 这消除了打开和关闭相机的任务,因为 CameraX 具有生命周期感知能力。
        val cameraProviderFuture = ProcessCameraProvider.getInstance(this)
        // 向 cameraProviderFuture 添加监听器。添加 Runnable 作为一个参数。我们会在稍后填写它。添加 ContextCompat.getMainExecutor() 作为第二个参数。这将返回一个在主线程上运行的 Executor。
        cameraProviderFuture.addListener({


            // 将相机的生命周期绑定到应用进程中的 LifecycleOwner。
            val cameraProvider: ProcessCameraProvider = cameraProviderFuture.get()
            val preview = Preview.Builder().build().also {

     it.setSurfaceProvider(viewBinding.viewFinder.surfaceProvider) } // preview 作为 usecase
            val cameraSelector = CameraSelector.DEFAULT_BACK_CAMERA
            try {


                cameraProvider.unbindAll() // Unbind use cases before rebinding
                cameraProvider.bindToLifecycle(this, cameraSelector, preview) // Bind use cases to camera: 把 cameraSelector 和 preview 绑定
            } catch (exc: Exception) {


                Log.e(TAG, "Use case binding failed", exc) // 有多种原因可能会导致此代码失败,例如应用不再获得焦点。在此记录日志。
            }
        }, ContextCompat.getMainExecutor(this))
    }
运行后,效果如下:

三、用 ImageCamera 拍照
在 MainActivity 中实现 takePhoto() 函数,代码如下:
    private fun takePhoto() {


        // Get a stable reference of the modifiable image capture use case
        val imageCapture = imageCapture ?: return

        // 存图路径和参数(时间、文件类型)
        val name = SimpleDateFormat(FILENAME_FORMAT, Locale.US).format(System.currentTimeMillis())
        val contentValues = ContentValues().apply {


            put(MediaStore.MediaColumns.DISPLAY_NAME, name)
            put(MediaStore.MediaColumns.MIME_TYPE, "image/jpeg")
        }
        // 我们希望将输出保存在 MediaStore 中,以便其他应用可以显示它
        val outputOptions =
            ImageCapture.OutputFileOptions.Builder(contentResolver, MediaStore.Images.Media.EXTERNAL_CONTENT_URI, contentValues).build()

        // 拍照后的回调函数
        imageCapture.takePicture(outputOptions, ContextCompat.getMainExecutor(this),
            object : ImageCapture.OnImageSavedCallback {


                override fun onError(exc: ImageCaptureException) {


                    Log.e(TAG, "Photo capture failed: ${

      exc.message}", exc)
                }

                override fun onImageSaved(outputFileResults: ImageCapture.OutputFileResults) {


                    val msg = "Photo capture succeeded: ${

      outputFileResults.savedUri}"
                    Toast.makeText(baseContext, msg, Toast.LENGTH_SHORT).show()
                    Log.d(TAG, msg)
                }
            })
    }
在 MainActivity 的 startCamera() 函数中,添加如下 imageCapture = ImageCapture.Builder().build() 来初始化摄像头的 use case,并绑定到 cameraProvider.bindToLifecycle() 中,完整代码如下。
    private fun startCamera() {


        // 用于将相机的生命周期绑定到生命周期所有者(MainActivity)。 这消除了打开和关闭相机的任务,因为 CameraX 具有生命周期感知能力。
        val cameraProviderFuture = ProcessCameraProvider.getInstance(this)
        // 向 cameraProviderFuture 添加监听器。添加 Runnable 作为一个参数。我们会在稍后填写它。添加 ContextCompat.getMainExecutor() 作为第二个参数。这将返回一个在主线程上运行的 Executor。
        cameraProviderFuture.addListener({


            // 将相机的生命周期绑定到应用进程中的 LifecycleOwner。
            val cameraProvider: ProcessCameraProvider = cameraProviderFuture.get()
            val preview = Preview.Builder().build().also {

     it.setSurfaceProvider(viewBinding.viewFinder.surfaceProvider) } // preview 作为 usecase
            imageCapture = ImageCapture.Builder().build()
            val cameraSelector = CameraSelector.DEFAULT_BACK_CAMERA
            try {


                cameraProvider.unbindAll() // Unbind use cases before rebinding
                cameraProvider.bindToLifecycle(this, cameraSelector, preview, imageCapture) // Bind use cases to camera
            } catch (exc: Exception) {


                Log.e(TAG, "Use case binding failed", exc) // 有多种原因可能会导致此代码失败,例如应用不再获得焦点。在此记录日志。
            }
        }, ContextCompat.getMainExecutor(this))
    }
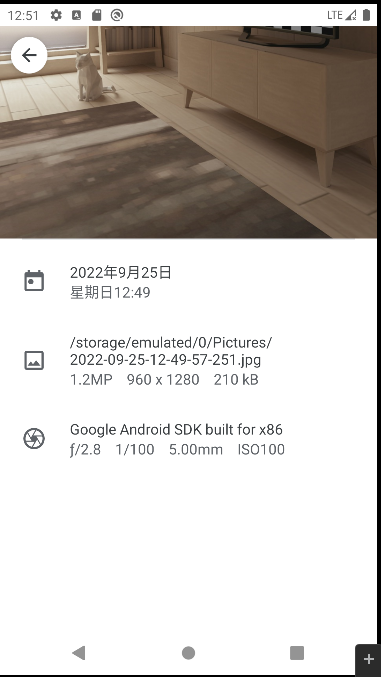
运行后,效果如下:
可以查看照片信息,经验证时间和图片名称确实设置成功,效果如下:
四、用 ImageAnalysis 分析各帧
使用 ImageAnalysis 功能可让相机应用变得更加有趣。它允许定义实现 ImageAnalysis.Analyzer 接口的自定义类,并使用传入的相机帧调用该类。我们无需管理相机会话状态,甚至无需处理图像;与其他生命周期感知型组件一样,仅绑定到应用所需的生命周期就足够了。
为 MainActivity 添加 LuminosityAnalyzer 内部类,代码如下:
    private class LuminosityAnalyzer(private val listener: LumaListener) : ImageAnalysis.Analyzer {


        private fun ByteBuffer.toByteArray(): ByteArray {


            rewind()    // Rewind the buffer to zero
            val data = ByteArray(remaining())
            get(data)   // Copy the buffer into a byte array
            return data // Return the byte array
        }

        override fun analyze(image: ImageProxy) {


            val buffer = image.planes[0].buffer
            val data = buffer.toByteArray()
            val pixels = data.map {

     it.toInt() and 0xFF }
            val luma = pixels.average()
            listener(luma)
            image.close()
        }
    }
然后,在 startCamera() 函数中,实例化 imageAnalyzer 对象,通过 setAnalyzer() 设置其回调函数来打印 luma(亮度),并绑定到 cameraProvider.bindToLifecycle() 上,代码如下:
    private fun startCamera() {


        // 用于将相机的生命周期绑定到生命周期所有者(MainActivity)。 这消除了打开和关闭相机的任务,因为 CameraX 具有生命周期感知能力。
        val cameraProviderFuture = ProcessCameraProvider.getInstance(this)
        // 向 cameraProviderFuture 添加监听器。添加 Runnable 作为一个参数。我们会在稍后填写它。添加 ContextCompat.getMainExecutor() 作为第二个参数。这将返回一个在主线程上运行的 Executor。
        cameraProviderFuture.addListener({


            // 将相机的生命周期绑定到应用进程中的 LifecycleOwner。
            val cameraProvider: ProcessCameraProvider = cameraProviderFuture.get()
            val preview = Preview.Builder().build().also {

     it.setSurfaceProvider(viewBinding.viewFinder.surfaceProvider) } // preview 作为 usecase
            imageCapture = ImageCapture.Builder().build()
            val imageAnalyzer = ImageAnalysis.Builder().build().also {


                it.setAnalyzer(cameraExecutor, LuminosityAnalyzer {

     luma ->
                    Log.d(TAG, "Average luminosity: $luma")
                })
            }
            val cameraSelector = CameraSelector.DEFAULT_BACK_CAMERA
            try {


                cameraProvider.unbindAll() // Unbind use cases before rebinding
                cameraProvider.bindToLifecycle(this, cameraSelector, preview, imageCapture, imageAnalyzer) // Bind use cases to camera
            } catch (exc: Exception) {


                Log.e(TAG, "Use case binding failed", exc) // 有多种原因可能会导致此代码失败,例如应用不再获得焦点。在此记录日志。
            }
        }, ContextCompat.getMainExecutor(this))
    }
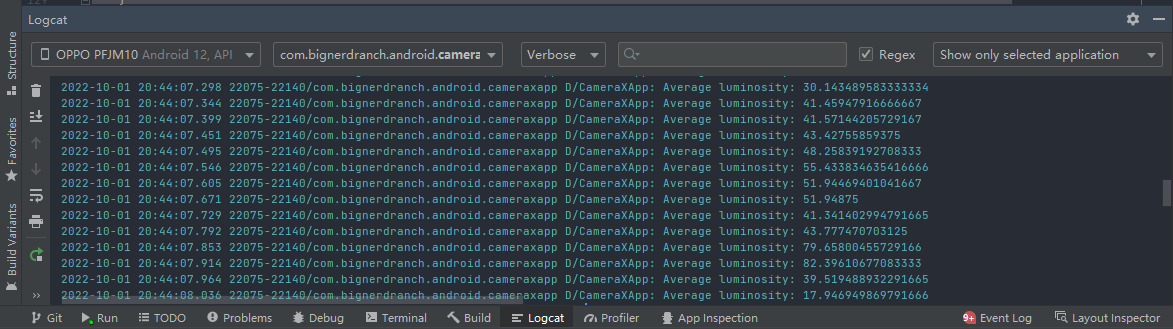
其实是通过 LuminosityAnalyzer.analyze() 函数内的 listener(luma) 将 luma 参数传给 listener() 函数,然后我们通过 setAnalyzer() 自定义了 listener() 函数,其接收亮度,并通过 Logcat 打印。
运行后,App 会在 Logcat 中,每帧图像均打印亮度,日志如下:
五、用 VideoCapture 录像
在 MainActivity 中实现 captureVideo() 函数如下:
    private fun captureVideo() {


        val videoCapture = this.videoCapture ?: return

        viewBinding.videoCaptureButton.isEnabled = false

        val curRecording = recording
        if (curRecording != null) {


            curRecording.stop()
            recording = null
            return
        }

        // create and start a new recording session
        val name = SimpleDateFormat(FILENAME_FORMAT, Locale.US).format(System.currentTimeMillis())
        val contentValues = ContentValues().apply {


            put(MediaStore.MediaColumns.DISPLAY_NAME, name)
            put(MediaStore.MediaColumns.MIME_TYPE, "video/mp4")
        }
        val mediaStoreOutputOptions = MediaStoreOutputOptions
            .Builder(contentResolver, MediaStore.Video.Media.EXTERNAL_CONTENT_URI)
            .setContentValues(contentValues)
            .build()
        recording = videoCapture.output
            .prepareRecording(this, mediaStoreOutputOptions)
            .apply {


                if (PermissionChecker.checkSelfPermission(
                        this@MainActivity, Manifest.permission.RECORD_AUDIO
                    ) == PermissionChecker.PERMISSION_GRANTED
                ) {


                    withAudioEnabled()
                }
            }
            .start(ContextCompat.getMainExecutor(this)) {

     recordEvent ->
                when (recordEvent) {


                    is VideoRecordEvent.Start -> {


                        viewBinding.videoCaptureButton.apply {


                            text = getString(R.string.stop_capture)
                            isEnabled = true
                        }
                    }
                    is VideoRecordEvent.Finalize -> {


                        if (!recordEvent.hasError()) {


                            val msg = "Video capture succeeded: ${

      recordEvent.outputResults.outputUri}"
                            Toast.makeText(baseContext, msg, Toast.LENGTH_SHORT).show()
                            Log.d(TAG, msg)
                        } else {


                            recording?.close()
                            recording = null
                            Log.e(TAG, "Video capture ends with error: ${

      recordEvent.error}")
                        }
                        viewBinding.videoCaptureButton.apply {


                            text = getString(R.string.start_capture)
                            isEnabled = true
                        }
                    }
                }
            }
    }
然后,在 MainActivity 的 startCamera() 函数中,将 videoCapture 绑定到 cameraProvider.bindToLifecycle() 函数中,因为camera 同时只能绑定3种use case,所以本节在拍照、摄像、预览、分析中,选择了前3种用途,代码如下:
   private fun startCamera() {


        // 用于将相机的生命周期绑定到生命周期所有者(MainActivity)。 这消除了打开和关闭相机的任务,因为 CameraX 具有生命周期感知能力。
        val cameraProviderFuture = ProcessCameraProvider.getInstance(this)
        // 向 cameraProviderFuture 添加监听器。添加 Runnable 作为一个参数。我们会在稍后填写它。添加 ContextCompat.getMainExecutor() 作为第二个参数。这将返回一个在主线程上运行的 Executor。
        cameraProviderFuture.addListener({


            // 将相机的生命周期绑定到应用进程中的 LifecycleOwner。
            val cameraProvider: ProcessCameraProvider = cameraProviderFuture.get()
            val preview = Preview.Builder().build().also {

     it.setSurfaceProvider(viewBinding.viewFinder.surfaceProvider) } // preview 作为 use case
            imageCapture = ImageCapture.Builder().build()
//            val imageAnalyzer = ImageAnalysis.Builder().build().also {


//                it.setAnalyzer(cameraExecutor, LuminosityAnalyzer { luma ->
//                    Log.d(TAG, "Average luminosity: $luma")
//                })
//            }
            val recorder = Recorder.Builder().setQualitySelector(QualitySelector.from(Quality.HIGHEST)).build()
            videoCapture = VideoCapture.withOutput(recorder)
            val cameraSelector = CameraSelector.DEFAULT_BACK_CAMERA
            try {


                cameraProvider.unbindAll() // Unbind use cases before rebinding
                cameraProvider.bindToLifecycle(this, cameraSelector, preview, imageCapture, videoCapture) // Bind use cases to camera
            } catch (exc: Exception) {


                Log.e(TAG, "Use case binding failed", exc) // 有多种原因可能会导致此代码失败,例如应用不再获得焦点。在此记录日志。
            }
        }, ContextCompat.getMainExecutor(this))
    }
运行后,可预览、拍照和录像,效果如下: