1. Preconditions: you've deployed a SonarQube service.
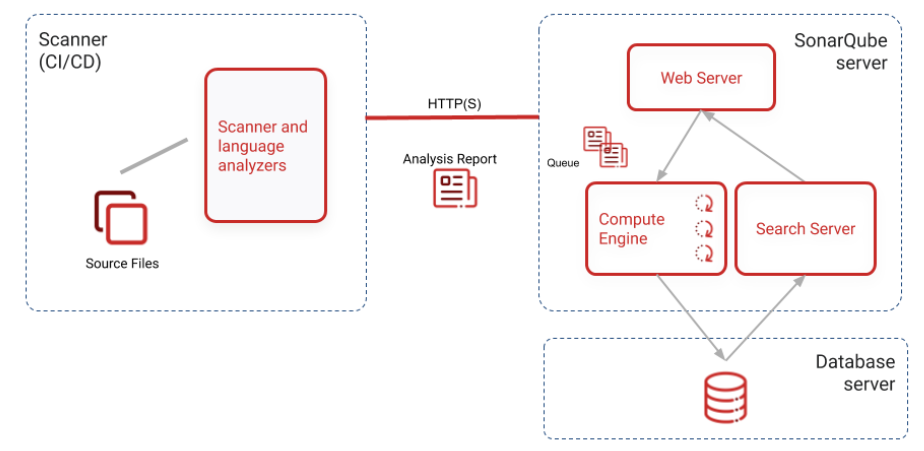
2. In order to test the processes, I'll install the sonar-scanner in your local computer, it's located on the left of the image above. Becasue I use a Windows system, I get the package from the website as below.
3. Add the installation path of sonar-scanner into your environment variables.

3. Input the command: sonar-scanner -h to check if it's working.
sonar-scanner -h
4. Add a setting: { type: 'lcovonly' } into karma.conf.js file to output the lcov.info file that it will upload to SonaQube.
// Karma configuration file, see link for more information
// https://karma-runner.github.io/1.0/config/configuration-file.html

module.exports = function (config) {
  config.set({
    basePath: '',
    frameworks: ['jasmine', '@angular-devkit/build-angular'],
    plugins: [
      require('karma-jasmine'),
      require('karma-chrome-launcher'),
      require('karma-jasmine-html-reporter'),
	  /*require('karma-coverage-istanbul-reporter'),*/
      require('karma-coverage'),
      require('@angular-devkit/build-angular/plugins/karma')
    ],
    client: {
      jasmine: {
        // you can add configuration options for Jasmine here
        // the possible options are listed at https://jasmine.github.io/api/edge/Configuration.html
        // for example, you can disable the random execution with `random: false`
        // or set a specific seed with `seed: 4321`
      },
      clearContext: false // leave Jasmine Spec Runner output visible in browser
    },
    jasmineHtmlReporter: {
      suppressAll: true // removes the duplicated traces
    },
    coverageReporter: {
      dir: require('path').join(__dirname, './coverage'),
      subdir: '.',
      reporters: [
        { type: 'html' }, { type: 'lcovonly' },
        { type: 'text-summary' }
      ]
    },
    reporters: ['progress', 'kjhtml'],
    port: 9876,
    colors: true,
    logLevel: config.LOG_INFO,
    autoWatch: true,
    browsers: ['Chrome'],
    singleRun: false,
    restartOnFileChange: true
  });
};

5. Add a sona properties file to save the setting for uploading UT coverage report.
In my project, it was called sonar-project.properties, here are the values.
# must be unique in a given SonarQube instance
sonar.projectKey=webapp-angular

# --- optional properties ---

# defaults to project key
#sonar.projectName=My project
# defaults to 'not provided'
#sonar.projectVersion=1.0

# Path is relative to the sonar-project.properties file. Defaults to .
sonar.sources=src/app
sonar.exclusions=**/node_modules/**,src/**.spec.ts,src/**.module.ts

# Encoding of the source code. Default is default system encoding
sonar.sourceEncoding=UTF-8
# https://sonar.xxx.com, it didn't work if using the domain in My computer.
sonar.host.url=http://10.*.*.*
sonar.login=xxxx

sonar.javascript.lcov.reportPaths=coverage/lcov.info
6. Generate a UT coverage report
ng test --no-watch --code-coverageAfter the command was runned, the UT coverage report will be done.

And you will found the lcov.info file under the coverage folder.

7. Run sonar-scanner, you will copy the command as below to run.
sonar-scanner -Dproject.settings=sonar-project.properties
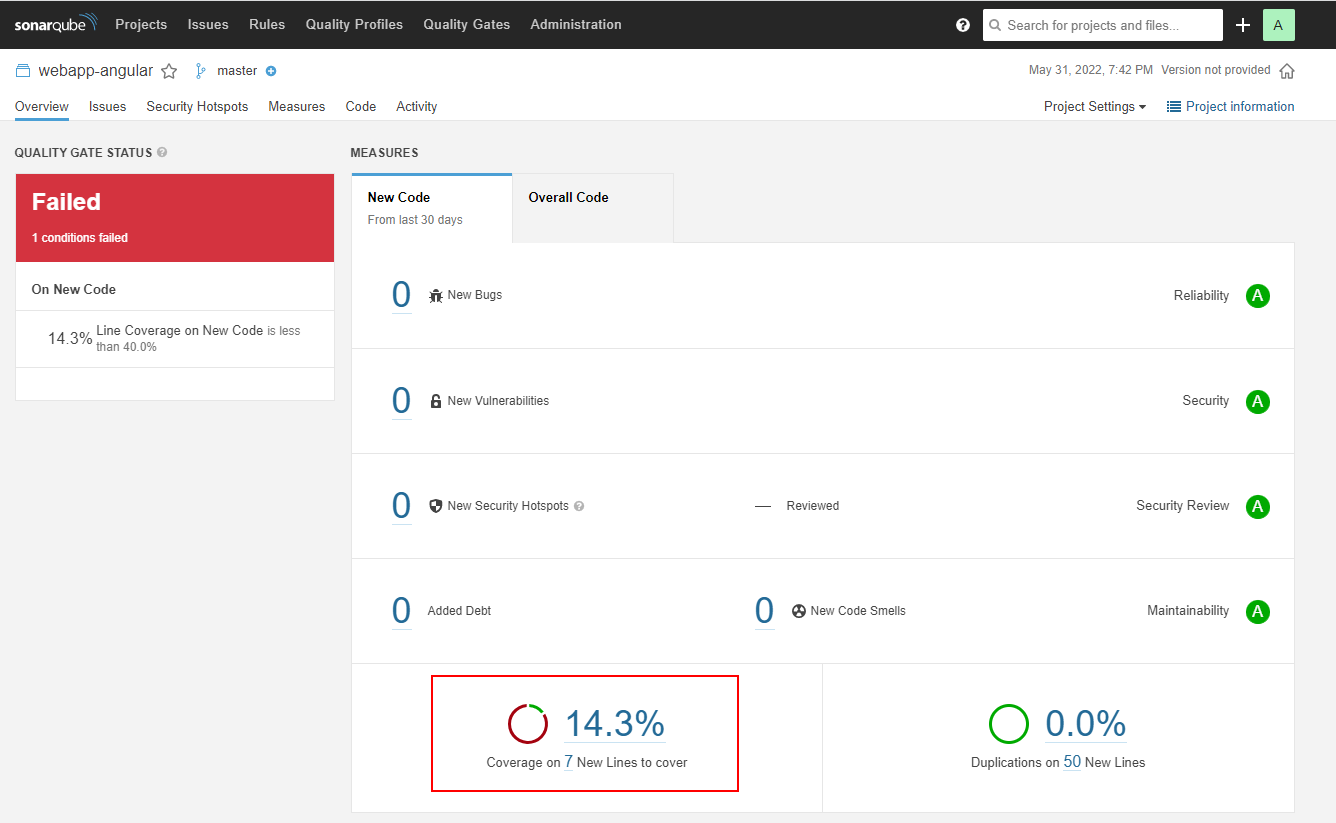
8. Please login the SonaQube website to check the UT coverage report.
If it doesn't work in your environment, please see the article for help.