一、理解shelljs
ShellJS是一个Node.js模块,可以让开发者在Node.js中轻松使用shell脚本命令。它提供了很多有用的函数,可以帮助程序员执行常见的Shell命令和Unix工具,比如cd、pwd、ls、grep、sed、awk等等。它还可以使Node.js程序执行一些系统任务,比如复制和删除文件,以及创建和管理子进程等。因此,ShellJS可以帮助开发者在Node.js项目中更方便地处理文件,执行命令和管理进程等任务。
二、shelljs 启动项目
2.1、本文项目
NUXT 2.X
2.2、package.josn
{
    scripts: {
        "TEST": "cross-env MODE=TEST nuxt",
        "lessStart": "node less-start.js"
    }
}
2.3、less-start.js
const { exec } = require('shelljs')
const env = process.argv[2]
if(env){
// 启动项目
exec(`yarn ${env}`)
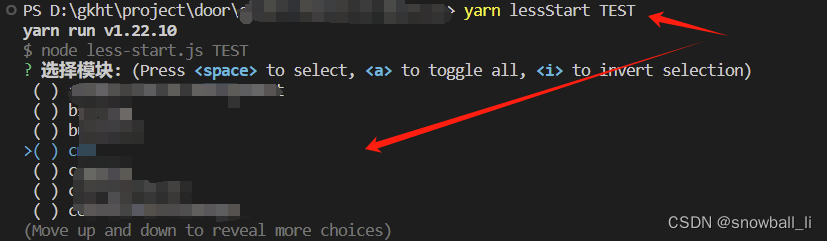
}2.4、yarn lessStart TEST

项目启动成功。
启动时间如图:38.61s
在启动项目的过程中,我们希望可以做一些工作,加快项目启动速度。
通过这种方式使得优化启动速度成为可能,我们来尝试一下。
三、优化思路
可以先指定要开发的路由,然后启动项目,
这样只启动了要启动的目录,启动速度就会提升,
如果项目积累内容比较多应该能有比较明显的提升。
四、开始优化 / 快速启动nuxt2.x项目
4.1、简化后目录
m-front-common // 组件
m-front-common/.cache/path.js // 启动目录
m-front-common/extendRoutes.js // 拓展路由
src // 源码
less-start.js // 快速启动
nuxt.config.js
package.json
4.2、根目录创建less-start.js
const fs = require('fs')
const path = require('path')
// eslint-disable-next-line import/no-extraneous-dependencies
const { exec } = require('shelljs')
// eslint-disable-next-line import/no-extraneous-dependencies
const inquirer = require('inquirer');

const env = process.argv[2]

// 获取目录
function getChoicesDirs() {
  const getDirs = (dir) => fs.readdirSync(dir).map(item => item.replace('.vue', '').replace('.js', '').replace('.ts', ''))
  const choices = [];
  const dir = path.resolve(__dirname, './src/pages')
  const itemDirs = getDirs(dir).map(d => d)
  choices.push(...itemDirs)
  return choices
}
// 选择需要的目录
function getCompileDirs() {
  const questions = [{
    type: "checkbox",
    message: `选择模块:`,
    name: "dir",
    choices: getChoicesDirs().map(name => ({ name, checked: ['worktable', 'login'].includes(name) }))
  }];
  const dirs = inquirer
    .prompt(
      questions
    )
    .then(answers => answers.dir)
    .catch(error => {
      console.log('error:', error)
    })
  return dirs
}
Promise.resolve(getCompileDirs()).then(async (res) => {
  // 新建文件./m-front-common/.cache
  if (!fs.existsSync(path.resolve(__dirname, './m-front-common/.cache'))) {
    fs.mkdirSync(path.resolve(__dirname, './m-front-common/.cache'))
  }
  // [ 'cms', 'login', 'worktable' ] 等目录 转化为 ./m-front-common/.cache/path.js 文件的内容
  const defaultStr = JSON.stringify(res)
    .replace(/([\[\]])/g, '$1\n')
    .replace(/("[^(")]*?",?)/g, '  $1\n')
    .replace(/(\/)_([\w\d_-]*?)([\/"]+)/g, '$1:$2?$3')
  fs.writeFileSync(path.resolve(__dirname, './m-front-common/.cache/path.js'), `exports.default = ${defaultStr}`)
  if (env) {
    exec(`yarn ${env}`)
  }
})
4.3、package.json
{
    scripts: {
        "TEST": "cross-env MODE=TEST nuxt",
        "lessStart": "node less-start.js"
    }
}
4.4、./m-front-common/.cache/path.js
启动项目后自动生成
exports.default = [
  "cms",
  "login",
  "worktable"
]
4.5、extendRoutes.js
const { default: entries } = require('./.cache/path')

exports.extendRoutes = function extendRoutes(routes, resolve) {
  const routeList = routes
  // console.log('编译模块:', entries)
  const newRoutes = routeList.filter(route => {
    if (route.path === '/') {
      return true
    }
    return entries.some(entry => {
      if (entry.endsWith('/index')) {
        return route.path === `/${entry.replace('/index', '')}`
      }
      return route.path.startsWith(`/${entry}/`) || route.path === `/${entry}`
    })
  })
  routeList.length = 0;
  routeList.push(...newRoutes)
}
4.6、nuxt.config.js
router.extendRoutes进行配置
router: {
    base: process.env.ROUTER_BASE,
    middleware: ['meta', 'auth'],
    mode: 'hash',
    extendRoutes(routes, resolve) {
      if (!(process.env.NODE_ENV === 'prodution')) {
        require('./m-front-common/extendRoutes').extendRoutes(routes, resolve)
      }
    },
  },
4.7、优化完成,启动测试
启动时间:15.84s
选中启动的页面,访问成功,没有选中的不能访问,达到预期效果。

五、过程记录
5.1、nuxtCli
const nuxtCli = require('@nuxt/cli/dist/cli')

NuxtCli.run() // 同样可以执行启动项目
5.2、inquirer
const inquirer = require('inquirer'); 这段代码的作用是导入inquirer模块,使得我们可以在Node.js环境中使用inquirer库中提供的交互式命令行工具。使用const关键字声明一个名为inquirer的常量,并在变量声明语句中使用了require()函数,这个函数用来引入Node.js模块并返回对应模块的对象。在这里,require('inquirer')返回了inquirer模块的对象,使得我们可以在代码中使用它提供的API。
5.3、extendRoutes
nuxt extendRoutes是Nuxt.js中用于扩展路由的方法,可以在nuxt.config.js文件中配置。这个方法可以在构建过程中对生成的路由进行自定义修改,比如添加额外的路由规则、修改现有的路由规则等。
5.4、vue项目可以使用这个方法吗
vue2思路大同小异,可以使用的。
vue3 + vite 项目启动速度本来就很快,就不必费工夫了。