安卓常用控件RecyclerView+HorizontalScrollView实现item侧滑效果
简单来介绍下RecyclerView,首先这个控件要做的事类似ListView,实际上它就是为了弥补ListView的不足而出现,那么我们来看下它的简单应用吧!
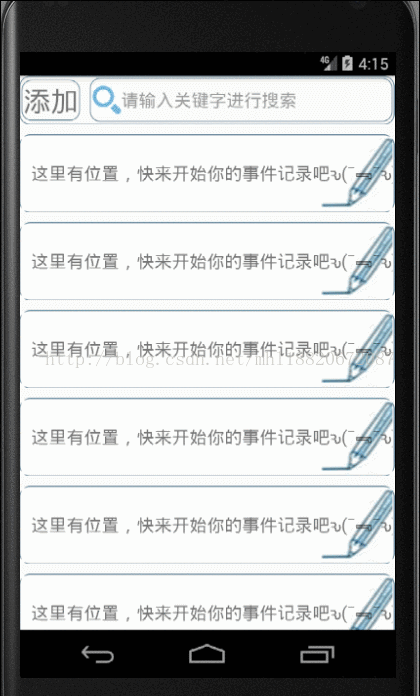
先上效果图
RecyclerView是新增的控件,所以在使用这个控件时必须先在app/build.gradle文件中添加依赖闭包(dependencies)
-
dependencies {
-
compile fileTree(dir: 'libs', include: ['*.jar'])
-
androidTestCompile('com.android.support.test.espresso:espresso-core:2.2.2', {
-
exclude group: 'com.android.support', module: 'support-annotations'
-
})
-
-
compile 'com.android.support:appcompat-v7:26.0.0-alpha1'
-
compile 'com.android.support:design:26.0.0-alpha1'
-
testCompile 'junit:junit:4.12'
-
compile'com.android.support:recyclerview-v7:24.2.1' //RecyclerView 的依赖闭包
-
compile 'com.google.android.gms:play-services-appindexing:8.4.0'
-
}
-
添加完后点击Sync Now同步,到这里所有的准备工作已经完成,现在开始正式使用RecyclerView,在布局中的添加RecyclerView,在这里,和往常添加的控件稍微不同,这里添加控件不能只是给出RecyclerView的名字,要将完整的包路径给出
-
<android.support.v7.widget.RecyclerView
-
android:id=
"@+id/notes_title_recycler_view"
-
android:layout_width=
"match_parent"
-
android:layout_height=
"match_parent"/>
好,到这里,控件添加进来,一开始说它的功能类似于ListView,接下来当然时去新建一个子布局(item),下面这一长串的代码就是我定义的子布局,其中里面有一个自定义控件
com.example.haha.note.Note_delete(实现侧滑的重要控件,下面会详细介绍),从这里就可以看出如果不是安卓SDK内置的控件,要使用统一要给出完整的路径
-
<LinearLayout xmlns:android=
"http://schemas.android.com/apk/res/android"
-
android:layout_width=
"match_parent"
-
android:layout_height=
"80dp"
-
android:orientation=
"vertical"
-
android:background=
"@drawable/diy_frame"
-
android:layout_marginTop=
"10dp">
-
<com.example.haha.note.Note_delete
-
android:layout_width=
"match_parent"
-
android:layout_height=
"match_parent"
-
android:scrollbars=
"none">
-
<LinearLayout
-
android:layout_width=
"wrap_content"
-
android:layout_height=
"match_parent"
-
android:orientation=
"horizontal">
-
<RelativeLayout
-
android:id=
"@+id/left"
-
android:layout_width=
"match_parent"
-
android:layout_height=
"match_parent"
-
android:background=
"@drawable/item_bg">
-
<TextView
-
android:id=
"@+id/notes_title"
-
android:layout_width=
"match_parent"
-
android:layout_height=
"match_parent"
-
android:layout_gravity=
"center"
-
android:gravity=
"center_vertical"
-
android:maxLines=
"1"
-
android:ellipsize=
"end"
-
android:textSize=
"18sp"
-
android:paddingLeft=
"10dp"
-
android:paddingRight=
"10dp"
-
android:paddingTop=
"15dp"
-
android:paddingBottom=
"15dp"
-
/>
-
</RelativeLayout>
-
<RelativeLayout
-
android:id=
"@+id/right"
-
android:layout_width=
"200dp"
-
android:layout_height=
"match_parent"
-
android:layout_toRightOf=
"@+id/left">
-
<ImageView
-
android:id=
"@+id/edit_note"
-
android:layout_width=
"100dp"
-
android:layout_height=
"match_parent"
-
android:layout_gravity=
"center"
-
android:gravity=
"center"
-
android:src=
"@drawable/editor"
-
/>
-
<ImageView
-
android:id=
"@+id/tv_delete"
-
android:layout_width=
"match_parent"
-
android:layout_height=
"match_parent"
-
android:layout_gravity=
"center"
-
android:gravity=
"center"
-
android:layout_toRightOf=
"@+id/edit_note"
-
android:src=
"@drawable/cut"
-
/>
-
</RelativeLayout>
-
</LinearLayout>
-
</com.example.haha.note.Note_delete>
-
</LinearLayout>
子布局定义完后,接下来还是老步骤,它和ListView一样需要一个适配器,现在我们去创建一个java类让它继承RecyclerView.Adapter,下面这一大段只需要理解 onCreateViewHolder()、onBindViewHolder()和getItemCount(),因为继承自RecyclerView.Adapter就得重写这3个方法
-
class NoteAdapter extends RecyclerView.Adapter<NoteAdapter.ViewHolder>{
-
private List<notes> mNoteList;
-
-
class ViewHolder extends RecyclerView.ViewHolder{
-
TextView noteTitleText;
-
ImageView deleteItem;
-
public ViewHolder(View view){
-
super(view);
-
noteTitleText=(TextView) view.findViewById(R.id.notes_title);
-
deleteItem=(ImageView)view.findViewById(R.id.tv_delete);
-
}
-
}
-
-
public NoteAdapter(List<notes> notesList){
-
-
mNoteList=notesList;
-
}
-
@Override
-
-
public ViewHolder onCreateViewHolder(ViewGroup parent, int viewType){
//加载子布局时调用
-
View view= LayoutInflater.from(parent.getContext()).inflate(R.layout.notes_item,parent,
false);
-
item_edit=(ImageView) view.findViewById(R.id.edit_note);
-
item_delete=(ImageView) view.findViewById(R.id.tv_delete);
-
final ViewHolder holder=
new ViewHolder(view);
-
item_edit.setOnClickListener(
new View.OnClickListener() {
-
public void onClick(View view) {
//RecyclerView的点击事件,这段代码和本文章无太大关系,所以可以忽略
-
notes note=mNoteList.get(holder.getAdapterPosition());
-
if(isTwoPane){
-
NotesContentFragment notesContentFragment=(NotesContentFragment) getFragmentManager().findFragmentById(R.id.notes_content_fragment);
-
notesContentFragment.refresh(note.getTitle(),note.getContent());
-
}
else {
-
notesContentActivity.actionStart(getActivity(),note.getTitle(),note.getContent());
-
}
-
}
-
});
-
return holder;
-
}
-
/*
-
添加删除Item
-
*/
-
public void delete_item( List<notes> mNoteList,int position){
-
mNoteList.remove(position);
-
notifyItemRemoved(position);
-
notifyItemRangeChanged(position,mNoteList.size()-position);
-
}
-
-
public void onBindViewHolder(final ViewHolder holder, final int position){
-
//由onCreateViewHolder返回一个对应子布局的holder,再由onBindViewHolder进行赋值
-
notes note=mNoteList.get(position);
-
holder.noteTitleText.setText(note.getTitle());
-
holder.deleteItem.setOnClickListener(
new View.OnClickListener() {
-
@Override
-
public void onClick(View view) {
-
delete_item(mNoteList,position);
-
}
-
});
-
}
-
-
-
-
public int getItemCount(){
-
return mNoteList.size();
-
}
-
-
-
}
适配器类写好之后,接下来介绍实现侧滑的重要控件,com.example.haha.note.Note_delete 。这是个自定义控件,我们来看下它的代码
-
package com.example.haha.note;
-
-
import android.content.Context;
-
import android.util.AttributeSet;
-
import android.util.TypedValue;
-
import android.view.MotionEvent;
-
import android.view.ViewGroup;
-
import android.widget.HorizontalScrollView;
-
import android.widget.LinearLayout;
-
-
import
static android.R.id.content;
-
-
/**
-
* Created by haha on 2017/9/12.
-
*/
-
-
public
class Note_delete extends HorizontalScrollView{
-
private
int mScreenWidth;
//屏幕宽度
-
private
int mMenuWidth;
//菜单宽度
-
-
private
boolean once;
-
public Note_delete(Context context, AttributeSet attrs){
-
super(context,attrs);
-
mScreenWidth=ScreenUtil.getScreenWidth(context);
//由安卓内置类ScreenUtil获取屏幕宽度 ,注意要写一个ScreenUtil类
-
}
-
-
protected void onMeasure(int widthMeasureSpec,int heightMeasureSpec){
-
/*
-
* 自定义类是继承自HorizontalScrollView,那么意图就非常明显,就是要利用父类的水平滑动效果
-
* 而HorizontalScrollView这个控件只允许放一个子控件,一般来说,一个控件是远远不够,那么就
-
* 直接设置一个线性布局,然后再在线性布局里放置任意我们想放的控件,这样就解决了控件数量的
-
* 限制,所以下面的getChildAt(0)让对应的就是设置的线性布局,获取对象,然后再由该对象获取布
-
* 局中的控件对象,这样所有控件对象都能取到*/
-
LinearLayout wrapper=(LinearLayout) getChildAt(
0);
-
ViewGroup menu=(ViewGroup) wrapper.getChildAt(
1);
//获取线性布局中的第二个控件对象
-
mMenuWidth=mScreenWidth/
2;
-
menu.getLayoutParams().width=mMenuWidth;
//给获取的控件对象进行属性设置
-
super.onMeasure(widthMeasureSpec,heightMeasureSpec);
-
}
-
-
public boolean onTouchEvent(MotionEvent ev){
-
int action=ev.getAction();
-
switch (action){
-
case MotionEvent.ACTION_UP:
//触碰抬起,判断手指滑动距离
-
int scrollX=getScrollX();
-
if(scrollX > mMenuWidth/
4)
-
this.smoothScrollTo(mMenuWidth,
0);
-
else
-
this.smoothScrollTo(
0,
0);
-
return
true;
-
}
-
return
super.onTouchEvent(ev);
-
}
-
-
}
写ScreenUtil类,用于获取屏幕高宽度
-
package com.example.haha.note;
-
-
import android.content.Context;
-
import android.util.DisplayMetrics;
-
import android.view.WindowManager;
-
-
/**
-
* Created by haha on 2017/9/12.
-
*/
-
-
public
class ScreenUtil {
-
private ScreenUtil(){
-
throw
new UnsupportedOperationException(
"cannot be instantiated");
-
}
-
//获得屏幕高度
-
public static int getScreenHeight(Context context){
-
WindowManager wm = (WindowManager) context.getSystemService(Context.WINDOW_SERVICE);
-
DisplayMetrics outMetrics =
new DisplayMetrics();
-
wm.getDefaultDisplay().getMetrics(outMetrics);
-
return outMetrics.heightPixels;
-
-
}
-
-
//获得屏幕宽度
-
public static int getScreenWidth(Context context) {
-
WindowManager wm = (WindowManager) context.getSystemService(Context.WINDOW_SERVICE);
-
DisplayMetrics outMetrics =
new DisplayMetrics();
-
wm.getDefaultDisplay().getMetrics(outMetrics);
-
return outMetrics.widthPixels;
-
-
-
}
-
}
最后,初始化数据,开始使用RecyclerView+HorizontalScrollView
这里我实现了Fragment,实际上和文章有关的代码仅仅需要看注释1-3的代码和初始化方法就行
-
public
class NotesTitleFragment extends Fragment {
-
ImageView item_delete;
-
ImageView item_edit;
-
TextView item_add;
-
private
boolean isTwoPane;
-
public View onCreateView( LayoutInflater inflater, ViewGroup container, Bundle savedInstanceState){
-
View view=inflater.inflate(R.layout.notes_title_frag,container,
false);
//这不是活动类,所以必须将布局引进
-
-
RecyclerView noteTitleRecyclerView=(RecyclerView) view.findViewById(R.id.notes_title_recycler_view);
//1
-
LinearLayoutManager layoutManager=
new LinearLayoutManager(getActivity());
//2
-
noteTitleRecyclerView.setLayoutManager(layoutManager);
//3
-
/*
-
* 上面注释着1-3的代码就是使用RecyclerView的核心
-
* 1.获取对象
-
* 2.这句代码就能体现RecyclerView的强大之处,这里用的是线性布局管理,说白了就是控制RecyclerView里的item布局,
-
* 那么它当然不只有这一种布局方式,还有瀑布式布局等,而相比ListView只能是垂直摆放来说,RecyclerView简直是
-
* 强大到炸,非常灵活
-
* 3.对RecyclerView对象进行布局设置*/
-
-
-
final NoteAdapter adapter=
new NoteAdapter(getNote());
-
noteTitleRecyclerView.setAdapter(adapter);
-
item_add=view.findViewById(R.id.tv_add);
-
item_add.setOnClickListener(
new View.OnClickListener() {
-
@Override
-
public void onClick(View view) {
-
addItem(adapter);
-
}
-
});
-
return view;
-
}
-
-
public void addItem(NoteAdapter noteAdapter){
//实现动态添加一个item
-
noteAdapter.notifyItemInserted(
1);
-
-
}
-
private List<notes> getNote(){
-
List<notes> notesList=
new ArrayList<>();
-
for(
int i=
1;i<=
50;i++){
-
notes note=
new notes();
-
note.setTitle(
"这里有位置,快来开始你的事件记录吧ԅ(¯﹃¯ԅ)" );
-
note.setContent(
"美好的一天,怎能忍心错过不进行记录呢(「・ω・)「嘿");
-
notesList.add(note);
-
}
-
return notesList;
-
}