1.前言
上一节:SpringCloud进击 | 七浅出:服务网关 - 过滤器(Zuul Filter)【Finchley版本】
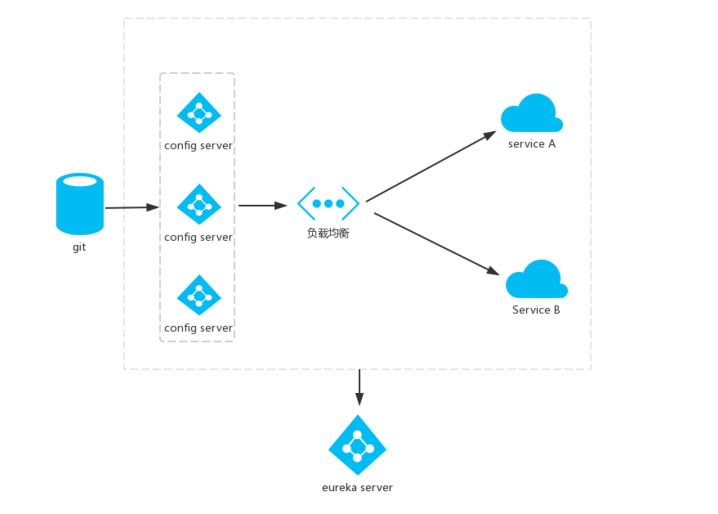
通常情况下,Config Server 与 Eureka 服务注册中心一样,也需要将其架构成高可用的集群。所以,我们来改进一下,以一种更为简单的方式 -- 把 Config Server 也注册为服务。这样,所有客户端就能以服务的方式进行访问,通过这种方法,只需要启动多个指向同一 Git 仓库位置的 Config Server 就能实现高可用的分布式配置中心。
基础实现见浅出系列第五节:SpringCloud进击 | 五浅出:配置中心(Git配置与更新)【Finchley版本】
2.准备
先来回顾一下前面浅出部分我们都完成了什么:
- 构建 服务注册中心:wei-eureka-server,端口号:8090
- 创建 服务提供者:wei-service-provider,端口号:8010
- 创建 服务消费者:wei-consumer-ribbon,端口号:8020 和 wei-consumer-feign,端口号:8030
- 实现 Spring Cloud Netflix Hystrix 断路器 的融断机制
- 实现 服务配置中心:wei-config-server,端口号:8040 和 wei-config-client,端口号:8050
- 实现 服务网关的映射和过滤器:wei-gateway-zuul,端口号:8060
这里我们继续使用上一节的代码来进行相应改造:
- Eureka 注册中心:wei-eureka-server (无需改造)
- Config Server:wei-config-server (需要改造)
- Config Client:wei-config-client (需要改造)
3.进击
3.1.Config Server 服务端改造
3.1.1.pom 依赖改造
pom.xml 文件添加以下依赖:
        <dependency>
            <groupId>org.springframework.cloud</groupId>
            <artifactId>spring-cloud-starter-netflix-eureka-client</artifactId>
        </dependency>
完整的 pom 文件依赖:
<?xml version="1.0" encoding="UTF-8"?>
<project xmlns="http://maven.apache.org/POM/4.0.0" xmlns:xsi="http://www.w3.org/2001/XMLSchema-instance"
    xsi:schemaLocation="http://maven.apache.org/POM/4.0.0 http://maven.apache.org/xsd/maven-4.0.0.xsd">
    <modelVersion>4.0.0</modelVersion>

    <groupId>com.wei</groupId>
    <artifactId>wei-config-server</artifactId>
    <version>0.0.1-SNAPSHOT</version>
    <packaging>jar</packaging>

    <name>wei-config-server</name>
    <description>Demo project for Spring Boot</description>

    <parent>
        <groupId>org.springframework.boot</groupId>
        <artifactId>spring-boot-starter-parent</artifactId>
        <version>2.0.5.RELEASE</version>
        <relativePath/> <!-- lookup parent from repository -->
    </parent>

    <properties>
        <project.build.sourceEncoding>UTF-8</project.build.sourceEncoding>
        <project.reporting.outputEncoding>UTF-8</project.reporting.outputEncoding>
        <java.version>1.8</java.version>
        <spring-cloud.version>Finchley.SR1</spring-cloud.version>
    </properties>

    <dependencies>
        <dependency>
            <groupId>org.springframework.cloud</groupId>
            <artifactId>spring-cloud-config-server</artifactId>
        </dependency>

        <!--高可用配置中心-服务端服务化-->
        <dependency>
            <groupId>org.springframework.cloud</groupId>
            <artifactId>spring-cloud-starter-netflix-eureka-client</artifactId>
        </dependency>

        <dependency>
            <groupId>org.springframework.boot</groupId>
            <artifactId>spring-boot-starter-test</artifactId>
            <scope>test</scope>
        </dependency>
    </dependencies>

    <dependencyManagement>
        <dependencies>
            <dependency>
                <groupId>org.springframework.cloud</groupId>
                <artifactId>spring-cloud-dependencies</artifactId>
                <version>${spring-cloud.version}</version>
                <type>pom</type>
                <scope>import</scope>
            </dependency>
        </dependencies>
    </dependencyManagement>

    <build>
        <plugins>
            <plugin>
                <groupId>org.springframework.boot</groupId>
                <artifactId>spring-boot-maven-plugin</artifactId>
            </plugin>
        </plugins>
    </build>

</project>
3.1.2.application 配置改造
application.yml 文件完整配置:
eureka:
  client:
    service-url:
      defaultZone: http://localhost:8090/eureka/    # 指定进行服务注册的地址。高可用配置中心-服务端服务化
server:
  port: 8040
spring:
  application:
    name: wei-config-server
  cloud:
    config:
      label: master    # 对应 Git 上不同的分支,默认为 master
      server:
        git:
          username:
          password:
          uri: https://github.com/itanping/wei-springcloud     # 配置 Git 仓库地址
          search-paths: wei-config/config-profile            # Git仓库地址下的相对地址,可以配置多个,用,分割
3.1.3.启动类
启动类与上节保持一致,不需要改造。
这样,Config Server 服务端的改造就完成了。
3.2.Config Client 客户端改造
3.2.1.pom 依赖改造
pom.xml 文件添加以下依赖:
<dependency>
    <groupId>org.springframework.cloud</groupId>
    <artifactId>spring-cloud-starter-netflix-eureka-client</artifactId>
</dependency>
完整的 pom 依赖:
<?xml version="1.0" encoding="UTF-8"?>
<project xmlns="http://maven.apache.org/POM/4.0.0" xmlns:xsi="http://www.w3.org/2001/XMLSchema-instance"
    xsi:schemaLocation="http://maven.apache.org/POM/4.0.0 http://maven.apache.org/xsd/maven-4.0.0.xsd">
    <modelVersion>4.0.0</modelVersion>

    <groupId>com.wei</groupId>
    <artifactId>wei-config-client</artifactId>
    <version>0.0.1-SNAPSHOT</version>
    <packaging>jar</packaging>

    <name>wei-config-client</name>
    <description>Demo project for Spring Boot</description>

    <parent>
        <groupId>org.springframework.boot</groupId>
        <artifactId>spring-boot-starter-parent</artifactId>
        <version>2.0.5.RELEASE</version>
        <relativePath/> <!-- lookup parent from repository -->
    </parent>

    <properties>
        <project.build.sourceEncoding>UTF-8</project.build.sourceEncoding>
        <project.reporting.outputEncoding>UTF-8</project.reporting.outputEncoding>
        <java.version>1.8</java.version>
        <spring-cloud.version>Finchley.SR1</spring-cloud.version>
    </properties>

    <dependencies>
        <dependency>
            <groupId>org.springframework.boot</groupId>
            <artifactId>spring-boot-starter-web</artifactId>
        </dependency>
        <dependency>
            <groupId>org.springframework.cloud</groupId>
            <artifactId>spring-cloud-starter-config</artifactId>
        </dependency>

        <dependency>
            <groupId>org.springframework.cloud</groupId>
            <artifactId>spring-cloud-starter-netflix-eureka-client</artifactId>
        </dependency>

        <dependency>
            <groupId>org.springframework.boot</groupId>
            <artifactId>spring-boot-starter-test</artifactId>
            <scope>test</scope>
        </dependency>
    </dependencies>

    <dependencyManagement>
        <dependencies>
            <dependency>
                <groupId>org.springframework.cloud</groupId>
                <artifactId>spring-cloud-dependencies</artifactId>
                <version>${spring-cloud.version}</version>
                <type>pom</type>
                <scope>import</scope>
            </dependency>
        </dependencies>
    </dependencyManagement>

    <build>
        <plugins>
            <plugin>
                <groupId>org.springframework.boot</groupId>
                <artifactId>spring-boot-maven-plugin</artifactId>
            </plugin>
        </plugins>
    </build>

</project>
3.2.2.配置文件改造
application.yml 文件添加配置项:eureka.client.service-url.defaultZone,设置指向配置中心的地址。
server:
  port: 8050
bootstrap.yml 文件配置:
eureka:
  client:
    service-url:
      defaultZone: http://localhost:8090/eureka/    # 指定进行服务注册的地址。高可用配置中心实现
spring:
  application:
    name: wei-config-client
  cloud:
    config:
      name: config-client     # 对应配置文件名 config-client-dev.properties 的 {application} 部分
      profile: dev            # 对应配置文件名 config-client-dev.properties 的 {profile} 部分
      label: master           # 使用 {label} 对应 Git 的分支名,如果配置中心使用的是本地存储,则该参数无用
      discovery:
        enabled: true                    # 开启 Config 服务发现支持
        service-id: wei-config-server    # 高可用配置中心实现需要将uri配置去掉,使用service-id直接指向Server端地址
bootstrap.yml 主要是去掉了 spring.cloud.config.uri 配置,使用 service-id 直接指向 Server 端地址。因这 uri 好设置,但是不具有微服务的灵活性。
另外需要增加配置:
- spring.cloud.config.discovery.enabled:开启 Config 服务发现支持
- spring.cloud.config.discovery.serviceId:指定 Server 端的 name,也就是 Server 端 spring.application.name 的值
这两个配置文件都需要放到 bootstrap.yml 的配置中。
3.2.3.启动类
启动类与上节保持一致,不需要改造。
如此,Config Client 客户端的改造也完成了。
4.测试
依次做以下准备:
- 启动 Eureka 注册中心:wei-eureka-server,端口 8090
- 启动 Config Server:为了模拟生产环境,我们分别以端口号 8040、8041 启动两个 wei-config-server 做集群,以此来提供高可用的支持
- 启动 Config Client:wei-config-client,端口:8050
依次启动完了后,去注册中心看看:http://localhost:8090/

如图,可以看到会有 8040、8041 两个 Config Server 端同时提供配置中心服务,这样可以防止某一台服务挂掉之后影响整个系统的使用。Config Client 端也已经注册了到注册中心。
以上,测试就绪。
4.1.Config 服务端验证
我们分别访问URL:http://localhost:8040/config-client/dev 和 http://localhost:8041/config-client/dev
是不是?浏览器打印了相同信息:
{
"name": "config-client",
"profiles": [
"dev"
],
"label": null,
"version": "a66db4adfd79df7a91cd148e73eef572a9378d3d",
"state": null,
"propertySources": [
{
"name": "https://github.com/itanping/wei-springcloud/wei-config/config-profile/config-client-dev.properties",
"source": {
"config.tip": "Demo for Spring Cloud config",
"config.env": "dev for update"
}
}
]
}
说明两个服务配置中心都正常读取到了配置信息。服务端OK。
4.2.Config 客户端验证
我们再来访问:http://localhost:8050/demo/info
浏览器打印:
[Config Client] dev for update, 错误配置属性config.tips测试,此处应该为config.tip
说明客户端已经读取到了 Config Server 端的内容。客户端OK。
4.3.Config 服务端集群验证
我们再随机停掉一台 Config Server 端的服务,就停掉 8041吧。然后再次访问:http://localhost:8050/demo/info
浏览器还是会打印:
[Config Client] dev for update, 错误配置属性config.tips测试,此处应该为config.tip
说明高可用的分布式配置中心已经在正常运作。
5.总结
此时的架构:
源码:
参考:
https://springcloud.cc/spring-cloud-netflix.html
https://blog.csdn.net/forezp/article/details/81041045
https://windmt.com/2018/04/19/spring-cloud-8-config-with-eureka/
6.系列
SpringCloud进击 | 一浅出:服务注册与发现(Eureka)【Finchley版本】
SpringCloud进击 | 二浅出:服务消费者(Ribbon+REST)【Finchley版本】
SpringCloud进击 | 三浅出:服务消费者(Feign)【Finchley版本】
SpringCloud进击 | 四浅出:断路器与容错(Hystrix)【Finchley版本】
SpringCloud进击 | 五浅出:配置中心(Git配置与更新)【Finchley版本】
SpringCloud进击 | 六浅出:服务网关 - 路由(Zuul Router)【Finchley版本】
SpringCloud进击 | 七浅出:服务网关 - 过滤器(Zuul Filter)【Finchley版本】
下一节,请继续关注