60 二值图像分析—霍夫直线检测二
代码
import cv2 as cv
import numpy as np
def canny_demo(image):
t = 80
canny_output = cv.Canny(image, t, t * 2)
return canny_output
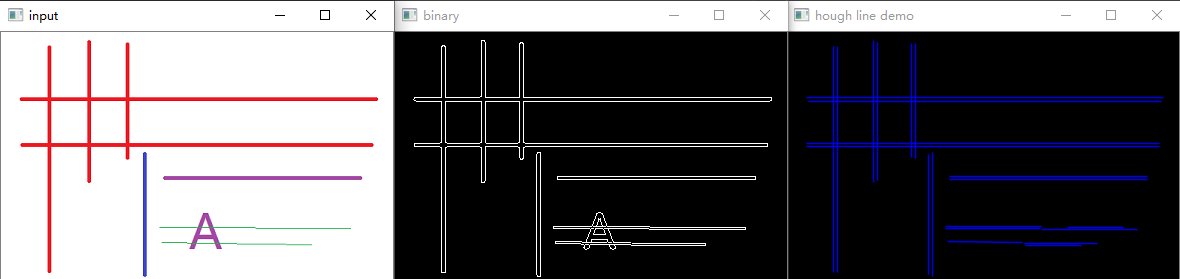
src = cv.imread("../images/morph01.png")
cv.namedWindow("input", cv.WINDOW_AUTOSIZE)
cv.imshow("input", src)
binary = canny_demo(src)
cv.imshow("binary", binary)
linesP = cv.HoughLinesP(binary, 1, np.pi / 180, 50, None, 50, 10)
res = np.zeros(src.shape, src.dtype)
if linesP is not None:
for i in range(0, len(linesP)):
l = linesP[i][0]
cv.line(res, (l[0], l[1]), (l[2], l[3]), (255, 0, 0), 1, cv.LINE_AA)
# 显示
cv.imshow("hough line demo", res)
cv.waitKey(0)
cv.destroyAllWindows()
实验结果
解释
OpenCV中还有另外一个霍夫直线检测的API,该API更为常用,它会直接返回直线的空间坐标点,比返回霍夫空间参数更加的直观,容易理解,而且还可以声明线段长度、间隔等参数,非常有用。该参数详解如下:
lines = cv.HoughLinesP( image, rho, theta, threshold[, lines[, minLineLength[, maxLineGap]]])
Image输入二值图像Lines返回的直线两个点Rho极坐标r得步长Theta角度步长Threshold累加器阈值minLineLength最小线段长度maxLineGap线段间隔
所有内容均来源于贾志刚老师的知识星球——OpenCV研习社,本文为个人整理学习,已获得贾老师授权,有兴趣、有能力的可以加入贾老师的知识星球进行深入学习。