微信小程序页面加载更多数据其实也不是很难,官方很好的给出了相应的组件和使用方法。只是需要在实际的开发中注意一下相关的问题点
1:需要使用到的组件和API
scroll-view
基础库 1.0.0 开始支持,低版本需做兼容处理。
可滚动视图区域。使用竖向滚动时,需要给scroll-view一个固定高度,通过 WXSS 设置 height。组件属性的长度单位默认为px,2.4.0起支持传入单位(rpx/px)。
| 属性 | 类型 | 默认值 | 必填 | 说明 | 最低版本 |
|---|---|---|---|---|---|
| scroll-x | boolean | false | 否 | 允许横向滚动 | 1.0.0 |
| scroll-y | boolean | false | 否 | 允许纵向滚动 | 1.0.0 |
| upper-threshold | number/string | 50 | 否 | 距顶部/左边多远时,触发 scrolltoupper 事件 | 1.0.0 |
| lower-threshold | number/string | 50 | 否 | 距底部/右边多远时,触发 scrolltolower 事件 | 1.0.0 |
| scroll-top | number/string | 否 | 设置竖向滚动条位置 | 1.0.0 | |
| scroll-left | number/string | 否 | 设置横向滚动条位置 | 1.0.0 | |
| scroll-into-view | string | 否 | 值应为某子元素id(id不能以数字开头)。设置哪个方向可滚动,则在哪个方向滚动到该元素 | 1.0.0 | |
| scroll-with-animation | boolean | false | 否 | 在设置滚动条位置时使用动画过渡 | 1.0.0 |
| enable-back-to-top | boolean | false | 否 | iOS点击顶部状态栏、安卓双击标题栏时,滚动条返回顶部,只支持竖向 | 1.0.0 |
| enable-flex | boolean | false | 否 | 启用 flexbox 布局。开启后,当前节点声明了 display: flex 就会成为 flex container,并作用于其孩子节点。 |
2.7.3 |
| scroll-anchoring | boolean | false | 否 | 开启 scroll anchoring 特性,即控制滚动位置不随内容变化而抖动,仅在 iOS 下生效,安卓下可参考 CSS overflow-anchor 属性。 |
2.8.2 |
| refresher-enabled | boolean | false | 否 | 开启自定义下拉刷新 | 2.10.1 |
| refresher-threshold | number | 45 | 否 | 设置自定义下拉刷新阈值 | 2.10.1 |
| refresher-default-style | string | "black" | 否 | 设置自定义下拉刷新默认样式,支持设置 black | white | none, none 表示不使用默认样式 |
2.10.1 |
| refresher-background | string | "#FFF" | 否 | 设置自定义下拉刷新区域背景颜色 | 2.10.1 |
| refresher-triggered | boolean | false | 否 | 设置当前下拉刷新状态,true 表示下拉刷新已经被触发,false 表示下拉刷新未被触发 | 2.10.1 |
| bindscrolltoupper | eventhandle | 否 | 滚动到顶部/左边时触发 | 1.0.0 | |
| bindscrolltolower | eventhandle | 否 | 滚动到底部/右边时触发 | 1.0.0 | |
| bindscroll | eventhandle | 否 | 滚动时触发,event.detail = {scrollLeft, scrollTop, scrollHeight, scrollWidth, deltaX, deltaY} | 1.0.0 | |
| bindrefresherpulling | eventhandle | 否 | 自定义下拉刷新控件被下拉 | 2.10.1 | |
| bindrefresherrefresh | eventhandle | 否 | 自定义下拉刷新被触发 | 2.10.1 | |
| bindrefresherrestore | eventhandle | 否 | 自定义下拉刷新被复位 | 2.10.1 | |
| bindrefresherabort | eventhandle | 否 | 自定义下拉刷新被中止 | 2.10.1 |
scrol-view需要指定一个高度,这个高度可以按自己的需求计算,我使用的是屏幕可用高度并且默认一页显示10条数据
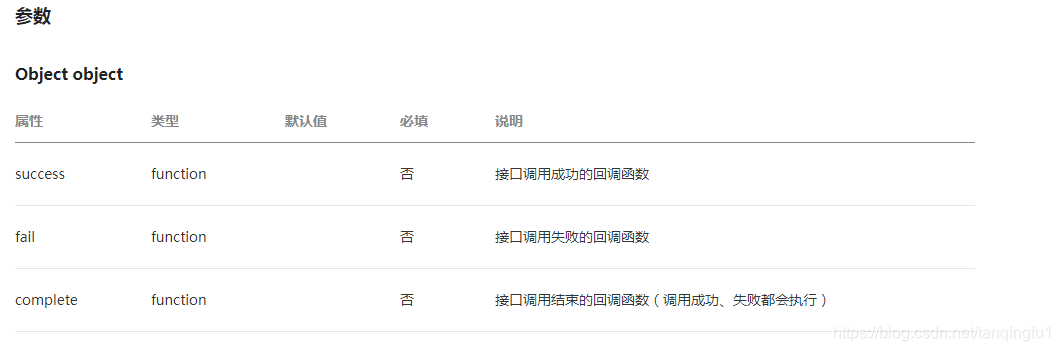
2:获取手机宽高 wx.getSystemInfo(Object object)方法
  /**
  * 获取页面高度和宽度
  */
  get_systime: function () {
    var that = this;
    wx.getSystemInfo({
      success: function (res) {
        that.setData({
          winWidth: res.windowWidth,
          winHeight: res.windowHeight
        });
      }
    });
  }

3:添加滚动到底部绑定需要触发的事件
<scroll-view id="list" scroll-y="true"  style="height:{{winHeight-30}}px" bindscrolltolower='bindscrolltolower'>
</scroll-view>
4:滑动来加载更多数据事件函数
主要是将请求下来的数据用concat方法进行合并,然后赋值,我是用的for循环假装添加的数据,实际项目中可以换成自己的ajax,先调用提示框api成功之后关闭。
/**
* 加载更多数据
*/
bindscrolltolower: function () {
if (this.data.currentPage < this.data.pagecount) {
this.data.currentPage++;
this.get_list();
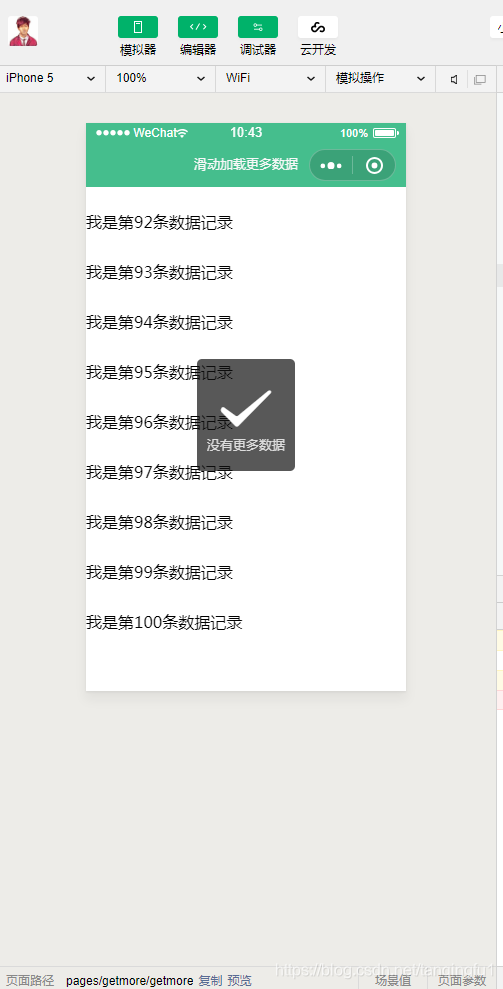
} else {
//没有更多数据
this.nomore_showToast();
}
}5 :调用相关请求数据的方法,然后进行合并数据源
 /**
   * demo获取数据
   */
  get_list: function () {
    let that = this;

    //下面的for循环是模拟请求数据方法
    var temlist = that.data.list; //原始的数据集合
    for(var i=0;i<10; i++){
      var currentPage = that.data.currentPage; //获取当前页码
      var size = that.data.size;//每页数据条数
      if (currentPage == 1) {
        temlist = temlist.concat("我是第"+i+"条数据记录"); //初始化数据列表
          currentPage = 1;
      } else {
          temlist = temlist.concat("我是第" + ((i + 1) + (currentPage - 1) * size) + "条数据记录"); //请求的数据追加到原始数据集合里
          currentPage = currentPage + 1;
      }
     }
      that.setData({
        currentPage: currentPage,
        list: temlist,
        totalCount: 100, //总的数据条数
        pagecount: 100 / that.data.size //总页数
      })

    // //下面方法是实际去请求数据地址和相关参数传递
    // var webData = {
    //   size: this.data.size,
    //   currentPage: this.data.currentPage,
    // }
    // var url = "get_evaluationDate";
    // base.getWebDataWithPostOrGet({
    //   url: url,
    //   param: webData,
    //   method: "POST",
    //   success: function (res) {
    //     if (res.data.status == "success") {
    //       var temlist = that.data.allceplist; //原始的数据集合
    //       var currentPage = that.data.currentPage; //获取当前页码
    //       if (currentPage == 1) {
    //         temlist = res.data.data; //初始化数据列表
    //         currentPage = 1;
    //       } else {
    //         temlist = temlist.concat(res.data.data); //请求的数据追加到原始数据集合里
    //         currentPage = currentPage + 1;
    //       }
    //       that.setData({
    //         currentPage: currentPage,
    //         allceplist: temlist,
    //         totalCount: res.data.totalCount, //总的数据条数
    //         pagecount: res.data.totalCount / that.data.size //总页数
    //       })
    //     } else {
    //       wx.showToast({
    //         title: res.data.status,
    //         icon: "error"
    //       })
    //     }
    //     //console.log(that.data.allceplist);
    //   }
    // })
  }
6:然后在页面使用wx:for循环渲染数据就好了
<!--pages/getmore/getmore.wxml-->
<!-- winHeight 必须要获取当前手机的尺寸不染不会触动滑动事件 -->
<scroll-view id="list" scroll-y="true"  style="height:{{winHeight-30}}px" bindscrolltolower='bindscrolltolower'>
  <view>
    <block wx:if="{{list.length>0}}">
      <block wx:for="{{list}}" wx:key="index">
        <!-- 设置高度为了显示滚动条 可以滑动 -->
        <view style="height:50px">
          <text>{{item}}</text>
        </view>
      </block>
    </block>
  </view>
</scroll-view>
7:完整的页面&代码附上
7.1 getmore.wxml
<!--pages/getmore/getmore.wxml-->
<!-- winHeight 必须要获取当前手机的尺寸不染不会触动滑动事件 -->
<scroll-view id="list" scroll-y="true"  style="height:{{winHeight-30}}px" bindscrolltolower='bindscrolltolower'>
  <view>
    <block wx:if="{{list.length>0}}">
      <block wx:for="{{list}}" wx:key="index">
        <!-- 设置高度为了显示滚动条 可以滑动 -->
        <view style="height:50px">
          <text>{{item}}</text>
        </view>
      </block>
    </block>
  </view>
</scroll-view>
7.2 getmore.js
// pages/getmore/getmore.js
Page({

  /**
   * 页面的初始数据
   */
  data: {
    //默认(必须)
    currentPage: 1,//请求数据的页码
    size: 10,//每页数据条数
    totalCount: 0,//总是数据条数
    pagecount: 0,//总的页数
    //页面设置
    winWidth: 0,
    winHeight: 0,
    list:[],//你的数据源
  },

  /**
   * 生命周期函数--监听页面加载
   */
  onLoad: function (options) {

  },

  /**
   * 生命周期函数--监听页面初次渲染完成
   */
  onReady: function () {

  },
  /**
    * 获取页面高度和宽度
    */
  get_systime: function () {
    var that = this;
    wx.getSystemInfo({
      success: function (res) {
        that.setData({
          winWidth: res.windowWidth,
          winHeight: res.windowHeight
        });
      }
    });
  },
  /**
   * 生命周期函数--监听页面显示
   */
  onShow: function () {
    this.get_systime(); //获取手机屏幕高度宽度
    this.get_list(); //默认加载第一页数据
  },

  /**
   * 生命周期函数--监听页面隐藏
   */
  onHide: function () {

  },

  /**
   * 生命周期函数--监听页面卸载
   */
  onUnload: function () {

  },

  /**
   * 页面相关事件处理函数--监听用户下拉动作
   */
  onPullDownRefresh: function () {

  },

  /**
   * 页面上拉触底事件的处理函数
   */
  onReachBottom: function () {

  },

  /**
   * 用户点击右上角分享
   */
  onShareAppMessage: function () {

  },
  /**
   * demo获取数据
   */
  get_list: function () {
    let that = this;

    //下面的for循环是模拟请求数据方法
    var temlist = that.data.list; //原始的数据集合
    for(var i=0;i<10; i++){
      var currentPage = that.data.currentPage; //获取当前页码
      var size = that.data.size;//每页数据条数
      if (currentPage == 1) {
        temlist = temlist.concat("我是第"+i+"条数据记录"); //初始化数据列表
          currentPage = 1;
      } else {
          temlist = temlist.concat("我是第" + ((i + 1) + (currentPage - 1) * size) + "条数据记录"); //请求的数据追加到原始数据集合里
          currentPage = currentPage + 1;
      }
     }
      that.setData({
        currentPage: currentPage,
        list: temlist,
        totalCount: 100, //总的数据条数
        pagecount: 100 / that.data.size //总页数
      })

    // //下面方法是实际去请求数据地址和相关参数传递
    // var webData = {
    //   size: this.data.size,
    //   currentPage: this.data.currentPage,
    // }
    // var url = "get_evaluationDate";
    // base.getWebDataWithPostOrGet({
    //   url: url,
    //   param: webData,
    //   method: "POST",
    //   success: function (res) {
    //     if (res.data.status == "success") {
    //       var temlist = that.data.allceplist; //原始的数据集合
    //       var currentPage = that.data.currentPage; //获取当前页码
    //       if (currentPage == 1) {
    //         temlist = res.data.data; //初始化数据列表
    //         currentPage = 1;
    //       } else {
    //         temlist = temlist.concat(res.data.data); //请求的数据追加到原始数据集合里
    //         currentPage = currentPage + 1;
    //       }
    //       that.setData({
    //         currentPage: currentPage,
    //         allceplist: temlist,
    //         totalCount: res.data.totalCount, //总的数据条数
    //         pagecount: res.data.totalCount / that.data.size //总页数
    //       })
    //     } else {
    //       wx.showToast({
    //         title: res.data.status,
    //         icon: "error"
    //       })
    //     }
    //     //console.log(that.data.allceplist);
    //   }
    // })
  },
  /**
   * 加载更多数据
   */
  bindscrolltolower: function () {
    if (this.data.currentPage < this.data.pagecount) {
      this.data.currentPage++;
      this.get_list();
    } else {
      //没有更多数据
     this.nomore_showToast();
    }
  },
  /**
 * 没有更多数据
 * */
  nomore_showToast :function () {
    wx.showToast({
      title: '没有更多数据',
      icon: 'success',
      duration: 1500,
      mask: true
    })
  }
})
好了 到此为止滑动加载数据就完美的实现啦 如果你看了,对你有帮助就三连吧 谢谢
