目录
注:本文语法都是基于TensorFlow2.0的
一、初识
import tensorflow as tf      #  导入
print("TensorFlow版本是:",tf.__verson__)      # 显示当前版本
TensorFlow版本是:2.0.0
node1 = tf.constant([[3.0,1.5],[2.5,6.0]],tf.float32)
node2 = tf.constant([[4.0,1.0],[5.0,2.5]],tf.float32)
node3 = tf.add(node1,node2)

node3     # 输出的是一个Tensor
<tf. Tensor: id=2, shape=(2, 2),dtype=float32, numpy=array([[7.,2.5],[7.5, 8.5]],dtype=float32)>
print(node3.numpy()) #输出运算结果Tensor的值
[[7. 2.5]
[7.5 8.5]]
二、基础知识
1. TensorFlow = Tensor + Flow
- Tensor 张量
数据结构:多维数组 - Flow 流
计算模型:张量之间通过计算而转换的过程 - TensorFlow是一个通过计算图的形式表述计算的编程系统,每一个计算都是计算图上的一个节点,节点之间的边描述了计算之间的关系
2. 张量
1.概念
- TensorFlow中,所有的数据都通过张量的形式
来表示 - 张量可以理解为多维数组
- 张量并没有真正保存数字,保存的是计算过程(2.0运用了实时运算)
2.属性
- 标识符(id):唯一标识符
- 形状(shape):张量的维度信息
- 类型(dtype):不匹配会报错
- 值(value):numpy()方法获取
形状
| 阶 | 形状 | 维数 | 例子 |
|---|---|---|---|
| 0 | () | 0-D | 4 |
| 1 | (D0) | 1-D | [2,3,5] |
| 2 | (D0,D1) | 2-D | [[2,3],[3,4]] |
| 3 | (D0,D1,D2) | 3-D | [[[7], [[3]]],[[[2]],[[4]]]] |
| N | (D0,D1,…,Dn-1) | n-D | 形为(D0,D1,…,Dn-1)的张量 |
scalar = tf. constant (100)
vector = tf. constant([1, 2, 3,4, 5])
matrix = tf. constant([1, 2, 3],[4, 5, 6]])
cube_matrix = tf. constant([[1],[2], [3], [[4], [5], [6]],[[7], [8], [9]]])
print (scalar.shape)             # 输出()
print (vector.shape)             # 输出(5,)
print (matrix.shape)             # 输出(2,3)
print (cube_matrix. get_shape() # 输出(3, 3, 1)
()
(5,)
(2, 3)
(3,3,1)
类型
- TensorFlow支持14种不同类型:
实数 tf. float32, tf. f loat64
整数 tf. int8, tf. int16, tf. int32, tf. int64, tf. uint8
布尔 tf. bool
复数 tf. complex64, tf. complex128 - 默认类型:
不带小数点的数会被默认为 int32
带小数点的会被默认为 float32
a = tf. constant([1, 2])
b = tf. constant([2.0, 3.0])
result = tf. add(a, b)
#运行报错
在TensorFlow中可以通过tf.cast()进行数据类型转换
a = tf. constant([1, 2])
b = tf. constant([2.0, 3.0])
a = tf. cast(a, tf. float32) #数据类型转换
result = tf. add(a, b)
result
<tf. Tensor: id=13, shape=(2,),dtype=float32, numpy=array([3., 5.],dtype=float32)>
三、常量与变量
1. 常量 constant
- 创建语句:
tf.constant(
value,
dtype=None,
shape=None,
name=‘Const’
) 其中只有value是必填的属性。
a = tf.constant([1,2,3,4,5,6],tf.float32, shape=[2,3])
a
a会自动的对应dtype值进行类型转换,对应shape的值进行reshape工作
2. 变量 variable
- tf.Variable(
initial_ value,
dtype=None,
shape=None,
trainable =True,
name=‘Variable’
) 其中只有value是必填的属性。
v1 = tf. Variable([1, 2])
v2 = tf. Variable([3, 4], tf. float32)
v1, v2
(<tf. Variable ’ Variable:0’ shape=(2,) dtype=int32, numpy=array([1, 2])>,
<tf. Variable ’Variable:0’ shape=(2,) dtype=int32, numpy=array([3, 4])>)
类型是根据初始值定义的
还可以直接利用张量赋初值
C = tf. constant (1)
v = tf. Variable(c)
C, V
(<tf. Tensor: id=36, shape=(),dtype=int32, numpy=1>,
<tf. Variable ’Variable:0’ shape=() dtype=int32, numpy=1>)
- 在TensorFlow中变量和普通编程语言中的变量有着较大区别
- TensorFlow中的变量是一种特殊的设计,是可以被机器优化过程中自动改变值的张量,也可以理解为待优化的张量。
- 在TensorFlow中变量创建(赋初值)后,一般无需人工进行赋值,系统会根据算法模型,在训练优化过程中自动调整变量的值。
- 在变量的参数中,
trainable参数用来表征当前变量是否需要被自动优化,创建变量对象时默认是启用自动优化标志。但是有时候(如迁移学习)对某些已经训练好的权值,我们会将其冻结。
3. 变量赋值
如果硬要人工更新变量值,可使用assign()实现
v = tf. Variable(5)
v. assign(v+1)
v
<tf. Variable ’Variable:0’ shape=() dtype=int32,numpy=6>
还有加法和减法对应的assign_add()、assign_sub()
v1 = tf. Variable(5)
v2 = tf. Variable(5)
v1.assign_add (1)
v2.assign_sub(1)
v1, v2
(<tf. Variable ’Variable:0’ shape=() dtype=int32, numpy=6>,
<tf. Variable’ Variable:0’ shape=() dtype=int32, numpy=4)
四、在2.0中实现1.x的静态图执行模式
1. TensorFlow计算模型 - 计算图
- TensorFlow 2 →Eager Execution
- TensorFlow 1.x →Graph Execution
2. 计算图的执行
- 构建阶段:建立一个“计算图”,通过图的模式来定义数据与操作的执行步骤
- 执行阶段:建立一个会话,使用会话对象来实现计算图的执行
#一个简单计算图
node1 = tf . constant(3.0, tf . float32, name=" node1")
node2 = tf . constant(4.0, tf . float32 , name=" node2")
node3 = tf . add(node1, node2 )
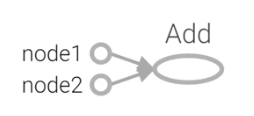
print(node3)
Tensor(“Add:0”, shape=(), dtype=float32)
输出结果不是一个具体的数字,而是一个张量的结构,如图:
3. TensorFlow 2中实现图执行模式开发
- TensorFlow 2虽然TensorFlow 1.X有较大差异,不能直接兼容TensorFlow 1.X代码。但实际上还是提供了对TensorFlow 1.X的API支持
- 原有的TensorFlow 1.X的API整理到tensorflow.compat.v1包里去了
TensorFlow 2中执行或者开发TensorFlow 1.X代码,可以做如下处理:
- 导入TensorFlow时使用import tensorflow.compat.v1 as tf代替import tensorflow as tf;
- 执行tf.disable_ eager _execution()禁用TensorFlow 2默认的即时执行模式。
#在TensorFlow 2下执行TensorFlow 1. x版本代码
import tensorf low. compat. v1 as tf
tf. disable_ eager_ execution() # 改为图执行模式运行
#定义了一个简单的“计算图
nodel = tf. constant(3.0, tf. float32, name=" node1")
node2 = tf. constant(4.0, tf. float32, name=" node2")
node3 = tf. add (node1, node2)
print (node3)
Tensor(“Add:0”,shape=(), dtype=float32)
若要执行,则
sess = tf. Session()    #建立对话并显示运行结果(分配资源)
print("运行sess. run (node1)的结果:",sess. run (node1))
print("运行sess. run (node2)的结果:",sess. run (node2))
print("运行sess. run (node3)的结果:",sess. run (node3))

sess. close()     #关闭session
运行sess. run (node1)的结果: 3.0
运行sess. run (node2)的结果: 4.0
运行sess. run (node3)的结果: 7.0
