1.Order Of Drawing Demo: This demo explains about sequential drawing. This is key to drawing multiple objects to the screen e.g. overlapping objects.
示意图
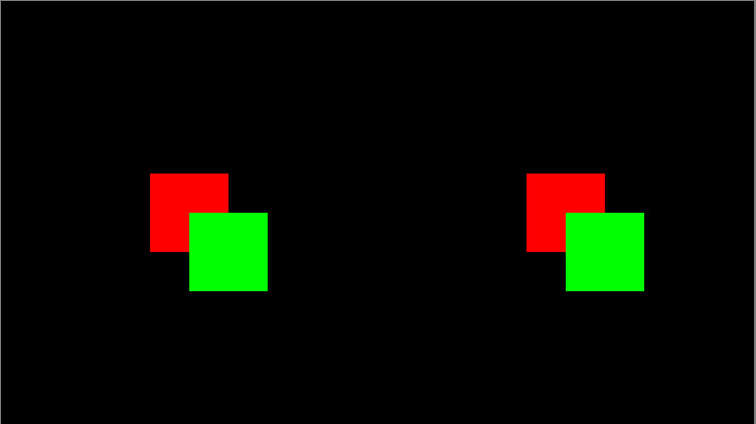
参考链接:http://peterscarfe.com/drawingorderdemo.html
% Open an on screen window and color it black
[window, windowRect] = PsychImaging('OpenWindow', screenNumber, black);

% Get the size of the on screen window in pixels
[screenXpixels, screenYpixels] = Screen('WindowSize', window);

% Get the centre coordinate of the window in pixels
[xCenter, yCenter] = RectCenter(windowRect);

% Make a base Rect of 200 by 200 pixels.
baseRect = [0 0 200 200];

% Center the left hand side squares on positions in the screen.
leftBackRect = CenterRectOnPointd(baseRect, screenXpixels * 0.25, yCenter);
leftForwardRect = CenterRectOnPointd(baseRect,...
    screenXpixels * 0.25 + 100, yCenter + 100);

% Do the same of the right hand side squares, but not concatonate these
% into a single matrix. This is bacause we will be drawing these both in a
% single line of code. For more details use Screen DrawRect?
rightBackRect = CenterRectOnPointd(baseRect,...
    screenXpixels * 0.75, yCenter);
rightForwardRect = CenterRectOnPointd(baseRect,...
    screenXpixels * 0.75 + 100, yCenter + 100);
rightRects = [rightBackRect; rightForwardRect]';

% We do the same of the colors of the rects. Put them in one matrix for
% drawing
rightRectColors = [1 0 0; 0 1 0]';

% Draw the left hand side squares onto the screen, we do this sequentially
% with two lines of code, one for each rectangle.
Screen('FillRect', window, [1 0 0], leftBackRect);
Screen('FillRect', window, [0 1 0], leftForwardRect);

% Now we draw the two right hand side squares to the screen. We get the
% same results as if we draw in two seperate lines, however we efficiently
% draw both squares in a single line of code. Note, that as detailed above,
% we acheive the same ordering of squares by placing the coordinates of the
% square we want to draw first into the matrix first.
Screen('FillRect', window, rightRectColors, rightRects);

% Flip to the screen. This command basically draws all of our previous
% commands onto the screen. See later demos in the animation section on more
% timing details. And how to demos in this section on how to draw multiple
% rects at once.
Screen('Flip', window);
2.Simultaneous Contrast Illusion Demo:This demo builds on "Order Of Drawing Demo" by drawing a simple simultaneous contrast illusion, this time with all the objects draw in a single line of code.
参考链接:http://peterscarfe.com/ptbtutorials.html
示意图

% Open an on screen window and color it black
[window, windowRect] = PsychImaging('OpenWindow', screenNumber, grey);

% Get the size of the on screen window in pixels
[screenXpixels, screenYpixels] = Screen('WindowSize', window);

% Get the centre coordinate of the window in pixels
[xCenter, yCenter] = RectCenter(windowRect);

% Make a base Rect of 1/2 screen Y dimension for the black and white
% background squares, and 1/6 for the front grey squares. This will produce
% a standard simultaneous contrast illustion where the two smaller grey
% sqaures, although the same luminance will appear different shades of grey
% due to being on different backgrounds. The one on the white background
% square will look darker then the one on the white background square.
backDim = screenYpixels / 2;
baseRectBack = [0 0 backDim backDim];

frontDim = screenYpixels / 6;
baseRectFront = [0 0 frontDim frontDim];

% Position the rectangles on the screen
backLeftRect = CenterRectOnPointd(baseRectBack,...
    xCenter - backDim / 2, yCenter);
backRightRect = CenterRectOnPointd(baseRectBack,...
    xCenter + backDim / 2, yCenter);

frontLeftRect = CenterRectOnPointd(baseRectFront,...
    xCenter - backDim / 2, yCenter);
frontRightRect = CenterRectOnPointd(baseRectFront,...
    xCenter + backDim / 2, yCenter);

% Make a marix of all the rect coordinates
allRects = [backLeftRect; backRightRect; frontLeftRect; frontRightRect]';

% We do the same of the colors of the rects. Put them in one matrix for
% drawing
allColors = [white white white; black black black;...
    grey grey grey; grey grey grey]';

% Draw all the rects in one line of code
Screen('FillRect', window, allColors, allRects);

% Flip to the screen. This command basically draws all of our previous
% commands onto the screen. See later demos in the animation section on more
% timing details. And how to demos in this section on how to draw multiple
% rects at once.
Screen('Flip', window);
3.Semi-Transparent Squares Demo: Shows you how to make shapes semi-transparent using the "alpha" channel, so that you can partially "see through shapes" to those behind. Again, the order of operations is key.
参考链接:http://peterscarfe.com/semitransparentsquaresdemo.html
示意图

% Open an on screen window
[window, windowRect] = PsychImaging('OpenWindow', screenNumber, white);

% Get the size of the on screen window
[screenXpixels, screenYpixels] = Screen('WindowSize', window);

% Set blend function for alpha blending
Screen('BlendFunction', window, 'GL_SRC_ALPHA', 'GL_ONE_MINUS_SRC_ALPHA');

% Get the centre coordinate of the window
[xCenter, yCenter] = RectCenter(windowRect);

% Make a base Rect of 400 by 400 pixels
baseRect = [0 0 400 400];

% Screen X positions of our three rectangles
squareXpos = [xCenter - 200 xCenter + 200 xCenter];
squareYpos = [yCenter yCenter yCenter + 200];
numSqaures = length(squareXpos);

% Set the colors to Red, Green and Blue, with the fourth value being the
% "alpha" value. This also takes a value between 0 and 1 just like a
% normal colour, however now 0 = totally transparent and 1 = totally
% opaque. Our RGB triplets are now RGBA values.
allColors = [1 0 0 1; 0 1 0 1; 0 0 1 0.5]';

% Make our rectangle coordinates
allRects = nan(4, 3);
for i = 1:numSqaures
    allRects(:, i) = CenterRectOnPointd(baseRect,...
        squareXpos(i), squareYpos(i));
end

% Draw the rect to the screen
Screen('FillRect', window, allColors, allRects);

% Flip to the screen
Screen('Flip', window);
注:1.上述代码使用矩阵转置是由于FillRect函数的原因
2.第三部分代码[R G B A]第四个参数是α值,取值0为完全透明,取值1为完全不透明
3.nan是not a number的意思,nan(4,3)生成一个四行三列的矩阵,其中每个值都是nan