实验环境redhat 6.5
一主
host1:172.25.254.1
两从:
host2:172.25.254.2
host3:172.25.254.3
selinux=disabled ,firewalld=stop
一.yum仓库搭建主从安装组建:
[root@host1 ~]# vim /etc/yum.repos.d/yum.repo
[saltstack]
name=76.5
baseurl=ftp://172.25.254.250/pub/rhel6
gpgcheck=0

[root@host1 ~]# yum repolist
其他两从一样配置yum源
[root@host1 ~]# scp /etc/yum.repos.d/yum.repo  host2:/etc/yum.repos.d/yum.repo
[root@host1 ~]# scp /etc/yum.repos.d/yum.repo  host3:/etc/yum.repos.d/yum.repo
主节点:安装salt-master
[root@host1 ~]# yum install salt-master -y
[root@host1 ~]# /etc/init.d/salt-master start
[root@host1 ~]# netstat -anltpp
 4505    推送给slave
 4506    接收slave接收到报告
从节点安装salt-minion
[root@host2 ~]# yum install salt-minion -y
[root@host3 ~]# yum install salt-minion -y
简单配置文件
两从节点操作相同
vim /etc/salt/minion
  17 master: 172.25.254.1  ##指向主节点
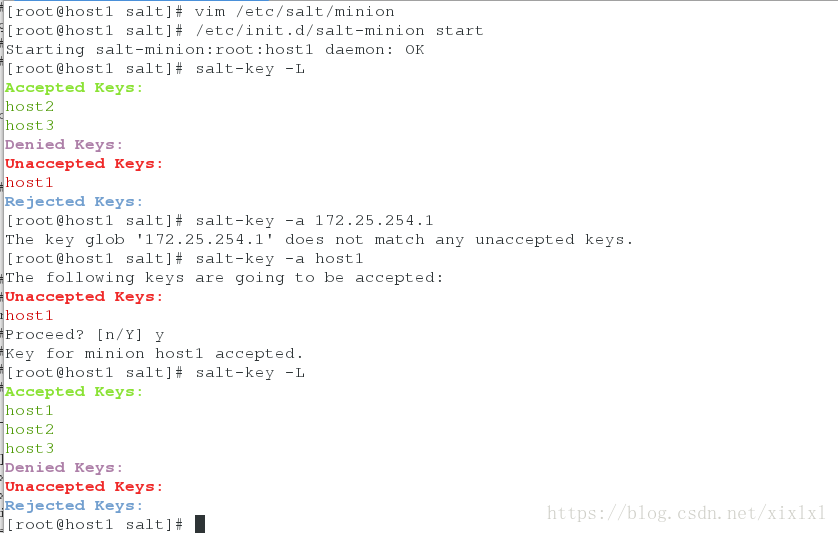
/etc/init.d/salt-minion start 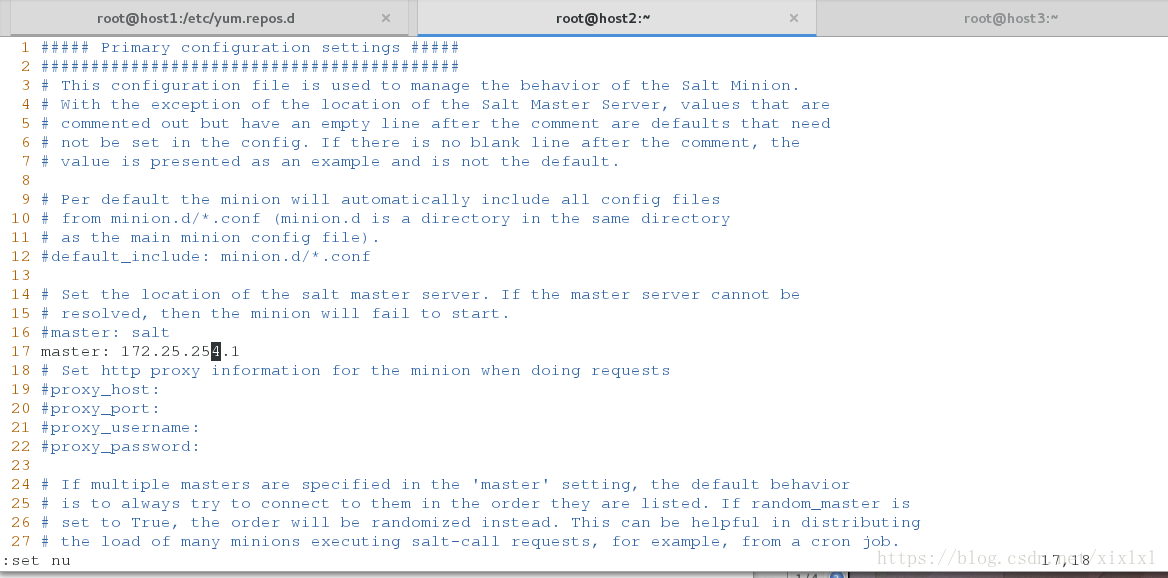

关联:
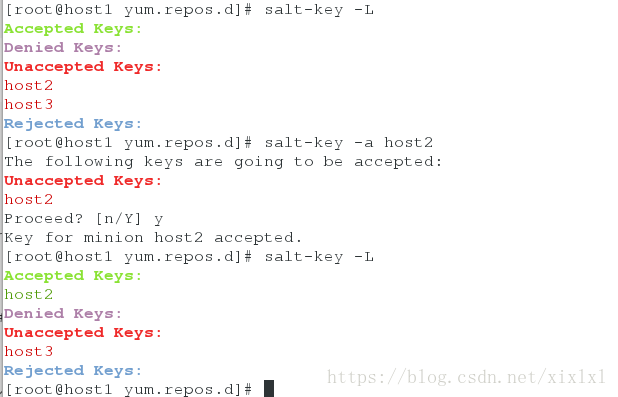
[root@host1 ~]# salt-key -L ##列出所有的可关联slave
    Accepted Keys:
    Denied Keys:
    Unaccepted Keys:
    host2
    host3
    Rejected Keys:
[root@server1 ~]# salt-key -a host2  ##关联host2,更多用法 salt-key --help
    The following keys are going to be accepted:
    Unaccepted Keys:
    host2
    Proceed? [n/Y] y
    Key for minion host2 accepted.
[root@host1 ~]# salt-key -L   ##再次查看
    Accepted Keys:
    host2
    Denied Keys:
    Unaccepted Keys:
    host3
    Rejected Keys:
相同的方法添加host3
[root@server1 ~]# salt-key -a host3
事实上,主从做了个公钥相互交换
查看下主从交换了公钥
yum install tree -y
[root@host1 ~]# cd /etc/salt/pki/master/
tree .
 [root@host1 ~]# cd /etc/salt/pki/master/
 [root@host1 master]# tree .
 [root@host1 master]# tree .
 ├── master.pem
 ├── master.pub
 ├── minions
 │ ├── host2
 │ └── host3
 ├── minions_autosign
 ├── minions_denied
 ├── minions_pre
 └── minions_rejected
主节点查看公钥
[root@host1 master]# md5sum master.pub
 ab49d70ee5b54f52854d3d3f6deca87c master.pub ##这是主节点公钥
从节点查看主节点公钥,
[root@host3 minion]# md5sum minion_master.pub
 ab49d70ee5b54f52854d3d3f6deca87c minion_master.pub
 [root@host3 minion]# pwd
 /etc/salt/pki/minion
host3从节点自己的公钥
[root@host3 minion]# md5sum minion.pub
 a660f8b4517e6fa032888ce6ff9455cb minion.pub
 [root@host3 minion]# pwd
 /etc/salt/pki/minion
主节点有host3的公钥
[root@host1 minions]# md5sum host3
 a660f8b4517e6fa032888ce6ff9455cb host3
 [root@host1 minions]# pwd
 /etc/salt/pki/master/minions
host2和host3情况相同。主从彼此都交换了自己的公钥
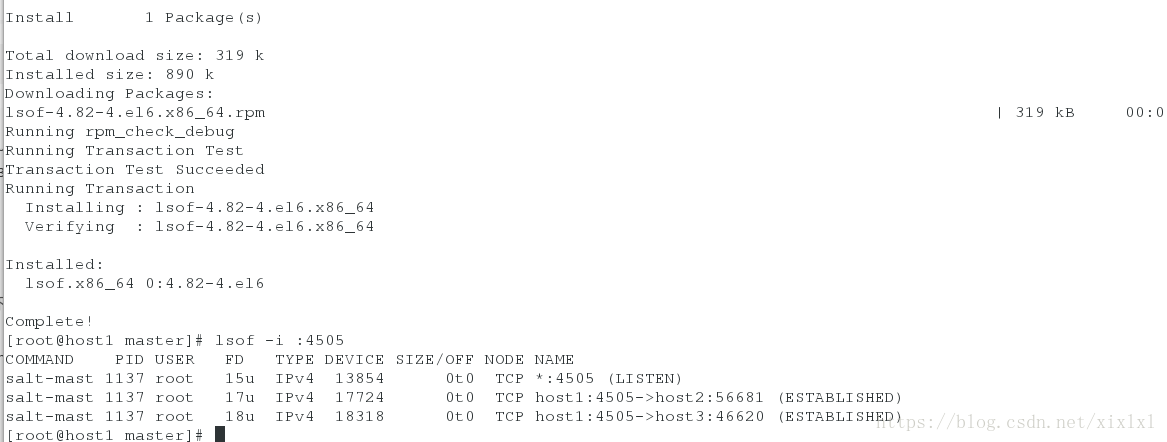
lsof -i :4505   ##显示主从之间正在此保持连接中,没这个命令yum安装
[root@host1 master]# lsof -i :4505
COMMAND    PID USER   FD   TYPE DEVICE SIZE/OFF NODE NAME
salt-mast 1137 root   15u  IPv4  13854      0t0  TCP *:4505 (LISTEN)
salt-mast 1137 root   17u  IPv4  17724      0t0  TCP host1:4505->host2:56681 (ESTABLISHED)
salt-mast 1137 root   18u  IPv4  18318      0t0  TCP host1:4505->host3:46620 (ESTABLISHED)
saltstack自测ping下
salt '*' test.ping   ##可以ping通
    host2:
        True
    host3:
        True

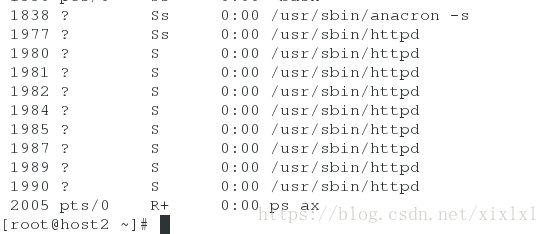
查看工作进程
yum install python-setproctitle.x86_64 -y
/etc/init.d/salt-master restart
ps ax
     1135 ?        S      0:00 /usr/bin/python2.6 /usr/bin/salt-master -d
     1142 ?        S      0:01 /usr/bin/python2.6 /usr/bin/salt-master -d
     3026 ?        S      0:00 /usr/bin/python2.6 /usr/bin/salt-master -d ProcessManager
     3027 ?        S      0:00 /usr/bin/python2.6 /usr/bin/salt-master -d MultiprocessingLoggingQueue
     3029 ?        Sl     0:00 /usr/bin/python2.6 /usr/bin/salt-master -d ZeroMQPubServerChannel
     3030 ?        S      0:00 /usr/bin/python2.6 /usr/bin/salt-master -d EventPublisher
     3033 ?        S      0:00 /usr/bin/python2.6 /usr/bin/salt-master -d Maintenance
     3034 ?        S      0:00 /usr/bin/python2.6 /usr/bin/salt-master -d ReqServer_ProcessManager
     3035 ?        Sl     0:00 /usr/bin/python2.6 /usr/bin/salt-master -d MWorkerQueue
     3036 ?        Sl     0:01 /usr/bin/python2.6 /usr/bin/salt-master -d MWorker-0
     3037 ?        Sl     0:01 /usr/bin/python2.6 /usr/bin/salt-master -d MWorker-1
     3044 ?        Sl     0:01 /usr/bin/python2.6 /usr/bin/salt-master -d MWorker-2
     3045 ?        Sl     0:01 /usr/bin/python2.6 /usr/bin/salt-master -d MWorker-3
     3046 ?        Sl     0:01 /usr/bin/python2.6 /usr/bin/salt-master -d MWorker-4

二.前期工作做好后,可以推送了,推送给host2一个apache服务
[root@host1 ~]# vim /etc/salt/master  #去消注释即可,
      534 file_roots:
          535   base:
          536     - /srv/salt

是没有目录的要新建
[root@host1 ~]# mkdir /srv/salt
[root@host1 ~]# cd /srv/salt/
[root@host1 salt]# /etc/init.d/salt-master restart

关于yaml语法的问题可以参考这里
http://docs.saltstack.cn/topics/yaml/index.html
saltstack模块参考
http://docs.saltstack.cn/ref/states/all/
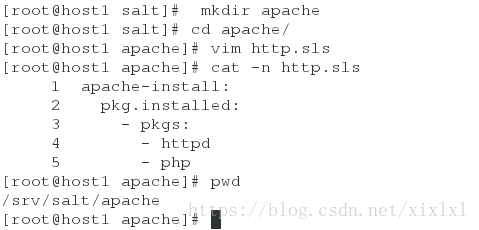
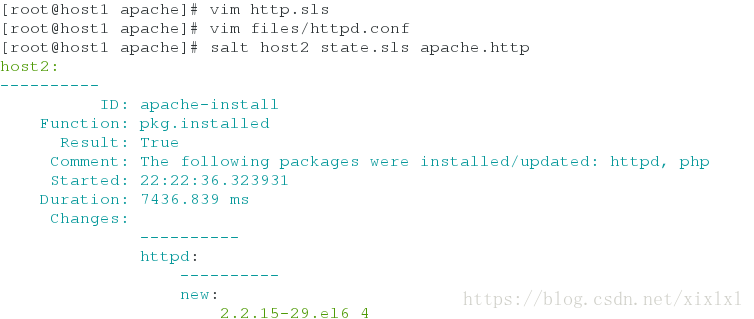
[root@host1 salt]# mkdir apache  ##创建apache目录,名字任意
[root@host1 salt]# cd apache/
[root@host1 apache]# vim http.sls  ##必须以.sls结尾,在apache目录之内,前缀名任意,文件内容注意格式,严谨
       apache-install:
         pkg.installed:
           - pkgs:
             - httpd
             - php
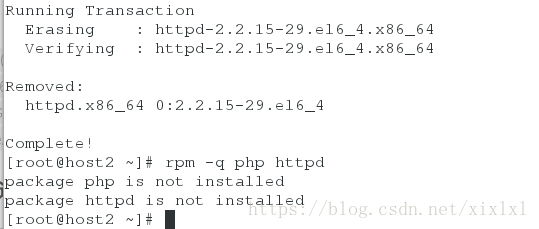
检查下host2有没有安装httpd服务,装了的话删除
[root@host2 ~]# rpm -q php httpd

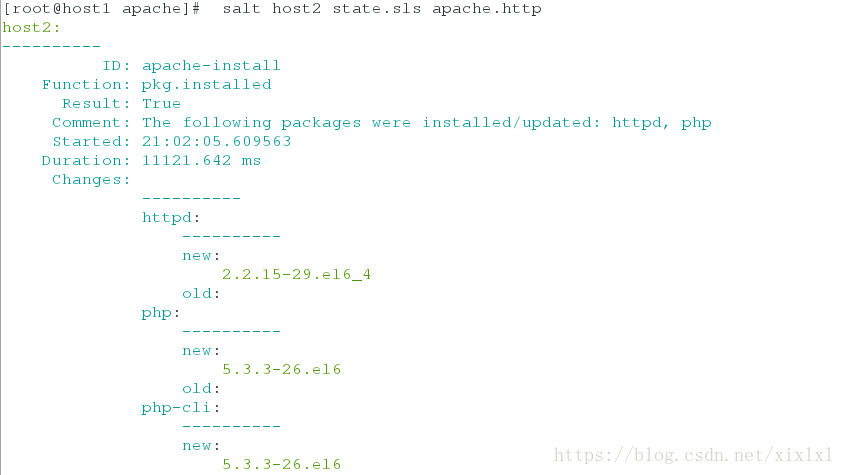
1.主开始推送
[root@host1 apache]# salt host2 state.sls
apache.http    ##apache 指定在工作目录/srv/salt/下, .http是apache目录下的http.sls文件
成功显示如下,没红色文字就ok
    host2:
    ----------
              ID: apache-install
        Function: pkg.installed
          Result: True
         Comment: The following packages were installed/updated: httpd, php
         Started: 21:02:05.609563
        Duration: 11121.642 ms
         Changes:
                  ----------
                  httpd:
                      ----------
                      new:
                          2.2.15-29.el6_4
                      old:
                  php:
                      ----------
                      new:
                          5.3.3-26.el6
                      old:
                  php-cli:
                      ----------
                      new:
                          5.3.3-26.el6
                      old:
                  php-common:
                      ----------
                      new:
                          5.3.3-26.el6
                      old:

    Summary for host2
    ------------
    Succeeded: 1 (changed=1)
    Failed:    0
    ------------
    Total states run:     1
    Total run time:  11.122 s
salt host2 state.sls apache.http test=true可校验

再回过头看host2,httpd服务已经安装
[root@host2 ~]# rpm -q php httpd
php-5.4.16-42.el7.x86_64
httpd-2.4.6-45.el7.x86_64
2.上边只是完成了推送还没有启动
在/srv/slat/apache/新建目录fiels,
[root@host1 apache]# ls
http.sls
[root@host1 apache]# mkdir files
[root@host1 apache]# cd files/
[root@host1 files]# ls
host2:把推送过去的httpd主配置文件传给主host1
[root@host2 ~]# scp /etc/httpd/conf/httpd.conf  host1:/srv/salt/apache/files/
[root@host1 files]# ls
httpd.conf
[root@host1 files]# pwd
/srv/salt/apache/files


查看主传来的httpd.conf的md5码,和host2:/etc/httpd/conf/httpd.conf md5码相同
[root@host1 files]# md5sum httpd.conf
 f5e7449c0f17bc856e86011cb5d152ba httpd.conf
[root@host2 ~]# md5sum /etc/httpd/conf/httpd.conf
 f5e7449c0f17bc856e86011cb5d152ba /etc/httpd/conf/httpd.conf
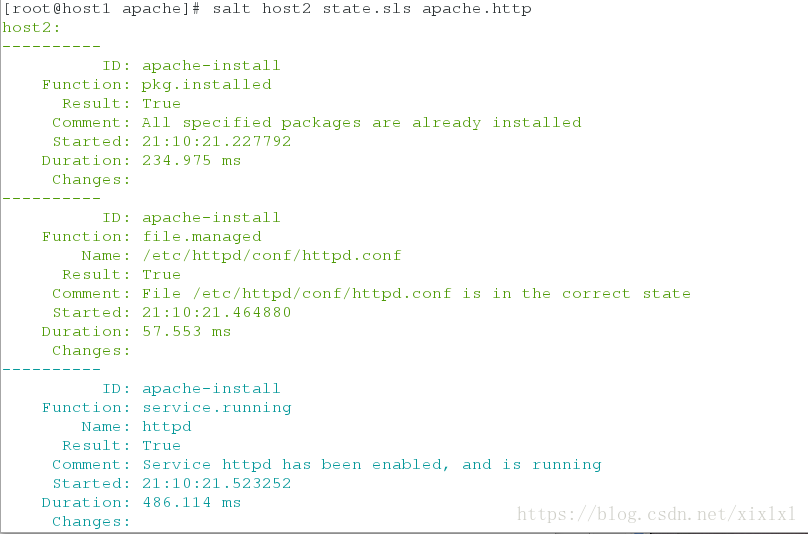
主继续配置/srv/salt/apache/http.sls
[root@host1 apache]# vim http.sls
[root@host1 apache]# pwd
/srv/salt/apache
apache-install:
pkg.installed:
- pkgs:
- httpd
- php
file.managed:
- name: /etc/httpd/conf/httpd.conf
- source: salt://apache/files/httpd.conf
- user: root
- group: root
- mode: 644
service.running:
- name: httpd
- enable: true
- reload: true
- watch:
- file: apache-install
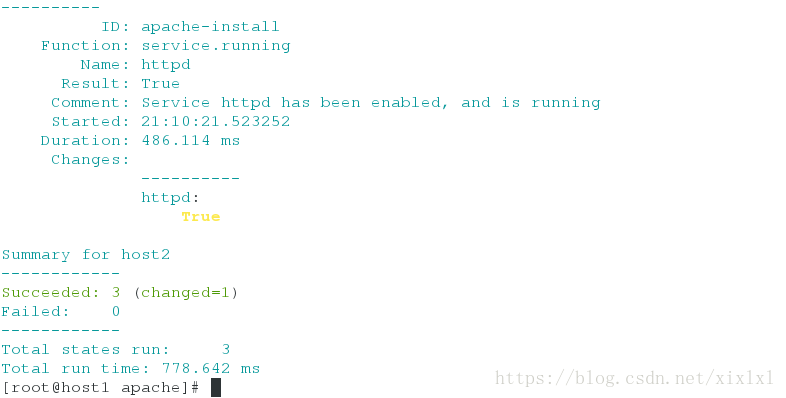
[root@host1 apache]# salt host2 state.sls apache.http ##推送
host2:
----------
ID: apache-install
Function: pkg.installed
Result: True
Comment: All specified packages are already installed
Started: 21:10:21.227792
Duration: 234.975 ms
Changes:
----------
ID: apache-install
Function: file.managed
Name: /etc/httpd/conf/httpd.conf
Result: True
Comment: File /etc/httpd/conf/httpd.conf is in the correct state
Started: 21:10:21.464880
Duration: 57.553 ms
Changes:
----------
ID: apache-install
Function: service.running
Name: httpd
Result: True
Comment: Service httpd has been enabled, and is running
Started: 21:10:21.523252
Duration: 486.114 ms
Changes:
----------
httpd:
True
Summary for host2
------------
Succeeded: 3 (changed=1)
Failed: 0
------------
Total states run: 3
Total run time: 778.642 ms
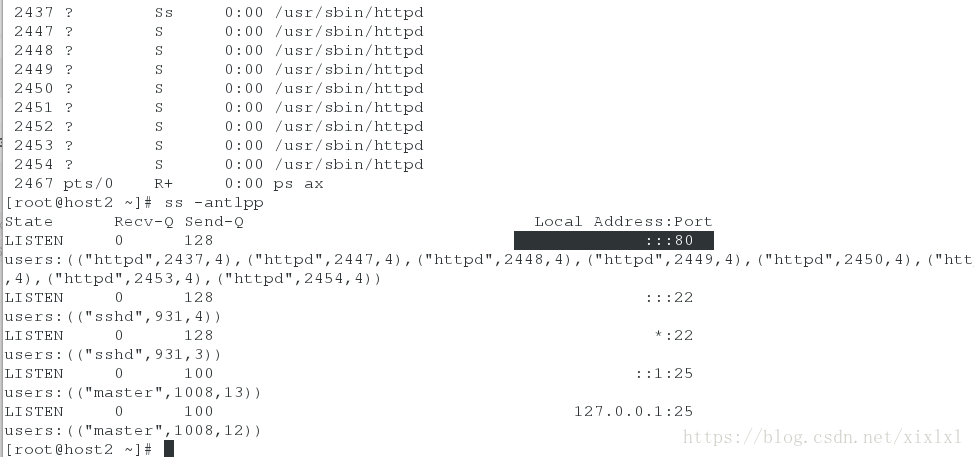
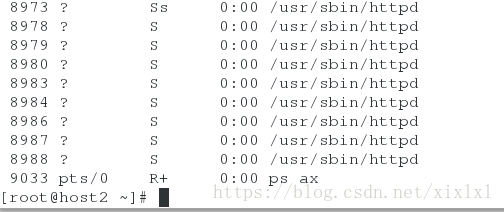
host2查看httpd状态
[root@host2 ~]# ps ax
[root@host2 ~]# ss -antlpp
再推个网页过去
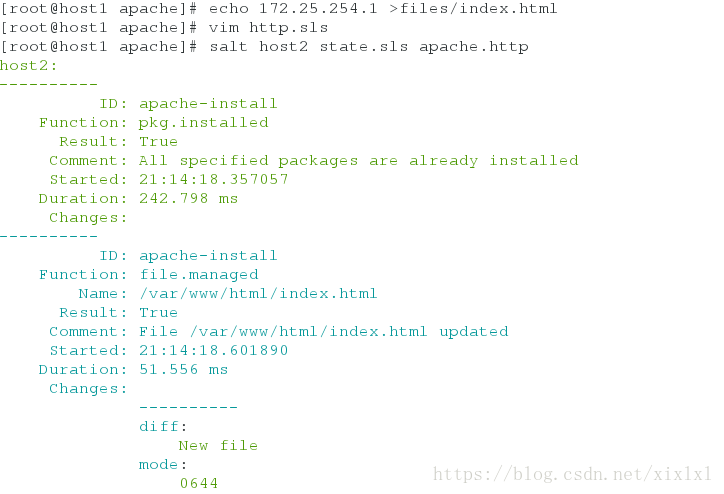
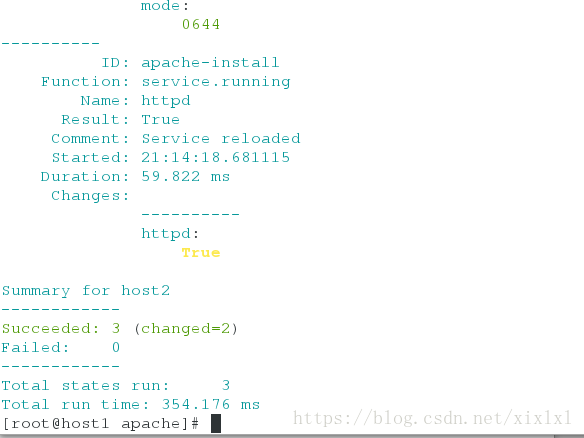
[root@host1 files]# echo 172.25.254.1 >index.html
[root@host1 files]# pwd
/srv/salt/apache/files
[root@host1 files]# cd ..
[root@host1 apache]# ls
files  http.sls
[root@host1 apache]# vim http.sls
       apache-install:
         pkg.installed:
           - pkgs:
             - httpd
             - php


         file.managed:
           - name: /etc/httpd/conf/httpd.conf
           - source: salt://apache/files/httpd.conf
           - user: root
           - group: root
           - mode: 644

           - name: /var/www/html/index.html
           - source: salt://apache/files/index.html
           - user: root
           - group: root
           - mode: 777

         service.running:
           - name: httpd
           - enable: true
           - reload: true
           - watch:
             - file: apache-install


[root@host1 apache]# salt host2 state.sls apache.http
客户端测试:
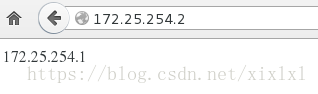
curl 172.25.254.2
三.源码推送,以nginx为例,推给host3
存在依赖问题:先解决
[root@host1 salt]# pwd
    /srv/salt
[root@host1 salt]# mkdir /srv/salt/pkgs
[root@host1 salt]# vim /srv/salt/pkgs/make.sls
     nginx-make:
       pkg.installed:
         - pkgs:
           - gcc
           - pcre-devel
           - openssl-devel

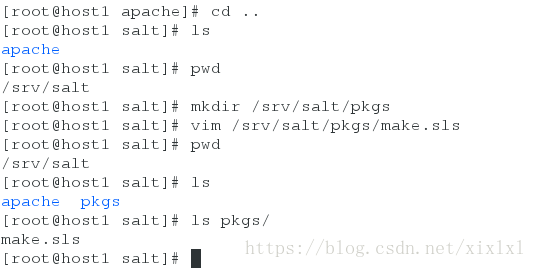
再来编辑放置tar包
[root@host1 salt]# ls
apache pkgs
[root@host1 salt]# pwd
/srv/salt
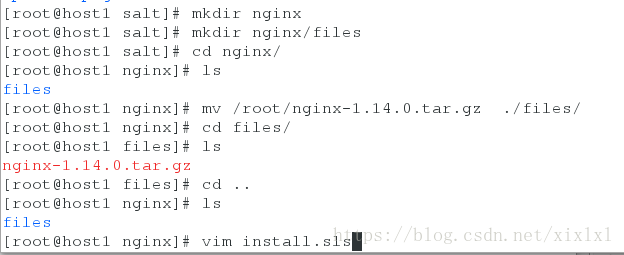
[root@host1 salt]# mkdir /srv/salt/nginx
[root@host1 salt]# cd nginx/
[root@host1 nginx]# mkdir files
[root@host1 nginx]# cd files/
[root@host1 files]# pwd
/srv/salt/nginx/files
[root@host1 files]# mv /root/nginx-1.14.0.tar.gz . ##(/srv/salt/nginx/files)
[root@shost1 files]# ls
nginx-1.14.0.tar.gz
[root@host1 files]# cd ..
[root@host1 nginx]# vim install.sls
include:
- pkgs.make
nginx-install:
file.managed:
- name: /mnt/nginx-1.14.0.tar.gz
- source: salt://nginx/files/nginx-1.14.0.tar.gz
cmd.run:
- name: cd /mnt && tar zxf nginx-1.14.0.tar.gz && cd nginx-1.14.0 && sed -i.bak 's/CFLAGS="$CFLAGS -g"/#CFLAGS="$C FLAGS -g"/g' auto/cc/gcc && sed -i.bak 's/#define NGINX_VER "nginx\/" NGINX_VERSION/#define NGINX_VER "nginx"/g' src/core/nginx.h && ./configure --prefix=/usr/local/nginx --with-http_stub_status_module --with-http_ssl_module &>/dev/null && make &>/dev/null && make install &>/dev/null
- create: /usr/local/nginx
- require:
- pkg: nginx-make
[root@host1 nginx]# salt host3 state.sls nginx.install

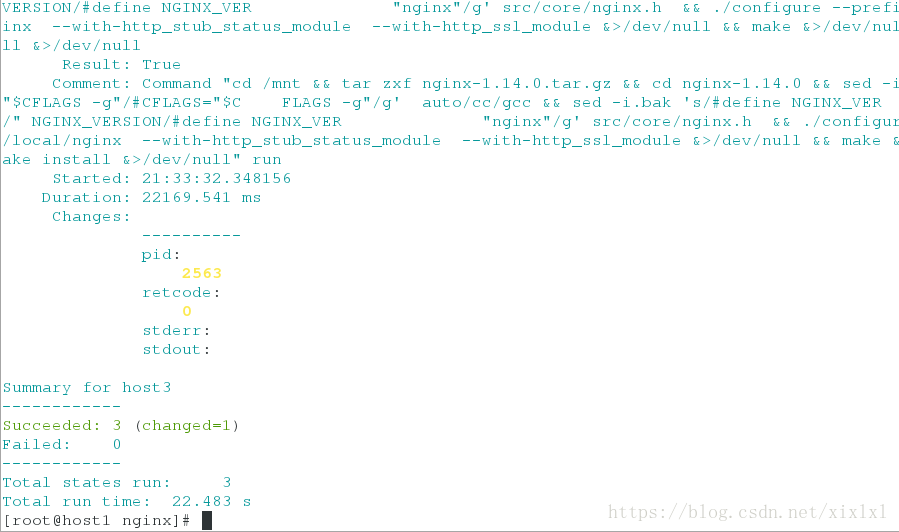
这个时候已经推送过去了,同样还没启动
把推送过去安装后的配置文件传给master
[root@host3 mnt]# scp /usr/local/nginx/conf/nginx.conf 172.25.254.1:/srv/salt/nginx/files/

[root@host1 nginx]# ls
files  install.sls
[root@host1 nginx]# cd files/
[root@host1 files]# ls
nginx-1.14.0.tar.gz  nginx.conf
[root@host1 files]# vim nginx.conf
[root@host1 files]# pwd
/srv/salt/nginx/files
       user  nginx nginx;
       worker_processes  auto;
这个时候,对于host3来讲并没有nginx用户,
[root@host1 files]# cd /srv/salt/
[root@host1 salt]# ls
     apache  nginx  pkgs
[root@host1 salt]# mkdir user
[root@host1 salt]# cd user/
[root@host1 user]# vim adduser.sls
      nginx:
        user.present:
          - uid: 800
          - shell: /sbin/nologin

做完以上工作后,再来编辑/srv/salt/nginx/service.sls 你也可以直接写在安装文件里(/srv/salt/nginx/install.sls)
[root@host1 nginx]# pwd
/srv/salt/nginx
[root@host1 nginx]# ls
files install.sls
[root@host1 nginx]# vim service.sls
include:
- nginx.install
- user.adduser
/usr/local/nginx/conf/nginx.conf:
file.managed:
- source: salt://nginx/files/nginx.conf
/usr/local/nginx/html/index.html:
file.managed:
- source: salt://nginx/files/index.html
nginx-service:
file.managed:
- name: /etc/init.d/nginx
- source: salt://nginx/files/nginx
- mode: 755
service.running:
- name: nginx
- enable: true
- reload: true
- require:
- user: nginx
- watch:
- file: /usr/local/nginx/conf/nginx.conf
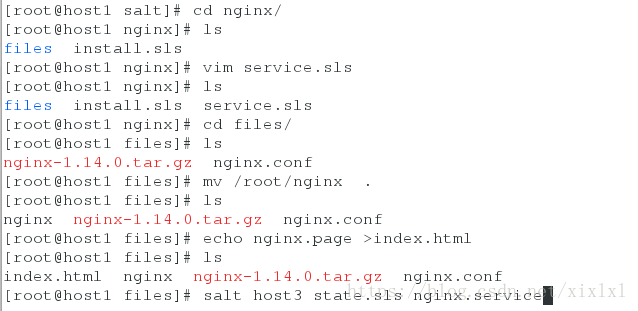
ok,/srv/salt/nginx/files/没有启动脚本nginx和推送的默认发布页
[root@host1 files]# mv /root/nginx .
[root@host1 files]# ls
nginx nginx-1.14.0.tar.gz nginx.conf
[root@host1 files]# echo nginx.page >index.html
[root@host1 files]# ls
index.html nginx nginx-1.14.0.tar.gz nginx.conf
[root@host1 nginx]# salt host3 state.sls nginx.service

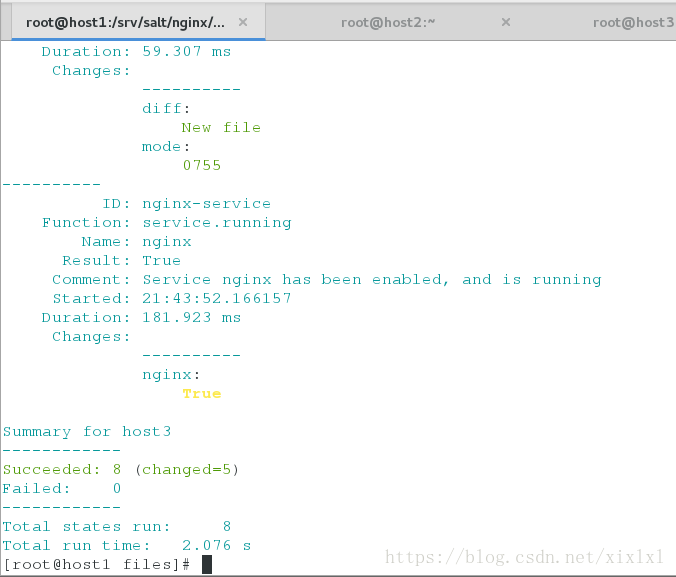
没报错:ok,去host4上看看
先看下有没有nginx用户
[root@host3 mnt]# id nginx

浏览器访问下,检查默认页是否推送

查看nginx进程:
ps aux
推送多个主机
[root@host1 salt]# vim top.sls
base:
  'host3':
    - nginx.service
  'host2':
    - apache.http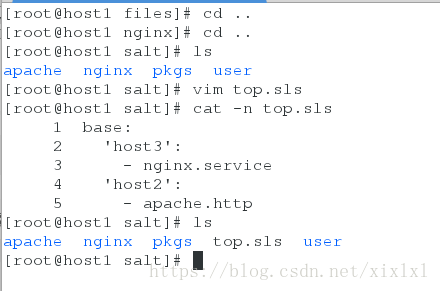
[root@host1 salt]# salt '*' state.highstate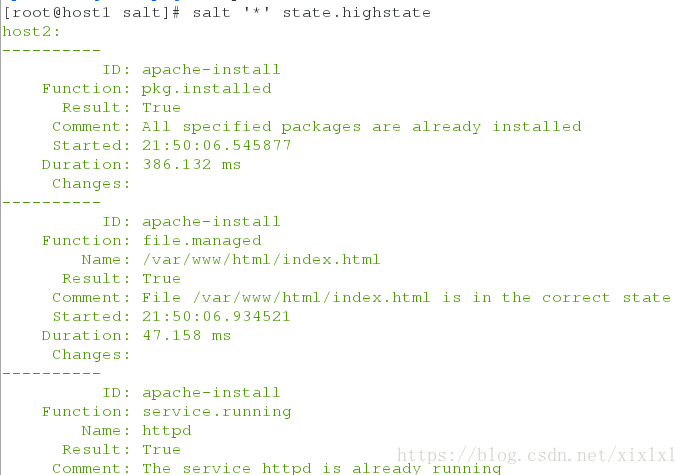
三.集群nginx+httpd+haproxy
yum源安装haproxy
host1为haproxy,同样安装salt客户端
[root@host1 salt]# yum install salt-minion -y
     17 master: 172.25.254.1
[root@host1 salt]# /etc/init.d/salt-minion start
yum安装haproxy,推送文件
[root@host1 salt]# yum install haproxy -y
[root@host1 salt]# mkdir haproxy
[root@host1 salt]# pwd
/srv/salt
[root@host1 salt]# cd haproxy/
[root@host1 haproxy]# vim install.sls
haproxy-install:
pkg.installed:
- pkgs:
- haproxy
file.managed:
- name: /etc/haproxy/haproxy.cfg
- source: salt://haproxy/files/haproxy.cfg
service.running:
- name: haproxy
- enable: true
- reload: true
- watch:
- file: haproxy-install
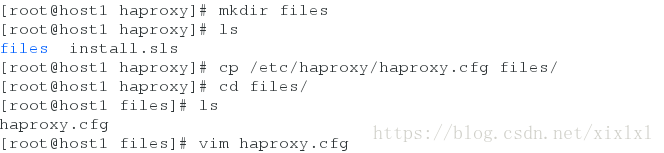
[root@host1 haproxy]# mkdir files
[root@host1 haproxy]# ls
files install.sls
[root@host1 haproxy]# cp /etc/haproxy/haproxy.cfg files/
[root@host1 haproxy]# cd files/
[root@host1 files]# ls
haproxy.cfg
[root@host1 files]# vim haproxy.cfg
多个推送文件配置
[root@host1 salt]# ls
    apache  haproxy  nginx  pkgs  top.sls  user
[root@host1 salt]# vim top.sls
    base:
      'host1':
        - haproxy.install
      'host3':
        - nginx.service
      'host2':
        - apache.http
推送
[root@host1 haproxy]# salt '*' state.highstate
显示如下:比较多
host2:
----------
ID: apache-install
Function: pkg.installed
Result: True
Comment: All specified packages are already installed
Started: 22:07:58.845620
Duration: 398.024 ms
Changes:
----------
ID: apache-install
Function: file.managed
Name: /var/www/html/index.html
Result: True
Comment: File /var/www/html/index.html is in the correct state
Started: 22:07:59.247127
Duration: 62.403 ms
Changes:
----------
ID: apache-install
Function: service.running
Name: httpd
Result: True
Comment: The service httpd is already running
Started: 22:07:59.310487
Duration: 38.182 ms
Changes:
Summary for host2
------------
Succeeded: 3
Failed: 0
------------
Total states run: 3
Total run time: 498.609 ms
host3:
----------
ID: nginx-make
Function: pkg.installed
Result: True
Comment: All specified packages are already installed
Started: 22:07:59.100144
Duration: 330.108 ms
Changes:
----------
ID: nginx-install
Function: file.managed
Name: /mnt/nginx-1.14.0.tar.gz
Result: True
Comment: File /mnt/nginx-1.14.0.tar.gz is in the correct state
Started: 22:07:59.433286
Duration: 68.242 ms
Changes:
----------
ID: nginx-install
Function: cmd.run
Name: cd /mnt && tar zxf nginx-1.14.0.tar.gz && cd nginx-1.14.0 && sed -i.bak 's/CFLAGS="$CFLAGS -g"/#CFLAGS="$C FLAGS -g"/g' auto/cc/gcc && sed -i.bak 's/#define NGINX_VER "nginx\/" NGINX_VERSION/#define NGINX_VER "nginx"/g' src/core/nginx.h && ./configure --prefix=/usr/local/nginx --with-http_stub_status_module --with-http_ssl_module &>/dev/null && make &>/dev/null && make install &>/dev/null
Result: True
Comment: /usr/local/nginx exists
Started: 22:07:59.502565
Duration: 0.371 ms
Changes:
----------
ID: nginx
Function: user.present
Result: True
Comment: User nginx is present and up to date
Started: 22:07:59.503810
Duration: 1.567 ms
Changes:
----------
ID: /usr/local/nginx/conf/nginx.conf
Function: file.managed
Result: True
Comment: File /usr/local/nginx/conf/nginx.conf is in the correct state
Started: 22:07:59.505490
Duration: 32.097 ms
Changes:
----------
ID: /usr/local/nginx/html/index.html
Function: file.managed
Result: True
Comment: File /usr/local/nginx/html/index.html is in the correct state
Started: 22:07:59.537802
Duration: 46.604 ms
Changes:
----------
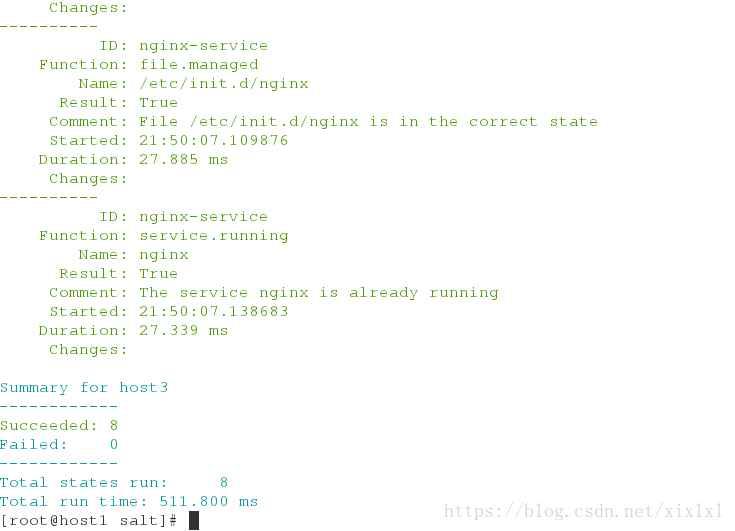
ID: nginx-service
Function: file.managed
Name: /etc/init.d/nginx
Result: True
Comment: File /etc/init.d/nginx is in the correct state
Started: 22:07:59.584539
Duration: 38.323 ms
Changes:
----------
ID: nginx-service
Function: service.running
Name: nginx
Result: True
Comment: The service nginx is already running
Started: 22:07:59.624942
Duration: 31.316 ms
Changes:
Summary for host3
------------
Succeeded: 8
Failed: 0
------------
Total states run: 8
Total run time: 548.628 ms
host1:
----------
ID: haproxy-install
Function: pkg.installed
Result: True
Comment: All specified packages are already installed
Started: 22:07:59.775183
Duration: 347.258 ms
Changes:
----------
ID: haproxy-install
Function: file.managed
Name: /etc/haproxy/haproxy.cfg
Result: True
Comment: File /etc/haproxy/haproxy.cfg updated
Started: 22:08:00.124612
Duration: 71.718 ms
Changes:
----------
diff:
---
+++
@@ -60,27 +60,25 @@
#---------------------------------------------------------------------
# main frontend which proxys to the backends
#---------------------------------------------------------------------
-frontend main *:5000
- acl url_static path_beg -i /static /images /javascript /stylesheets
- acl url_static path_end -i .jpg .gif .png .css .js
+frontend main *:80
+ # acl url_static path_beg -i /static /images /javascript /stylesheets
+ # acl url_static path_end -i .jpg .gif .png .css .js
- use_backend static if url_static
+ # use_backend static if url_static
default_backend app
#---------------------------------------------------------------------
# static backend for serving up images, stylesheets and such
#---------------------------------------------------------------------
-backend static
- balance roundrobin
- server static 127.0.0.1:4331 check
-
+#backend static
+# balance roundrobin
+# server static 127.0.0.1:4331 check
+#
#---------------------------------------------------------------------
# round robin balancing between the various backends
#---------------------------------------------------------------------
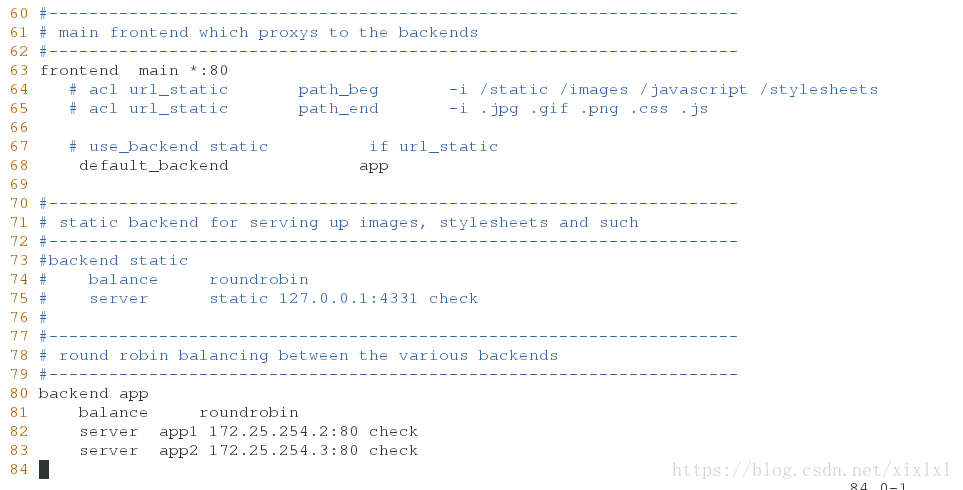
backend app
balance roundrobin
- server app1 127.0.0.1:5001 check
- server app2 127.0.0.1:5002 check
- server app3 127.0.0.1:5003 check
- server app4 127.0.0.1:5004 check
+ server app1 172.25.254.2:80 check
+ server app2 172.25.254.3:80 check
----------
ID: haproxy-install
Function: service.running
Name: haproxy
Result: True
Comment: Service haproxy has been enabled, and is running
Started: 22:08:00.197084
Duration: 205.375 ms
Changes:
----------
haproxy:
True
Summary for host1
------------
Succeeded: 3 (changed=2)
Failed: 0
------------
Total states run: 3
Total run time: 624.351 ms
客户端查看:
curl 172.25.254.1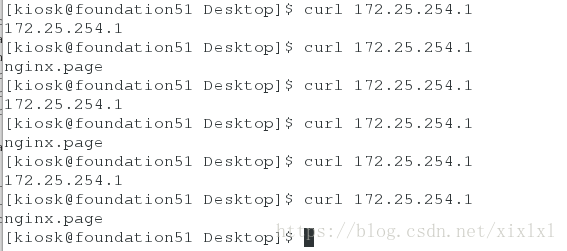
四.saltstack其他命令
1.Grians匹配
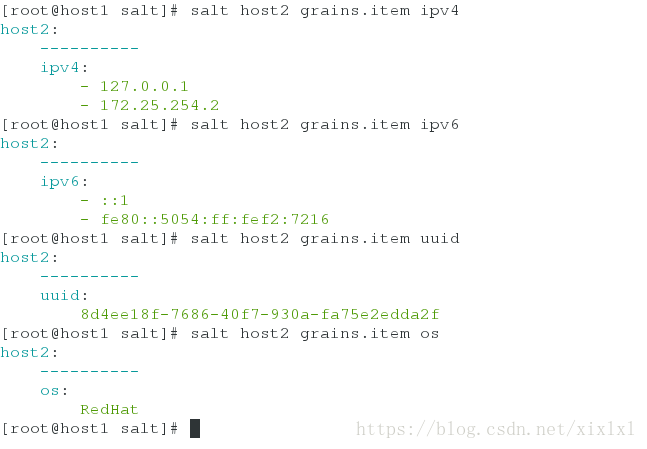
查找host2的ip
[root@host1 salt]# salt host2 grains.item ipv4   ##查找host2的ip
[root@host1 salt]# salt host2 grains.item ipv6  ##查找host2的ip6
[root@host1 salt]# salt host2 grains.item uuid  ##查找host2的uuid
[root@host1 salt]# salt host2 grains.item os   #查找host2的操作系统
2.Grians匹配
[root@host1 salt]# salt -G 'os:RedHat' test.ping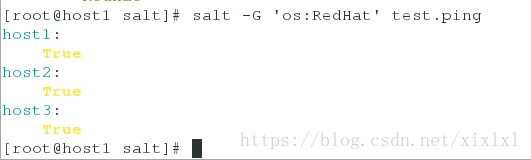
[root@host1 salt]# salt -G 'os:RedHat' cmd.run hostname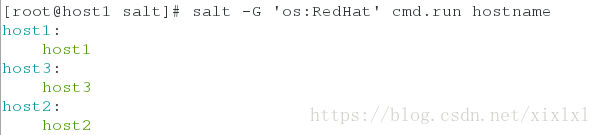
[root@host1 salt]# salt -G 'os:RedHat' cmd.run 'touch /mnt/lel'  ##在操作系统为redhat的主机上/mnt/新建文件lel
[root@host1 salt]# salt -G 'os:RedHat' cmd.run 'ip addr'   ##操作系统为redhat的主机上显示执行命令ip addr
[root@host1 salt]# salt -G 'os:RedHat' cmd.run 'ip addr show eth0'  ##操作系统为redhat的主机上显示eth0信息
host2是apache服务主机
[root@host2 mnt]# vim /etc/salt/minion
    120 grains:
    121   roles:
    122     - apache
[root@host2 mnt]# /etc/init.d/salt-minion restart[root@host3 mnt]# vim /etc/salt/minion
120 grains:
121 roles:
122 - nginx
[root@host3 mnt]# /etc/init.d/salt-minion restart看下效果:
[root@host1 salt]# salt -G 'roles:nginx' cmd.run hostname
host3:
    host3
[root@host1 salt]# salt -G 'roles:apache' cmd.run hostname
host2:
    host2
[root@host1 salt]# salt host3 grains.item roles
host3:
    ----------
    roles:
        - nginx
[root@host1 salt]# salt host2 grains.item roles
host2:
    ----------
    roles:
        - apache
[root@host1 salt]# salt host3 grains.item roles
 host3:
 ----------
 roles:
 - nginx
 [root@host1 salt]# salt host2 grains.item roles
 host2:
 ----------
 roles:
 - apache
 [root@host1 salt]# salt host2 grains.item qq
 host2:
 ----------
 qq:
 [root@host1 salt]# salt host2 grains.item www
 host2:
 ----------
 www:
 [root@host1 salt]# salt host2 grains.item qq
host3 主机vim /etc/salt/grains
vim /etc/salt/grains
 1 user:
 2   lel
 /etc/init.d/salt-minion restart
查看:
[root@host1 salt]# salt host3 grains.item user
host3:
    ----------
    user:
        lel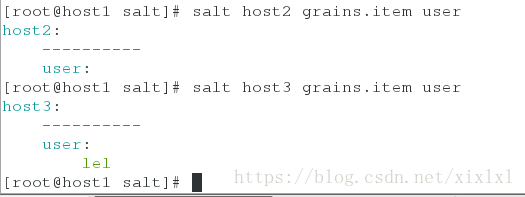
对与master来说
[root@host1 salt]# vim top.sls
base:
  'host1':
    - haproxy.install
  'roles:nginx':
    - match: grain
    - nginx.service
  'roles:apache':
    - match: grain
    - apache.http
[root@host1 salt]# salt '*' state.highstate
这样也可以
五.相对于Grains的静态参数,Pillar可以配置更灵活的参数,熟练地运用Pillar可以十分强大的发挥Saltstack的威力。pillar是动态参数
注释掉grain静态参数
host1
vim /etc/salt/minion
#grains:
#  roles:
#    haproxy     ##注意没短杠
host2
vim /etc/salt/minion
grains:
  roles:
     apache
/etc/init.d/salt-minion restart
host3
vim /etc/salt/minion
grains:
  roles:
     nginx
/etc/init.d/salt-minion restart
hoat1作为修改mater配置文件
[root@host1 salt]# vim /etc/salt/master

 file_roots:        ##524行取消注释即可
   base:
     - /srv/salt/

[root@host1 salt]# /etc/init.d/salt-master rsetart
matser配置pillar工作目录
[root@host1 salt]#  mkdir /srv/pillar
[root@host1 salt]# cd /srv/pillar/
[root@host1 pillar]# mkdir web
[root@host1 pillar]# vim web/server.sls
{% if grains['roles'] == 'apache' %}
webserver: apache
{% elif grains['roles'] == 'nginx' %}
webserver: nginx
{% endif %}
[root@host1 pillar]# vim top.sls
base:
  '*':
    - web.server

[root@host1 pillar]# tree .
.
├── top.sls
└── web
    └── server.sls
完成后刷新动态参数
[root@host1 pillar]# salt '*' saltutil.refresh_pillar
host1:
    True
host3:
    True
host2:
    True
测试
[root@host1 pillar]# salt '*' pillar.item webserver
host2:
    ----------
    webserver:
        apache
host3:
    ----------
    webserver:
        nginx
host1:       ##当然没有角色,web/server.sls就没定义host1
    ----------
    webserver:
上边的/srv/pillar/web/server.sls可以写成这样
[root@host1 pillar]# vim web/server.sls

{% if grains['fqdn'] == 'host2' %}
webserver: apache
{% elif grains['fqdn'] == 'host3' %}
webserver: nginx
{% endif %}
刷新测试下
[root@host1 pillar]# salt '*' saltutil.refresh_pillar
host2:
    True
host3:
    True
host1:
    True
[root@host1 pillar]# salt '*' pillar.item webserver
host2:
    ----------
    webserver:
        apache
host1:
    ----------
    webserver:
host3:
    ----------
    webserver:
        nginx
六.一些命令
[root@host2 pillar]# salt 'host3' service.get_all ##查看host3开启的所有服务


[root@host2 pillar]# salt 'host3' service.start nginx  ## 启动host3的nginx
[root@host2 pillar]# salt 'host3' service.stop nginx ## 关闭host3的nginx

[root@host2 ~]# salt-cp '*' /etc/passwd /tmp/     ##复制/etc/passwd 到所有节点/tmp下
[root@host2 ~]# salt '*' cmd.run 'rm -fr /tmp/passwd'   ##删除所有节点/tmp/passwd
[root@host2 ~]# salt '*' state.show_top  ##查看最近动过的服务
[root@host2 ~]# salt '*' state.single pkg.installed tree ##所有node安装tree
七.执行命令的查看,保存,执行结果状态
1.minion端会给master和数据库主机发份return
这里把数据库安装在host1上,你也可以装在其他主机上上不要紧
[root@host1 ~]# yum install mysql-server
[root@host1 ~]# /etc/init.d/mysqld start  ##启动数据库
[root@host1~]# mysql_secure_installation ##初始化设置密码westos
[root@host1 ~]# mysql -p < test.sql   ##把准备好的主句库导进去
Enter password: westos

[root@host1 ~]# mysql -p
Enter password: westos
mysql> grant all on salt.* to salt@'%'  identified by 'westos';    ##授权
其中一minion节点host2安装python-MYSQL模块,配置minion文件
[root@host2 ~]# yum install MySQL-python
[root@host2 ~]# vim /etc/salt/minion
####找对位置大概80?行,
#return: mysql
#
#return: mysql,slack,redis
#
#return:
#  - mysql
#  - hipchat
#  - slack

mysql.host: '172.25.254.1'
mysql.user: 'salt'
mysql.pass: 'westos'
mysql.db: 'salt'
mysql.port: '3306'
[root@host2 ~]# /etc/init.d/salt-minion restart
在master上执行条命令
[root@host1 pillar]# salt 'host2' test.ping --return mysql
登陆数据库查看,执行了两ping’命令
[root@host1 pillar]# mysql -h 172.25.254.1 -u salt -p
Enter password: westos
mysql> select * from salt.salt_returns;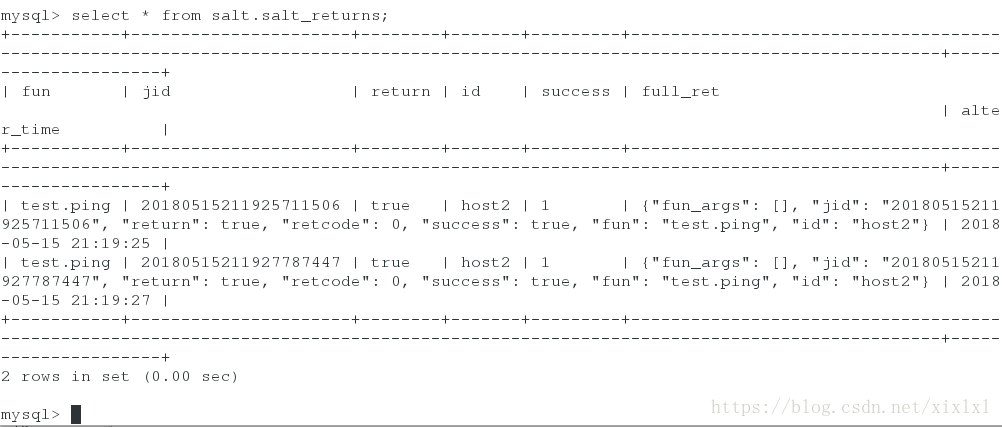
[root@host1 pillar]# salt-run jobs.list_jobs
##查看最近执行的命令
2.设置返还给master,不给数据库,由matser去发送给数据库
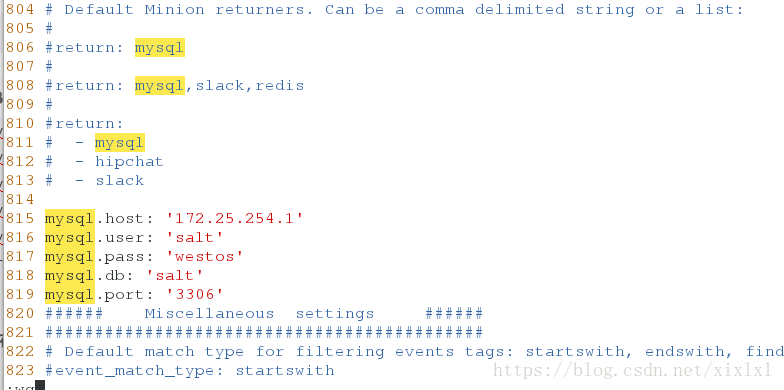
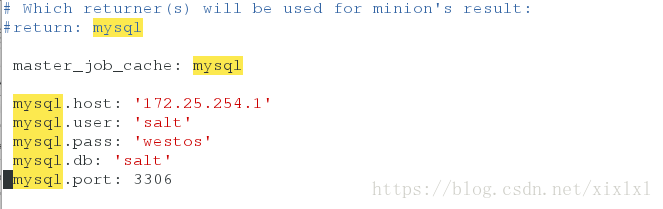
[root@host1 pillar]# vim /etc/salt/master
# Which returner(s) will be used for minion's result:
#return: mysql

master_job_cache: mysql

mysql.host: '172.25.254.1'
mysql.user: 'salt'
mysql.pass: 'westos'
mysql.db: 'salt'
mysql.port: 3306
[root@host1 pillar]# /etc/init.d/mysqld restart
因为上边这个写法导致无法重启salt-master服务,只好每行空一格,如下图得以启动服务,至于原因尚且不只
MySQL-python这个模块要装在master上
[root@host1 pillar]# yum install MySQL-python
[root@host1 pillar]# salt host3 cmd.run 'df -h'

[kiosk@foundation51 Desktop]$ mysql -h 172.25.254.1 -u salt -p
 登陆数据库查看
 MySQL [(none)]> select * from  salt.salt_returns;

[root@host1 pillar]# salt-run jobs.list_jobs
##查看最近执行的命令
八.自定义模块
编写自己的模块远程执行
[root@host1 pillar]# mkdir /srv/salt/_module
[root@host1 pillar]# cd /srv/salt/_modules  ##必须是这个名字_modules ,否则无法同步,不信你试试
[root@host1 _modules]# vim my_disk.py
#!/usr/bin/env python
def df():
   cmd = 'df -H'
   return  __salt__['cmd.run'](cmd)
同步这个模块到host3
[root@host1 _modules]# salt host3 saltutil.sync_modules
host3:
    - modules.my_disk
host3查看该模块
[root@host3 ~]# cd /var/cache/salt/minion/
[root@host3 minion]# tree .
.
├── accumulator
├── extmods
│   └── modules
│       ├── my_disk.py
│       └── my_disk.pyc
├── files
│   └── base
│       ├── _modules
│       │   └── my_disk.py    ##自定义模块在这里
│       ├── nginx
│       │   ├── files
│       │   │   ├── index.html
│       │   │   ├── nginx
│       │   │   ├── nginx-1.14.0.tar.gz
│       │   │   └── nginx.conf
│       │   ├── install.sls
│       │   └── service.sls
│       ├── pkgs
│       │   └── make.sls
│       ├── top.sls
│       └── user
│           └── adduser.sls
├── highstate.cache.p
├── module_refresh
├── proc
└── sls.p

11 directories, 15 files
执行同步过去的模块
[root@host1 _modules]# salt host3 my_disk.df
host3:
    Filesystem                    Size  Used Avail Use% Mounted on
    /dev/mapper/VolGroup-lv_root   20G  1.2G   18G   7% /
    tmpfs                         258M   50k  258M   1% /dev/shm
    /dev/sda1                     508M   35M  448M   8% /boot

九.jinja模块
这里实例httpd服务
1.简单设置
[root@host1 _modules]# cd /srv/salt/apache/
[root@host1 apache]# tree
.
├── files
│   └── httpd.conf
└── http.sls

1 directory, 2 files

调用jinja模块
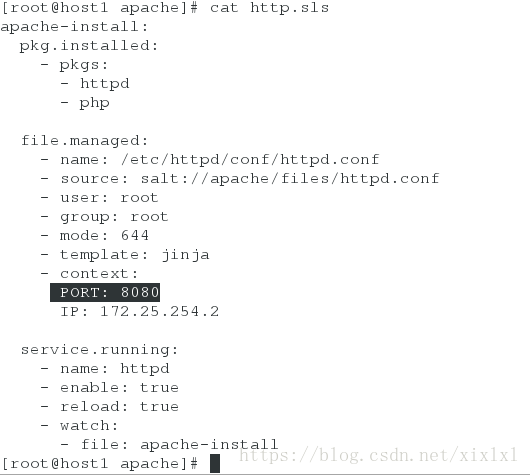
[root@host1 apache]# vim http.sls
  pkg.installed:
    - pkgs:
      - httpd
      - php

  file.managed:
    - name: /etc/httpd/conf/httpd.conf
    - source: salt://apache/files/httpd.conf
    - user: root
    - group: root
    - mode: 644
    - template: jinja    ##这里,here
    - context:
      PORT: 8080
      IP: 172.25.254.2

  service.running:
    - name: httpd
    - enable: true
    - reload: true
    - watch:
      - file: apache-install
配置文件引用
[root@host1 apache]# vim files/httpd.conf
... ##省略多行
Listen {{ IP }}:{{ PORT }} ##就这行引用,固定格式
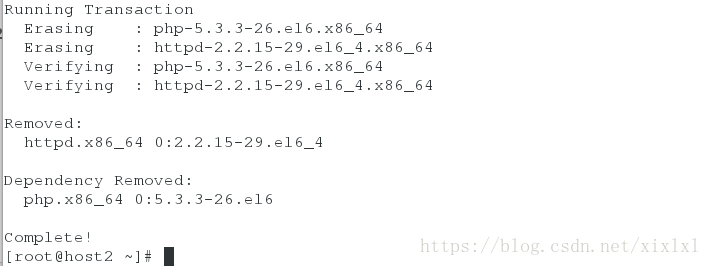
... ##省略多行为了实验效果,直接removehttpd从host2上
[root@host2 ~]# yum remove httpd

要变身了,推送
[root@host1 apache]# salt host2 state.sls apache.http
...
-Listen 80
+Listen 172.25.254.2:8080   ##这里实现了引用

....
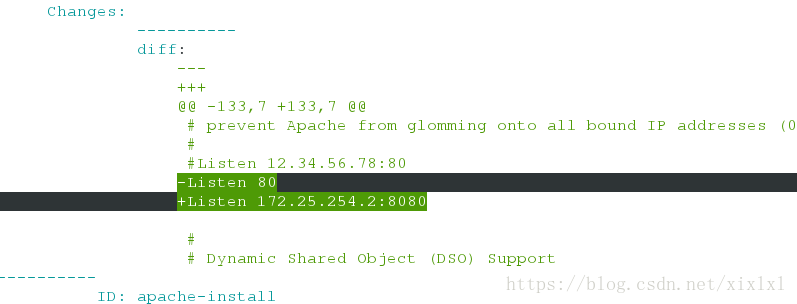
host3查看下8080端口
ss -antlpp
或者netstat -antlpp
ps ax 查看进程
2.全局引用(优先级高)
[root@host1 apache]# pwd
/srv/salt/apache
[root@host1 apache]# vim files/lib.sls
{% set PORT= 80 %}
{% set IP = '172.25.10.2' %}
[root@host1 apache]# tree .
.
├── files
│   ├── httpd.conf
│   └── lib.sls
└── http.sls
1 directory, 3 files
http主配置文件
[root@host1 apache]# vim files/httpd.conf
{% from 'apache/files/lib.sls' import PORT with context %}  ##写在第一行第一行
...    ##省略
Listen {{ IP }}:{{ PORT }}
...    ##省略
注意哦,lib.sls文件中定义的是80端口,而http.sls中是80,这次不关也不些在之前推送过去的host2的httpd服务,直接推送
推送
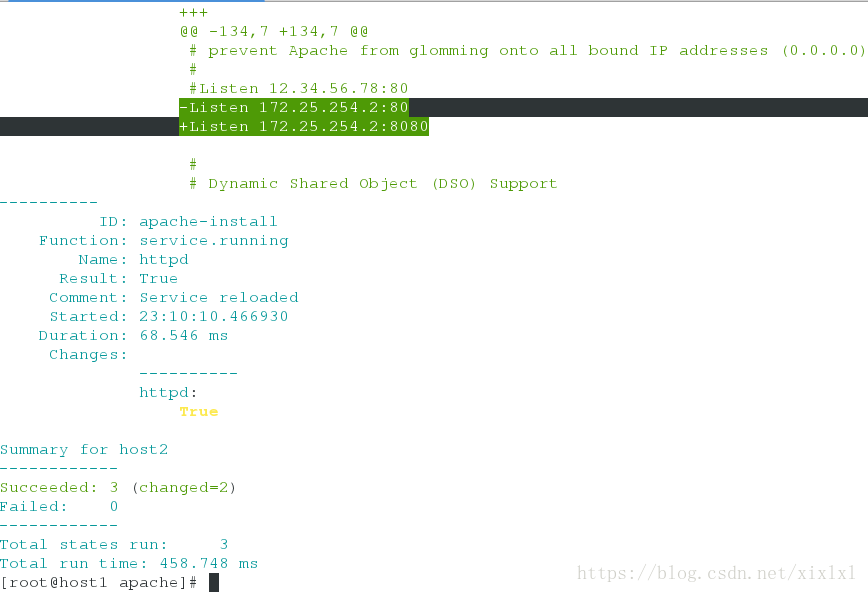
[root@host1 apache]# salt host2 state.sls apache.http
...
-Listen 172.25.254.2:8080
+Listen 172.25.254.2:80   ##变过来了
...
host2查看下端口
[root@host2 ~]# ss -antpp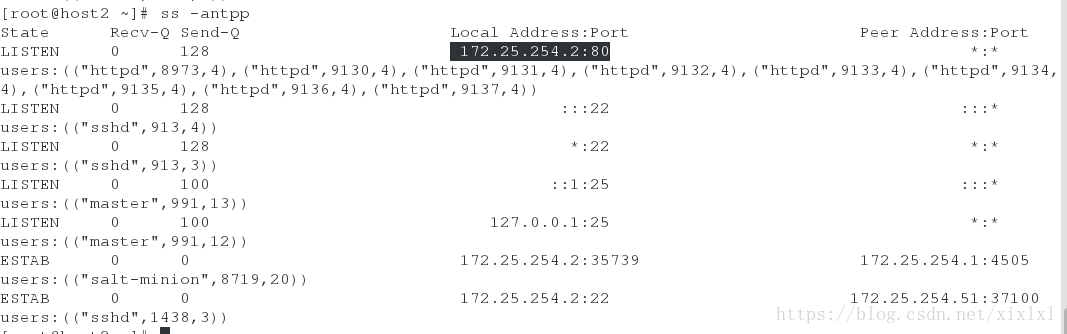
3.变量的定义静态grain
[root@host1 apache]# vim  files/httpd.conf
{% from 'apache/files/lib.sls' import test with context %}  ##写在第一行,全局
...
Listen {{ grains['ipv4'][1] }}:{{ PORT }}  ##这种格式
...

之前用的80端口,这里该为8080
[root@host1 apache]# vim  files/lib.sls
{% set PORT= 8080 %}
{% set IP = '172.25.10.2' %}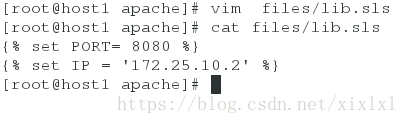
推送
[root@host1 apache]# salt host2 state.sls apache.http
 ...
-Listen 172.25.254.2:80
+Listen 172.25.254.2:8080
 ...
host3查看

4变量的定义动态参数pillar
/srv/pillar/web/server.sls
[root@host1 apache]# vim /srv/pillar/web/server.sls

{% if grains['fqdn'] == 'host2' %}
webserver: apache
IP: 172.25.254.2
PORT: 80
{% elif grains['fqdn'] == 'host3' %}
webserver: nginx
IP: 172.25.10.3
PORT: 8080
{% endif %}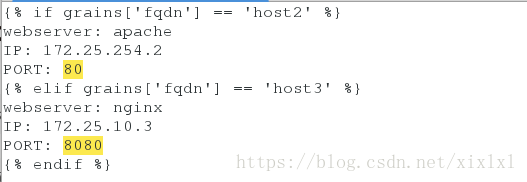
/srv/salt/apache/files/httpd.conf
[root@host1 apache]# vim /srv/salt/apache/files/httpd.conf
 1 {% from 'apache/files/lib.sls' import PORT with context %}
...
137 Listen {{ pillar['IP'] }}:{{ pillar['PORT'] }}
...

推送
[root@host1 apache]# salt host2 state.sls apache.http
host3查看端口为80

5.变量的另一种定义
[root@host1 apache]# ls
files http.sls
[root@host1 apache]# pwd
/srv/salt/apache
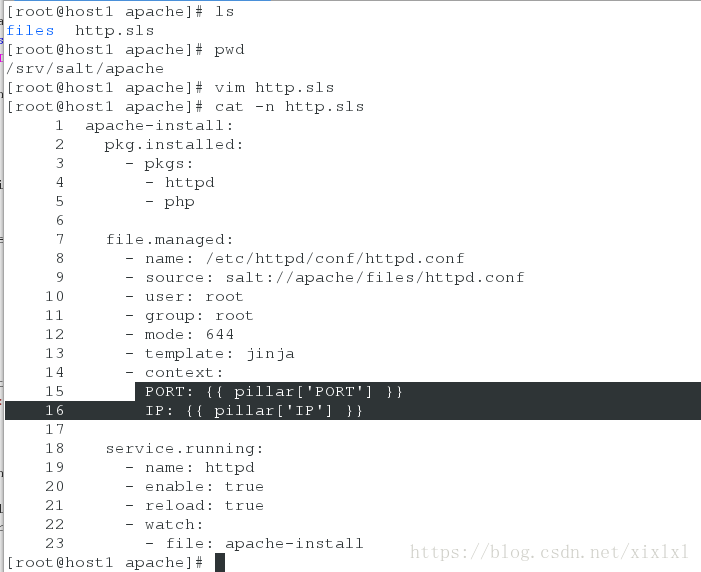
[root@host1 apache]# vim http.sls
apache-install:
pkg.installed:
- pkgs:
- httpd
- php
file.managed:
- name: /etc/httpd/conf/httpd.conf
- source: salt://apache/files/httpd.conf
- user: root
- group: root
- mode: 644
- template: jinja
- context:
PORT: {{ pillar['PORT'] }}
IP: {{ pillar['IP'] }}
service.running:
- name: httpd
- enable: true
- reload: true
- watch:
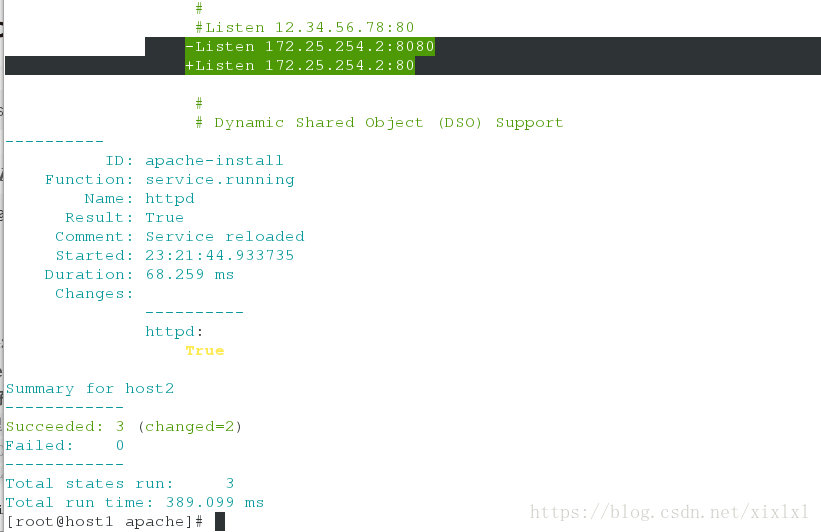
- file: apache-install如下图
推送,事实上这个时候files/http.conf的第一行定义已经无关紧要了,当你变动/srv/pillar/web/server.sls里边的参数时,推送会随之改变
[root@host1 apache]# salt host2 state.sls apache.http
九.源码包推送keepalived
[root@host1 salt]# mkdir keepalived
[root@host1 salt]# cd keepalived/
[root@host1 keepalived]# mkdir files
[root@host1 keepalived]# mv /root/keepalived-1.4.3.tar.gz files/
[root@host1 keepalived]# vim install.sls
{% set version = '1.4.3' %}

keepalived-install:
  file.managed:
    - name: /mnt/keepalived-{{version}}.tar.gz
    - source: salt://keepalived/files/keepalived-{{version}}.tar.gz

  cmd.run:
    - name: cd /mnt && yum install gcc  openssl-devel  -y &>/dev/null && tar zxf keepalived-{{version}}.tar.gz && cd keepalived-{{version}} && ./configure --prefix=/usr/local/keepalived --with-init=SYSV &>/dev/null && make &>/dev/null && make install &>/dev/null
    - creates: /usr/local/keepalived
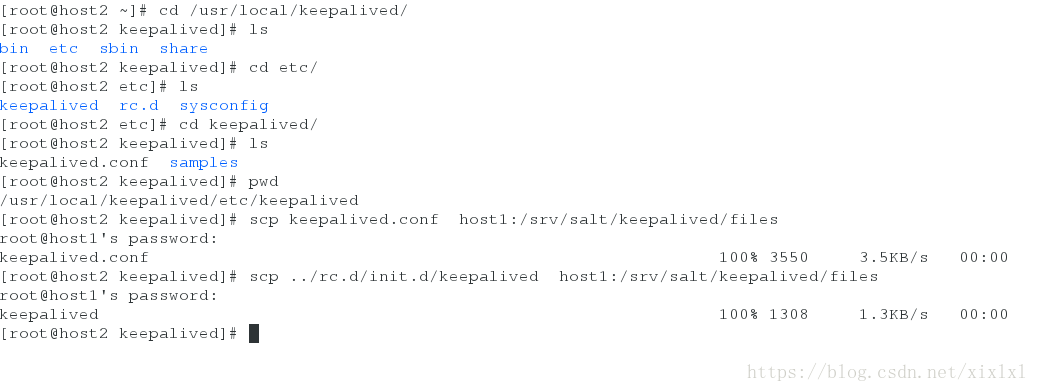
salt host2 state.sls keepalived.install先推送过去检查是否有问题,获取配置文件
scp /usr/local/keepalived/etc/keepalived/keepalived.conf host1:/srv/salt/keepalived/files ##配置文件
scp /usr/local/keepalived/etc /rc.d/init.d/keepalived host1:/srv/salt/keepalived/files ##脚本
接着继续写install.sls
[root@host1 keepalived]# vim install.sls
{% set version = '1.4.3' %}

keepalived-install:
  file.managed:
    - name: /mnt/keepalived-{{version}}.tar.gz
    - source: salt://keepalived/files/keepalived-{{version}}.tar.gz

  cmd.run:
    - name: cd /mnt && yum install gcc  openssl-devel  -y &>/dev/null && tar zxf keepalived-{{version}}.tar.gz && cd keepalived-{{version}} && ./configure --prefix=/usr/local/keepalived --with-init=SYSV &>/dev/null && make &>/dev/null && make install &>/dev/null
    - creates: /usr/local/keepalived

/etc/keepalived:
  file.directory:
    - mode: 755

/etc/sysconfig/keepalived:
  file.symlink:
    - target: /usr/local/keepalived/etc/sysconfig/keepalived

/sbin/keepalived:
  file.symlink:
    - target: /usr/local/keepalived/sbin/keepalived

/etc/init.d/keepalived:
  file.managed:
    - source: salt://keepalived/files/keepalived
    - mode: 755
~
编写keepalived.conf
只是简单的高可用,并没有配置负载均衡
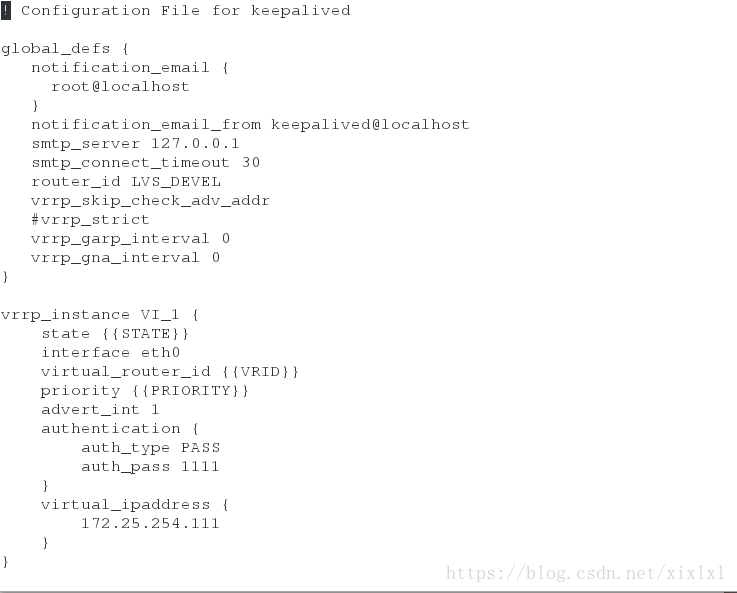
[root@host1 keepalived]# vim files/keepalived.conf
! Configuration File for keepalived

global_defs {
   notification_email {
     root@localhost
   }
   notification_email_from keepalived@localhost
   smtp_server 127.0.0.1
   smtp_connect_timeout 30
   router_id LVS_DEVEL
   vrrp_skip_check_adv_addr
   #vrrp_strict
   vrrp_garp_interval 0
   vrrp_gna_interval 0
}

vrrp_instance VI_1 {
    state {{STATE}}
    interface eth0
    virtual_router_id {{VRID}}
    priority {{PRIORITY}}
    advert_int 1
    authentication {
        auth_type PASS
        auth_pass 1111
    }
    virtual_ipaddress {
        172.25.254.111
    }
}
静态参数
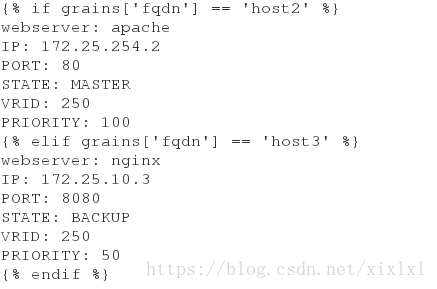
[root@host1 keepalived]# vim /srv/pillar/web/server.sls
{% if grains['fqdn'] == 'host2' %}
webserver: apache
IP: 172.25.254.2
PORT: 80
STATE: MASTER
VRID: 250
PRIORITY: 100
{% elif grains['fqdn'] == 'host3' %}
webserver: nginx
IP: 172.25.10.3
PORT: 8080
STATE: BACKUP
VRID: 250
PRIORITY: 50
{% endif %}
编写启动文件
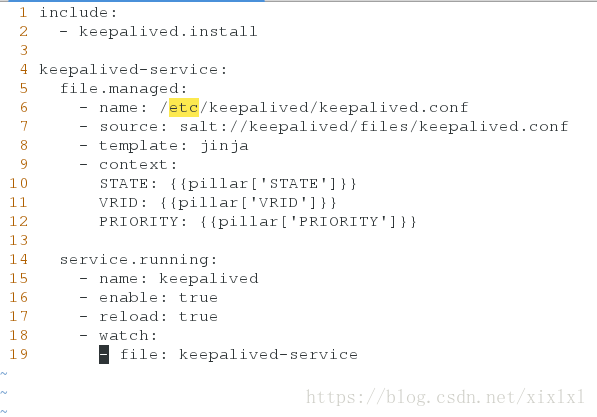
[root@host1 keepalived]# vim  server.sls

include:
  - keepalived.install

keepalived-service:
  file.managed:
    - name: /etc/keepalived/keepalived.conf
    - source: salt://keepalived/files/keepalived.conf
    - template: jinja
    - context:
      STATE: {{pillar['STATE']}}
      VRID: {{pillar['VRID']}}
      PRIORITY: {{pillar['PRIORITY']}}

  service.running:
    - name: keepalived
    - enable: true
    - reload: true
    - watch:
      - file: keepalived-service
编写批量推送文件
[root@host1 keepalived]# cd ..
[root@host1 salt]# pwd
/srv/salt
[root@host1 salt]# ls
apache  haproxy  keepalived  _modules  nginx  pkgs  top.sls  user
[root@host1 salt]# vim top.sls
base:
  'host2':
    - keepalived.server
  'host3':
    - keepalived.server

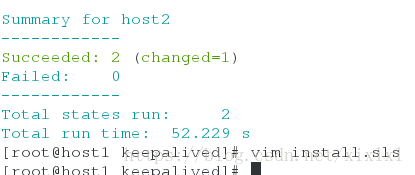
批量推送,
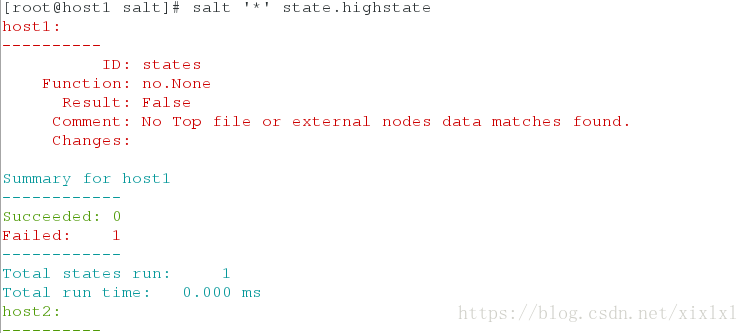
root@host1 salt]# salt '*' state.highstate
期间会报错host1失败,没关系,top.sls里边就没定义host1推什么,主机多的话可以使用正则:比如:
salt host[2-3] state.highstate
salt host[2,3] state.highstate等

回头检查下,ps ax 查看host2进程keepalived启动,因为它为master,vip自然在它那;同样host3进程中也有keepalived,ok实验成功

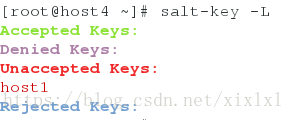
十.Salt Syndic,syndic的意思为理事,其实如果叫salt-proxy的话那就更好理解了,它就是一层代理,如同zabbix proxy功能一样,隔离master与minion,使其不需要通讯,只需要与syndic都通讯就可以,这样的话就可以在跨机房的时候将架构清晰部署了
基于上述实验:salt-matser为host1,salt-minion为host2和host3,salt为top-master
[root@host1 ~]# /etc/init.d/salt-minion stop
[root@host1 ~]# chkconfig salt-minion off
[root@host1 ~]# salt-key -d host1
[root@host1 ~]# salt-key -L
安装salt-syndic
[root@host1 ~]# yum install salt-syndic -y
##一般salt-syndic部署在salt-master上
[root@host1 ~]# yum install salt-syndic -y
配置master文件指向top-master
[root@host1 ~]# vim /etc/salt/master
862 syndic_master: 172.25.254.4
[root@host1 ~]# /etc/init.d/salt-master restart
top-master安装salt-master(host4:ip 172.25.254.4)
[root@host4 ~]# yum install salt-master -y

[root@host4 ~]# vim /etc/salt/master
 534 file_roots:
 535   base:
 536     - /srv/salt

 694 pillar_roots:
 695   base:
 696     - /srv/pillar

 858 order_masters: True
[root@host4 ~]# /etc/init.d/salt-master start
top-master关联host1
如果不显示host1,重启host1的salt-master和salt-syndic服务
[root@host4 ~]# salt-key -L
Accepted Keys:
Denied Keys:
Unaccepted Keys:
host1
Rejected Keys:
添加host1
[root@host4 ~]# salt-key -a host1
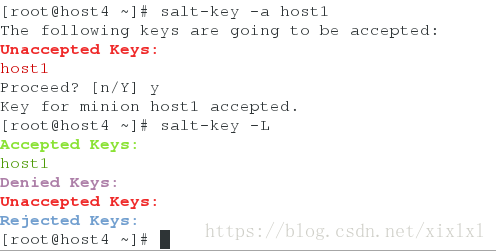
host4测试一下
这里有坑,ping如果告诉你没反映,重启host1的salt-master和salt-syndic服务,注意报错,可能需要reboot,完成后还没响应,尝试用host1去平两台minion,如果不同,重启两个minion结点的的salt-minion服务
[root@host4 ~]# salt '*'  test.ping
host2:
    True
host3:
    True
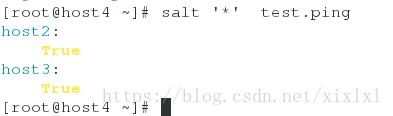
这个时候可以执行任务了比如
[root@host4 ~]# salt '*' cmd.run df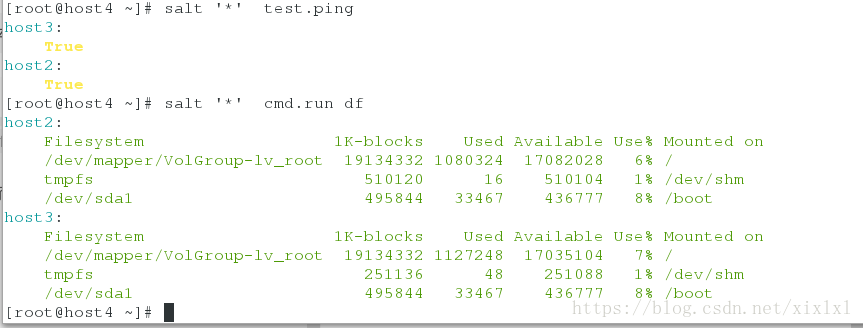
十二:salt-ssh串行
host1安装salt-ssh
[root@host1 ~]# yum install salt-ssh -y

[root@host1 ~]# vim /etc/salt/roster

host2:
  host: 172.25.254.2
  user: root
  passwd: redhat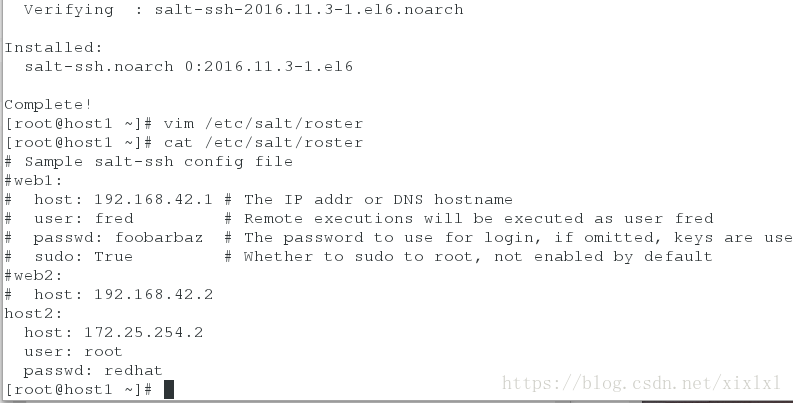
完成后直接测试
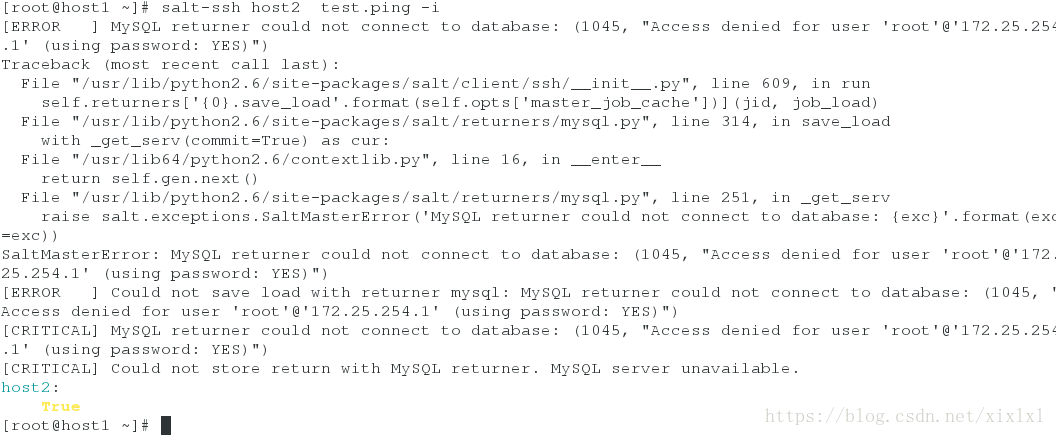
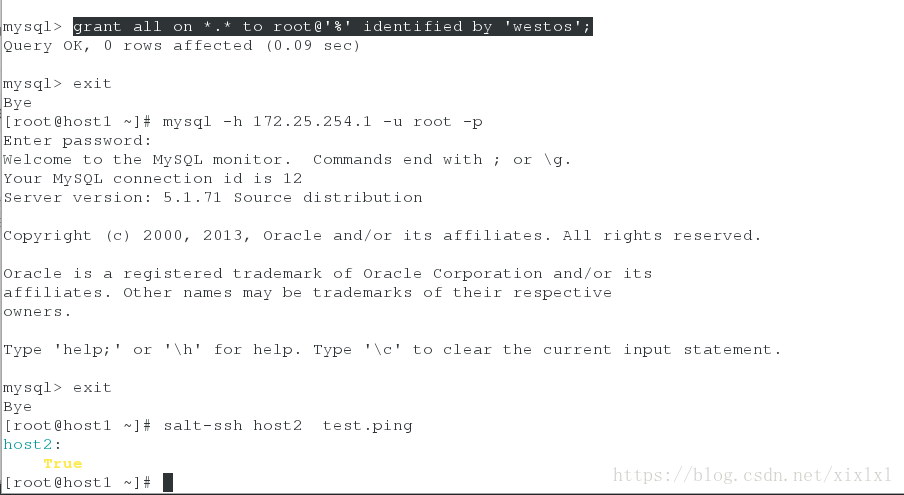
[root@host1 ~]# salt-ssh host2 test.ping -i
成功了,但是你会看见很多报错,别忘记了master文件里边配置了数据库,而数据库链接不到,要么注释掉数据库参数,要么启用数据库并且给root授权远程登陆,-i非交互式
十三.api
安装api服务
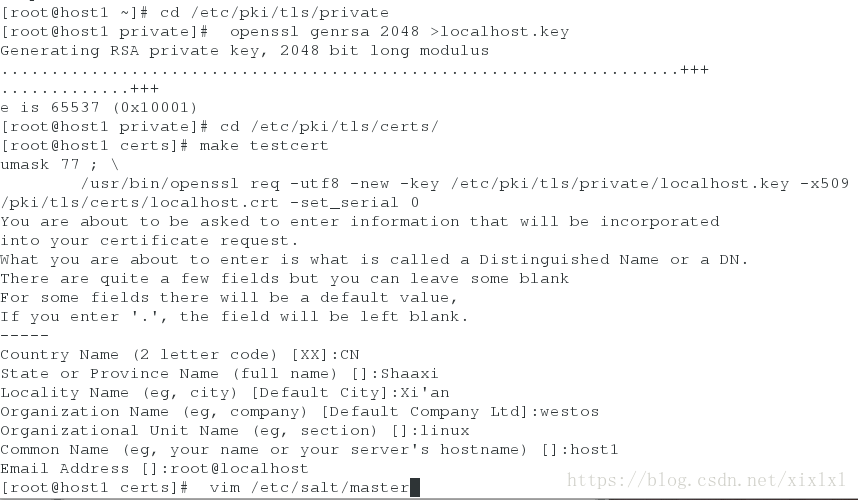
[root@host1 ~]# yum install salt-api -y
[root@host1 ~]# cd /etc/pki/tls/private
[root@host1 private]# openssl genrsa 2048 >localhost.key
[root@host1 private]# cd /etc/pki/tls/certs/
[root@host1 certs]# make testcert  ##填写各种信息
    Country Name (2 letter code) [XX]:CN
    State or Province Name (full name) []:Shaaxi
    Locality Name (eg, city) [Default City]:Xi'an
    Organization Name (eg, company) [Default Company Ltd]:westos
    Organizational Unit Name (eg, section) []:linux
    Common Name (eg, your name or your server's hostname) []:host1
    Email Address []:root@localhost
完成后主配置文件修改
[root@host1 certs]#  vim /etc/salt/master
12 default_include: master.d/*.conf   ##取消注释
[root@host1 certs]# /etc/init.d/salt-master restart

添加用户设置密码westos
[root@host1 master.d]# useradd  saltapi
[root@host1 master.d]# passwd saltapi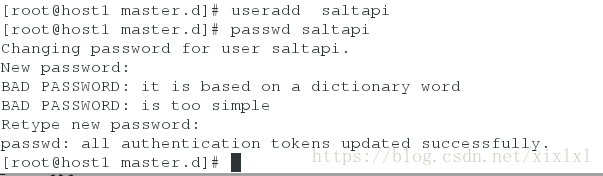
编写认证文件
[root@host1 certs]# cd /etc/salt/master.d/
[root@host1 master.d]# vim eauth.conf

external_auth:
  pam:
    saltapi:
      - .*
      - '@wheel'
      - '@runner'
      - '@jobs'
[root@host1 master.d]# vim api.conf
rest_cherrypy:
  host: 172.25.254.1
  port: 8000
  ssl_crt: /etc/pki/tls/certs/localhost.crt
  ssl_key: /etc/pki/tls/private/localhost.key
[root@host1 master.d]# /etc/init.d/salt-api start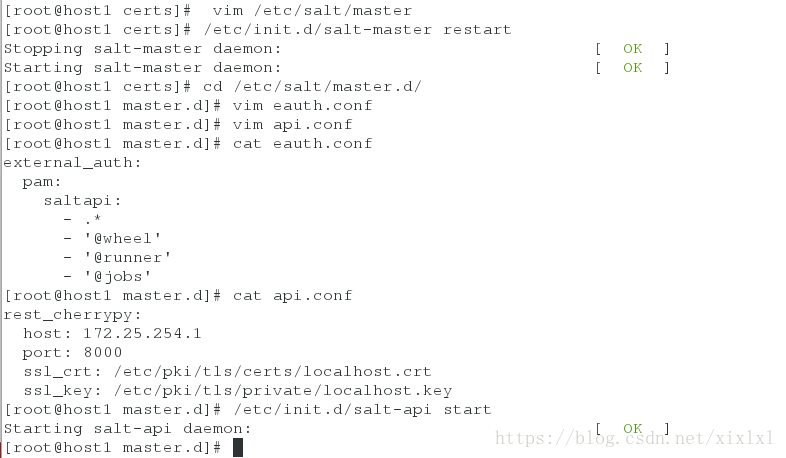
查看下api端口8000要开启
[root@host1 master.d]# netstat -anltpp接着获取token’
[root@host1 master.d]# curl -sSk https://172.25.254.1:8000/login -H 'Accept: application/x-yaml' -d username=saltapi -d password=westos -d eauth=pam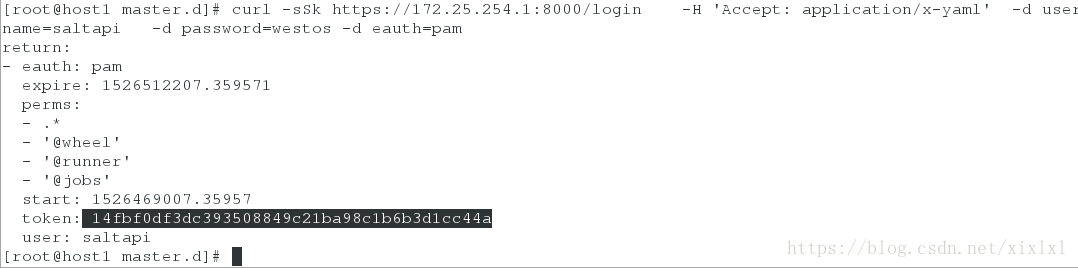
测试
[root@host1 master.d]# curl -sSk https://172.25.254.1:8000  -H 'Accept: application/x-yaml'  -H 'X-Auth-Token: 14fbf0df3dc393508849c21ba98c1b6b3d1cc44a' -d client=local -d tgt='*' -d fun=test.ping
return:
- host2: true
  host3: true

写各api接口脚本
[root@host1 ~]# vim  saltapi.py
#!/usr/bin/env python
# -*- coding: utf-8 -*-

import urllib2,urllib
import time

try:
    import json
except ImportError:
    import simplejson as json

class SaltAPI(object):
    __token_id = ''
    def __init__(self,url,username,password):
        self.__url = url.rstrip('/')
        self.__user = username
        self.__password = password

    def token_id(self):
        ''' user login and get token id '''
        params = {'eauth': 'pam', 'username': self.__user, 'password': self.__password}
        encode = urllib.urlencode(params)
        obj = urllib.unquote(encode)
        content = self.postRequest(obj,prefix='/login')
    try:
            self.__token_id = content['return'][0]['token']
        except KeyError:
            raise KeyError

    def postRequest(self,obj,prefix='/'):
        url = self.__url + prefix
        headers = {'X-Auth-Token'   : self.__token_id}
        req = urllib2.Request(url, obj, headers)
        opener = urllib2.urlopen(req)
        content = json.loads(opener.read())
        return content

    def list_all_key(self):
        params = {'client': 'wheel', 'fun': 'key.list_all'}
        obj = urllib.urlencode(params)
        self.token_id()
        content = self.postRequest(obj)
        minions = content['return'][0]['data']['return']['minions']
        minions_pre = content['return'][0]['data']['return']['minions_pre']
        return minions,minions_pre

    def delete_key(self,node_name):
        params = {'client': 'wheel', 'fun': 'key.delete', 'match': node_name}
        obj = urllib.urlencode(params)
        self.token_id()
        content = self.postRequest(obj)
        ret = content['return'][0]['data']['success']
        return ret

    def accept_key(self,node_name):
        params = {'client': 'wheel', 'fun': 'key.accept', 'match': node_name}
        obj = urllib.urlencode(params)
        self.token_id()
        content = self.postRequest(obj)
        ret = content['return'][0]['data']['success']
        return ret

    def remote_noarg_execution(self,tgt,fun):
        ''' Execute commands without parameters '''
        params = {'client': 'local', 'tgt': tgt, 'fun': fun}
        obj = urllib.urlencode(params)
        self.token_id()
        content = self.postRequest(obj)
        ret = content['return'][0][tgt]
        return ret

    def remote_execution(self,tgt,fun,arg):
        ''' Command execution with parameters '''
        params = {'client': 'local', 'tgt': tgt, 'fun': fun, 'arg': arg}
        obj = urllib.urlencode(params)
        self.token_id()
        content = self.postRequest(obj)
        ret = content['return'][0][tgt]
        return ret

    def target_remote_execution(self,tgt,fun,arg):
        ''' Use targeting for remote execution '''
        params = {'client': 'local', 'tgt': tgt, 'fun': fun, 'arg': arg, 'expr_form': 'nodegroup'}
        obj = urllib.urlencode(params)
        self.token_id()
        content = self.postRequest(obj)
        jid = content['return'][0]['jid']
        return jid

    def deploy(self,tgt,arg):
        ''' Module deployment '''
        params = {'client': 'local', 'tgt': tgt, 'fun': 'state.sls', 'arg': arg}
        obj = urllib.urlencode(params)
        self.token_id()
        content = self.postRequest(obj)
        return content

    def async_deploy(self,tgt,arg):
        ''' Asynchronously send a command to connected minions '''
        params = {'client': 'local_async', 'tgt': tgt, 'fun': 'state.sls', 'arg': arg}
        obj = urllib.urlencode(params)
        self.token_id()
        content = self.postRequest(obj)
        jid = content['return'][0]['jid']
        return jid

    def target_deploy(self,tgt,arg):
        ''' Based on the node group forms deployment '''
        params = {'client': 'local_async', 'tgt': tgt, 'fun': 'state.sls', 'arg': arg, 'expr_form': 'nodegroup'}
        obj = urllib.urlencode(params)
        self.token_id()
        content = self.postRequest(obj)
        jid = content['return'][0]['jid']
        return jid

def main():
    sapi = SaltAPI(url='https://172.25.254.1:8000',username='saltapi',password='westos')
    sapi.token_id()
    print sapi.list_all_key()   ##测试
    #sapi.delete_key('test-01')  ##删除key
    #sapi.accept_key('test-01') ##添加key
    #sapi.deploy('*','apache.http')  ##推送
    #print sapi.remote_noarg_execution('test-01','grains.items')

if __name__ == '__main__':
    main()
执行上边的脚本,注意x权限
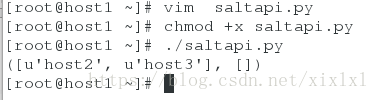
给host2退送http服务
修改脚本如下图
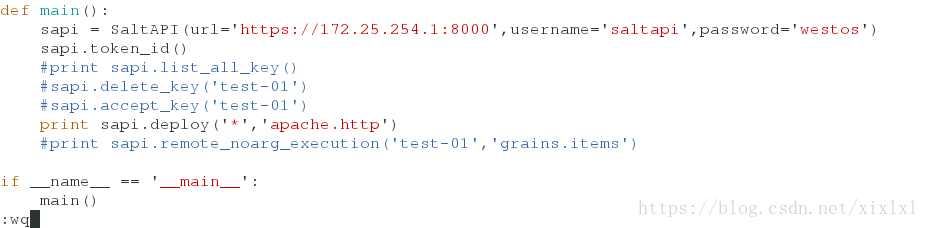
执行./saltapi.py
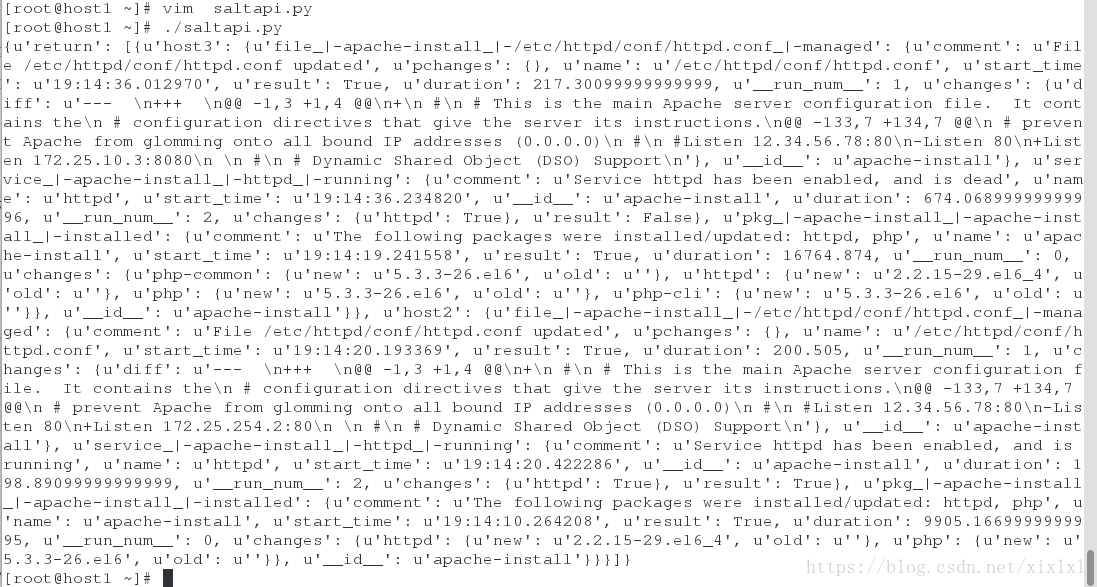
去host2上看看