标签(空格分隔): Java Spring Mybatis
作者 : Maxchen
版本 : V1.0.0
日期 : 2020/3/19
目录
1. 简介
1.1 Hutool工具类库简介
这里引用一下官方对它的介绍:Hutool是一个精简全面的Java工具类库,通过静态方法封装,降低相关API的学习成本,提高工作效率,使Java拥有函数式语言般的优雅。
Hutool中的工具方法来自于每个开源贡献者的精雕细琢,它涵盖了Java开发底层代码中的方方面面,它既是大型项目开发中解决小问题的利器,也是小型项目中的效率担当;
Hutool是项目中util包友好的替代,它节省了开发人员对项目中公用类和公用工具方法的封装时间,使开发专注于业务,同时可以最大限度的避免封装不完善带来的bug。
以计算MD5为例:
【以前】打开搜索引擎 -> 搜“Java MD5加密” -> 打开某篇博客-> 复制粘贴 -> 改改好用
【现在】引入Hutool -> SecureUtil.md5()
Hutool的存在就是为了减少代码搜索成本,避免网络上参差不齐的代码出现导致的bug。具体使用访问https://gitee.com/loolly/hutool
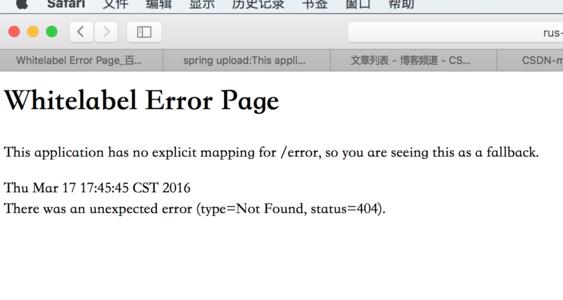
1.2 SpringBoot异常处理简介
SpringBoot 默认的处理异常的机制:SpringBoot 默认的已经提供了一套处理异常的机制。 一旦程序中出现了异常 SpringBoot 会像/error 的 url 发送请求。在 SpringBoot 中提供了一个 叫 BasicExceptionController 来处理/error 请求,然后跳转到默认显示异常的页面来展示异常信息。
默认错误页面:

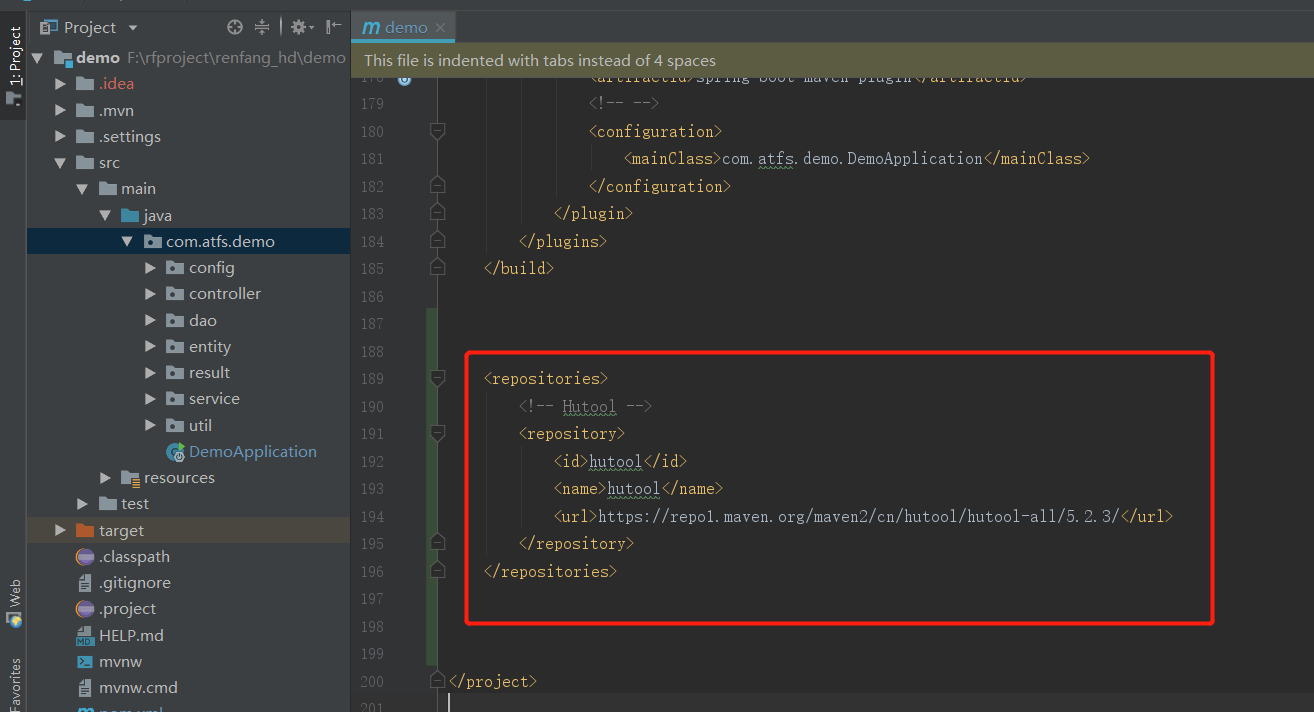
2. maven项目集成Hutool
第一步: 增加Hutool的maven源
	<repositories>
		<!-- Hutool -->
		<repository>
			<id>hutool</id>
			<name>hutool</name>
			<url>https://repo1.maven.org/maven2/cn/hutool/hutool-all/5.2.3/</url>
		</repository>
	</repositories>
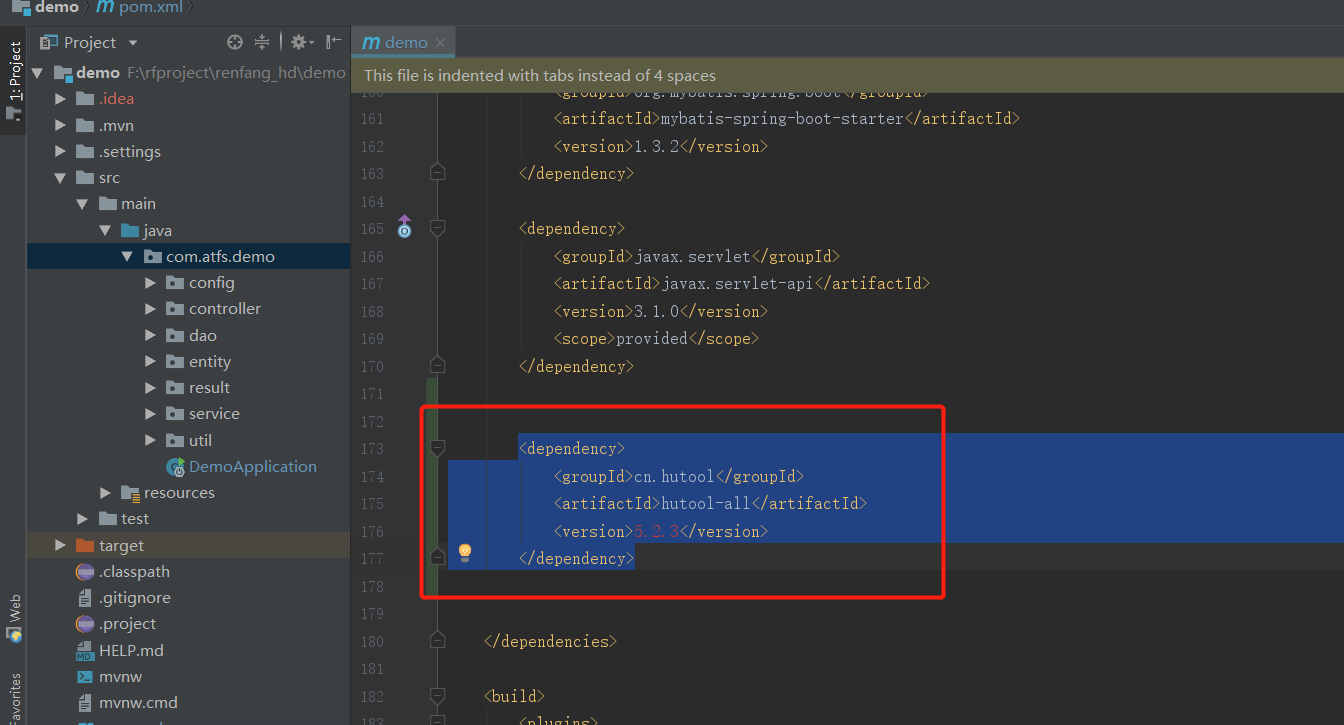
第二步: 添加Hutool依赖
<dependency>
    <groupId>cn.hutool</groupId>
    <artifactId>hutool-all</artifactId>
    <version>5.2.3</version>
</dependency>
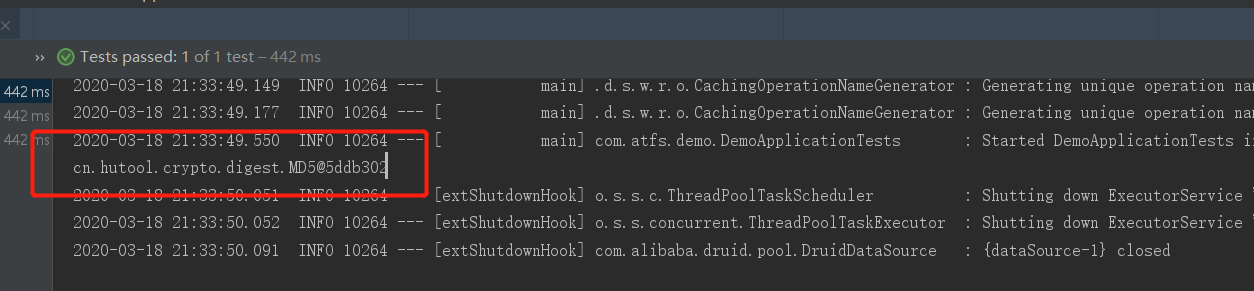
第三步: 测试Hutool
package com.atfs.demo;

import cn.hutool.crypto.SecureUtil;
import org.junit.jupiter.api.Test;
import org.springframework.boot.test.context.SpringBootTest;

@SpringBootTest
class DemoApplicationTests {

	//测试Hutool
	@Test
	void hutoolTest(){
		System.out.println(SecureUtil.md5());
	}

}
如果打印以下信息表明集成Hutool成功
3. 基于开源工具改造代码
3.1 MD5工具类改造
旧代码:
User user = loginService.login(username, MD5.getmd5(password));
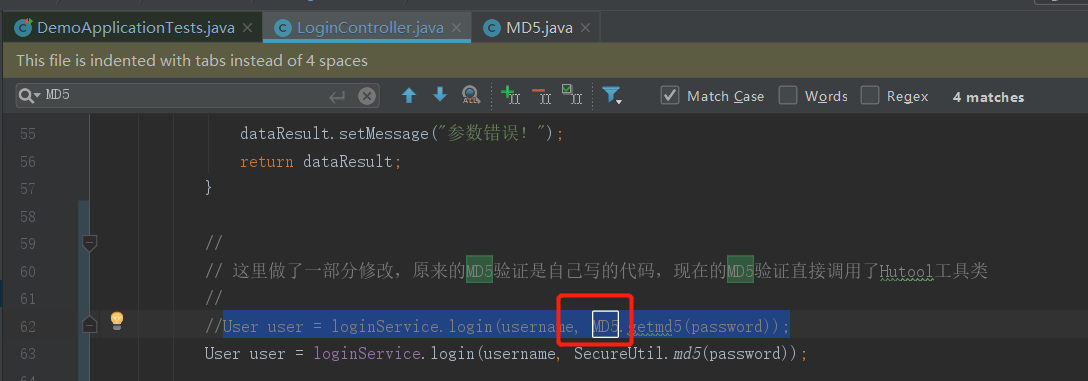
新代码:
//
// 这里做了一部分修改,原来的MD5验证是自己写的代码,现在的MD5验证直接调用了Hutool工具类
//
//User user = loginService.login(username, MD5.getmd5(password));
User user = loginService.login(username, SecureUtil.md5(password));
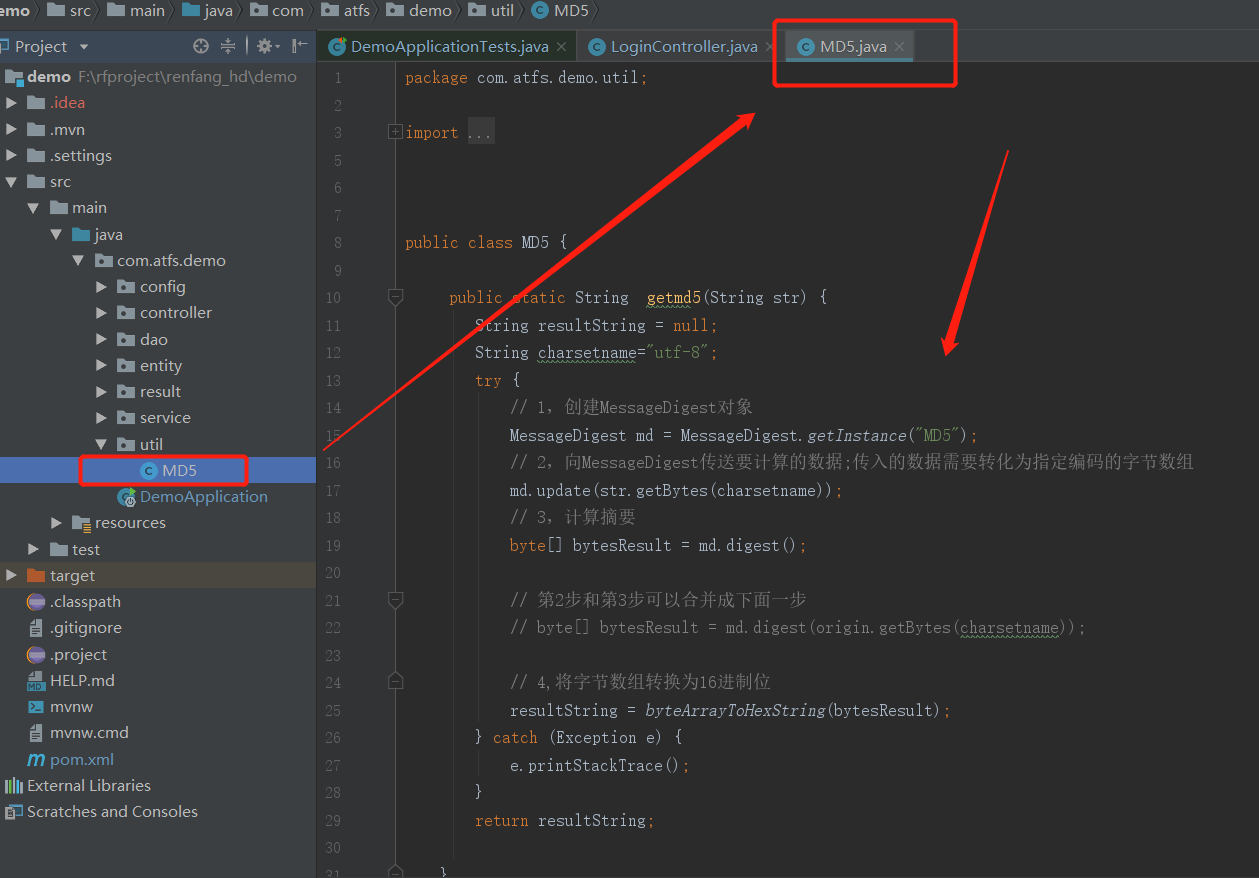
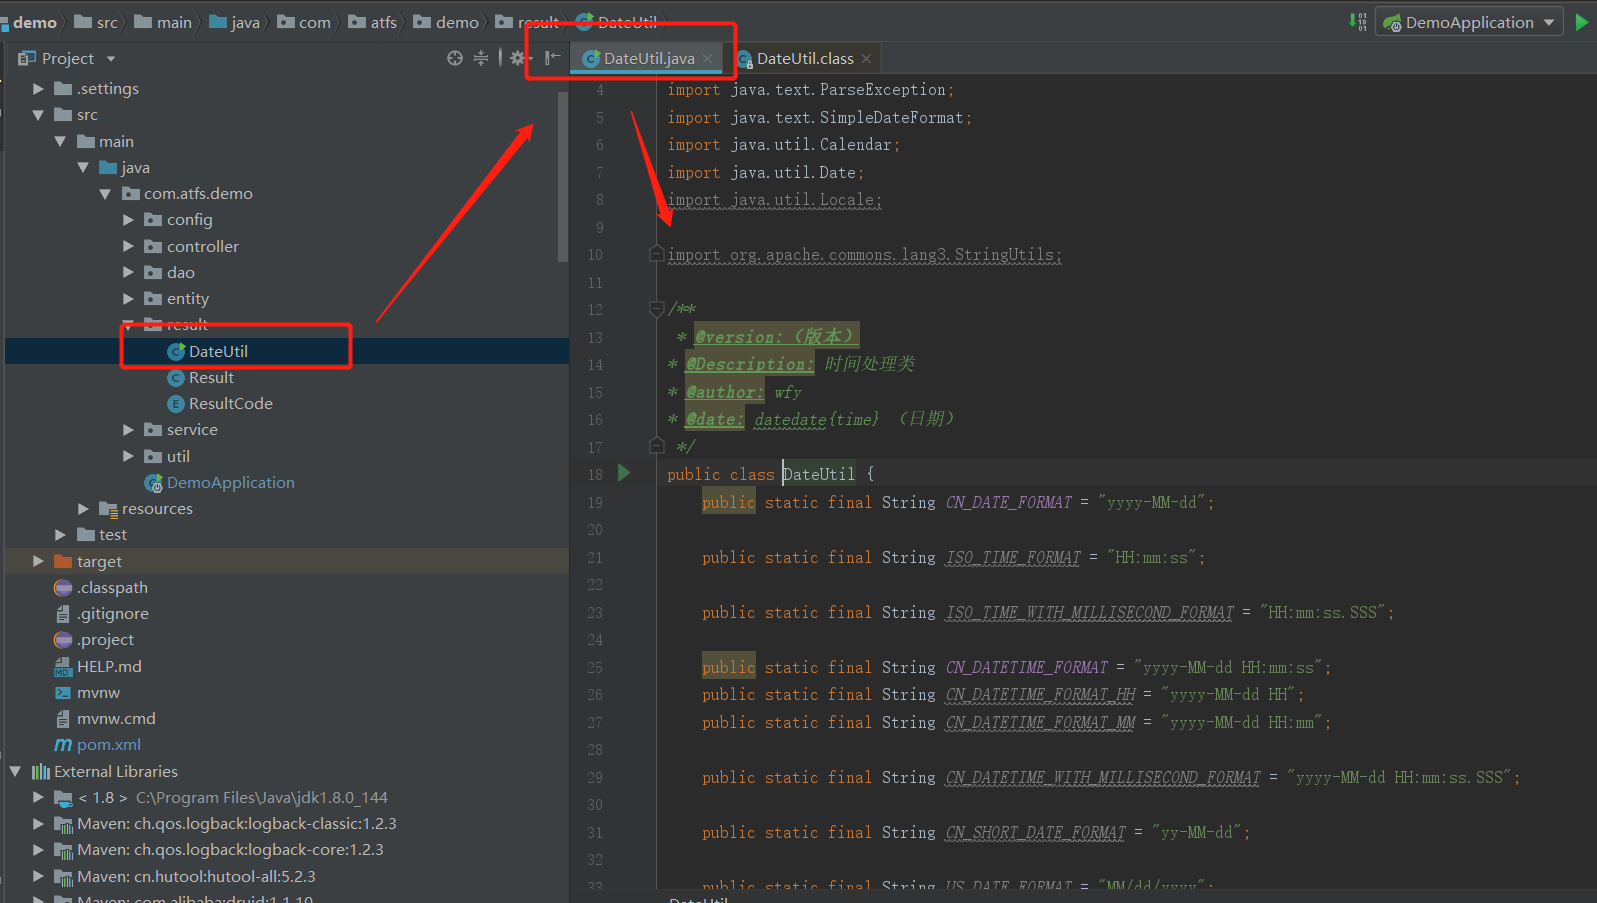
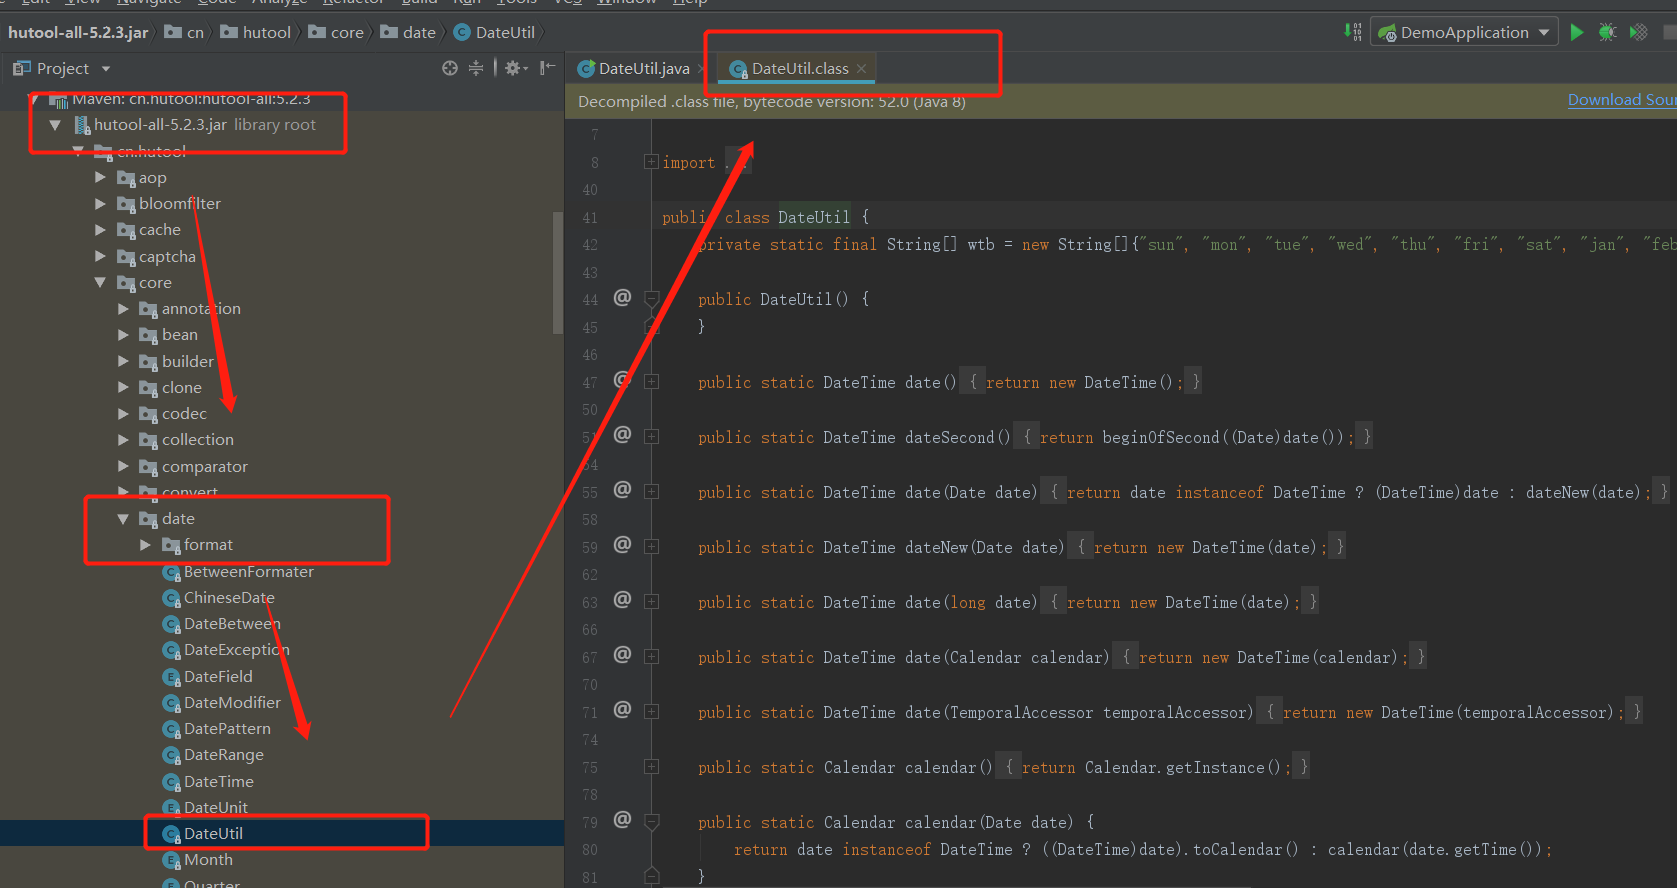
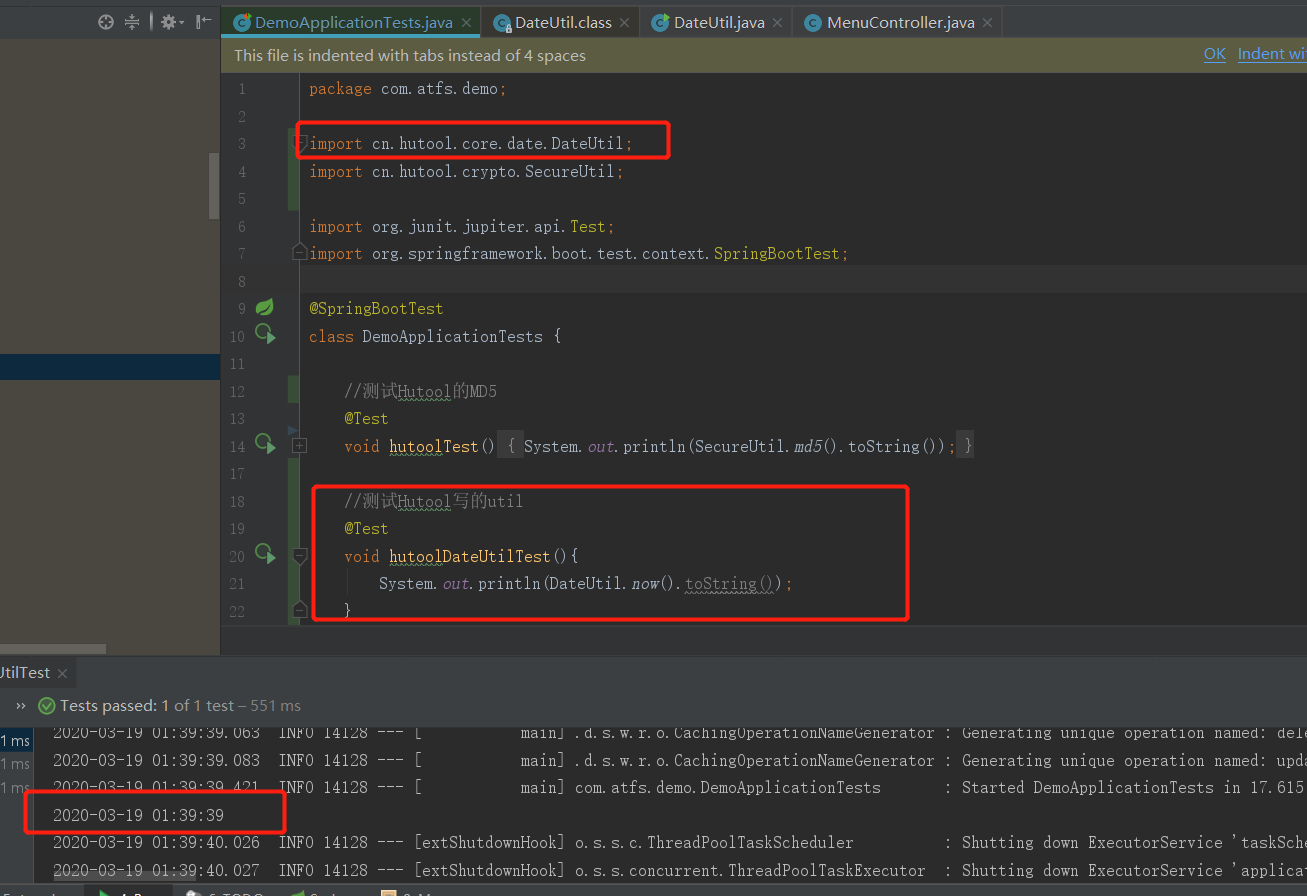
3.2 DateUtil工具类改造
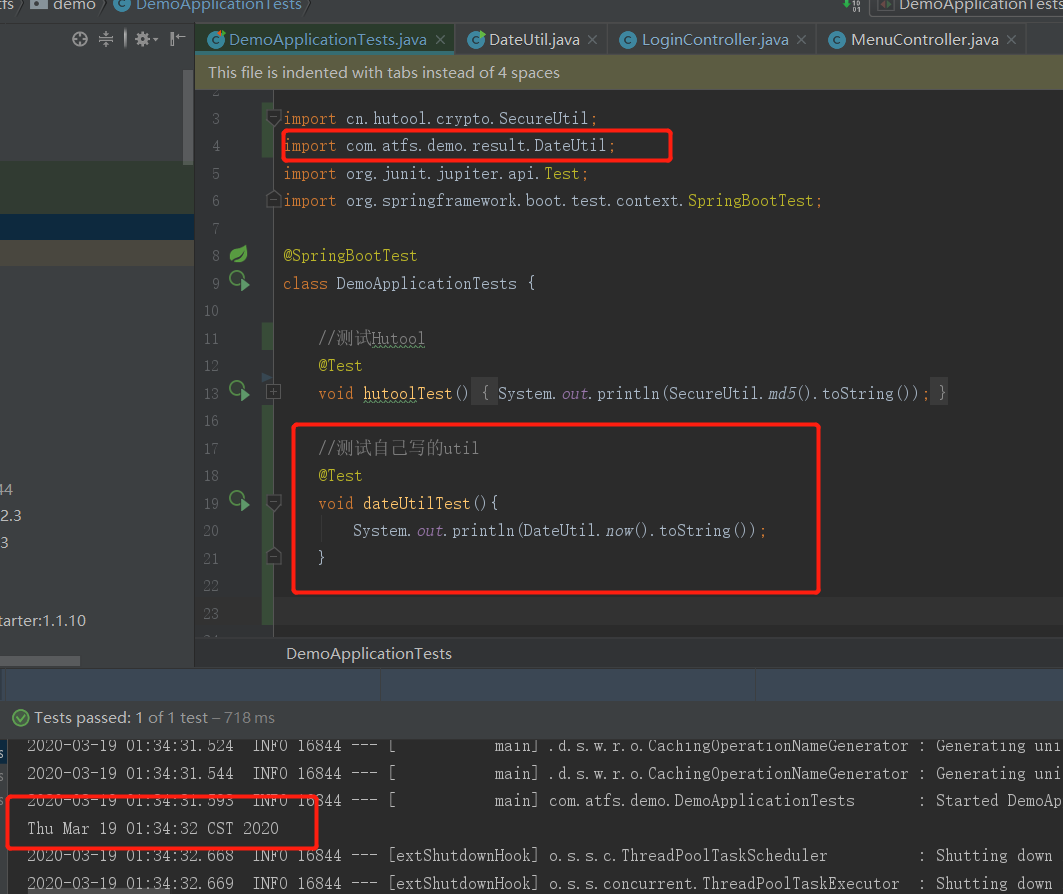
旧代码:
package com.atfs.demo;


import com.atfs.demo.result.DateUtil;
import org.junit.jupiter.api.Test;
import org.springframework.boot.test.context.SpringBootTest;

@SpringBootTest
class DemoApplicationTests {

	//测试自己写的dateUtil
	@Test
	void hutoolDateUtilTest(){
		System.out.println(DateUtil.now().toString());
	}

}
新代码:
package com.atfs.demo;


import cn.hutool.core.date.DateUtil;
import org.junit.jupiter.api.Test;
import org.springframework.boot.test.context.SpringBootTest;

@SpringBootTest
class DemoApplicationTests {

	//测试Hutool写的dateUtil
	@Test
	void hutoolDateUtilTest(){
		System.out.println(DateUtil.now().toString());
	}

}
3.3 接口返回格式改造
SpringBoot 提供了默认的异常处理类,异常展示如下图,在一个大型系统中,服务是部署在不同的服务器下面的,我们难免会遇到某一个服务挂掉或者请求不到的时候,如果不做任何处理,服务网关请求不到会抛出 500 错误,对用户是不友好的。
因此需要重写此类,返回统一的格式:
第一步: 创建统一接口返回实体类
package com.atfs.demo.result;

import cn.hutool.core.date.DateUtil;
import lombok.Data;

/**
 * 请求统一返回结果
 */
@Data
public class ResultEntity<T> {

    /**
     * 自定义状态码
     */
    private Integer status;
    /**
     * 状态码对应的提示信息
     */
    private String message;
    /**
     * 当前时间
     */
    private String timestamp = DateUtil.now();
    /**
     * 返回体
     */
    private T data;

    public ResultEntity(int status, String message) {
        this.status = status;
        this.message = message;
    }

    public ResultEntity(int status, String message, T data) {
        this.status = status;
        this.message = message;
        this.data = data;
    }

}
第二步: 考虑到Springboot可能会扩展成Spring Cloud的网关,因此我们需要明确抛出网关层异常
package com.atfs.demo.exception;

import lombok.Data;

/**
 * @ClassName: CustomException
 * @Description: 网关异常类
 * @Author Maxchen
 * @Date 2020/3/19 14:33
 * @Version V1.0.0
 */
@Data
public class GatewayException extends RuntimeException {

    private static final long serialVersionUID = 1L;
    /**
     * 错误码
     */
    private Integer errorCode;
    /**
     * 错误消息
     */
    private String errorMessage;

}
第三步: 自定义异常处理
package com.atfs.demo.exception;

import com.atfs.demo.result.ResultEntity;
import org.springframework.http.HttpStatus;
import org.springframework.web.HttpRequestMethodNotSupportedException;
import org.springframework.web.bind.annotation.ControllerAdvice;
import org.springframework.web.bind.annotation.ExceptionHandler;
import org.springframework.web.bind.annotation.ResponseBody;
import org.springframework.web.context.request.RequestContextHolder;
import org.springframework.web.context.request.ServletRequestAttributes;
import org.springframework.web.servlet.NoHandlerFoundException;

import javax.servlet.http.HttpServletResponse;

/**
 * @ClassName: JsonExceptionHandler
 * @Description: 自定义异常处理:SpringBoot 提供了默认的异常处理类,这显然不符合我们的预期,因此需要重写此类,返回统一的 JSON 格式
 * @Author Maxchen
 * @Date 2020/3/19 14:12
 * @Version V1.0.0
 */
@ControllerAdvice
@ResponseBody
public class GlobalExceptionHandler {

    /**
     * 统一异常处理
     *
     * @param e
     * @return
     */
    @ExceptionHandler({Exception.class})
    public ResultEntity<?> processException(Exception e) {
        HttpServletResponse response = ((ServletRequestAttributes) RequestContextHolder
                .getRequestAttributes()).getResponse();
        // 默认返回200状态码
        response.setStatus(HttpStatus.OK.value());
        ResultEntity<?> result = null;
        if (e instanceof NoHandlerFoundException) {
            // 处理404
            response.setStatus(HttpStatus.NOT_FOUND.value());
            result = new ResultEntity<String>(HttpStatus.NOT_FOUND.value(), e.getMessage());
        } else if (e instanceof GatewayException) {
            // 网关层自定义的异常明确抛出
            GatewayException gatewayException = (GatewayException) e;
            result = new ResultEntity<String>(gatewayException.getErrorCode(), gatewayException.getErrorMessage());
        } else if (e instanceof HttpRequestMethodNotSupportedException) {
            // 处理405,方法调用错误
            response.setStatus(HttpStatus.METHOD_NOT_ALLOWED.value());
            result = new ResultEntity<String>(HttpStatus.METHOD_NOT_ALLOWED.value(), e.getMessage());
        } else {
            // 其他异常,返回500状态码
            response.setStatus(HttpStatus.INTERNAL_SERVER_ERROR.value());
            result = new ResultEntity<String>(HttpStatus.INTERNAL_SERVER_ERROR.value(), e.getMessage());
        }
        return result;
    }

}
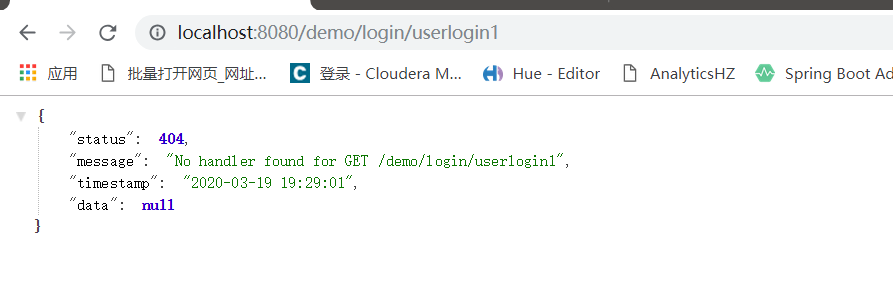
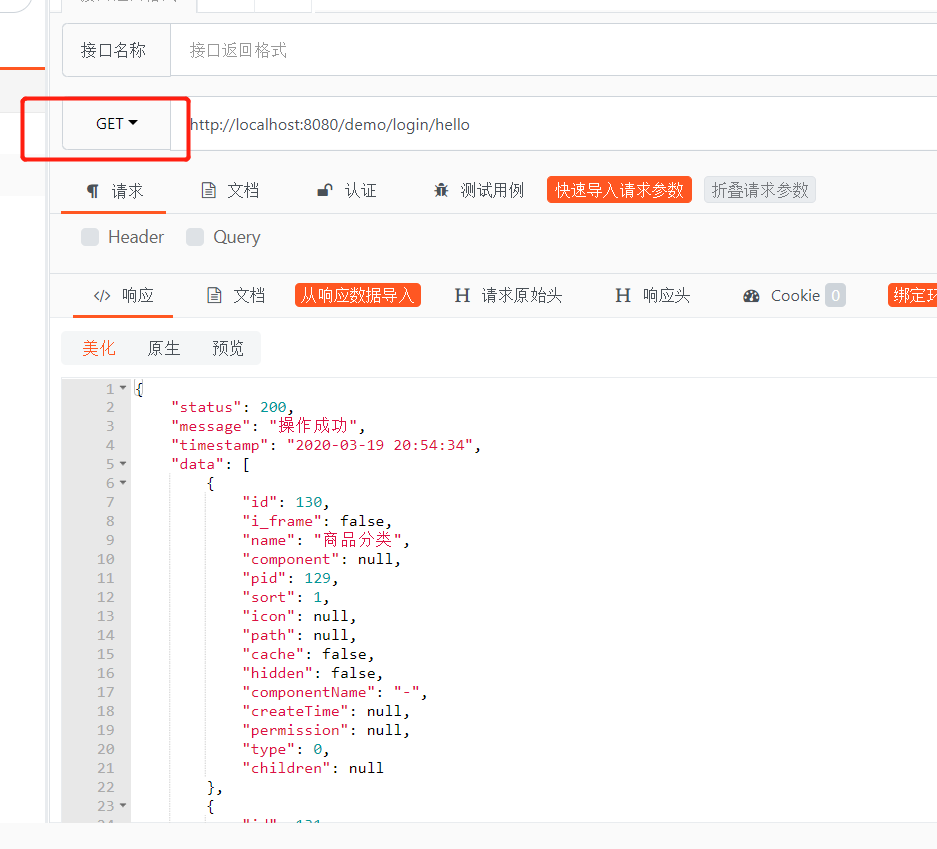
第四步: 写个接口来测试
@GetMapping("/hello")
public ResultEntity<?> hello() {
    ResultEntity<?> result = null;
    try {
        User user = loginService.login("admin", "e10adc3949ba59abbe56e057f20f883e");
        result = new ResultEntity(HttpStatus.OK.value(),"操作成功",loginService.getMenu(user.getId()));
    } catch (Exception e) {
        result = new ResultEntity(HttpStatus.BAD_REQUEST.value(),"操作失败",null);
        e.printStackTrace();
    }
    return result;
}
通过GET形式访问,可以正常返回数据
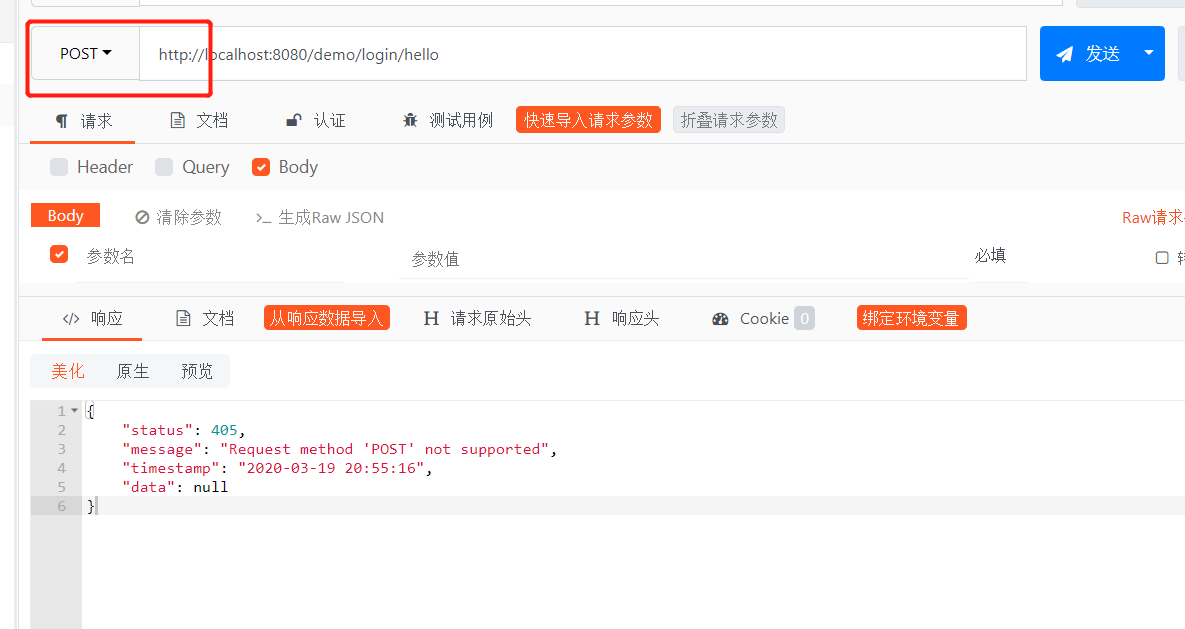
通过POST形式访问,会提示不支持POST类型的访问
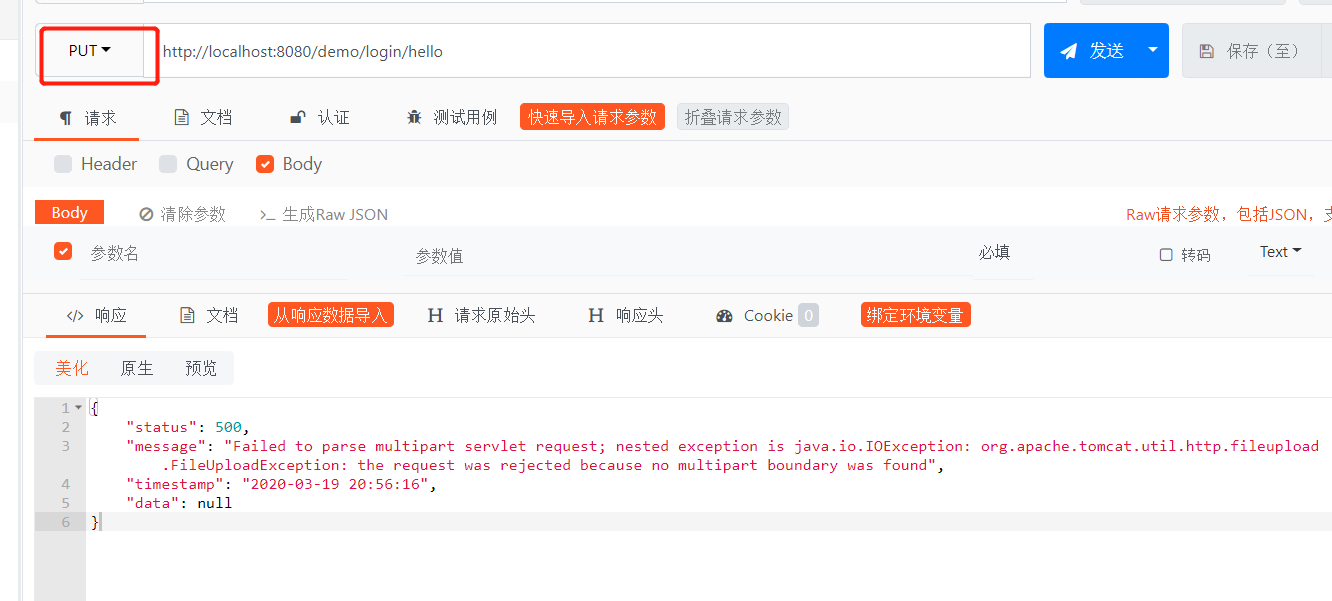
通过PUT形式访问,会产生报错信息