本人准备使用YOLO进行人脸检测,硬件设备为Jetson TX2。查阅YOLO官网,要部署YOLO,首先要安装CUDA、CUDNN、OPENCV,然后部署Darknet,最后部署YOLO。
本文参考:
https://pjreddie.com/darknet/yolo/
https://pjreddie.com/darknet/install/
https://zhuanlan.zhihu.com/p/35630431
准备工作:
1. 安装CUDA、CUDNN和OPENCV,由于笔者使用的设备TX2在刷机之后,自带CUDA9.0和OPENCV3.3.1,并且已经装过CUDNN,可直接开始安装Darknet;若没有CUDNN,可参看:https://blog.csdn.net/dhaduce/article/details/80155121
2. 了解YOLO。YOLO将物体检测作为回归问题求解。基于一个单独的end-to-end网络,完成从原始图像的输入到物体位置和类别的输出。简单的说,就是一个字快。详细说明可参看官网:https://pjreddie.com/darknet/yolo/;还有论文:https://arxiv.org/abs/1506.02640
部署过程:
1. 部署darknet
git clone https://github.com/pjreddie/darknet.git

cd darknet

sudo gedit Makefile
修改Makefile:
GPU=1
CUDNN=1
OPENCV=1
OPENMP=0
DEBUG=0

ARCH= -gencode arch=compute_53,code=[sm_53,compute_53] \
      -gencode arch=compute_62,code=[sm_62,compute_62]
#      -gencode arch=compute_20,code=[sm_20,sm_21] \ This one is deprecated?
# This is what I use, uncomment if you know your arch and want to specify
# ARCH= -gencode arch=compute_52,code=compute_52
make -j4
部署成功会出现如下信息:
mkdir -p obj
gcc -I/usr/local/cuda/include/  -Wall -Wfatal-errors  -Ofast....
gcc -I/usr/local/cuda/include/  -Wall -Wfatal-errors  -Ofast....
gcc -I/usr/local/cuda/include/  -Wall -Wfatal-errors  -Ofast....
.....
gcc -I/usr/local/cuda/include/  -Wall -Wfatal-errors  -Ofast -lm....
2. 部署YOLOv3
wget https://pjreddie.com/media/files/yolov3.weights //下载已经训练好的YOLO文件
3. 测试yolov3
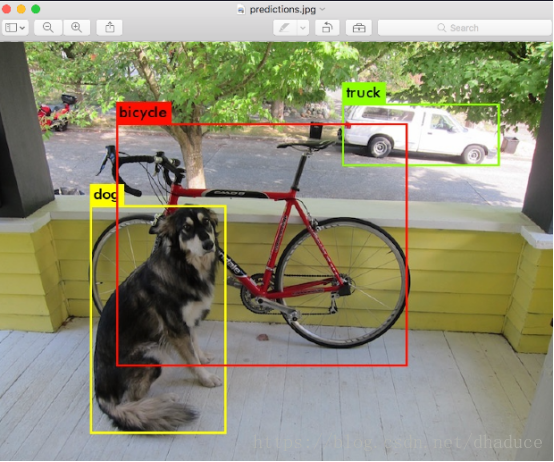
./darknet detect cfg/yolov3.cfg yolov3.weights data/dog.jpg
测试完成会出现如下信息:
layer     filters    size              input                output
    0 conv     32  3 x 3 / 1   416 x 416 x   3   ->   416 x 416 x  32  0.299 BFLOPs
    1 conv     64  3 x 3 / 2   416 x 416 x  32   ->   208 x 208 x  64  1.595 BFLOPs
    .......
  105 conv    255  1 x 1 / 1    52 x  52 x 256   ->    52 x  52 x 255  0.353 BFLOPs
  106 detection
truth_thresh: Using default '1.000000'
Loading weights from yolov3.weights...Done!
data/dog.jpg: Predicted in 0.029329 seconds.
dog: 99%
truck: 93%
bicycle: 99%
如安装了opencv会弹出图像:
在data文件里有好多测试图片
4. 在data文件里有一些测试图片,可以替换测试命令中的data/dog.jpg为data/eagle.jpg
data/person.jpg
data/horses.jpg
data/scream.jpg
data/giraffe.jpg
data/kite.jpg
也可以下载jpg格式的图片进行测试
5. 调整阈值
YOLO默认的阈值为.25 可以在测试语句最后面添加 -thresh <阈值> 从而修改阈值
./darknet detect cfg/yolov3.cfg yolov3.weights data/dog.jpg -thresh .1
使用摄像头进行实时检测
./darknet detector demo cfg/coco.data cfg/yolov3.cfg yolov3.weights
笔者在进行测试时,出现如下错误:
libv4l2: error setting pixformat: Invalid argument
libv4l2: error setting pixformat: Invalid argument
libv4l2: error setting pixformat: Invalid argument
libv4l2: error setting pixformat: Invalid argument
VIDEOIO ERROR: V4L2: Pixel format of incoming image is unsupported by OpenCV
Couldn't connect to webcam.
OPENCV默认采用0号摄像头,TX2的0号摄像头是板子上自带的板上摄像头,而我们的usb摄像头是1号,故笔者使用如下代码,解决了问题:
./darknet detector demo cfg/coco.data cfg/yolov3.cfg yolov3.weights -c 1//使用1号摄像头
如果上述方法不能解决问题,可以尝试如下操作:
首先检查是否安装了v4l1compat.so
dpkg -S v4l1compat.so
若没有安装,则安装;若找到该文件,则跳过安装,进行下一步
apt-cache search libv4l
sudo apt-get install libv4l-ruby1.8
然后添加环境变量
export LD_PRELOAD=/usr/lib/aarch64-linux-gnueabihf/libv4l/v4l1compat.so
export LD_PRELOAD=/usr/lib/aarch64-linux-gnueabihf/libv4l/v4l2convert.so
sudo ldconfig