1、背景
看了点东西,写点东西
2、资源加载
总所周知,Android资源加载通过Resource和AssetManager,比如一个textview的setText过程(api 21):
1、textView.setText(R.string.str);
//调用Resrouce的getText()
2、public final void setText(int resid) {
        setText(getContext().getResources().getText(resid));
    }
//调用AssetManager的getResourceText()方法
3、public CharSequence getText(int id) throws NotFoundException {
        CharSequence res = mAssets.getResourceText(id);
        if (res != null) {
            return res;
        }
        throw new NotFoundException("String resource ID #0x"
                                    + Integer.toHexString(id));
    }
//AssetManager的getResourceText()具体实现
4、final CharSequence getResourceText(int ident) {
        synchronized (this) {
            TypedValue tmpValue = mValue;
            int block = loadResourceValue(ident, (short) 0, tmpValue, true);
            if (block >= 0) {
                if (tmpValue.type == TypedValue.TYPE_STRING) {
                    return mStringBlocks[block].get(tmpValue.data);
                }
                return tmpValue.coerceToString();
            }
        }
        return null;
    }
而AssetManager提供了一个方法addAssetPath()来加载外部资源
	/**
     * Add an additional set of assets to the asset manager.  This can be
     * either a directory or ZIP file.  Not for use by applications.  Returns
     * the cookie of the added asset, or 0 on failure.
     * {@hide}
     */
    public final int addAssetPath(String path) {
        synchronized (this) {
            int res = addAssetPathNative(path);
            makeStringBlocks(mStringBlocks);
            return res;
        }
    }
因此可以想办法通过手动创建这两个类的方式,达到加载外部资源的目的。
3、具体实现
3.1、创建AssetManager和Resource
为了调用addAssetPath方法,需要一个AssetManaer实例(该类是隐藏的,不能直接new),方法有:
- 1、context的getAssets()方法返回
- 2、反射
这里用方法2,为什么不用方法1,因为会把原来的资源文件替换掉。因此具体实现如下:
	private void initAssetManager(File apkFile) throws Exception {
		//创建AssetManager
        mAssetManager = AssetManager.class.newInstance();

        Method addAssetPathMethod = AssetManager.class.getDeclaredMethod("addAssetPath", String.class);
        addAssetPathMethod.setAccessible(true);
        int result = (int) addAssetPathMethod.invoke(mAssetManager, apkFile.getAbsolutePath());
        Log.e(TAG, "initAssetManager: addAssetPath " + result);
		//创建Resource
		mResources = new Resources(mAssetManager, getResources().getDisplayMetrics(), getResources().getConfiguration());
    }
在application初始化中加载外部资源apk文件
	private AssetManager mAssetManager;
    private Resources mResources;

    @Override
    public void onCreate() {
        super.onCreate();
        File file = new File(getFilesDir(), "skin.apk");
        try {
            initAssetManager(file);
        } catch (Exception e) {
            e.printStackTrace();
        }
    }

    private void initAssetManager(File apkFile) throws Exception {
        mAssetManager = AssetManager.class.newInstance();
        Method addAssetPathMethod = AssetManager.class.getDeclaredMethod("addAssetPath", String.class);
        addAssetPathMethod.setAccessible(true);
        int result = (int) addAssetPathMethod.invoke(mAssetManager, apkFile.getAbsolutePath());
        Log.e(TAG, "initAssetManager: addAssetPath " + result);
        //
        Method ensureStringBlocksMethod = AssetManager.class.getDeclaredMethod("ensureStringBlocks");
        ensureStringBlocksMethod.setAccessible(true);
        ensureStringBlocksMethod.invoke(mAssetManager);

        mResources = new Resources(mAssetManager, getResources().getDisplayMetrics(), getResources().getConfiguration());

    }

    @Override
    public AssetManager getAssets() {
        return mAssetManager == null ? super.getAssets() : mAssetManager;
    }

    @Override
    public Resources getResources() {
        return mResources == null ? super.getResources() : mResources;
    }
4、简单测试
4.1、 主app
主app中编写BaseActivity用来获取加载外部资源的AssetManager和Resource
	private AssetManager mAssetManager;
    private Resources mResources;

    private boolean open = true;

    @Override
    protected void onCreate(@Nullable Bundle savedInstanceState) {
        super.onCreate(savedInstanceState);
        mAssetManager = getApplication().getAssets();
        mResources = getApplication().getResources();
    }


    @Override
    public AssetManager getAssets() {
        return mAssetManager != null && isOpen() ? mAssetManager : super.getAssets();
    }

    @Override
    public Resources getResources() {
        return mResources != null && isOpen() ? mResources : super.getResources();
    }

    @Override
    public void setContentView(int layoutResID) {
        super.setContentView(getIdentifier(layoutResID));
    }

    @Override
    public <T extends View> T findViewById(int id) {
        return super.findViewById(getIdentifier(id));
    }

    protected boolean isOpen(){
        return open;
    }

    /**
     * 获取该id对应的外部资源的资源id
     * @param id
     * @return
     */
    public int getIdentifier(int id){
        try {
            String resourceEntryName = BaseActivity.super.getResources().getResourceEntryName(id);
            String resourceTypeName = BaseActivity.super.getResources().getResourceTypeName(id);
            Log.e(TAG, "getIdentifier: " + resourceEntryName + " " + resourceTypeName);
            int identifier = ((App)getApplication()).getResIdentifier(resourceEntryName, resourceTypeName);
            Log.e(TAG, "getIdentifier: " + identifier);
            return identifier > 0 ? identifier : id;
        } catch (Exception e){
            e.printStackTrace();
        }
        return id;
    }
添加布局文件和字符串资源
<?xml version="1.0" encoding="utf-8"?>
<androidx.constraintlayout.widget.ConstraintLayout xmlns:android="http://schemas.android.com/apk/res/android"
xmlns:app="http://schemas.android.com/apk/res-auto"
xmlns:tools="http://schemas.android.com/tools"
android:layout_width="match_parent"
android:layout_height="match_parent"
tools:context=".MainActivity">
<TextView
android:id="@+id/text"
android:layout_width="wrap_content"
android:layout_height="wrap_content"
android:text="Hello World!"
app:layout_constraintBottom_toBottomOf="parent"
app:layout_constraintLeft_toLeftOf="parent"
app:layout_constraintRight_toRightOf="parent"
app:layout_constraintTop_toTopOf="parent" />
</androidx.constraintlayout.widget.ConstraintLayout>
string.xml
<resources>
<string name="app_name">AppPlugin</string>
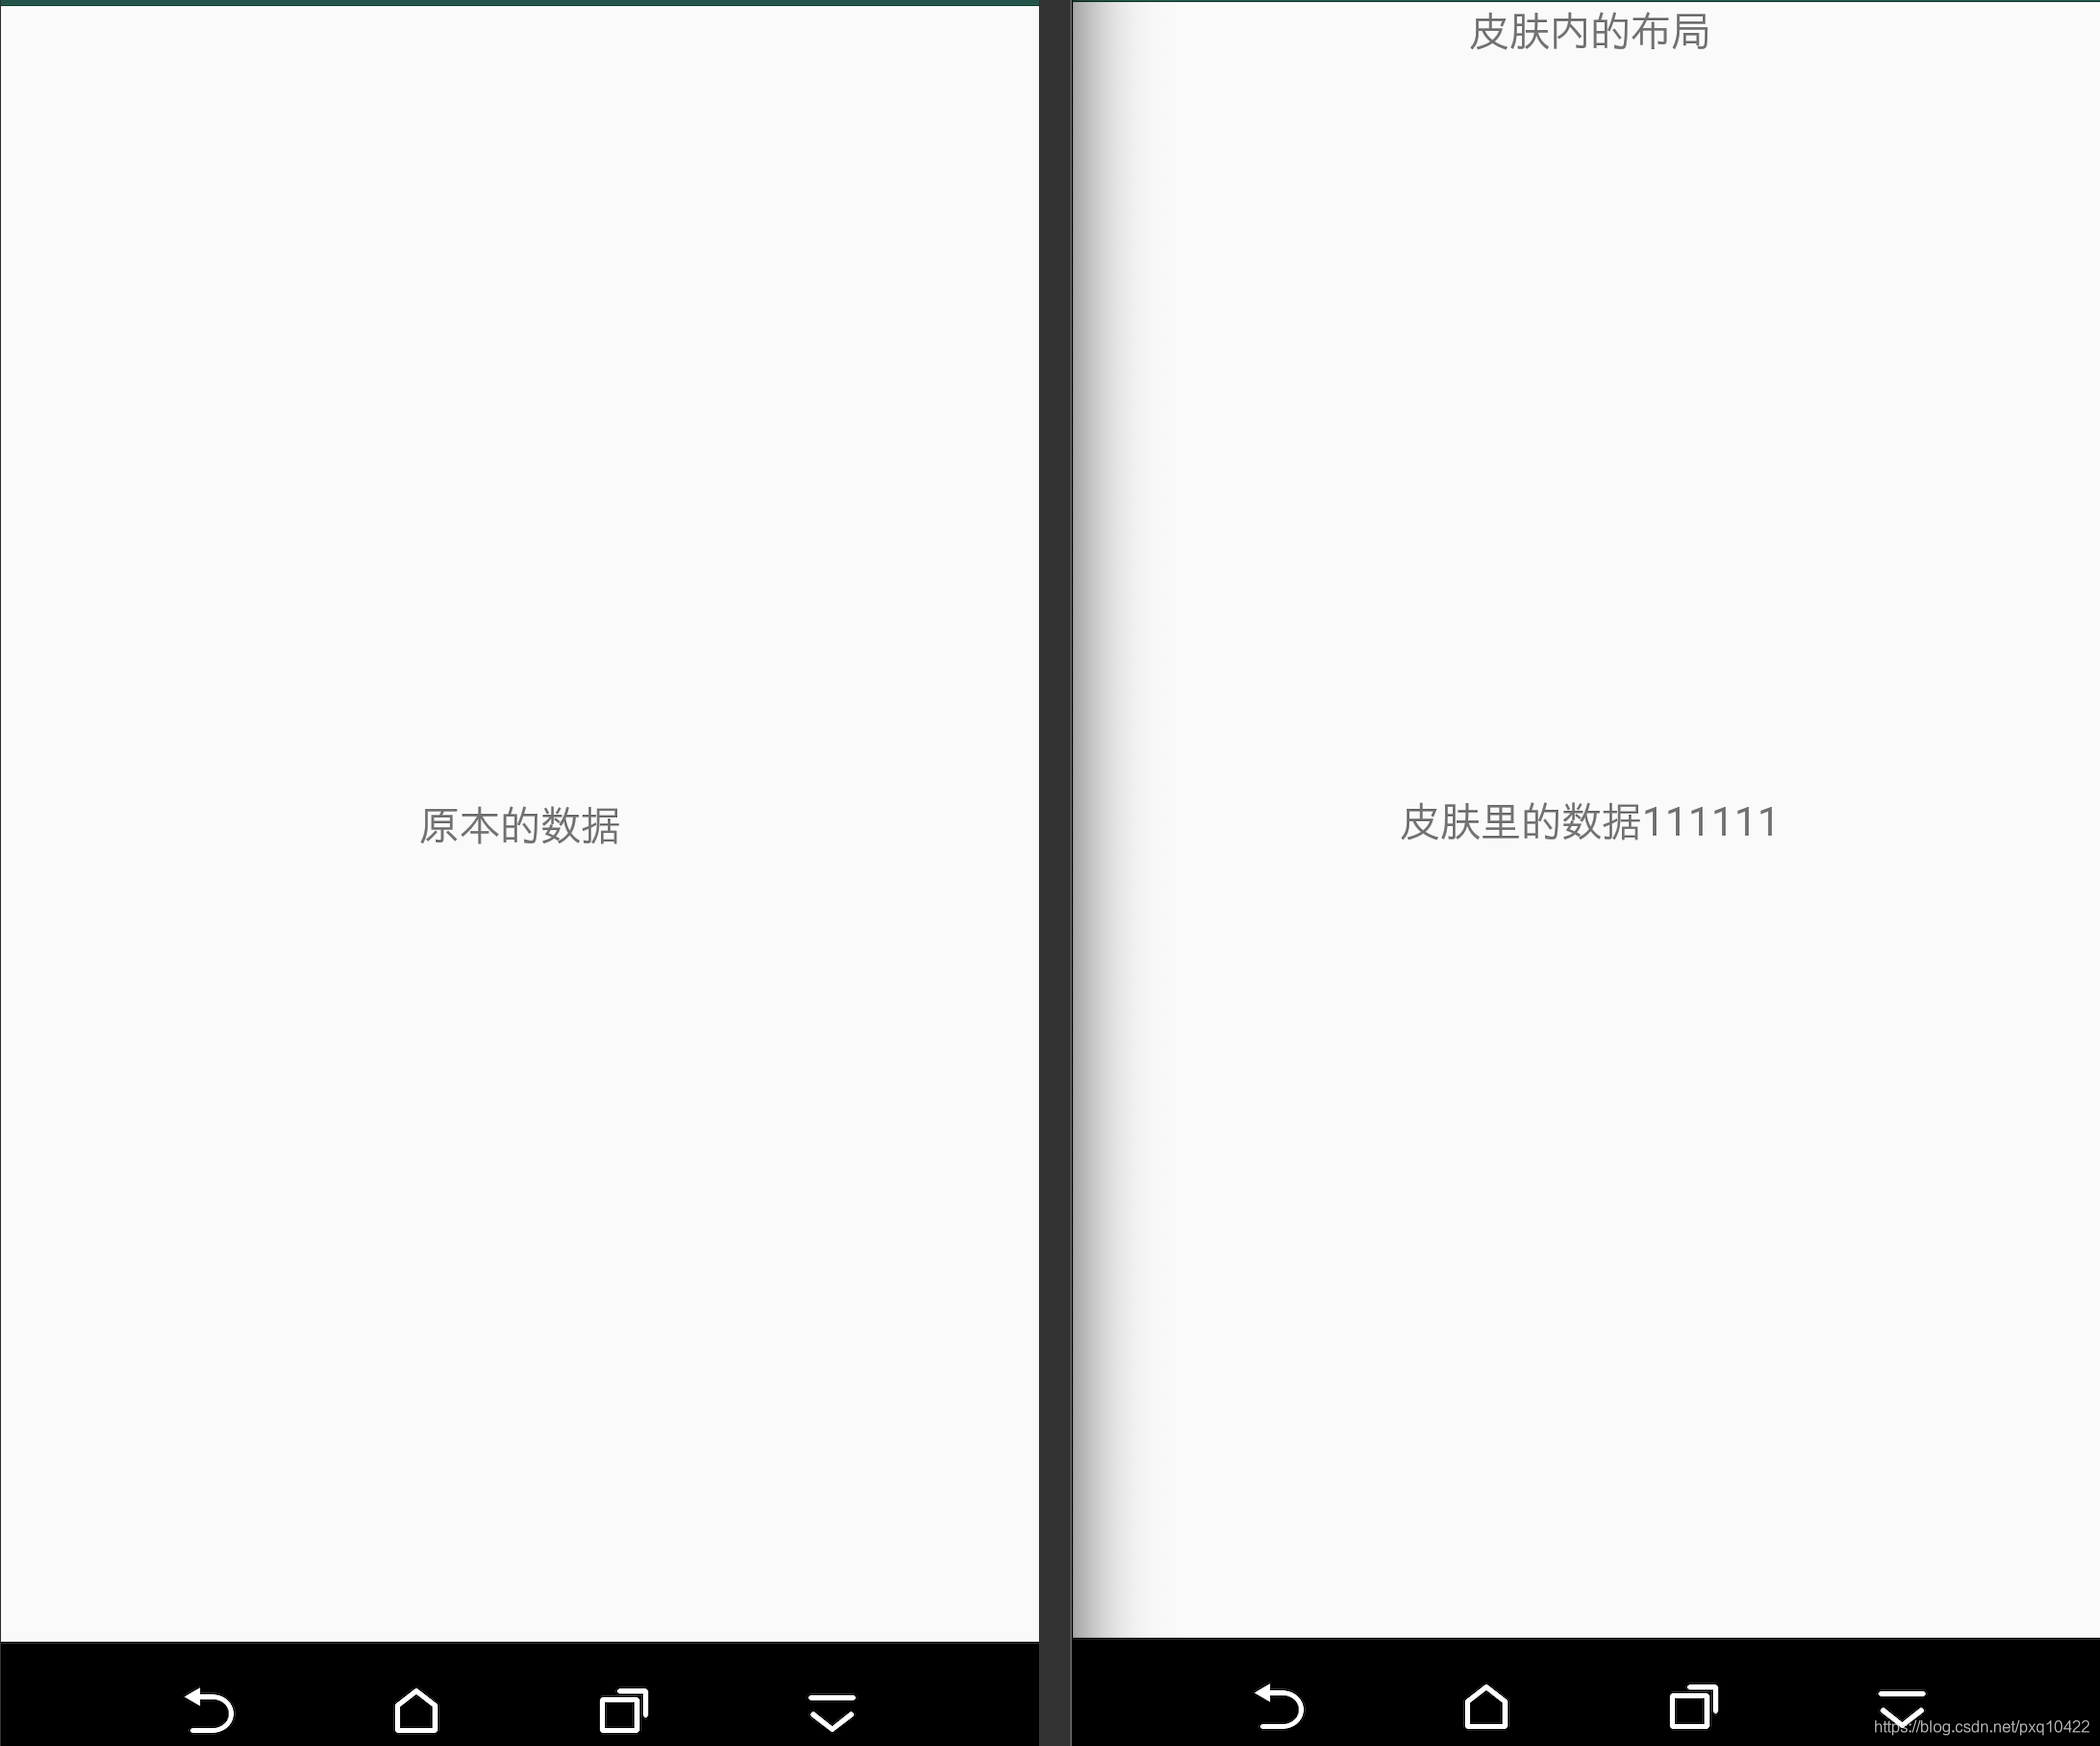
<string name="test_str">原本的数据</string>
</resources>
在activity中设置数据
public class MainActivity extends BaseActivity {

    @Override
    protected void onCreate(Bundle savedInstanceState) {
        super.onCreate(savedInstanceState);
        setContentView(R.layout.activity_main);
        TextView textView = findViewById(R.id.text);
        textView.setText(R.string.test_str);
        Toast.makeText(this, R.string.test_str, Toast.LENGTH_SHORT).show();

    }
}
4.2、资源包app
创建同样命名的布局文件和字符串资源(资源包不需要写java代码)
//添加多一个控件区分
<?xml version="1.0" encoding="utf-8"?>
<RelativeLayout xmlns:android="http://schemas.android.com/apk/res/android"
    android:layout_width="match_parent"
    android:layout_height="match_parent"
    android:orientation="vertical">

    <TextView
        android:id="@+id/text"
        android:layout_width="wrap_content"
        android:layout_height="wrap_content"
        android:layout_centerInParent="true"/>

    <TextView
        android:layout_width="wrap_content"
        android:layout_height="wrap_content"
        android:text="皮肤内的布局"
        android:layout_centerHorizontal="true"/>

</RelativeLayout>

string.xml
<resources>
    <string name="app_name">skin</string>
    <string name="test_str">皮肤里的数据111111</string>
</resources>
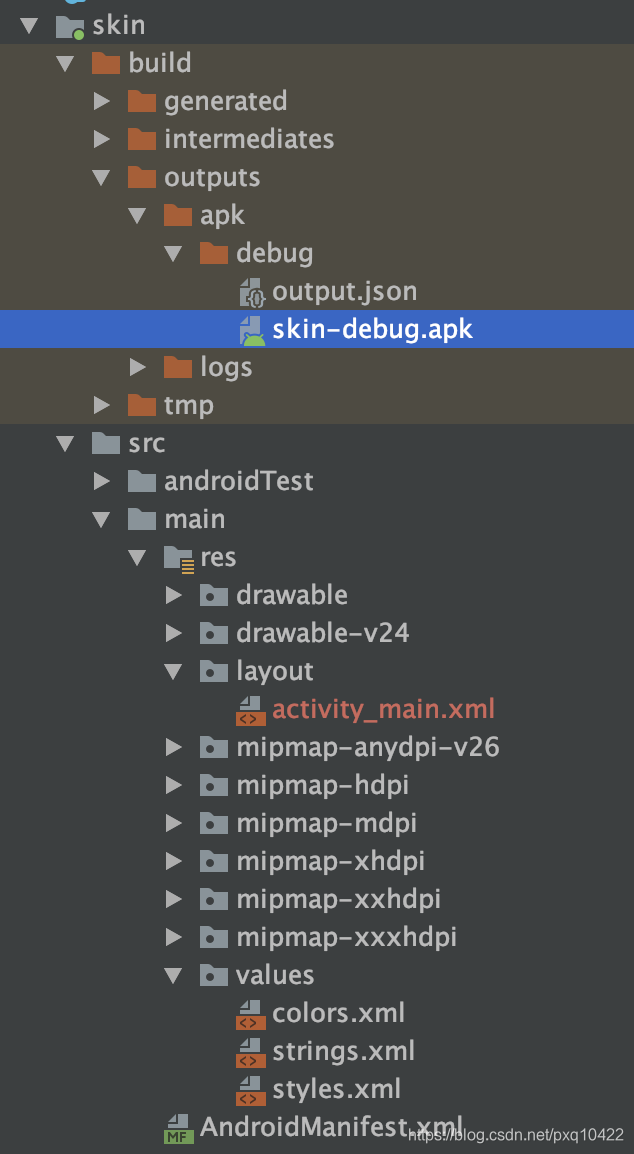
打包出来(Build --> Make Module )放在指定文件夹加载
4.3、加载资源
在application中加载外部资源
@Override
    public void onCreate() {
        super.onCreate();
        File file = new File(getFilesDir(), "skin-debug.apk");
        try {
            initAssetManager(file);
        } catch (Exception e) {
            e.printStackTrace();
        }
    }
效果对比: