前言
之前的博文介绍了Channel、EventLoop及由其衍生出来的相关概念。但这些都是静态的概念,为了能使Netty程序运行起来,必须要有一个全局的组件将上述内容串联起来,这便就是本文所讲内容——引导。
引导类
引导类的层次结构如下:
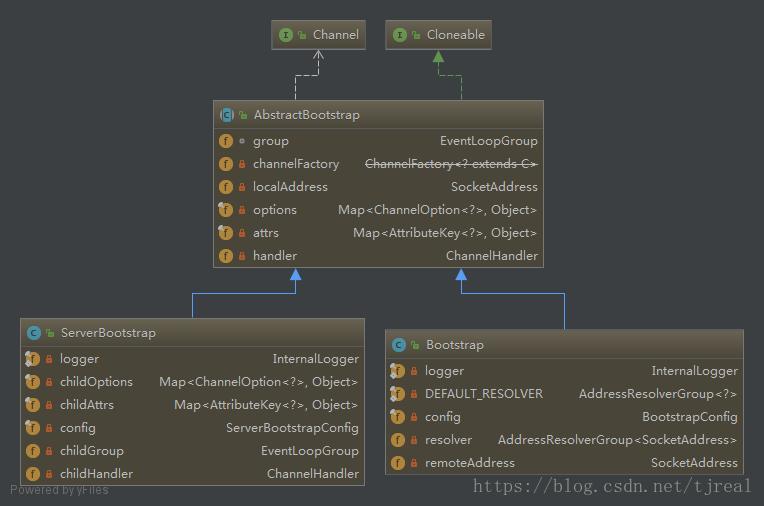
主要包括一个抽象父类(AbstractBootstrap)和两个具体的子类(Bootstrap、ServerBootstrap)。从类名可以看出,Bootstrap主要用于客户端的引导,只需要一个单独的、没有父Channel的Channel来参与网络交互;ServerBootstrap用于服务端、父Channel接收客户端连接,子Channel处理与客户端的通信。
本文以ServerBootstrap为例,介绍Netty如何发挥引导作用的。
ServerBootstrap
            ServerBootstrap b = new ServerBootstrap();
            b.group(bossGroup, workerGroup)
                    .channel(NioServerSocketChannel.class)
                    .option(ChannelOption.SO_BACKLOG, 1024)
                    .childHandler(new ChannelInitializer<SocketChannel>(){
                        @Override
                        protected void initChannel(SocketChannel ch) throws Exception {
                            ch.pipeline().addLast(new TimeServerHandler());
                        }
                    });

            ChannelFuture f = b.bind(port).sync();
这是之前Netty示例程序中的一段代码,实现的功能就是创建一个ServerBootstrap服务端引导类,初始化并绑定至指定端口,等待客户端连接请求。
Netty服务端初始化过程在ServerBoostrap的bind(port)方法中,而bind 方法会触发如下的调用链:
AbstractBootstrap.bind -> AbstractBootstrap.doBind -> AbstractBootstrap.initAndRegister从方法名称可以看出,initAndRegister方法包含了最核心的处理逻辑,具体代码如下:
    final ChannelFuture initAndRegister() {
        Channel channel = null;
        try {
            //1,使用反射方式,调用默认构造方法,创建一个channel
            channel = channelFactory.newChannel();
            //2,初始化channel
            init(channel);
        }
        ……
        //3,注册channel
        ChannelFuture regFuture = config().group().register(channel);
        ……
     }
initAndRegister方法通过反射方式创建一个Channel,而Channel的类型是ServerBootstrap的channel()方法所设定的,此处类型为NioServerSocketChannel,之前的博文中提过,通过调用 SelectorProvider.openSocketChannel() 来打开一个新的 Java NIO SocketChannel,同时将这个Channel与selector相关联并关注OP_ACCEPT事件,同时又创建一个ChannelPipeline与之相关联。
之后调用init方法对Channe进行初始化操作,具体代码如下:
        //此处省去很多跟主逻辑关系不大的代码
        ChannelPipeline p = channel.pipeline();

        p.addLast(new ChannelInitializer<Channel>() {
            @Override
            public void initChannel(final Channel ch) throws Exception {
                final ChannelPipeline pipeline = ch.pipeline();
                ChannelHandler handler = config.handler();
                if (handler != null) {
                    pipeline.addLast(handler);
                }
                ch.eventLoop().execute(new Runnable() {
                    @Override
                    public void run() {
                        pipeline.addLast(new ServerBootstrapAcceptor(
                                ch, currentChildGroup, currentChildHandler, currentChildOptions, currentChildAttrs));
                    }
                });
            }
        });
针对Channel初始化过程中创建的ChannelPipeline添加ChannelHandler,此处添加的ChannelInitializer是一个ChannelHandler的适配器类,通过此匿名类设置回调方法等待回调。之前我们讲过Netty采用了事件机制,当Channel成功注册到一个eventLoop的Selector中, 并且将当前Channel作为attachment时,便产生了一个Inbound事件触发了ChannelHandlerContext.fireChannelRegistered()方法,那Channel何时注册到一个eventLoop的Selector呢?我们继续往下看。
channel初始化完成后,便是注册处理,之前关于Netty线程模型的博文中提到,channel会和一个EventLoop绑定:
    ChannelFuture regFuture = config().group().register(channel);

     public ChannelFuture register(Channel channel) {
        return next().register(channel);
     }

     public ChannelFuture register(Channel channel) {
         return register(new DefaultChannelPromise(channel, this));
     }
    public ChannelFuture register(final ChannelPromise promise) {
        ObjectUtil.checkNotNull(promise, "promise");
        promise.channel().unsafe().register(this, promise);
        return promise;
    }
group()方法返回的是主EventLoopGroup,上述代码的过程就是将之前创建的NioServerSocketChannel注册到主EventLoopGroup中的某一个EventLoop上。next()方法返回一个EventLoop,沿着调用链,最后进入到AbstractUnsafe的register0方法,代码如下:
        private void register0(ChannelPromise promise) {
            ……
                boolean firstRegistration = neverRegistered;
                doRegister();
                neverRegistered = false;
                registered = true;

                pipeline.invokeHandlerAddedIfNeeded();

                safeSetSuccess(promise);
                pipeline.fireChannelRegistered();

                if (isActive()) {
                    if (firstRegistration) {
                        pipeline.fireChannelActive();
                    } else if (config().isAutoRead()) {
                        beginRead();
                    }
                }
            ……
        }


        protected void doRegister() throws Exception {
            // 省略错误处理
            selectionKey = javaChannel().register(eventLoop().selector, 0, this);
}
此处AbstractNioChannel.doRegister 方法将之前创建的NioServerSocketChannel注册到一个eventLoop的Selector中, 并且将当前 Channel 作为 attachment。
同时我们看到了前文涉及到的fireChannelRegistered方法,以此触发Channel自身的初始化添加ChannelHandler的过程,具体过程之前的博文已经介绍过,不再赘述。
再回到主流程,当完成对Channel的初始化和注册工作之后,便开始绑定操作,
    private static void doBind0(
            final ChannelFuture regFuture, final Channel channel,
            final SocketAddress localAddress, final ChannelPromise promise) {
        channel.eventLoop().execute(new Runnable() {
            @Override
            public void run() {
                if (regFuture.isSuccess()) {
                    channel.bind(localAddress, promise).addListener(ChannelFutureListener.CLOSE_ON_FAILURE);
                } else {
                    promise.setFailure(regFuture.cause());
                }
            }
        });
    }
可以看到此处是异步调用Channel的bind方法实现异步绑定,之前的博文介绍过,Channel的bind方法会产生一个出站事件,那我们进入到bind方法内部看一下,
    public ChannelFuture bind(SocketAddress localAddress, ChannelPromise promise) {
        return pipeline.bind(localAddress, promise);
    }

    public final ChannelFuture bind(SocketAddress localAddress, ChannelPromise promise) {
        return tail.bind(localAddress, promise);
    }

    public ChannelFuture bind(final SocketAddress localAddress, final ChannelPromise promise) {
        if (localAddress == null) {
            throw new NullPointerException("localAddress");
        }
        if (isNotValidPromise(promise, false)) {
            // cancelled
            return promise;
        }

        final AbstractChannelHandlerContext next = findContextOutbound();
        EventExecutor executor = next.executor();
        if (executor.inEventLoop()) {
            next.invokeBind(localAddress, promise);
        } else {
            safeExecute(executor, new Runnable() {
                @Override
                public void run() {
                    next.invokeBind(localAddress, promise);
                }
            }, promise, null);
        }
        return promise;
    }
这部分代码看起来好像很熟悉,的确如此,之前博文中有关于Inbound事件触发InboundChannelHandler初始化,这里便是Outbound事件触发OutboundChannelHandler初始化,过程基本相同,不再赘述。
到这里,Netty服务端程序初始化完毕,等待客户端连接。当一个客户端连接到服务端时, Java 底层的 NIOServerSocketChannel 会有产生一个 SelectionKey.OP_ACCEPT 就绪事件, 接着就会调用到 NioServerSocketChannel.doReadMessages方法,
    protected int doReadMessages(List<Object> buf) throws Exception {
        ……

        SocketChannel ch = SocketUtils.accept(javaChannel());

        buf.add(new NioSocketChannel(this, ch));

        ……
    }
在 doReadMessages 中,先获取客户端新连接的 SocketChannel,接着实例化一个 NioSocketChannel,接下来就经由 Netty 的 ChannelPipeline 机制,将读取事件逐级发送到各个 handler 中,于是就会触发前面我们提到的 ServerBootstrapAcceptor.channelRead 方法啦。
总结
Netty的引导过程比较复杂,本文只是大概梳理了一下过程,希望能帮助读者理解此过程。