servlet+jdbc+html+css小案例
简单的web小案例实现MVC小功能,学过一些Javaweb的童鞋们可以自己动手做一做了
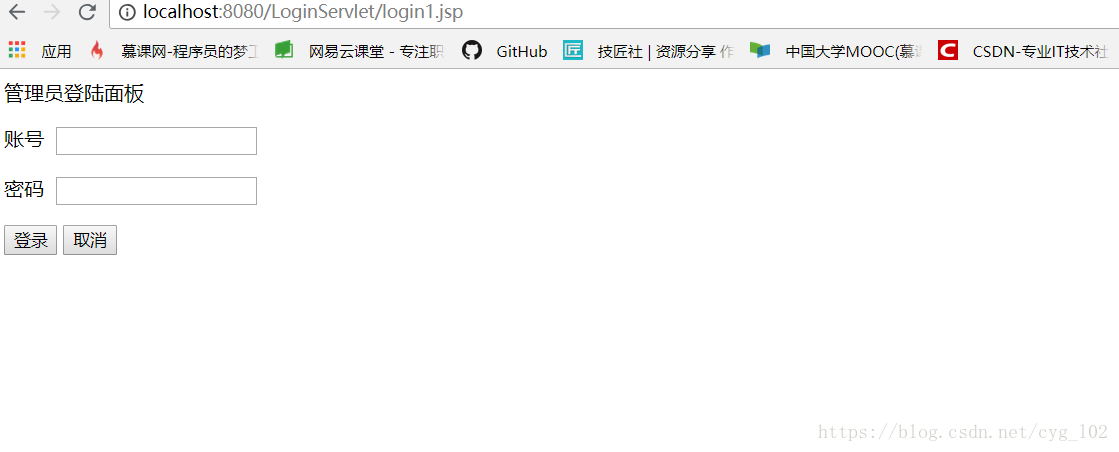
实现后的登录界面是这样子的
刚开始我确实使用了css,但是由于css还是使用的太菜了,没用好,所以就没有将css用上去,见谅
我的思路:
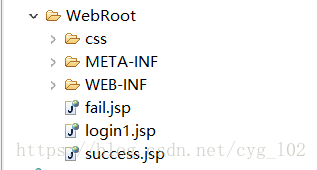
1、先在web root下创建三个.jsp文件
2、创建servlet类,可以直接创建,记得要打开自动配置web.xml文件,在project->Build Automatically打上勾即可

3、编写loginservlet类,连接jdbc,并且从数据库中取出数据,判断用户登录的用户名和密码是否一致
4、判断是否一致,从而判断链接的页面.jsp文件进行链接

5、编写数据库之类的也要有
开始编写代码,思路一定要清晰;
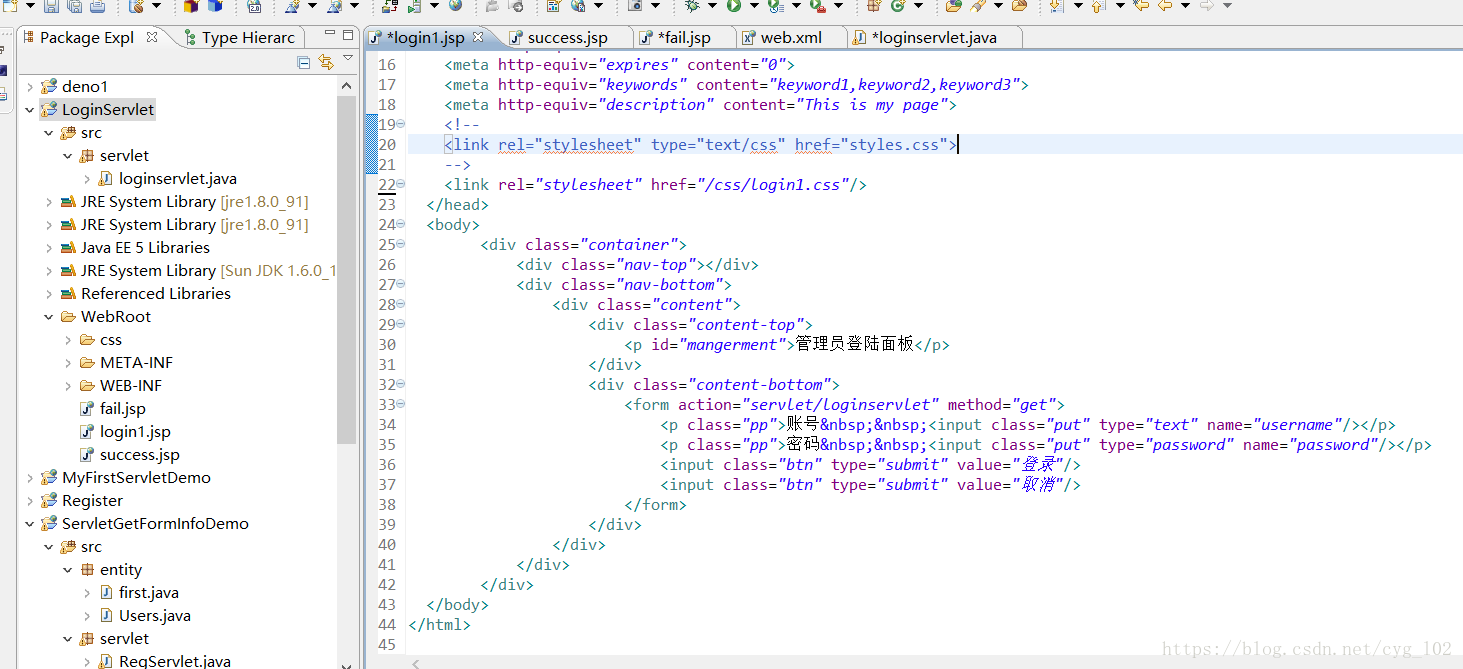
1、我是先写login1.jsp文件的
具体代码如下:
<%@ page language="java" import="java.util.*" contentType="text/html; charset=utf-8"%>
<%
String path = request.getContextPath();
String basePath = request.getScheme()+"://"+request.getServerName()+":"+request.getServerPort()+path+"/";
%>
<!DOCTYPE HTML PUBLIC "-//W3C//DTD HTML 4.01 Transitional//EN">
<html>
<head>
<base href="<%=basePath%>">
<title>login</title>
<meta http-equiv="pragma" content="no-cache">
<meta http-equiv="cache-control" content="no-cache">
<meta http-equiv="expires" content="0">
<meta http-equiv="keywords" content="keyword1,keyword2,keyword3">
<meta http-equiv="description" content="This is my page">
<!--
<link rel="stylesheet" type="text/css" href="styles.css">
-->
<link rel="stylesheet" href="/css/login1.css"/>
</head>
<body>
<div class="container">
<div class="nav-top"></div>
<div class="nav-bottom">
<div class="content">
<div class="content-top">
<p id="mangerment">管理员登陆面板</p>
</div>
<div class="content-bottom">
<form action="servlet/loginservlet" method="get">
<p class="pp">账号 <input class="put" type="text" name="username"/></p>
<p class="pp">密码 <input class="put" type="password" name="password"/></p>
<input class="btn" type="submit" value="登录"/>
<input class="btn" type="submit" value="取消"/>
</form>
</div>
</div>
</div>
</div>
</body>
</html>
其中关键的代码:

链接的CSS文件进行样式匹配,由于我的CSS还是不太好,故此做的样式效果不好,我也就没用了,注释掉了,见谅如果自己需要的话可以美化界面,去学习一下CSS挺好的

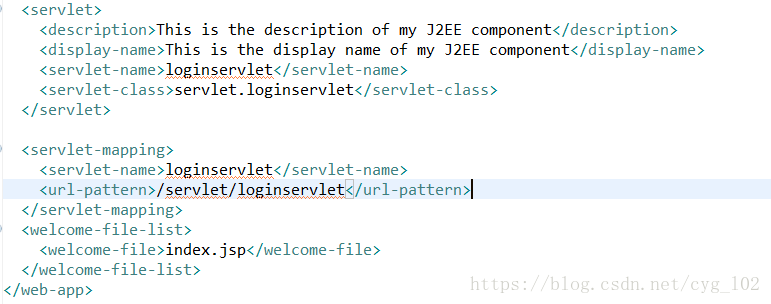
在一个就是请求方式的action一定要填写web.xml中的<wrl-padding>中的如图:
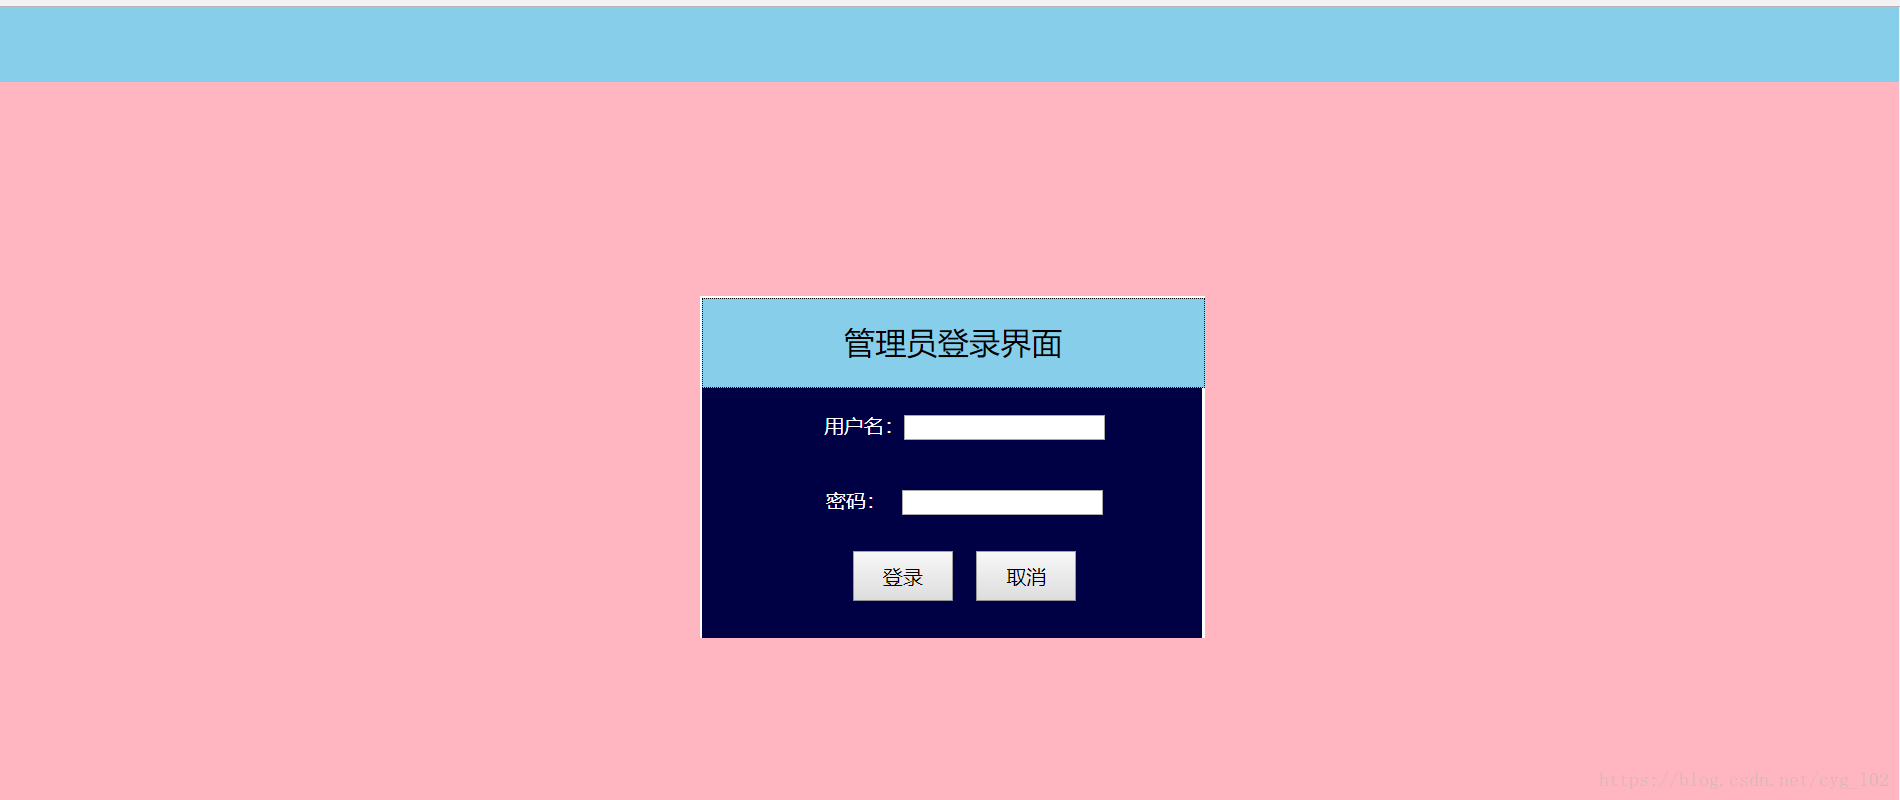
补:css样式大概做出来了,大致是这样子
源码:
<!DOCTYPE html>
<html lang="en">
<head><meta charset="utf-8">
<title>登录界面</title>
<style type="text/css">
*{
margin: 0px;
padding: 0px;
}
.container{
width: 100%;
height:100%;
}
.nav-top{
margin: 0px;
padding: 0px;
width: 100%;
height:60px;
background: skyblue;
}
.nav-bottom{
width: 100%;
height: 100%;
padding: 0px;
margin: 0px;
position: absolute;
top: 60px;
left: 0px;
background: lightpink;
}
.content{
width: 400px;
height: 270px;
position: fixed;
top: 50%;
left: 50%;
margin-left: -200px;
margin-top: -135px;
border: 2px solid #fff;
}
.content-top{
width: 100%;
height: 70px;
border: 1px dotted #000;
margin: 0px;
padding: 0px;
background: skyblue;
text-align: center;
font-size: 25px;
font-family: arial;
line-height: 70px;
}
.content-bottom{
background: #000044;
height: 200px;
width: 100%;
border: 0px solid #fff;
}
.content-bottom .put{
width: 100%;
height: 40px;
text-align: center;
font-size: 16px;
font-family: arial;
border: 0px solid #000;
padding: 10px;
line-height: 40px;
color: white;
}
.pp{
width: 100%;
height: 40px;
padding: 10px;
text-align: center;
line-height: 40px;
border: 0px solid #000;
}
.title{
width: 80px;
height: 40px;
line-height: 40px;
font-size: 16px;
font-family: arial;
}
</style>
</head>
<body>
<div class="container">
<div class="nav-top"></div>
<div class="nav-bottom">
<div class="content">
<div class="content-top">管理员登录界面</div>
<div class="content-bottom">
<div class="put">用户名:<input type="text" name="username"/></div>
<div class="put">密码: <input type="password" name="password"></div>
<div class="pp"><input class="title" type="submit" value="登录"> <input class="title" type="reset" value="取消"></div>
</div>
</div>
</div>
</div>
</body>
</html>
2、同理,编写success.jsp和fail.jsp文件
success.jsp文件的编写:
<%@ page language="java" import="java.util.*" contentType="text/html; charset=utf-8"%>
<%
String path = request.getContextPath();
String basePath = request.getScheme()+"://"+request.getServerName()+":"+request.getServerPort()+path+"/";
%>
<!DOCTYPE HTML PUBLIC "-//W3C//DTD HTML 4.01 Transitional//EN">
<html>
<head>
<base href="<%=basePath%>">
<title>登录成功提示</title>
<meta http-equiv="pragma" content="no-cache">
<meta http-equiv="cache-control" content="no-cache">
<meta http-equiv="expires" content="0">
<meta http-equiv="keywords" content="keyword1,keyword2,keyword3">
<meta http-equiv="description" content="This is my page">
<!--
<link rel="stylesheet" type="text/css" href="styles.css">
-->
</head>
<body>
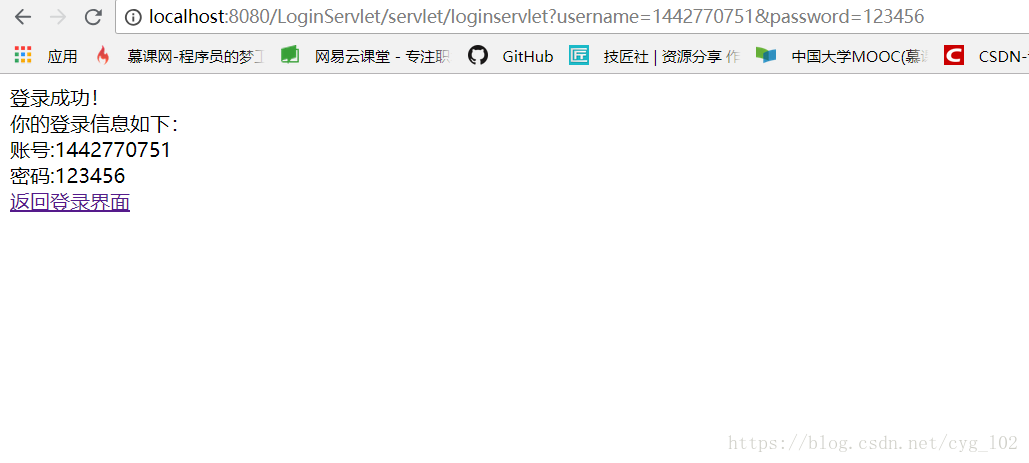
登录成功!<br>
你的登录信息如下:<br>
账号:<%=request.getParameter("username") %><br>
密码:<%=request.getParameter("password") %><br>
<a href="<%=request.getContextPath()%>/login1.jsp">返回登录界面</a>
</body>
</html>
fail.jsp文件的编写:
<%@ page language="java" import="java.util.*" contentType="text/html; charset=utf-8"%>
<%
String path = request.getContextPath();
String basePath = request.getScheme()+"://"+request.getServerName()+":"+request.getServerPort()+path+"/";
%>
<!DOCTYPE HTML PUBLIC "-//W3C//DTD HTML 4.01 Transitional//EN">
<html>
<head>
<base href="<%=basePath%>">
<title>登录失败提示</title>
<meta http-equiv="pragma" content="no-cache">
<meta http-equiv="cache-control" content="no-cache">
<meta http-equiv="expires" content="0">
<meta http-equiv="keywords" content="keyword1,keyword2,keyword3">
<meta http-equiv="description" content="This is my page">
<!--
<link rel="stylesheet" type="text/css" href="styles.css">
-->
</head>
<body>
登录失败!<br>
<h4>密码错误</h4>
你的登录信息如下:<br>
账号:<%=request.getParameter("username") %><br>
<a href="<%=request.getContextPath()%>/login1.jsp">返回登录界面</a>
</body>
</html>
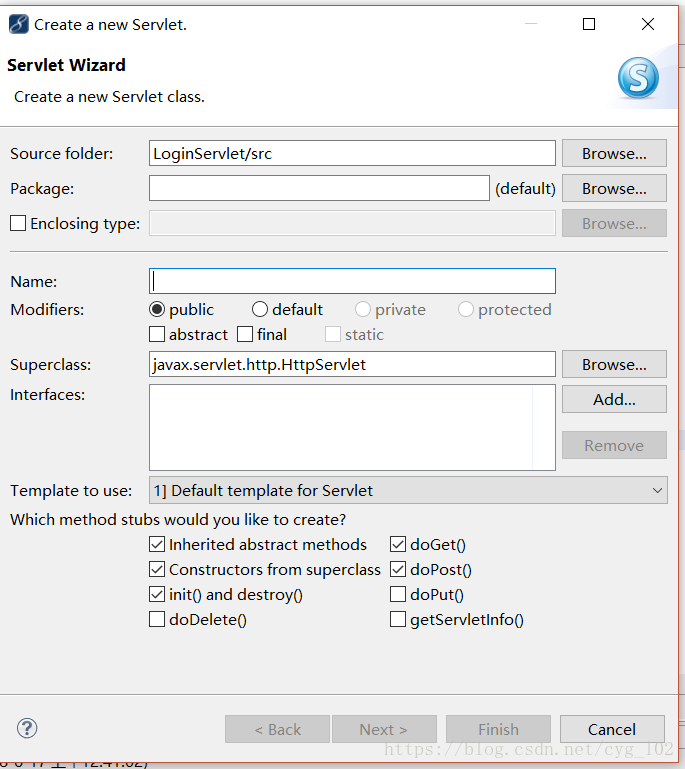
3、在servlet包下创建类servletlogin.java
直接创建servlet后的图片便是这样的,后面直接确定即可,系统会帮你配置好web.xml中的映射
源码如下:
package servlet;
import java.io.IOException;
import java.io.PrintWriter;
import java.sql.Connection;
import java.sql.DriverManager;
import java.sql.ResultSet;
import java.sql.Statement;
import javax.servlet.RequestDispatcher;
import javax.servlet.ServletException;
import javax.servlet.http.HttpServlet;
import javax.servlet.http.HttpServletRequest;
import javax.servlet.http.HttpServletResponse;
public class loginservlet extends HttpServlet {
public Connection con=null;
public static String username;
public static String password;
public loginservlet() {
super();
}
/**
* Destruction of the servlet. <br>
*/
public void destroy() {
super.destroy(); // Just puts "destroy" string in log
// Put your code here
}
public void doGet(HttpServletRequest request, HttpServletResponse response)
throws ServletException, IOException {
request.setCharacterEncoding("utf-8");
username=request.getParameter("username");
password=request.getParameter("password");
System.out.println(username);
System.out.println(password);
System.out.println("取得request的请求参数");
try{
String driverName="com.mysql.cj.jdbc.Driver";
Class.forName(driverName);
System.out.println("加载驱动完成");
String dbURL="jdbc:mysql://127.0.0.1:3306/test?characterEncoding=utf8&&useSSL=true&&serverTimezone=GMT";
String userName="root";
String userPwd="";
con=DriverManager.getConnection(dbURL,userName,userPwd);
Statement statement=con.createStatement();
String sql="select * from login";
ResultSet rs=statement.executeQuery(sql);
while(rs.next()){
String user=rs.getString("username");
String pwd=rs.getString("password");
if(username!=null&&password!=null&&username.equals(user)&&password.equals(pwd)){
request.getRequestDispatcher("../success.jsp").forward(request, response);
}else{
request.getRequestDispatcher("../fail.jsp").forward(request, response);
}
rs.close();
con.close();
}
}catch(Exception e){
e.printStackTrace();
}
}
public void doPost(HttpServletRequest request, HttpServletResponse response)
throws ServletException, IOException {
doGet(request,response);
}
public void init() throws ServletException {
// Put your code here
}
}
标红的地方是我的MySQL数据库的连接,这个地方我搞了好久,可能每个人是不一样的,可以自己先配置好数据库再来使用。
如果不懂得地方尽管去CSDN上找答案,很多问题都有答案的。
if(username!=null&&password!=null&&username.equals(user)&&password.equals(pwd)){
request.getRequestDispatcher("../success.jsp").forward(request, response);
}else{
request.getRequestDispatcher("../fail.jsp").forward(request, response);
}
这是请求跳转页面。
username=request.getParameter("username");
password=request.getParameter("password");
这是从login.jsp中获取的username和password,然后与数据库中的进行对比。
我的从网页输入开始的链接是:http://localhost:8080/LoginServlet/login1.jsp 当然每个人设置不一样输入就不一样
大体上功能差不多实现了,其实简单MVC还是挺简单的,自己要学好点servlet,便可以找出问题的所在。
最后还有创建数据库:附图
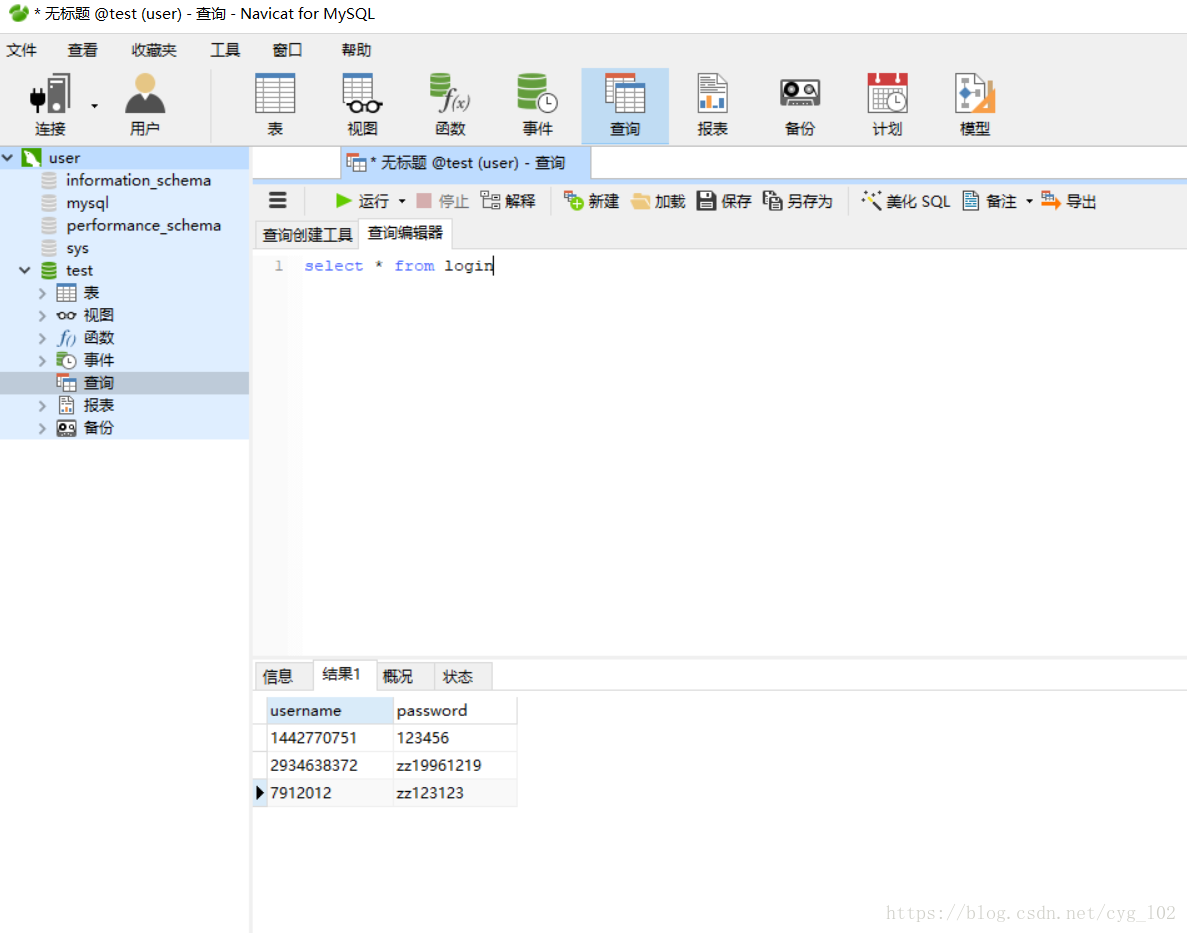
附上一张总图
综上,总结自己做的小项目,确实挺小的,但是还是要花点心思的,建议学习Java web前端入门的小白们可以拿来练练手。
相信自己,好好练习Java,总有一天会有成就感的。
