先升级安装gcc至7.3以上版本,建议使用yum安装,源码安装时间太长:
[root@mb ~]# sudo yum install -y centos-release-scl
[root@mb ~]# sudo yum install -y devtoolset-7-gcc*
[root@mb ~]# scl enable devtoolset-7 bash
[root@mb ~]# which gcc
/opt/rh/devtoolset-7/root/usr/bin/gcc
[root@mb ~]# gcc --version
gcc (GCC) 7.3.1 20180303 (Red Hat 7.3.1-5)
Copyright (C) 2017 Free Software Foundation, Inc.
This is free software; see the source for copying conditions.  There is NO
warranty; not even for MERCHANTABILITY or FITNESS FOR A PARTICULAR PURPOSE.
安装git:
[root@mb ~]# yum install -y git
安装其他组件:
[root@mb ~]# yum install curl-devel expat-devel gettext-devel openssl-devel zlib-devel asciidoc xmlto autoconf -y
安装node-js,此过程比较漫长,预计半小时到四十分钟,确保服务器内存4G以上,不然可能会报错:
[root@mb ~]# tar -zxf node-v12.15.0.tar.gz
[root@mb ~]# cd node-v12.15.0
[root@mb ~]# ./configure --prefix=/usr/local/node-v12.15.0
[root@mb ~]# make -j 8 && make install
node-js安装完成后添加系统环境变量:
[root@mb ~]# vim /etc/profile
################nodejs###############
export NODE_HOME=/usr/local/node-v12.15.0
export PATH=$PATH:$NODE_HOME/bin
[root@mb ~]# source /etc/profile
[root@mb ~]# node -v
12.15.0
[root@mb ~]# npm -v
6.13.4
克隆ElasticSearch-Head包:
[root@mb ~]# cd /opt/soft
[root@mb soft]# git clone https://github.com/mobz/elasticsearch-head.git
安装grunt客户端程序来控制head插件, 安装grunt会提示缺少phantomjs-2.1.1-linux-x86_64.tar.bz2,并自动尝试下载,但速度特别慢,建议手动下载后上传至/tmp/phantomjs目录下,下载链接为https://github.com/Medium/phantomjs/releases/download/v2.1.1/phantomjs-2.1.1-linux-x86_64.tar.bz2:
[root@mb ~]# mkdir -p /tmp/phantomjs
[root@mb ~]# cd /tmp/phantomjs
[root@mb ~]# wget https://github.com/Medium/phantomjs/releases/download/v2.1.1/phantomjs-2.1.1-linux-x86_64.tar.bz2
[root@mb ~]# yum install -y bzip2
安装grunt,要指定淘宝源,如果不指定,会默认使用国外的镜像源,安装特别慢,且容易安装失败:
[root@mb soft]# cd /opt/zip/elasticsearch-head
[root@mb elasticsearch-head]# npm install --registry=https://registry.npm.taobao.org
[root@mb elasticsearch-head]# npm install -g grunt --save-dev --registry=https://registry.npm.taobao.org
修改head插件配置:
进入vi后,直接搜索9100,然后在9100上一行添加hostname字段
[root@mb ~]#  vim /opt/soft/elasticsearch-head/Gruntfile.js
                connect: {
                        server: {
                                options: {
                                        hostname: "*",
                                        port: 9100,
                                        base: '.',
                                        keepalive: true
                                }
                        }
                }
修改elasticsearch-head/_site/app.js,把localhost改为ES服务器的IP:
[root@mb elasticsearch-head]$ vim /opt/soft/elasticsearch-head/_site/app.js
将:
this.base_uri = this.config.base_uri || this.prefs.get("app-base_uri") || "http://localhost:9200";
修改为:
this.base_uri = this.config.base_uri || this.prefs.get("app-base_uri") || "10.1.1.19:9200";
修改elasticsearch-7.5.2/config/elasticsearch.yml,修改完head插件后,还需要修改elasticsearch配置文件来支持跨域访问:
[elk@mb elasticsearch-head]$ echo 'http.cors.enabled: true' >> /opt/soft/elasticsearch-7.5.2/config/elasticsearch.yml
[elk@mb elasticsearch-head]$ echo 'http.cors.allow-origin: "*" ' >> /opt/soft/elasticsearch-7.5.2/config/elasticsearch.yml
启动head插件:
[root@mb elasticsearch-head]# grunt server
Running "connect:server" (connect) task
Waiting forever...
Started connect web server on http://localhost:9100
这时访问http://10.1.1.19:9100,已经连接到es集群了:
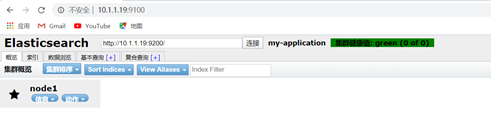 至此,基本的Head插件安装完成了。
