Qt5 位置相关函数
概述
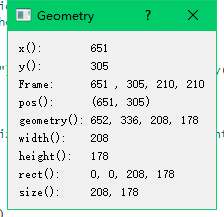
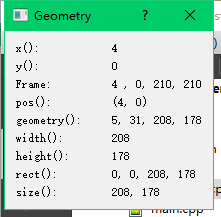
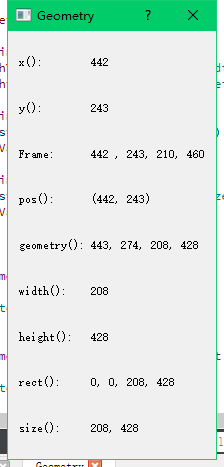
如图所示是Qt提供的关于位置的几种主要的位置函数。

示例
通过一个简单的例子来介绍上述各函数具体的用法。
- main.cpp
#include "geometry.h"

#include <QApplication>

int main(int argc, char *argv[])
{
    QApplication a(argc, argv);
    Geometry w;
    w.show();
    return a.exec();
}
- geometry.h
#ifndef GEOMETRY_H
#define GEOMETRY_H

#include <QDialog>
#include <QLabel>
#include <QGridLayout>

class Geometry : public QDialog
{
    Q_OBJECT

public:
    Geometry(QWidget *parent = nullptr);
    ~Geometry();
    void updateLabel();

protected:
    void moveEvent(QMoveEvent *);
    void resizeEvent(QResizeEvent *);

private:
    QLabel *xLabel;
    QLabel *xValue;
    QLabel *yLabel;
    QLabel *yValue;
    QLabel *posLabel;
    QLabel *posValue;
    QLabel *frameLabel;
    QLabel *frameValue;
    QLabel *geometryLabel;
    QLabel *geometryValue;
    QLabel *widthLabel;
    QLabel *widthValue;
    QLabel *heightLabel;
    QLabel *heightValue;
    QLabel *rectLabel;
    QLabel *rectValue;
    QLabel *sizeLabel;
    QLabel *sizeValue;
    QGridLayout *mainLayout;

};
#endif // GEOMETRY_H
- geometry.cpp
#include "geometry.h"

Geometry::Geometry(QWidget *parent)
    : QDialog(parent)
{
    setWindowTitle(tr("Geometry"));

    xLabel = new QLabel(tr("x():"));
    xValue = new QLabel;
    yLabel = new QLabel(tr("y():"));
    yValue = new QLabel;

    frameLabel = new QLabel(tr("Frame:"));
    frameValue = new QLabel;
    posLabel = new QLabel(tr("pos():"));
    posValue = new QLabel;
    geometryLabel = new QLabel(tr("geometry():"));
    geometryValue = new QLabel;

    widthLabel = new QLabel(tr("width():"));
    widthValue = new QLabel;
    heightLabel = new QLabel(tr("height():"));
    heightValue = new QLabel;

    rectLabel = new QLabel(tr("rect():"));
    rectValue = new QLabel;
    sizeLabel = new QLabel(tr("size():"));
    sizeValue = new QLabel;

    //布局
    mainLayout = new QGridLayout(this);
    mainLayout->addWidget(xLabel, 0, 0);
    mainLayout->addWidget(xValue, 0, 1);
    mainLayout->addWidget(yLabel, 1, 0);
    mainLayout->addWidget(yValue, 1, 1);
    mainLayout->addWidget(frameLabel, 2, 0);
    mainLayout->addWidget(frameValue, 2, 1);
    mainLayout->addWidget(posLabel, 3, 0);
    mainLayout->addWidget(posValue, 3, 1);
    mainLayout->addWidget(geometryLabel, 4, 0);
    mainLayout->addWidget(geometryValue, 4, 1);
    mainLayout->addWidget(widthLabel, 5, 0);
    mainLayout->addWidget(widthValue, 5, 1);
    mainLayout->addWidget(heightLabel, 6, 0);
    mainLayout->addWidget(heightValue, 6, 1);
    mainLayout->addWidget(rectLabel, 7, 0);
    mainLayout->addWidget(rectValue, 7, 1);
    mainLayout->addWidget(sizeLabel, 8, 0);
    mainLayout->addWidget(sizeValue, 8, 1);

    updateLabel();
}

Geometry::~Geometry()
{
}

void Geometry::updateLabel()
{
    QString xstr;
    xValue->setText(xstr.setNum(x()));
    QString ystr;
    yValue->setText(ystr.setNum(y()));

    QString framestr;
    framestr = QString("%1 , %2, %3, %4").arg(frameGeometry().x()).arg(frameGeometry().y())\
            .arg(frameGeometry().width()).arg(frameGeometry().height());
    frameValue->setText(framestr);

    QString posstr;
    posstr = QString("(%1, %2)").arg(pos().x()).arg(pos().y());
    posValue->setText(posstr);

    QString geostr;
    geostr = QString("%1, %2, %3, %4").arg(geometry().x()).arg(geometry().y()).arg(geometry().width())\
            .arg(geometry().height());
    geometryValue->setText(geostr);

    QString wstr, hstr;
    widthValue->setText(wstr.setNum(width()));
    heightValue->setText(hstr.setNum(height()));

    QString rectstr;
    rectstr = QString("%1, %2, %3, %4").arg(rect().x()).arg(rect().y()).arg(rect().width()).arg(rect().height());
    rectValue->setText(rectstr);

    QString sizestr;
    sizestr = QString("%1, %2").arg(size().width()).arg(size().height());
    sizeValue->setText(sizestr);

}

void Geometry::moveEvent(QMoveEvent *)
{
    updateLabel();
}

void Geometry::resizeEvent(QResizeEvent *)
{
    updateLabel();
}
- 实现结果

Qt5 基础图形的绘制
通过一个示例实现基本的图像绘制功能:
示例
实现一个基础图形绘制。
新建一个绘图项目,项目名称为“PaintEx”,基类选择“QWidget”,类名命名为“mainWidget”,取消“创建界面”复选框。
PaintArea类继承自QWidget类,在类声明中。首先声明一个枚举变量Shap,列举了所有用到的图像形状。
通过每个设置的槽函数来实现各个功能,具体描述如下:
- 设置形状参数:
void mainWidget::showshape(int value)
{
    //设置PaintArea对象的形状参数
    PaintArea::Shape shape = PaintArea::Shape(shapeCombox->itemData(value, Qt::UserRole).toInt());
    paintarea->setShap(shape);
}
- 设置画笔属性:
void mainWidget::showpencolor()
{
    //设置画笔颜色
    QColor color = QColorDialog::getColor(static_cast<int>(Qt::blue));
    penColorFrame->setPalette(QPalette(color));
    int value = penWidthSpinbox->value();
    //通过调用combox下的itemData返回当前显示的数据(枚举类型的序号)。
    Qt::PenStyle style = Qt::PenStyle(penstylecombox->itemData(penstylecombox->currentIndex(), Qt::UserRole).toInt());
    Qt::PenCapStyle cap = Qt::PenCapStyle(pencapcombox->itemData(pencapcombox->currentIndex(), Qt::UserRole).toInt());
    Qt::PenJoinStyle join = Qt::PenJoinStyle(penjoincombox->itemData(penjoincombox->currentIndex(), Qt::UserRole).toInt());

    paintarea->setPen(QPen(color, value, style, cap, join));//调用成员函数完成设置
}
- 设置画笔宽度
void mainWidget::showpenwidth(int value)
{
    //获取当前的画笔颜色
    QColor color = penColorFrame->palette().color(QPalette::Window);
    //获取当前选择的各个参数。
    Qt::PenStyle style = Qt::PenStyle(penstylecombox->itemData(penstylecombox->currentIndex(), Qt::UserRole).toInt());
    Qt::PenCapStyle cap = Qt::PenCapStyle(pencapcombox->itemData(pencapcombox->currentIndex(), Qt::UserRole).toInt());
    Qt::PenJoinStyle join = Qt::PenJoinStyle(penjoincombox->itemData(penjoincombox->currentIndex(), Qt::UserRole).toInt());

    paintarea->setPen(QPen(color, value, style, cap, join));//调用接口更新
}
- 关于设置画笔的各个接口都类似,其中风格式样如下:


void mainWidget::showpencolor()
{
    //设置画笔颜色,调用颜色对话框进行选择
    QColor color = QColorDialog::getColor(static_cast<int>(Qt::blue));
    penColorFrame->setPalette(QPalette(color));
    int value = penWidthSpinbox->value();
    //通过调用combox下的itemData返回当前显示的数据(枚举类型的序号)。
    Qt::PenStyle style = Qt::PenStyle(penstylecombox->itemData(penstylecombox->currentIndex(), Qt::UserRole).toInt());
    Qt::PenCapStyle cap = Qt::PenCapStyle(pencapcombox->itemData(pencapcombox->currentIndex(), Qt::UserRole).toInt());
    Qt::PenJoinStyle join = Qt::PenJoinStyle(penjoincombox->itemData(penjoincombox->currentIndex(), Qt::UserRole).toInt());

    paintarea->setPen(QPen(color, value, style, cap, join));//调用成员函数完成设置
}

void mainWidget::showpenwidth(int value)
{
    //获取当前的画笔颜色
    QColor color = penColorFrame->palette().color(QPalette::Window);
    //获取当前选择的各个参数。
    Qt::PenStyle style = Qt::PenStyle(penstylecombox->itemData(penstylecombox->currentIndex(), Qt::UserRole).toInt());
    Qt::PenCapStyle cap = Qt::PenCapStyle(pencapcombox->itemData(pencapcombox->currentIndex(), Qt::UserRole).toInt());
    Qt::PenJoinStyle join = Qt::PenJoinStyle(penjoincombox->itemData(penjoincombox->currentIndex(), Qt::UserRole).toInt());

    paintarea->setPen(QPen(color, value, style, cap, join));//调用接口更新
}

void mainWidget::showpenstyle(int stylevalue)
{
    //获取当前的画笔颜色
    QColor color = penColorFrame->palette().color(QPalette::Window);
    int value = penWidthSpinbox->value();
    //获取当前选择的各个参数。

    //使用改变的stylevalue参数获取style
    Qt::PenStyle style = Qt::PenStyle(penstylecombox->itemData(stylevalue, Qt::UserRole).toInt());
    Qt::PenCapStyle cap = Qt::PenCapStyle(pencapcombox->itemData(pencapcombox->currentIndex(), Qt::UserRole).toInt());
    Qt::PenJoinStyle join = Qt::PenJoinStyle(penjoincombox->itemData(penjoincombox->currentIndex(), Qt::UserRole).toInt());

    paintarea->setPen(QPen(color, value, style, cap, join));//调用接口更新
}

void mainWidget::showpencap(int capvalue)
{
    //获取当前的画笔颜色
    QColor color = penColorFrame->palette().color(QPalette::Window);
    int value = penWidthSpinbox->value();
    //获取当前选择的各个参数。
    Qt::PenStyle style = Qt::PenStyle(penstylecombox->itemData(penstylecombox->currentIndex(), Qt::UserRole).toInt());
    //使用当前参数capvalue获取当前参数
    Qt::PenCapStyle cap = Qt::PenCapStyle(pencapcombox->itemData(capvalue, Qt::UserRole).toInt());
    Qt::PenJoinStyle join = Qt::PenJoinStyle(penjoincombox->itemData(penjoincombox->currentIndex(), Qt::UserRole).toInt());

    paintarea->setPen(QPen(color, value, style, cap, join));//调用接口更新
}

void mainWidget::showpenjoin(int joninvalue)
{
    //获取当前的画笔颜色
    QColor color = penColorFrame->palette().color(QPalette::Window);
    int value = penWidthSpinbox->value();
    //获取当前选择的各个参数。
    Qt::PenStyle style = Qt::PenStyle(penstylecombox->itemData(penstylecombox->currentIndex(), Qt::UserRole).toInt());
    Qt::PenCapStyle cap = Qt::PenCapStyle(pencapcombox->itemData(pencapcombox->currentIndex(), Qt::UserRole).toInt());

    Qt::PenJoinStyle join = Qt::PenJoinStyle(penjoincombox->itemData(joninvalue, Qt::UserRole).toInt());

    paintarea->setPen(QPen(color, value, style, cap, join));//调用接口更新
}
- 设置画刷风格,具体风格有:

void mainWidget::showbrush(int value)
{
    //更新画刷属性
    //获取画刷颜色
    QColor color = brushColorFrame->palette().color(QPalette::Window);//获取当前画面的颜色

    Qt::BrushStyle style = Qt::BrushStyle(brushstylecombox->itemData(value, Qt::UserRole).toInt());
    //设置画刷风格
    if(style == Qt::LinearGradientPattern)//线性渐变风格
    {
        //创建线性渐变类对象需要两个参数,分别表示起止点位置
        QLinearGradient linearGradient(0, 0, 400, 400);
        linearGradient.setColorAt(0.0, Qt::white);
        linearGradient.setColorAt(0.2, color);
        linearGradient.setColorAt(1.0, Qt::black);
        linearGradient.setSpread(spread);
        paintarea->setBrush(linearGradient);
    }
    else if(style == Qt::RadialGradientPattern)//圆形渐变风格
    {
        //创建圆形渐变类,三个参数,圆心位置,半径值,焦点位置
        QRadialGradient radialGradient(200, 200, 150, 150, 100);
        radialGradient.setColorAt(0.0, Qt::white);
        radialGradient.setColorAt(0.2, color);
        radialGradient.setColorAt(1.0, Qt::black);
        radialGradient.setSpread(spread);
        paintarea->setBrush(radialGradient);
    }
    else if(style == Qt::ConicalGradientPattern)//锥形渐变
    {
        //创建锥形渐变类,两个参数-锥形定点位置和渐变分界线水平夹角
        QConicalGradient conicalgradient(200, 200, 30);
        conicalgradient.setColorAt(0.0, Qt::white);
        conicalgradient.setColorAt(0.2, color);
        conicalgradient.setColorAt(1.0, Qt::black);
        paintarea->setBrush(conicalgradient);
    }
    else if(style == Qt::TexturePattern)
    {
        paintarea->setBrush(QBrush(QPixmap("butterfly.png")));
    }
    else{
        //没有渐变风格的设置
        paintarea->setBrush(QBrush(color, style));
    }

}
- main.cpp
#include "mainwidget.h"

#include <QApplication>
#include <QFont>


int main(int argc, char *argv[])
{
    QApplication a(argc, argv);
    //设置字体
    QFont f("ZYSong18030", 12);
    a.setFont(f);

    mainWidget w;
    w.show();
    return a.exec();
}
- 最终界面效果


Qt5 双缓冲机制
所谓双缓冲机制,其实就是在绘制控件时,首先将要绘制的内容绘制在一个图片中,然后一次性将图片显示到控件中。
示例代码:
通过Drawwidget对象实现窗口绘制。
- drawwidget.h
#ifndef DRAWWIDGET_H
#define DRAWWIDGET_H

#include <QWidget>
#include <QPixmap>
#include <QColor>
#include <QPoint>
#include <QMouseEvent>
#include <QPainter>

class Drawwidget : public QWidget
{
    Q_OBJECT
public:
    explicit Drawwidget(QWidget *parent = nullptr);
    void mouseMoveEvent(QMouseEvent *event);
    void mousePressEvent(QMouseEvent *event);
    void paintEvent(QPaintEvent *event);
    void resizeEvent(QResizeEvent *event);

signals:

public slots:
    void setStyle(int);//设置风格
    void setWidth(int);//设置宽度
    void setColor(QColor);//设置颜色
    void clear();//清空画面

private:
    QPixmap *pix;
    QPoint startpos;
    QPoint endpos;
    int style;
    int weight;
    QColor color;
};

#endif // DRAWWIDGET_H
- drawwidget.cpp
#include "drawwidget.h"

Drawwidget::Drawwidget(QWidget *parent) : QWidget(parent)
{
    setAutoFillBackground(true);//对窗体背景色设置
    setPalette(QPalette(Qt::white));
    pix = new QPixmap(size());
    pix->fill(Qt::white);
    setMinimumSize(600, 400);//设置最小尺寸
}

void Drawwidget::setColor(QColor c)
{
    color = c;
}

void Drawwidget::setStyle(int s)
{
    style = s;
}

void Drawwidget::setWidth(int w)
{
    weight = w;
}

void Drawwidget::mousePressEvent(QMouseEvent *event)
{
    startpos = event->pos();
}

void Drawwidget::mouseMoveEvent(QMouseEvent *event)
{
    QPainter *painter = new QPainter;
    QPen pen;
    pen.setStyle((Qt::PenStyle)style);
    pen.setWidth(weight);
    pen.setColor(color);

    painter->begin(pix);
    painter->setPen(pen);
    //绘制直线
    painter->drawLine(startpos, event->pos());
    painter->end();

    startpos = event->pos();

    update();
}

void Drawwidget::paintEvent(QPaintEvent *event)//绘图事件
{
    QPainter p(this);

    p.drawPixmap(QPoint(0,0), *pix);

}

void Drawwidget::resizeEvent(QResizeEvent *event)
{
    if(height() > pix->height() || width() > pix->width())
    {
        QPixmap *newpix = new QPixmap(size());
        newpix->fill(Qt::white);

        QPainter p(newpix);
        p.drawPixmap(QPoint(0, 0), *pix);
        pix = newpix;
    }
    QWidget::resizeEvent(event);//完成其余工作
}

void Drawwidget::clear()
{
    QPixmap *clearpix = new QPixmap(size());
    clearpix->fill(Qt::white);
    pix = clearpix;
    update();
}
- MainWindow.h
#ifndef MAINWINDOW_H
#define MAINWINDOW_H

#include <QMainWindow>
#include "drawwidget.h"
#include <QLabel>
#include <QComboBox>
#include <QSpinBox>
#include <QToolButton>

class MainWindow : public QMainWindow
{
    Q_OBJECT

public:
    MainWindow(QWidget *parent = nullptr);
    ~MainWindow();

    void createToolBar();

public slots:
    void showColor();
    void showStyle();

private:
    Drawwidget *drawWidget;
    QLabel *stylelabel;
    QComboBox *styleComboBox;
    QLabel *widthLabel;
    QSpinBox *widthSpinBox;
    QToolButton *colorBtn;
    QToolButton *clearBtn;

};
#endif // MAINWINDOW_H
- MainWindow.cpp
#include "mainwindow.h"
#include <QToolBar>
#include <QColor>
#include <QColorDialog>


MainWindow::MainWindow(QWidget *parent)
    : QMainWindow(parent)
{
    drawWidget = new Drawwidget;
    setCentralWidget(drawWidget);//新建的DrawWidget作为主窗口的中央。
    createToolBar();//工具栏实现

    setMinimumSize(600, 400);
    showStyle();//初始化线型,设置空间当前值作为初始值.

    drawWidget->setWidth(widthSpinBox->value());
    drawWidget->setColor(Qt::black);
}

MainWindow::~MainWindow()
{
}

void MainWindow::createToolBar()
{
    QToolBar *toolbar = addToolBar("Tool");
    stylelabel = new QLabel(tr("线型风格:"));
    styleComboBox = new QComboBox;
    styleComboBox->addItem(tr("SolidLine"), static_cast<int>(Qt::SolidLine));
    styleComboBox->addItem(tr("DashLine"), static_cast<int>(Qt::DashLine));
    styleComboBox->addItem(tr("DotLine"), static_cast<int>(Qt::DotLine));
    styleComboBox->addItem(tr("DashDotLine"), static_cast<int>(Qt::DashDotLine));
    styleComboBox->addItem(tr("DashDotDotLine"), static_cast<int>(Qt::DashDotDotLine));
    connect(styleComboBox, SIGNAL(activated(int)), this, SLOT(showStyle()));
    widthLabel = new QLabel(tr("线宽:"));
    widthSpinBox = new QSpinBox;
    connect(widthSpinBox, SIGNAL(valueChanged(int)), drawWidget, SLOT(setWidth(int)));

    colorBtn = new QToolButton;
    QPixmap pixmap(20, 20);
    pixmap.fill(Qt::black);
    colorBtn->setIcon(QIcon(pixmap));
    connect(colorBtn, SIGNAL(clicked()), this, SLOT(showColor()));
    clearBtn = new QToolButton;
    connect(clearBtn, SIGNAL(clicked()), drawWidget, SLOT(clear()));

    toolbar->addWidget(stylelabel);
    toolbar->addWidget(styleComboBox);
    toolbar->addWidget(widthLabel);
    toolbar->addWidget(widthSpinBox);
    toolbar->addWidget(colorBtn);
    toolbar->addWidget(clearBtn);

}

void MainWindow::showStyle()
{
    drawWidget->setStyle(styleComboBox->itemData(styleComboBox->currentIndex(), Qt::UserRole).toInt());
}

void MainWindow::showColor()
{
    QColor color = QColorDialog::getColor(static_cast<int>(Qt::black), this);
    if(color.isValid())//有效颜色
    {
        drawWidget->setColor(color);
        QPixmap p(20, 20);
        p.fill(color);
        colorBtn->setIcon(QIcon(p));//更新按钮颜色
    }
}
- main.cpp
#include "mainwindow.h"

#include <QApplication>
#include <QFont>

int main(int argc, char *argv[])
{
    QApplication a(argc, argv);
    QFont font("ZYSong18030", 12);
    a.setFont(font);

    MainWindow w;
    w.show();

    return a.exec();
}
Qt5 显示SVG格式图片
SVG(即可缩放的矢量图片)。它是由万维网联盟在2000年8月指定的一种新的二维矢量图形格式,也是规范中的网络矢量图形标准,是一个开放的图形标准。
SVG格式的特点如下:
- 基于XML
- 采用文本来描述对象
- 具有交互性和动态性
- 完全支持DOM
SVG相对于GIF、JPEG格式的优势是,SVG是一种矢量图片格式,比GIF、JPEG等栅格格式具有众多优势,如文件小,对于网络而言,下载速度快;可任意缩放而不会破坏图像的清晰度和细节;图像中的文字独立于图像,文字保留可编辑和可搜寻的状态,也没有字体的限制,用户系统即使没有安装某一种字体,也可看到与制作时完全相同的画面等。正是基于它的格式的各种优点及开放性,SVG得到了众多组织和知名厂商的支持与认可,因此能够迅速地开发和推广应用。
Qt为SVG格式的图片显示与生成提供了专门的QtSvg模块,此模块中包含了与SVG图形相关的所有类,主要有QSvgWidget、QSvgRender和QGraphicsSvgItem。
示例
创建一个打开显示SVG图片的窗口,能够使用鼠标滚轮进行放大缩小及左键拖动。
代码结构如下:
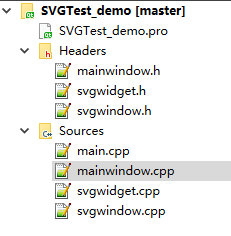
具体代码如下:
- main.cpp
#include "mainwindow.h"

#include <QApplication>

int main(int argc, char *argv[])
{
    QApplication a(argc, argv);
    MainWindow w;
    w.show();
    return a.exec();
}
- mainwindow.h
#ifndef MAINWINDOW_H
#define MAINWINDOW_H

#include <QMainWindow>
#include "svgwindow.h"

class MainWindow : public QMainWindow
{
    Q_OBJECT

public:
    MainWindow(QWidget *parent = nullptr);
    ~MainWindow();
    void createMenu();

public slots:
    void slotOpenFile();

private:
    SvgWindow *svgWindow;
};
#endif // MAINWINDOW_H
- mainwindow.cpp
#include "mainwindow.h"

MainWindow::MainWindow(QWidget *parent)
    : QMainWindow(parent)
{
    setWindowTitle(tr("SVG Viewer"));
    createMenu();
    svgWindow = new SvgWindow;
    setCentralWidget(svgWindow);
}

MainWindow::~MainWindow()
{
}

void MainWindow::createMenu()
{
    QMenu *fileMenu = menuBar()->addMenu(tr("文件"));
    QAction *openAct = new QAction(tr("打开"), this);
    connect(openAct, SIGNAL(triggered()), this, SLOT(slotOpenFile()));
    fileMenu->addAction(openAct);
}

void MainWindow::slotOpenFile()
{
    QString name = QFileDialog::getOpenFileName(this, "打开", "/", "svg files(*.svg)");
    svgWindow->setFile(name);
}
- svgwindow.h
#ifndef SVGWINDOW_H
#define SVGWINDOW_H

#include <QObject>
#include <QScrollArea>
#include "svgwidget.h"


class SvgWindow : public QScrollArea
{
    Q_OBJECT
public:
    SvgWindow(QWidget *parent = 0);
    void setFile(QString);
    void mousePressEvent(QMouseEvent *);
    void mouseMoveEvent(QMouseEvent *);

private:
    SvgWidget *svgWidget;
    QPoint mousePressPos;
    QPoint scrollBarValuesOnMousePress;

};

#endif // SVGWINDOW_H
- svgwindow.cpp
#include "svgwindow.h"

SvgWindow::SvgWindow(QWidget *parent):QScrollArea(parent)
{
    svgWidget = new SvgWidget;
    setWidget(svgWidget);//设置滚动区窗体
}

void SvgWindow::setFile(QString fileName)
{
    svgWidget->load(fileName);//加载新文件并显示
    QSvgRenderer *render = svgWidget->renderer();
    svgWidget->resize(render->defaultSize());//使窗体安装SVG图片默认尺寸进行显示。
}

void SvgWindow::mousePressEvent(QMouseEvent *ev)
{
    mousePressPos = ev->pos();
    scrollBarValuesOnMousePress.rx() = horizontalScrollBar()->value();
    scrollBarValuesOnMousePress.ry() = verticalScrollBar()->value();
    ev->accept();
}

void SvgWindow::mouseMoveEvent(QMouseEvent *ev)
{
    horizontalScrollBar()->setValue(scrollBarValuesOnMousePress.x()- ev->pos().x() + mousePressPos.x());//设置水平滑轮新位置
    verticalScrollBar()->setValue(scrollBarValuesOnMousePress.y() - ev->pos().y() + mousePressPos.y());//对垂直滑轮进行设置

    horizontalScrollBar()->update();
    verticalScrollBar()->update();
    ev->accept();
}
- svgwidget.h
#ifndef SVGWIDGET_H
#define SVGWIDGET_H

#include <QObject>
#include <QtSvg>
#include <QSvgWidget>
#include <QSvgRenderer>

class SvgWidget : public QSvgWidget
{
    Q_OBJECT
public:
    SvgWidget(QWidget *parent = 0);

    void wheelEvent(QWheelEvent *);//响应鼠标的滚轮事件,使SVG图片允许通过鼠标滚轮进行缩放。

private:
    QSvgRenderer *render;//用于图片显示尺寸的确定
};

#endif // SVGWIDGET_H
- svgwidget.cpp
#include "svgwidget.h"

SvgWidget::SvgWidget(QWidget *parent):QSvgWidget(parent)
{
    render = renderer();
}

void SvgWidget::wheelEvent(QWheelEvent *ev)
{
    const double diff = 0.1;    //缩放比例
    //获取图片当前尺寸
    QSize size = render->defaultSize();
    int width = size.width();
    int height = size.height();
    if(ev->delta() > 0)
    {
        //对图片的长、宽进行处理,放大一定比例
        width = int(this->width() + this->width() * diff);
        height = int(this->height() + this->height() * diff);
    }
    else{
        //对图片的长、宽进行处理,缩小一定比例
        width = int(this->width() - this->width() * diff);
        height = int(this->height() - this->height() * diff);
    }
    resize(width, height);//利用新的长、宽值进行resize操作。
}
- 执行结果: