一、Vuex 原理解析
github:vuex 源码
案例:Vuex 原理解析
Vuex 的原理关键:使用 Vue 实例管理状态
 <body>
    <div id="root">{{data}}</div>
    <div id="root2">{{data2}}</div>
    <div id="root3">
      <button @click="change">change</button>
    </div>
    <script>
      function registerPlugin(Vue) {
        const vuex = {}
        vuex._vm = new Vue({
          data: {
            message: 'hello vue.js'
          }
        })
        vuex.state = vuex._vm
        vuex.mutations = {
          setMessage(value) {
            vuex.state.message = value
          }
        }
        function init() {
          this.$store = vuex
        }
        Vue.mixin({
          beforeCreate: init
        })
      }
      Vue.use(registerPlugin)
      new Vue({
        el: '#root',
        computed: {
          data() {
            return this.$store.state.message
          }
        }
      })
      new Vue({
        el: '#root2',
        computed: {
          data2() {
            return this.$store.state.message
          }
        }
      })
      new Vue({
        el: '#root3',
        methods: {
          change() {
            const newValue = this.$store.state.message + '.'
            this.$store.mutations.setMessage(newValue)
          }
        }
      })
    </script>
  </body>
本实例模仿了vuex的功能:
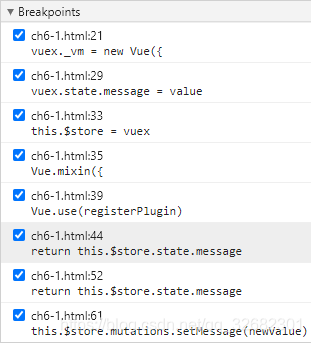
先打如上几个断点,刷新页面,依次停在如下断点上:
- Vue.use(registerPlugin) —— 全局使用 registerPlugin 组件
- vuex._vm = new Vue({…}) —— 创建全局Vue实例(关键)
- 利用vue的mixin混入机制,在beforeCreate钩子前混入init方法,init方法实现了store注入vue组件实例。

- 利用vue的mixin混入机制,在beforeCreate钩子前混入init方法,init方法实现了store注入vue组件实例。
- registerPlugin(){ init(){ this.$store = vuex } } —— 为#root绑定状态
- #root > computed: {data() { return this.$store.state.message} } —— #root获取状态数据
- registerPlugin(){ init(){ this.$store = vuex } } —— 为#root2绑定状态
- #root2 > computed: {data() { return this.$store.state.message} } —— #root2获取状态数据
- registerPlugin(){ init(){ this.$store = vuex } } —— 为#root3绑定状态
- 完成加载
点击按钮后: - #root3 > change() { this.$store.mutations.setMessage(newValue) }
- 对状态进行处理,并将新的状态统一到vuex中(这里其实也是双向绑定,响应式)
- vuex.mutations = {setMessage(value) {vuex.state.message = value}}
- 将新的状态统一到vuex中
- 最后将最新状态渲染到每个绑定状态的dom
拓展:
二、vue-router 实现原理
github:vue-router 源码
- vue-router 实例化时会初始化 this.history,不同 mode 对应不同的 history
// src/index.js 源码 35
constructor (options: RouterOptions = {}) {
    this.mode = mode

    switch (mode) {
      case 'history':
        this.history = new HTML5History(this, options.base)
        break
      case 'hash':
        this.history = new HashHistory(this, options.base, this.fallback)
        break
      case 'abstract':
        this.history = new AbstractHistory(this, options.base)
        break
      default:
        if (process.env.NODE_ENV !== 'production') {
          assert(false, `invalid mode: ${mode}`)
        }
    }
}
- 这里以 HashHistory 为例,vue-router 的 push 方法实现如下:
// src/index.js 源码 153
push (location: RawLocation, onComplete?: Function, onAbort?: Function) {
    // $flow-disable-line
    if (!onComplete && !onAbort && typeof Promise !== 'undefined') {
      return new Promise((resolve, reject) => {
        this.history.push(location, resolve, reject)
      })
    } else {
      this.history.push(location, onComplete, onAbort)
    }
}
- HashHistory 具体实现了 push 方法:
function pushHash (path) {
  if (supportsPushState) {
    pushState(getUrl(path))
  } else {
    window.location.hash = path
  }
}
对路由的监听通过 hash 相应的事件监听实现:
window.addEventListener(
  supportsPushState ? 'popstate' : 'hashchange',
  () => {
    const current = this.current
    if (!ensureSlash()) {
      return
    }
    this.transitionTo(getHash(), route => {
      if (supportsScroll) {
        handleScroll(this.router, route, current, true)
      }
      if (!supportsPushState) {
        replaceHash(route.fullPath)
      }
    })
  }
)
除此之外,vue-router 还提供了两个组件:
Vue.component('RouterView', View)
Vue.component('RouterLink', Link)
vue-router主要是通过history来实现相应功能,不同的history调用的底层方法不一样,底层都是通过window提供的location下面的相应方法进行实现的。
三、vue-router 路由守卫
新建项目并安装vue-router
vue create vue-router-test -d
cnpm i -S vue-router
创建 src/router.js:
import Vue from 'vue'
import Route from 'vue-router'
import HelloWorld from './components/HelloWorld'

Vue.use(Route)
const routes = [
  { path: '/hello-world', component: HelloWorld }
]
const router = new Route({
  routes
})

export default router
在 main.js 中引用 router,并加入 vue 实例:
import router from './router'

new Vue({
  render: h => h(App),
  router
}).$mount('#app')
修改App.vue为:
<template>
  <div id="app">
    <router-view/>
  </div>
</template>

<script>
export default {
  name: 'App'
}
</script>

<style>
</style>
运行npm run serve查看效果
新建src/components/A.vue
<template>
	<div>Component A</div>
</template>
src/router.js中添加如下内容:
import A from './components/A'
const routes = [
  { path: '/a', component: A },
  ...
]
查看http://localhost:8080/#/a
全局守卫
src/router.js中添加如下内容:
router.beforeEach((to, from, next) => {
  console.log('beforeEach', to, from)
  next()
})

router.beforeResolve((to, from, next) => {
  console.log('beforeResolve', to, from)
  next()
})

router.afterEach((to, from) => {
  console.log('afterEach', to, from)
})
可以尝试加入钩子函数,可看出,路由守卫是在钩子函数前执行(beforeCreate):
<script>
	export default {
		beforeCreate(){
			console.log('beforeCreate')
		},
		created(){
			console.log('created')
		},
		beforeMount(){
			console.log('beforeMount')
		},
		mounted(){
			console.log('mounted')
		},
		beforeDestroy(){
			console.log('beforeDestroy')
		},
	}
</script>
局部守卫
在A.vue中添加如下内容:
beforeRouteEnter (to, from, next) {
  // 不能获取组件实例 `this`
  console.log('beforeRouteEnter', to, from)
  next()
},
beforeRouteUpdate (to, from, next) {
  console.log('beforeRouteUpdate', to, from)
  next()
},
beforeRouteLeave (to, from, next) {
  console.log('beforeRouteLeave', to, from)
  next()
}
可以跳转到hello-word页面或是添加参数试试效果
四、路由元信息
通过 meta 定义路由元信息
const routes = [
  { path: '/a', component: A, meta: { title: 'Custom Title A' } },
  { path: '/hello-world', component: HelloWorld, meta: { title: 'HelloWorld' } }
]
使用 meta 信息动态修改标题
router.beforeEach((to, from, next) => {
  console.log('beforeEach', to, from)
  if (to.meta && to.meta.title) {
    document.title = to.meta.title
  } else {
    document.title = 'default title'
  }
  next()
})
也可以混合到生命周期中(不推荐):
Vue。mixin({
	beforeCreate(){
		if (this.$route.meta && this.$route.meta.title) {
			document.title = this.$route.meta.title
		} else {
			document.title = 'default title'
		}
	}
})
五、路由 API
新建src/components/B.vue
<template>
	<div>
		Component B
		<button @click="addRoute">AddRoute</button>
		<router-link to="/a">to Component A</router-link>
	</div>
</template>

<script>
	import A from './A'
	export default {
		methods: {
			addRoute() {
				// 使用 router.addRoutes 动态添加路由
				this.$router.addRoutes([{
					path: '/a', component: A, meta: { title: 'Custom Title A' },
				}])
			}
		}
	}
</script>
在router.js中将原始的a页面的内容改为b
import B from './components/B'
const routes = [
  { path: '/b', component: B, meta: { title: 'Custom Title B' } }
]
查看效果,点击按钮之前跳转A页面显示为空白,点击按钮之后,成功显示A页面
