一、什么是ASOC
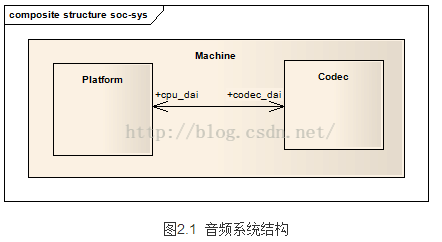
在嵌入式系统里面的声卡驱动为ASOC(ALSA System on Chip) ,它是在ALSA 驱动程序上封装的一层,分为3大部分,Machine,Platform和Codec ,三部分的关系如下图所示:其中Machine是指我们的开发板,Platform是指Soc,而Codec是指编解码器(如uda1341)
二、嵌入式系统声卡注册过程
这里我们以mini2440开发板为例
安装新驱动

insmod alsa/driver/myalsa/platform/s3c2440_iis.ko
insmod alsa/driver/myalsa/platform/s3c2440_dma.ko
insmod alsa/driver/myalsa/codec/uda1341.ko
insmod alsa/driver/myalsa/machine/s3c2440_uda1341.ko
首先我们往内核安装我们写好的声卡驱动(Machine部分的ko文件一定要放在最后面,Platform和Codec 则无特殊要求,下面会讲为什么)
1.platform部分
1.1 cpu_dai
安装s3c2440_iis.ko的时候会注册平台驱动s3c24xx_iis_driver,因为内核中有名字同为"s3c24xx-iis"的平台设备,所以调用了对应的probe函数s3c24xx_iis_dev_probe,该函数最终会把s3c24xx_i2s_dai(cpu_dai硬件操作相关)放入链表dai_list,并命名为"s3c24xx-iis"(后面Machine驱动根据这个名字来实例化声卡)
1. platform:
1.1 s3c24xx-i2s.c : 把s3c24xx_i2s_dai放入链表dai_list, .name = "s3c24xx-iis",
s3c24xx_iis_dev_probe
  snd_soc_register_dai(&pdev->dev, &s3c24xx_i2s_dai);
    list_add(&dai->list, &dai_list);
平台驱动
static struct platform_driver s3c24xx_iis_driver = {
.probe = s3c24xx_iis_dev_probe,
.remove = s3c24xx_iis_dev_remove,
.driver = {
.name = "s3c24xx-iis",
.owner = THIS_MODULE,
},
};
平台设备
struct platform_device s3c_device_iis = {
.name = "s3c24xx-iis",
.id = -1,
.num_resources = ARRAY_SIZE(s3c_iis_resource),
.resource = s3c_iis_resource,
.dev = {
.dma_mask = &s3c_device_iis_dmamask,
.coherent_dma_mask = 0xffffffffUL
}
};static struct snd_soc_dai_ops s3c24xx_i2s_dai_ops = {
.trigger = s3c24xx_i2s_trigger,
.hw_params = s3c24xx_i2s_hw_params,
.set_fmt = s3c24xx_i2s_set_fmt,
.set_clkdiv = s3c24xx_i2s_set_clkdiv,
.set_sysclk = s3c24xx_i2s_set_sysclk,
};
//cpu_dai相关的硬件操作
static struct snd_soc_dai_driver s3c24xx_i2s_dai = {
.probe = s3c24xx_i2s_probe,
.suspend = s3c24xx_i2s_suspend,
.resume = s3c24xx_i2s_resume,
.playback = {
.channels_min = 2,
.channels_max = 2,
.rates = S3C24XX_I2S_RATES,
.formats = SNDRV_PCM_FMTBIT_S8 | SNDRV_PCM_FMTBIT_S16_LE,},
.capture = {
.channels_min = 2,
.channels_max = 2,
.rates = S3C24XX_I2S_RATES,
.formats = SNDRV_PCM_FMTBIT_S8 | SNDRV_PCM_FMTBIT_S16_LE,},
.ops = &s3c24xx_i2s_dai_ops,
};1.2 platform_dma
安装s3c2440_dma.ko时,把samsung_asoc_platform放入了链表platform_list,并命名为"samsung-audio"(后面Machineko驱动根据这个名字来实例化声卡)
1.2 sound/soc/samsung/dma.c : 把samsung_asoc_platform放入了链表platform_list, .name = "samsung-audio",
samsung_asoc_platform_probe
  snd_soc_register_platform(&pdev->dev, &samsung_asoc_platform);
    list_add(&platform->list, &platform_list);
static struct snd_pcm_ops dma_ops = {
.open = dma_open,
.close = dma_close,
.ioctl = snd_pcm_lib_ioctl,
.hw_params = dma_hw_params,
.hw_free = dma_hw_free,
.prepare = dma_prepare,
.trigger = dma_trigger,
.pointer = dma_pointer,
.mmap = dma_mmap,
};
//cpu_dam相关的硬件操作
static struct snd_soc_platform_driver samsung_asoc_platform = {
.ops = &dma_ops,
.pcm_new = dma_new,
.pcm_free = dma_free_dma_buffers,
};2. codec注册部分
安装uda1341.ko 时,把soc_codec_dev_uda134x和uda134x_dai分别放入dai_list和codec_list链表(用于后面的Machineko驱动实例化声卡)
2. codec: uda134x.c
uda134x_codec_probe
  snd_soc_register_codec(&pdev->dev,&soc_codec_dev_uda134x, &uda134x_dai, 1);
      struct snd_soc_codec *codec;
      codec->driver = codec_drv; = &soc_codec_dev_uda134x

      snd_soc_register_dais(dev, dai_drv, num_dai); // uda134x_dai
        list_add(&dai->list, &dai_list); : 把uda134x_dai放入了链表dai_list
      list_add(&codec->list, &codec_list); 把soc_codec_dev_uda134x放入了链表codec_list
//设置codec芯片的硬件操作
static struct snd_soc_codec_driver soc_codec_dev_uda134x = {
.probe = uda134x_soc_probe,
.remove = uda134x_soc_remove,
.suspend = uda134x_soc_suspend,
.resume = uda134x_soc_resume,
.reg_cache_size = sizeof(uda134x_reg),
.reg_word_size = sizeof(u8),
.reg_cache_default = uda134x_reg,
.reg_cache_step = 1,
.read = uda134x_read_reg_cache,
.write = uda134x_write,
.set_bias_level = uda134x_set_bias_level,
};static struct snd_soc_dai_ops uda134x_dai_ops = {
.startup = uda134x_startup,
.shutdown = uda134x_shutdown,
.hw_params = uda134x_hw_params,
.digital_mute = uda134x_mute,
.set_sysclk = uda134x_set_dai_sysclk,
.set_fmt = uda134x_set_dai_fmt,
};
//codec_dai相关的硬件操作
static struct snd_soc_dai_driver uda134x_dai = {
.name = "uda134x-hifi",
/* playback capabilities */
.playback = {
.stream_name = "Playback",
.channels_min = 1,
.channels_max = 2,
.rates = UDA134X_RATES,
.formats = UDA134X_FORMATS,
},
/* capture capabilities */
.capture = {
.stream_name = "Capture",
.channels_min = 1,
.channels_max = 2,
.rates = UDA134X_RATES,
.formats = UDA134X_FORMATS,
},
/* pcm operations */
.ops = &uda134x_dai_ops,
};3. machine部分
machine部分内容很多,总的调用过程如下:
s3c24xx_uda134x_probe
  s3c24xx_uda134x_snd_device = platform_device_alloc("soc-audio", -1);
  platform_set_drvdata(s3c24xx_uda134x_snd_device, &snd_soc_s3c24xx_uda134x);
  platform_device_add(s3c24xx_uda134x_snd_device);

  .....
  soc_probe
    snd_soc_register_card(card);  // card = &snd_soc_s3c24xx_uda134x

      card->rtd = devm_kzalloc(card->dev,...
      card->rtd[i].dai_link = &card->dai_link[i];  // &s3c24xx_uda134x_dai_link

      list_add(&card->list, &card_list);

      snd_soc_instantiate_cards();  // 实例化声卡
          snd_soc_instantiate_card(card);
            3.1   /* bind DAIs */
                  for (i = 0; i < card->num_links; i++)
                    soc_bind_dai_link(card, i);
                        3.1.1 /* find CPU DAI */
                              rtd->cpu_dai = cpu_dai; = //&s3c24xx_i2s_dai
                        3.1.2 /* find_codec */
                              rtd->codec = codec;  = // codec, codec->driver=&soc_codec_dev_uda134x
                        3.1.3 /* find CODEC DAI */
                              rtd->codec_dai = codec_dai; // = &uda134x_dai
                        3.1.4 /* find_platform */
                              rtd->platform = platform; // = &samsung_asoc_platform
            3.2 /* initialize the register cache for each available codec */
                ret = snd_soc_init_codec_cache(codec, compress_type);

            3.3 snd_card_create
			err = snd_ctl_create(card);
				static struct snd_device_ops ops = {
					.dev_free = snd_ctl_dev_free,
					.dev_register =	snd_ctl_dev_register,
					.dev_disconnect = snd_ctl_dev_disconnect,
				};
				snd_device_new(card, SNDRV_DEV_CONTROL, card, &ops);
					dev->ops = ops;

            3.4 /* early DAI link probe */
                soc_probe_dai_link
                		/* probe the cpu_dai */
                		/* probe the CODEC */
                		/* probe the platform */
                		/* probe the CODEC DAI */
                		/* create the pcm */
                		ret = soc_new_pcm(rtd, num);
                			struct snd_pcm_ops *soc_pcm_ops = &rtd->ops;
							soc_pcm_ops->open	= soc_pcm_open;
							soc_pcm_ops->close	= soc_pcm_close;
							soc_pcm_ops->hw_params	= soc_pcm_hw_params;
							soc_pcm_ops->hw_free	= soc_pcm_hw_free;
							soc_pcm_ops->prepare	= soc_pcm_prepare;
							soc_pcm_ops->trigger	= soc_pcm_trigger;
							soc_pcm_ops->pointer	= soc_pcm_pointer;

                			snd_pcm_new
								static struct snd_device_ops ops = {
									.dev_free = snd_pcm_dev_free,
									.dev_register =	snd_pcm_dev_register,
									.dev_disconnect = snd_pcm_dev_disconnect,
								};
								err = snd_device_new(card, SNDRV_DEV_PCM, pcm, &ops)
									dev->ops = ops;

								pcm->private_data = rtd;
            3.5 snd_card_register
			snd_device_register_all
				err = dev->ops->dev_register(dev)调用前面snd_pcm_new的snd_pcm_dev_register
                              		snd_pcm_dev_register
                           			err = snd_register_device_for_dev(devtype, pcm->card,
						  	pcm->device,
						  	&snd_pcm_f_ops[cidx],
						  	pcm, str, dev);
安装s3c2440_uda1341.ko时,注册平台驱动s3c24xx_uda134x_driver,因为内核中有同名的平台设备mini2440_audio,所以调用了s3c24xx_uda134x_probe函数
//平台驱动
static struct platform_driver s3c24xx_uda134x_driver = {
	.probe  = s3c24xx_uda134x_probe,
	.remove = s3c24xx_uda134x_remove,
	.driver = {
		.name = "s3c24xx_uda134x",
		.owner = THIS_MODULE,
	},
};

//平台设备
static struct platform_device mini2440_audio = {
	.name		= "s3c24xx_uda134x",
	.id		= 0,
	.dev		= {
		.platform_data	= &mini2440_audio_pins,
	},
};①s3c24xx_uda134x_probe函数调用platform_set_drvdata把snd_soc_card结构体snd_soc_s3c24xx_uda134x(含有dai_link:用来负责连接Platform
和Codec,实例化的时候会用到)保存在pdev(platform_device)->dev->p->driver_data中,然后platform_device_add(s3c24xx_uda134x_snd_device),因为内核中有同名的平台驱动soc_driver,所以调用该驱动的probe函数(soc_probe函数)
    s3c24xx_uda134x_snd_device = platform_device_alloc("soc-audio", -1);
    platform_set_drvdata(s3c24xx_uda134x_snd_device, &snd_soc_s3c24xx_uda134x);
        dev_set_drvdata(&pdev->dev, data);
            dev->p->driver_data = data;
    platform_device_add(s3c24xx_uda134x_snd_device);
//指定了platform和codec
static struct snd_soc_dai_link s3c24xx_uda134x_dai_link = {
.name = "UDA134X",
.stream_name = "UDA134X",
.codec_name = "uda134x-codec",
.codec_dai_name = "uda134x-hifi",
.cpu_dai_name = "s3c24xx-iis",
.ops = &s3c24xx_uda134x_ops,
.platform_name = "samsung-audio",
};
static struct snd_soc_card snd_soc_s3c24xx_uda134x = {
.name = "S3C24XX_UDA134X",
.dai_link = &s3c24xx_uda134x_dai_link,
.num_links = 1, //只有1个dai_link
};/* ASoC platform driver */
static struct platform_driver soc_driver = {
.driver = {
.name = "soc-audio",
.owner = THIS_MODULE,
.pm = &snd_soc_pm_ops,
},
.probe = soc_probe,
.remove = soc_remove,
};②soc_probe函数调用platform_get_drvdata函数把第①步的snd_soc_card结构体snd_soc_s3c24xx_uda134x(含有dai_link:用来负责连接Platform和Codec,实例化的时候会用到)取出来,然后调用snd_soc_register_card函数注册它。
soc_probe
    struct snd_soc_card *card = platform_get_drvdata(pdev);
        return dev->p->driver_data;
snd_soc_register_card(card); // card = &snd_soc_s3c24xx_uda134x③snd_soc_register_card函数取出snd_soc_card结构体的dai_link(snd_soc_s3c24xx_uda134x结构体只有一个dai_link,这里的for只执行一次),然后调用snd_soc_instantiate_cards函数实例化声卡,其实就是根据snd_soc_s3c24xx_uda134x结构体里面的dai_link指定的名字,在dai_list、platform_list、codec_list链表找到我们之前platform和codec注册部分放入队列的那四个结构体。(soc_bind_dai_link函数逐个扫描这三个链表,根据card->dai_link[]中的名称进行匹配,匹配后把相应的codec,dai和platform实例赋值到(snd_soc_card)card->rtd[]中(snd_soc_pcm_runtime)。经过这个过程后,snd_soc_pcm_runtime:(card->rtd)中保存了本Machine中使用的Codec,DAI和Platform驱动的信息)
snd_soc_register_card
    card->rtd = kzalloc(sizeof(struct snd_soc_pcm_runtime) *
			    (card->num_links + card->num_aux_devs),
			    GFP_KERNEL);
    for (i = 0; i < card->num_links; i++)
		card->rtd[i].dai_link = &card->dai_link[i];
    list_add(&card->list, &card_list);
    snd_soc_instantiate_cards();
        snd_soc_instantiate_card(card);
            soc_bind_dai_link(card, i);
                /* find CPU DAI */
                rtd->cpu_dai = cpu_dai; = //&s3c24xx_i2s_dai
                /* find_codec */
                rtd->codec = codec;  = // codec, codec->driver=&soc_codec_dev_uda134x
                /* find CODEC DAI */
                rtd->codec_dai = codec_dai; // = &uda134x_dai
                /* find_platform */
rtd->platform = platform; // = &samsung_asoc_platform④调用传统ALSA声卡驱动的API,snd_card_create函数,该函数再调用snd_ctl_create,snd_ctl_create函数调用snd_device_new把snd_device_ops结构体ops填充到snd_device的ops成员(dev->ops = ops;),然后把snd_device挂到(snd_card)card->devices链表中。后面第⑧步snd_card_register的时候会用到snd_device_ops结构体的dev_register成员。目前我们只是先把它挂在一个链表中,如下图:
            3.3 snd_card_create
			err = snd_ctl_create(card);
				static struct snd_device_ops ops = {
					.dev_free = snd_ctl_dev_free,
					.dev_register =	snd_ctl_dev_register,
					.dev_disconnect = snd_ctl_dev_disconnect,
				};
				snd_device_new(card, SNDRV_DEV_CONTROL, card, &ops);
					dev->ops = ops;
⑤soc_probe_dai_link函数先是调用前面第三步找出来的cpu_dai等的probe函数(例如:s3c24xx_i2s_dai结构体的s3c24xx_iis_dev_probe),说白了就是硬件初始化。然后调用soc_new_pcm。
soc_probe_dai_link
   /* probe the cpu_dai */
    ret = cpu_dai->driver->probe(cpu_dai);
   /* probe the CODEC */
    ret = soc_probe_codec(card, codec);
   /* probe the platform */
    ret = platform->driver->probe(platform);
   /* probe the CODEC DAI */
    ret = codec_dai->driver->probe(codec_dai);
   /* create the pcm */
ret = soc_new_pcm(rtd, num);⑥soc_new_pcm函数函数先是给card->rtd->ops结构体里的函数指针赋值(APP调用的程序的过程中会通过这些函数再去调用到硬件相关的函数(如前面platform的s3c24xx_i2s_dai)),然后把card->rtd->ops的地址赋给substream->ops。最后调用snd_pcm_new。
ret = soc_new_pcm(rtd, num);
    struct snd_pcm_ops *soc_pcm_ops = &rtd->ops;

    soc_pcm_ops->open	= soc_pcm_open;
    soc_pcm_ops->close	= soc_pcm_close;
    soc_pcm_ops->hw_params	= soc_pcm_hw_params;
    soc_pcm_ops->hw_free	= soc_pcm_hw_free;
    soc_pcm_ops->prepare	= soc_pcm_prepare;
    soc_pcm_ops->trigger	= soc_pcm_trigger;
    soc_pcm_ops->pointer	= soc_pcm_pointer;

    snd_pcm_new

    snd_pcm_set_ops(pcm, SNDRV_PCM_STREAM_PLAYBACK, soc_pcm_ops);
        substream->ops = ops;
或
    snd_pcm_set_ops(pcm, SNDRV_PCM_STREAM_CAPTURE, soc_pcm_ops);
substream->ops = ops;⑦snd_pcm_new是传统的ALSA声卡驱动API,这一步和第④步是相似的,区别在于第④步对应的是snd_control,这里是snd_pcm的。snd_pcm_new执行完又回到soc_new_pcm函数的,这里有一个(snd_pcm)pcm->private_data = rtd;后面我们APP调用程序的时候会从pcm->private_data取出rtd(rtd里有对应我们开发板的cpu_dai、codec_dai...)
snd_pcm_new
	static struct snd_device_ops ops = {
		.dev_free = snd_pcm_dev_free,
		.dev_register =	snd_pcm_dev_register,
		.dev_disconnect = snd_pcm_dev_disconnect,
	};
	err = snd_device_new(card, SNDRV_DEV_PCM, pcm, &ops)
			dev->ops = ops;

pcm->private_data = rtd;⑧snd_card_register,该函数会调用前面第④、⑦步的snd_ctl_dev_register和snd_pcm_dev_register(通过snd_device_register_all()注册所有挂在该声卡下的逻辑设备,snd_device_register_all()实际上是通过snd_card的devices链表,遍历所有的snd_device,并且调用snd_device的ops->dev_register()来实现各自设备的注册的),这两个函数也是传统的ALSA声卡的API,它们最后都会调用到snd_register_device_for_dev函数,将snd_ctl_f_ops、snd_pcm_f_ops作为snd_register_device_for_dev的参数被传入,并被记录在snd_minors[minor]中的字段f_ops中,并创建设备节点(device_create(class_create则是在sound_core.c中))。用户程序需要打开control、pcm设备时,驱动程序通过snd_minors[]全局数组和此设备号,可以获得snd_ctl_f_ops、snd_pcm_f_ops结构中的各个回调函数(在另外一篇文章里介绍)
3.5 snd_card_register
		snd_device_register_all
			err = dev->ops->dev_register(dev)调用前面snd_ctl_create的snd_ctl_dev_register和snd_pcm_new的snd_pcm_dev_register
				snd_ctl_dev_register
					snd_register_device(SNDRV_DEVICE_TYPE_CONTROL, card, -1,&snd_ctl_f_ops, card, name)
                                            snd_register_device_for_dev
	                                            preg->type = type;
	                                            preg->card = card ? card->number : -1;
	                                            preg->device = dev;
	                                            preg->f_ops = f_ops;
	                                            preg->private_data = private_data;

	                                            snd_minors[minor] = preg;
	                                            preg->dev = device_create(sound_class, device, MKDEV(major, minor),private_data, "%s", name);

				和snd_pcm_dev_register
				 	err = snd_register_device_for_dev(devtype, pcm->card,
						  	pcm->device,
						  	&snd_pcm_f_ops[cidx],
						  	pcm, str, dev);
static const struct file_operations snd_ctl_f_ops =
{
.owner = THIS_MODULE,
.read = snd_ctl_read,
.open = snd_ctl_open,
.release = snd_ctl_release,
.llseek = no_llseek,
.poll = snd_ctl_poll,
.unlocked_ioctl = snd_ctl_ioctl,
.compat_ioctl = snd_ctl_ioctl_compat,
.fasync = snd_ctl_fasync,
};
const struct file_operations snd_pcm_f_ops[2] = {
{
.owner = THIS_MODULE,
.write = snd_pcm_write,
.aio_write = snd_pcm_aio_write,
.open = snd_pcm_playback_open,
.release = snd_pcm_release,
.llseek = no_llseek,
.poll = snd_pcm_playback_poll,
.unlocked_ioctl = snd_pcm_playback_ioctl,
.compat_ioctl = snd_pcm_ioctl_compat,
.mmap = snd_pcm_mmap,
.fasync = snd_pcm_fasync,
.get_unmapped_area = snd_pcm_get_unmapped_area,
},
{
.owner = THIS_MODULE,
.read = snd_pcm_read,
.aio_read = snd_pcm_aio_read,
.open = snd_pcm_capture_open,
.release = snd_pcm_release,
.llseek = no_llseek,
.poll = snd_pcm_capture_poll,
.unlocked_ioctl = snd_pcm_capture_ioctl,
.compat_ioctl = snd_pcm_ioctl_compat,
.mmap = snd_pcm_mmap,
.fasync = snd_pcm_fasync,
.get_unmapped_area = snd_pcm_get_unmapped_area,
}
};
至此,machine部分的任务已经完成。
4. 字符设备注册
在sound/core/sound.c中有alsa_sound_init()函数,register_chrdev中的参数major与之前创建pcm设备是device_create时的major是同一个,这样的结果是,当应用程序open设备文件/dev/snd/pcmCxDxp时,会进入snd_fops的open回调函数,该open函数以次设备号为索引,从snd_minors全局数组中取出当初注册conrol、pcm设备时填充的snd_minor结构,然后从snd_minor结构中取出control、pcm设备的f_ops,并且把file->f_op替换为pcm设备的f_ops,紧接着直接调用pcm设备的f_ops->open()...
#define CONFIG_SND_MAJOR	116	/* standard configuration */
static int major = CONFIG_SND_MAJOR;

static const struct file_operations snd_fops =
{
	.owner =	THIS_MODULE,
	.open =		snd_open,
	.llseek =	noop_llseek,
};

alsa_sound_init
    register_chrdev(major, "alsa", &snd_fops)
调用过程我们在下一篇文章再来详细介绍。
