因为最近项目不是很急(进入测试阶段),后期项目可能会用到spring boot相关技术,今天来了解下spring boot入门.
主要是介绍和编写第一个HelloWorld示例!
Spring Boot可以以jar包的形式来运行,运行一个Spring Boot项目我们只需要通过java -jar xx.jar类运行。非常方便。
“越来越多的企业选择使用spring boot 开发系统,spring boot牛在什么地方?难不难学?心动不如行动,让我们一起开始学习吧!”
使用Spring boot ,可以轻松的创建独立运行的程序,非常容易构建独立的服务组件,是实现分布式架构、微服务架构利器。Spring boot简化了第三方包的引用,通过提供的starter,简化了依赖包的配置。
Spring boot的优点
- 轻松创建独立的Spring应用程序。
- 内嵌Tomcat、jetty等web容器,不需要部署WAR文件。
- 提供一系列的“starter” 来简化的Maven配置。
- 开箱即用,尽可能自动配置Spring。
spring boot 快速入门
通过构建简单的REST应用,了解spring boot的开发基本流程,验证其简单、易用特性。
环境要求
Spring Boot 2.0.0.BUILD-SNAPSHOT 要求 Java 8 和 Spring Framework 5.0.2以上,Maven 3.2 以上或者Gradle 4。
本文使用 Spring Boot 1.5.9 、 Java8 和 Spring Framework 5.0.2.RELEASE以上,Maven 3.2。开发工具使用sping官方提供的spring suit tool 3.9.1(STS)。
创建项目
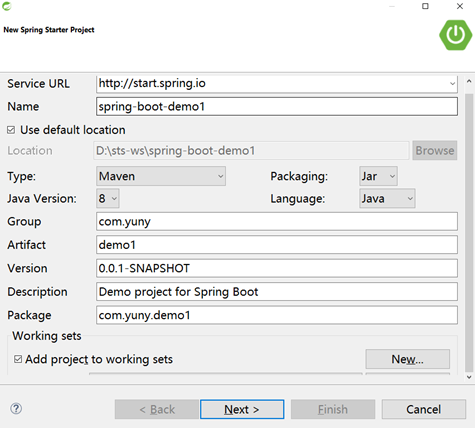
在STS中,通过NEW->Spring starter project创建spring boot 项目。

输入maven的group 和artifact。
选择spring boot版本和starter
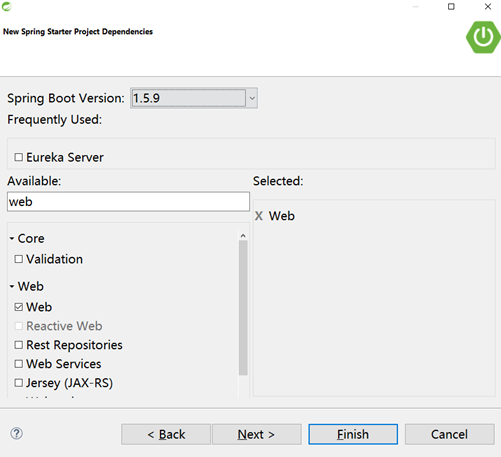
点击下一步,进入如下界面。
选择spring boot的版本,这里选择1.5.9 版本。
选择starter,通过搜索找到web 并勾选。点击完成。

创建项目的结构
点击finish 按钮。创建项目如下:
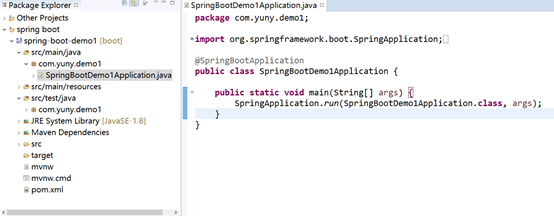
目录结构如图。
- Src/main/java。编写代码存放的目录。自动生成了程序入口代码 SpringBootDemo1Application.java。
- Src/main/resources。资源文件存放目录。自动生成了配置文件 application.properties
- Src/test/java。测试代码存放目录。自动生成了测试代码SpringBootDemo1ApplicationTests.java
POM文件说明
spring boot项目默认使用maven来构建,生成的POM文件如下:
|
1
2
3
4
5
6
7
8
9
10
11
12
13
14
15
16
17
18
19
20
21
22
23
24
25
26
27
28
29
30
31
32
33
34
35
36
37
38
39
40
41
42
43
44
45
46
47
48
|
<?
xml
version="1.0" encoding="UTF-8"?>
<
project
xmlns="http://maven.apache.org/POM/4.0.0" xmlns:xsi="http://www.w3.org/2001/XMLSchema-instance"
xsi:schemaLocation="http://maven.apache.org/POM/4.0.0 http://maven.apache.org/xsd/maven-4.0.0.xsd">
<
modelVersion
>4.0.0</
modelVersion
>
<
groupId
>com.yuny</
groupId
>
<
artifactId
>demo1</
artifactId
>
<
version
>0.0.1-SNAPSHOT</
version
>
<
packaging
>jar</
packaging
>
<
name
>spring-boot-demo1</
name
>
<
description
>Demo project for Spring Boot</
description
>
<
parent
>
<
groupId
>org.springframework.boot</
groupId
>
<
artifactId
>spring-boot-starter-parent</
artifactId
>
<
version
>1.5.9.RELEASE</
version
>
<
relativePath
/>
</
parent
>
<
properties
>
<
project.build.sourceEncoding
>UTF-8</
project.build.sourceEncoding
>
<
project.reporting.outputEncoding
>UTF-8</
project.reporting.outputEncoding
>
<
java.version
>1.8</
java.version
>
</
properties
>
<
dependencies
>
<
dependency
>
<
groupId
>org.springframework.boot</
groupId
>
<
artifactId
>spring-boot-starter-web</
artifactId
>
</
dependency
>
<
dependency
>
<
groupId
>org.springframework.boot</
groupId
>
<
artifactId
>spring-boot-starter-test</
artifactId
>
<
scope
>test</
scope
>
</
dependency
>
</
dependencies
>
<
build
>
<
plugins
>
<
plugin
>
<
groupId
>org.springframework.boot</
groupId
>
<
artifactId
>spring-boot-maven-plugin</
artifactId
>
</
plugin
>
</
plugins
>
</
build
>
</
project
>
|
其中,
设置spring-boot-starter-parent为父亲项目
这种方式可以比较容易的使用父项目中的starters的依赖。 当然也可以不用继承spring-boot-starter-parent为父亲,这种方式在以后我们会介绍。
|
1
2
3
4
5
6
|
<
parent
>
<
groupId
>org.springframework.boot</
groupId
>
<
artifactId
>spring-boot-starter-parent</
artifactId
>
<
version
>1.5.9.RELEASE</
version
>
<
relativePath
/>
</
parent
>
|
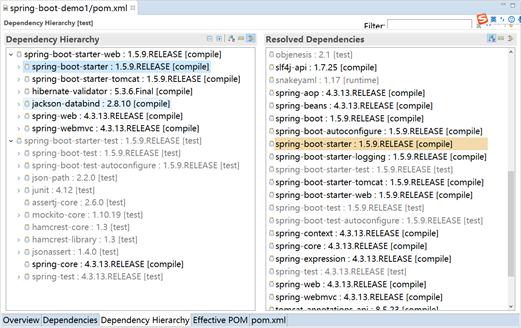
引入web依赖
Web starter依赖引入,会增加web容器、springweb、springmvc、jackson-databind等相关的依赖。
|
1
2
3
4
|
<
dependency
>
<
groupId
>org.springframework.boot</
groupId
>
<
artifactId
>spring-boot-starter-web</
artifactId
>
</
dependency
>
|
依赖层级关系如图
引入测试依赖
|
1
2
3
4
5
|
<
dependency
>
<
groupId
>org.springframework.boot</
groupId
>
<
artifactId
>spring-boot-starter-test</
artifactId
>
<
scope
>test</
scope
>
</
dependency
>
|
启动程序SpringBootDemo1Application 说明
我们通过此类的main函数来启动spring boot程序。
启动程序SpringBootDemo1Application是自动生成的,代码如下:

@SpringBootApplication
public class SpringBootDemo1Application {
    public static void main(String[] args) {
        SpringApplication.run(SpringBootDemo1Application.class, args);
    }
}
其中是@SpringBootApplication组合注解,兼备了@EnableAutoConfiguration和@ComponentScan 注解的功能(蓝色字体链接赋有详细解释)。
增加一个controller
在包com.yuny.demo1.controller下面增加类SampleController
|
1
2
3
4
5
6
7
|
@RestController
public class SampleController {
@RequestMapping("/")
String home() {
return "Hello World!";
}
}
|
运行启动程序后,访问http://localhost:8080/就可以访问这个controller的功能了。
启动很简单,直接选择SpringBootDemo1Application.java文件,使用java application方式运行即可:

访问效果:

测试
增加一个测试类
|
1
2
3
4
5
6
7
8
9
10
11
12
13
14
15
16
17
18
19
20
21
22
|
import static org.springframework.test.web.servlet.result.MockMvcResultMatchers.content; import static org.springframework.test.web.servlet.result.MockMvcResultMatchers.status; import org.junit.Before; import org.junit.Test; import org.junit.runner.RunWith; import org.springframework.boot.test.context.SpringBootTest; import org.springframework.http.MediaType; import org.springframework.mock.web.MockServletContext; import org.springframework.test.context.junit4.SpringJUnit4ClassRunner; import org.springframework.test.context.web.WebAppConfiguration; import org.springframework.test.web.servlet.MockMvc; import org.springframework.test.web.servlet.request.MockMvcRequestBuilders; import org.springframework.test.web.servlet.setup.MockMvcBuilders; @RunWith
(SpringJUnit4ClassRunner.
class
)
@SpringBootTest
(classes = MockServletContext.
class
)
@WebAppConfiguration
public
class
SampleControllerTest {
private
MockMvc mock;
@Before
public
void
setUp()
throws
Exception {
mock = MockMvcBuilders.standaloneSetup(
new
SampleController()).build();
}
@Test
public
void
testHome()
throws
Exception {
mock.perform(MockMvcRequestBuilders.get(
"/"
).accept(MediaType.APPLICATION_JSON))
.andExpect(status().isOk())
.andExpect(content().string(equalTo(
"Hello World!"
)));
}
}
|
上面我们创建项目及pom文件中提及到了starter,这里做一下扩展学习(先了解一下即可)
Spring Boot应用启动器基本的一共有44种,具体如下:
1)spring-boot-starter
这是Spring Boot的核心启动器,包含了自动配置、日志和YAML。
2)spring-boot-starter-actuator
帮助监控和管理应用。
3)spring-boot-starter-amqp
通过spring-rabbit来支持AMQP协议(Advanced Message Queuing Protocol)。
4)spring-boot-starter-aop
支持面向方面的编程即AOP,包括spring-aop和AspectJ。
5)spring-boot-starter-artemis
通过Apache Artemis支持JMS的API(Java Message Service API)。
6)spring-boot-starter-batch
支持Spring Batch,包括HSQLDB数据库。
7)spring-boot-starter-cache
支持Spring的Cache抽象。
8)spring-boot-starter-cloud-connectors
支持Spring Cloud Connectors,简化了在像Cloud Foundry或Heroku这样的云平台上连接服务。
9)spring-boot-starter-data-elasticsearch
支持ElasticSearch搜索和分析引擎,包括spring-data-elasticsearch。
10)spring-boot-starter-data-gemfire
支持GemFire分布式数据存储,包括spring-data-gemfire。
11)spring-boot-starter-data-jpa
支持JPA(Java Persistence API),包括spring-data-jpa、spring-orm、Hibernate。
12)spring-boot-starter-data-mongodb
支持MongoDB数据,包括spring-data-mongodb。
13)spring-boot-starter-data-rest
通过spring-data-rest-webmvc,支持通过REST暴露Spring Data数据仓库。
14)spring-boot-starter-data-solr
支持Apache Solr搜索平台,包括spring-data-solr。
15)spring-boot-starter-freemarker
支持FreeMarker模板引擎。
16)spring-boot-starter-groovy-templates
支持Groovy模板引擎。
17)spring-boot-starter-hateoas
通过spring-hateoas支持基于HATEOAS的RESTful Web服务。
18)spring-boot-starter-hornetq
通过HornetQ支持JMS。
19)spring-boot-starter-integration
支持通用的spring-integration模块。
20)spring-boot-starter-jdbc
支持JDBC数据库。
21)spring-boot-starter-jersey
支持Jersey RESTful Web服务框架。
22)spring-boot-starter-jta-atomikos
通过Atomikos支持JTA分布式事务处理。
23)spring-boot-starter-jta-bitronix
通过Bitronix支持JTA分布式事务处理。
24)spring-boot-starter-mail
支持javax.mail模块。
25)spring-boot-starter-mobile
支持spring-mobile。
26)spring-boot-starter-mustache
支持Mustache模板引擎。
27)spring-boot-starter-redis
支持Redis键值存储数据库,包括spring-redis。
28)spring-boot-starter-security
支持spring-security。
29)spring-boot-starter-social-facebook
支持spring-social-facebook
30)spring-boot-starter-social-linkedin
支持pring-social-linkedin
31)spring-boot-starter-social-twitter
支持pring-social-twitter
32)spring-boot-starter-test
支持常规的测试依赖,包括JUnit、Hamcrest、Mockito以及spring-test模块。
33)spring-boot-starter-thymeleaf
支持Thymeleaf模板引擎,包括与Spring的集成。
34)spring-boot-starter-velocity
支持Velocity模板引擎。
35)spring-boot-starter-web
S支持全栈式Web开发,包括Tomcat和spring-webmvc。
36)spring-boot-starter-websocket
支持WebSocket开发。
37)spring-boot-starter-ws
支持Spring Web Services。
Spring Boot应用启动器面向生产环境的还有2种,具体如下:
1)spring-boot-starter-actuator
增加了面向产品上线相关的功能,比如测量和监控。
2)spring-boot-starter-remote-shell
增加了远程ssh shell的支持。
最后,Spring Boot应用启动器还有一些替换技术的启动器,具体如下:
1)spring-boot-starter-jetty
引入了Jetty HTTP引擎(用于替换Tomcat)。
2)spring-boot-starter-log4j
支持Log4J日志框架。
3)spring-boot-starter-logging
引入了Spring Boot默认的日志框架Logback。
4)spring-boot-starter-tomcat
引入了Spring Boot默认的HTTP引擎Tomcat。
5)spring-boot-starter-undertow
引入了Undertow HTTP引擎(用于替换Tomcat)。