安装ik中文分词器
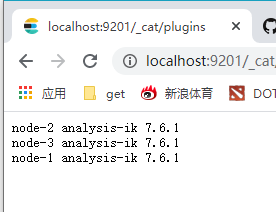
在bin目录下cmd:elasticsearch-plugin install https://github.com/medcl/elasticsearch-analysis-ik/releases/download/v7.6.1/elasticsearch-analysis-ik-7.6.1.zip,然后http://localhost:9201/_cat/plugins可以检查一下
ik分词器的分词过程
首先ik分词器跟之前的分词器的过程都一样,都要经过三部分:
字符过滤器:过滤特殊符号和停用词(例如“的”等量词)
字符处理:根据词库词典中的词把中文拆分,如果没有这个词就会分成单个字
分词过滤:如果搜索内容中有英文,会转成小写
接下来测试一下
GET _analyze?pretty
{
"analyzer":"ik_max_word",
"text":"中华人民共和国国歌"
}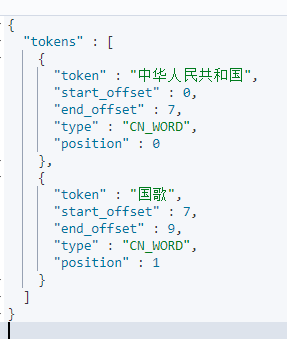 关于ik_smart,叫做智能分词器,他会在保证不重复的情况下尽可能分出最有意义的一组词,相对应的还有一种ik_max_word,最大化分词,分词结果:
{
  "tokens" : [
    {
      "token" : "中华人民共和国",
      "start_offset" : 0,
      "end_offset" : 7,
      "type" : "CN_WORD",
      "position" : 0
    },
    {
      "token" : "中华人民",
      "start_offset" : 0,
      "end_offset" : 4,
      "type" : "CN_WORD",
      "position" : 1
    },
    {
      "token" : "中华",
      "start_offset" : 0,
      "end_offset" : 2,
      "type" : "CN_WORD",
      "position" : 2
    },
    {
      "token" : "华人",
      "start_offset" : 1,
      "end_offset" : 3,
      "type" : "CN_WORD",
      "position" : 3
    },
    {
      "token" : "人民共和国",
      "start_offset" : 2,
      "end_offset" : 7,
      "type" : "CN_WORD",
      "position" : 4
    },
    {
      "token" : "人民",
      "start_offset" : 2,
      "end_offset" : 4,
      "type" : "CN_WORD",
      "position" : 5
    },
    {
      "token" : "共和国",
      "start_offset" : 4,
      "end_offset" : 7,
      "type" : "CN_WORD",
      "position" : 6
    },
    {
      "token" : "共和",
      "start_offset" : 4,
      "end_offset" : 6,
      "type" : "CN_WORD",
      "position" : 7
    },
    {
      "token" : "国",
      "start_offset" : 6,
      "end_offset" : 7,
      "type" : "CN_CHAR",
      "position" : 8
    },
    {
      "token" : "国歌",
      "start_offset" : 7,
      "end_offset" : 9,
      "type" : "CN_WORD",
      "position" : 9
    }
  ]
}
那么我们怎么选择呢?
这里有两个配置命令,analyzer:是在构建索引的时候指定用哪个分词器,search_analyzer:在搜索过程中指定用哪个分词器。
从之前说es匹配原理的时候说过,索引创建后分词存起来,搜索的时候分词然后匹配,一般对于英文来说,两种分词器应该要一样,不然分的词都不同,匹配度应该不会很高,但对于中文来说不一样,中文结构复杂,所以我们可以在构建索引的时候使用ik_max_word,查询的时候使用ik_smart,这样在构建索引的时候可以最大化的进行分词,在搜索的时候使用智能的,尽可能的了解用户的需要。
在config\analysis-ik下,打开extra_stopword.dic就可以看到中文的过滤词
 其他还有很多分词的词,可以去看下,后面我们就要扩展中文词库了。
接下来讲一下在实际应用中的使用
首先肯定是搜索索引的定义,定义字段逻辑,定义字段类型,定义字段analyzer
以大众点评的模式为例,创建索引首先将需要的数据库字段转化成es。这里有几个点需要说一下,"analyzer": "whitespace"这个分词器只是分空格,其他都不管,适用于标签搜索,"fielddata": true表示不仅分词,查询后还会把分词有几个统计出来,"type": "keyword"表示不分词,关键词搜索。
PUT /shop
{
  "settings": {
    "number_of_shards": 1,
    "number_of_replicas": 1
  },
  "mappings": {
    "properties": {
      "id":{"type":"integer"},
      "name":{"type": "text","analyzer": "ik_max_word","search_analyzer": "ik_smart"},
      "tags":{"type": "text","analyzer": "whitespace","fielddata": true},
      "location":{"type": "geo_point"},
      "remark_score":{"type": "double"},
      "price_per_man":{"type": "integer"},
      "category_id":{"type": "integer"},
      "category_name":{"type": "keyword"},
      "seller_id":{"type": "integer"},
      "seller_remark_score":{"type": "double"},
      "seller_disabled_flag":{"type": "integer"}
    }
  }
}
接下来构建索引内容,有几种方法:
全量索引构建:原本es中没有内容,将数据库中的数据全部导入es中。
增量索引构建:数据库发生增删改的时候,es对应的数据也要做出相应的调整,这就需要增量索引构建了。
关于全量索引的构建,可以使用logstash-input-jdbc,这是个包含数据源、数据目标、同步方式的组件,他作为一个管道连接了数据库和es,数据库这边可以监听,且可以查询数据,然后将查询出来的数据通过字段一一映射到es数据源中,并发给es做索引构建,那么如何使用logstash-input-jdbc?
首先下载logstash:https://artifacts.elastic.co/downloads/logstash/logstash-7.6.1.zip
解压进入bin目录,输入logstash-plugin install logstash-input-jdbc安装logstash-input-jdbc
由于logstash没有sql驱动,所以需要把驱动放一个位置,然后新建一个配置文件一个sql文件:
input {
    jdbc {
      # mysql 数据库链接,dianpingdb为数据库名
      jdbc_connection_string => "jdbc:mysql://localhost:3306/dianpingdb?useUnicode=true&characterEncoding=UTF-8&serverTimezone=UTC&nullCatalogMeansCurrent=true"
      # 用户名和密码
      jdbc_user => "root"
      jdbc_password => "root"
      # 驱动
      jdbc_driver_library => "F:/elasticsearch/logstash-7.6.1/logstash-7.6.1/bin/mysql/mysql-connector-java-8.0.13.jar"
      # 驱动类名
      jdbc_driver_class => "com.mysql.cj.jdbc.Driver"
      jdbc_paging_enabled => "true"
      jdbc_page_size => "50000"
    # 执行的sql 文件路径+名称
      statement_filepath => "F:/elasticsearch/logstash-7.6.1/logstash-7.6.1/bin/mysql/jdbc.sql"
      # 设置监听间隔  各字段含义(由左至右)分、时、天、月、年,全部为*默认含义为每分钟都更新
      schedule => "* * * * *"
    }
}

output {
    elasticsearch {
      # ES的IP地址及端口
        hosts => ["localhost:9200"]
      # 索引名称
        index => "shop"
		document_type => "_doc"
      # 自增ID 需要关联的数据库中有有一个id字段,对应索引的id号
        document_id => "%{id}"
    }
    stdout {
     # JSON格式输出
        codec => json_lines
    }
}
select a.id,a.name,a.tags,concat(a.latitude,',',a.longitude) as
location,a.remark_score,a.price_per_man,a.category_id,b.name as
category_name,a.seller_id,c.remark_score as seller_remark_score,c.disabled_flag as
seller_disabled_flag from shop a inner join category b on a.category_id = b.id inner join
seller c on c.id = a.seller_idsql语句需要和es的字段一一对应起来。然后在bin目录下运行logstash -f mysql/jdbc.conf,数据就进来了。

关于增量索引构建 ,可以基于时间轴的方式,数据库中一般都会有创建时间和修改时间,那么可以利用logstash每隔一定时间扫描数据库,扫描到数据改变的,就改变es数据。要做到这一点,需要新建一个文件last_value_meta,可以写:2010-11-11 11:11:11,然后在配置文件里加

开启了last_run_metadata_path,就代表会轮询了。然后sql加判断条件:
where a.updated_at > :sql_last_value or b.updated_at > :sql_last_value or c.updated_at > :sql_last_value 这样,当数据库有修改的时候,这里就会定期更新数据了。
当然,如果数据库变化频率非常大的时候,这种以时间轴为条件的更新也可能会不准确,当然还会有别的方法,以后再说。
es还有一个很强大的功能就是做距离计算,两个点的坐标来计算出两点的距离:
GET /shop/_search
{
  "query": {
    "match": {
      "name": "凯悦"
    }
  },
  "_source": "*",
  "script_fields": {
    "distance": {
      "script": {
        "source": "haversin(lat,lon,doc['location'].lat,doc['location'].lon)",
        "lang": "expression",
        "params": {
          "lat":31.37,
          "lon":127.12
        }
      }
    }
  }
}
"_source": "*"是指显示所有字段
haversin用于计算距离的公式,doc[]是es中存的,params是传入的,"lang": "expression"代表是表达式,输出结果:distance中就有了距离,单位是公里

距离有了,接下来我们进行距离排序:
GET /shop/_search
{
  "query": {
    "match": {
      "name": "凯悦"
    }
  },
  "_source": "*",
  "script_fields": {
    "distance": {
      "script": {
        "source": "haversin(lat,lon,doc['location'].lat,doc['location'].lon)",
        "lang": "expression",
        "params": {
          "lat":31.37,
          "lon":127.12
        }
      }
    }
  },
  "sort": [
    {
      "_geo_distance": {
        "location": {
          "lat": 31.37,
          "lon": 127.12
        },
        "order": "asc",
        "unit": "km",
        "distance_type": "arc"
      }
    }
  ]
}
当然在正常使用中,只用距离做排序并不可取,所以还是需要用function来定义一个打分公式,这里用高斯衰减函数来进行:
GET /shop/_search
{
  "_source": "*",
  "script_fields": {
    "distance": {
      "script": {
        "source": "haversin(lat,lon,doc['location'].lat,doc['location'].lon)",
        "lang": "expression",
        "params": {
          "lat":31.37914171,
          "lon":127.4878992
        }
      }
    }
  },
  "query": {
    "function_score": {
      "query": {
        "bool": {
          "must": [
            {"match": {"name": {"query": "凯悦"}}},
            {"term": {"seller_disabled_flag": 0}}
          ]
        }
      },
      "functions": [
        {
          "gauss":{
            "location":{
              "origin":"31.37914171,127.4878992",
              "scale":"100km",
              "offset":"0km",
              "decay":0.5
            }
          }
        }
      ]
    }
  }
}
这个意思就是指距离这个点0-100km区间,打分很好,但是超过这个值以后,就会以比较快的速度分数衰减,分也就越低。
当然,还可以在这种打分机制上价格权重:
GET /shop/_search
{
  "_source": "*",
  "script_fields": {
    "distance": {
      "script": {
        "source": "haversin(lat,lon,doc['location'].lat,doc['location'].lon)",
        "lang": "expression",
        "params": {
          "lat":31.306171,
          "lon":121.525841
        }
      }
    }
  },
  "query": {
    "function_score": {
      "query": {
        "bool": {
          "must": [
            {"match": {"name": {"query": "凯悦","boost": 0.1}}},
            {"term": {"seller_disabled_flag": 0}}
          ]
        }
      },
      "functions": [
        {
          "gauss":{
            "location":{
              "origin":"31.306171,121.525841",
              "scale":"100km",
              "offset":"0km",
              "decay":0.5
            }
          },
          "weight": 9
        },
        {
          "field_value_factor": {
            "field": "remark_score"
          },
          "weight": 0.2
        },
        {
          "field_value_factor": {
            "field": "seller_remark_score"
          },
          "weight": 0.1
        }
      ],
      "score_mode": "sum",
      "boost_mode": "sum"
    }
  }
}
query中的"boost": 0.1代表该条件所占权重只有0.1,在function中也可以用weight来控制重要性,还有一个"boost_mode": "sum"是指function中的分数与query的分数相加,如果想变成query只是查询条件,打分都是在下面的话,把sum改成replace就可以了。
