最近在开发中需要用到很多图片,结合以前学过python,想着能不能自己动手搞一个爬虫出来,并且有一个师弟发消息问我能不能帮他写个python脚本,说干就干。
ps:敲完了今晚的码子,竟然对scrapy异步爬虫有点懵逼,技术不能停滞啊,这才几天就忘差不多了。慢慢来吧,心态放稳,lets go!
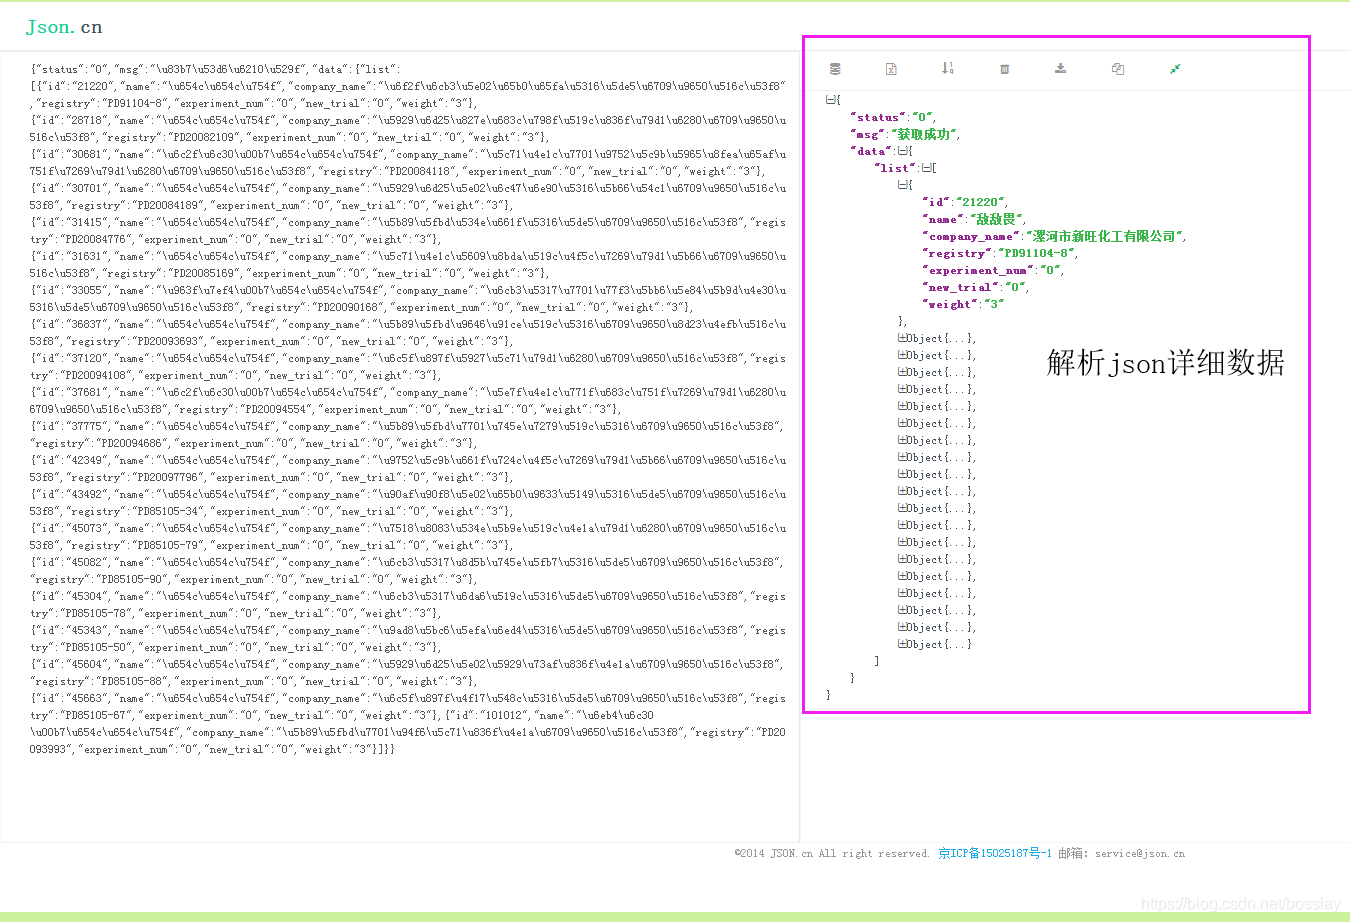
#先来通过查看网页请求看看爬虫基本的逻辑思路

-
↓↓↓爬虫的码子↓↓↓主要是爬虫代码
 # -*- coding: utf-8 -*-
from fake_useragent import UserAgent
import scrapy
import json
from nongcha.items import NongchaItem  # 引入item字段


class NcSpider(scrapy.Spider):
    name = 'nc'
    allowed_domains = ['cha.191.cn']
    #start_urls = ['http://cha.191.cn/home/search']
    ua = UserAgent()
    user_agent = f'{ua.random}'

    def __init__(self):
        super(NcSpider, self).__init__()
        self.page = 1

    def start_requests(self):
        """重写父类的请求函数"""
        yield scrapy.FormRequest(
            url='http://cha.191.cn/home/search/dosearch',
            formdata={
                'p': f'{self.page}',
                'keyword': '敌敌畏'},
            headers={
                'Cookie': 'PHPSESSID=komdv7aiqci9eq1hkf0u4npc63',
            #     'Content-Type': 'application/x-www-form-urlencoded; charset=UTF-8',
                'Referer': 'http://cha.191.cn/home/search'
            }
        )
        # 发起formrequest格式的请求,携带请求需要的相关参数

    def parse(self, response):
        """解析返回的数据的函数"""
        data = json.loads(response.text)
        if data['status'] == '0':  # 判断数据是否返回成功 0 为一个字符串
            infos = data['data']['list']  # 获取详细数据,列表嵌套20个字典
            if infos:   #  如果返回的数据为真
                for info in infos:  # 迭代这个列表
                    nc_id = info.get('id')  # 商品id
                    nc_name = info.get('name')  # 商品名称
                    nc_company = info.get('company_name')  # 商品公司名称
                    nc_registry = info.get('registry')  # 商品登记证号
                    nc_img = 'http://cha.191.cn/home/product/detailToImage/productId/' + nc_id  # 拼接商品详情页图片的地址
                    print(nc_company)
                    item = NongchaItem()  # 创建item实例  以便下载+存储数据
                    item['nc_id'] = nc_id
                    item['nc_name'] = nc_name
                    item['nc_company'] = nc_company
                    item['nc_registry'] = nc_registry
                    item['nc_img'] = [nc_img]
                    yield item

                self.page += 1  # 下一页数据
                try:
                    yield scrapy.FormRequest(
                        url='http://cha.191.cn/home/search/dosearch',
                        formdata={
                            'p': f'{self.page}',
                            'keyword': '敌敌畏'},
                        headers={
                            'Cookie': 'PHPSESSID=komdv7aiqci9eq1hkf0u4npc63',
                            #     'Content-Type': 'application/x-www-form-urlencoded; charset=UTF-8',
                            'Referer': 'http://cha.191.cn/home/search'
                        },
                        callback=self.parse
                    )
                    # 发起formrequest格式的请求,携带请求需要的相关参数
                except Exception as out_of_page:
                    print(out_of_page)
                    print('全部数据爬取完成!')


if __name__ == '__main__':
    from scrapy.cmdline import execute
    execute(['scrapy', 'crawl', 'nc'])
-
↓↓↓pipeline的码子↓↓↓最复杂的吧 分为下载图片+Excel表格存储+异步数据库存储
    # -*- coding: utf-8 -*-

# Define your item pipelines here
#
# Don't forget to add your pipeline to the ITEM_PIPELINES setting
# See: https://doc.scrapy.org/en/latest/topics/item-pipeline.html
from scrapy.pipelines.images import ImagesPipeline  # 引入scrapy自带的图片下载pipeline
from scrapy import Request
import xlwt
from twisted.enterprise import adbapi
import pymysql
from nongcha.items import NongchaItem

class NongchaPipeline(object):

    def process_item(self, item, spider):
        return item


class CustomImagePipeline(ImagesPipeline):

    """图片下载数据模型,继承自自带模型"""

    def get_media_requests(self, item, info):  # 重写一个创建请求对象的函数
        return [Request(x, meta={'item': item}) for x in item.get(self.images_urls_field, [])]
        # 创建图片地址的请求对象,并将item放在request中进行携带

    def file_path(self, request, response=None, info=None):
        """返回图片路径以及保存地址的函数"""
        item = request.meta.get('item')  # 从request中取出item
        if item:
            nc_company = item['nc_company']  # 商品名称
            nc_id = item['nc_id']  # 商品id
            path = f'{nc_company}/{nc_id}.jpg'  # 拼接图片路径
            item['img_path'] = f'images/{path}'  # 将图片存储的路径 写入item字段
            return path


class ExcelPipeline(object):
    """将数据写入Excel表格的模型"""

    def open_spider(self, spider):
        """启动爬虫时执行的函数"""

        self.workbook = xlwt.Workbook(encoding='utf-8')  # 建立工作簿
        self.sheet = self.workbook.add_sheet('ncc_data')  # 写入表头
        self.sheet.write(0, 0, 'nc_id')
        self.sheet.write(0, 1, 'nc_name')
        self.sheet.write(0, 2, 'nc_company')
        self.sheet.write(0, 3, 'nc_registry')
        self.sheet.write(0, 4, 'nc_img')
        self.sheet.write(0, 5, 'img_path')

        self.count = 0  # 记录行号

    def process_item(self, item, spider):
        """处理数据的函数"""
        self.count += 1  # 逐行加一
        self.sheet.write(self.count, 0, item['nc_id'])
        self.sheet.write(self.count, 1, item['nc_name'])
        self.sheet.write(self.count, 2, item['nc_company'])
        self.sheet.write(self.count, 3, item['nc_registry'])
        self.sheet.write(self.count, 4, item['nc_img'][0])
        self.sheet.write(self.count, 5, item['img_path'])

        self.workbook.save('ncc.data.xls')  # 保存数据
        return item


class AsyncWriteMysql(object):
    """异步写入数据库的模型"""

    def __init__(self):
        """初始化属性"""
        prams = dict(
            host='127.0.0.1',  # 本地
            port=3306,  # 端口
            user='root',  # 用户
            password='123456',  # 密码
            db='ncc',  # 数据库名称
            charset='utf8',  # 字符集
            use_unicode=True,  # 是否使用unicode编码
            cursorclass=pymysql.cursors.DictCursor  # 使用字典类型的游标
        )  # 创建字典型的参数
        self.db_pool = adbapi.ConnectionPool('pymysql', **prams)  # 创建连接池对象 1.用来操作mysql的第三方包名称 2.连接数据库所需的参数

    def process_item(self, item, spider):
        """处理数据的函数"""
        result = self.db_pool.runInteraction(self.insert_item, item)  # 让连接池执行任务,异步执行任务,任务完成之后 会返回执行的结果
        result.addErrback(self.insert_error, item)  # 给执行结果添加错误回调函数
        return item

    def insert_item(self, cursor, item):
        """向数据库插入数据的函数 cursor为必要参数"""
        # item = NongchaItem()
        item.save(cursor)  # 判断当前数据属于哪一个爬虫类,并调取函数作相应保存

    def insert_error(self, fail, item):  # 错误回调函数
        print(item['nc_id'])  # 输出出现错误的数据id
        print(fail)  # 输出错误信息
- **
↓↓↓item的码子↓↓↓主要是写入数据字段以及保存数据进数据库**
    # -*- coding: utf-8 -*-

# Define here the models for your scraped items
#
# See documentation in:
# https://doc.scrapy.org/en/latest/topics/items.html

import scrapy


class NongchaItem(scrapy.Item):
    # define the fields for your item here like:
    # name = scrapy.Field()
    nc_id = scrapy.Field()
    nc_name = scrapy.Field()
    nc_company = scrapy.Field()
    nc_registry = scrapy.Field()
    nc_img = scrapy.Field()
    img_path = scrapy.Field()

    def save(self, cursor):
        """将数据保存至数据库的函数"""
        cursor.execute("INSERT INTO ncc_data(nc_id, nc_name, nc_company, nc_registry, nc_img, img_path)VALUES (%s, %s, %s, %s, %s, %s)", (self['nc_id'], self['nc_name'], self['nc_company'], self['nc_registry'], self['nc_img'][0], self['img_path']))
        # 执行sql语句
- **
↓↓↓settings的码子↓↓↓大部分注释掉**
    # -*- coding: utf-8 -*-

# Scrapy settings for nongcha project
#
# For simplicity, this file contains only settings considered important or
# commonly used. You can find more settings consulting the documentation:
#
#     https://doc.scrapy.org/en/latest/topics/settings.html
#     https://doc.scrapy.org/en/latest/topics/downloader-middleware.html
#     https://doc.scrapy.org/en/latest/topics/spider-middleware.html

BOT_NAME = 'nongcha'

SPIDER_MODULES = ['nongcha.spiders']
NEWSPIDER_MODULE = 'nongcha.spiders'


# Crawl responsibly by identifying yourself (and your website) on the user-agent
#USER_AGENT = 'nongcha (+http://www.yourdomain.com)'

# Obey robots.txt rules
ROBOTSTXT_OBEY = False

# Configure maximum concurrent requests performed by Scrapy (default: 16)
CONCURRENT_REQUESTS = 16

# Configure a delay for requests for the same website (default: 0)
# See https://doc.scrapy.org/en/latest/topics/settings.html#download-delay
# See also autothrottle settings and docs
# DOWNLOAD_DELAY = 1
# The download delay setting will honor only one of:
#CONCURRENT_REQUESTS_PER_DOMAIN = 16
#CONCURRENT_REQUESTS_PER_IP = 16

# Disable cookies (enabled by default)
#COOKIES_ENABLED = False

# Disable Telnet Console (enabled by default)
#TELNETCONSOLE_ENABLED = False

# Override the default request headers:

DEFAULT_REQUEST_HEADERS ={
    'Host': 'cha.191.cn',
}
# Enable or disable spider middlewares
# See https://doc.scrapy.org/en/latest/topics/spider-middleware.html
# #激活爬虫的中间件
# SPIDER_MIDDLEWARES = {
#    'nongcha.middlewares.NongChaMiddleware': 100,
# }

# Enable or disable downloader middlewares
# See https://doc.scrapy.org/en/latest/topics/downloader-middleware.html
# DOWNLOADER_MIDDLEWARES = {
#    'nongcha.middlewares.NongChaMiddleware': 543,
# }

# Enable or disable extensions
# See https://doc.scrapy.org/en/latest/topics/extensions.html
#EXTENSIONS = {
#    'scrapy.extensions.telnet.TelnetConsole': None,
#}

# Configure item pipelines
# See https://doc.scrapy.org/en/latest/topics/item-pipeline.html
ITEM_PIPELINES = {
    'nongcha.pipelines.CustomImagePipeline': 200,
    'nongcha.pipelines.ExcelPipeline': 300,
    'nongcha.pipelines.AsyncWriteMysql': 250

}
# 保存图片地址的字段名
IMAGES_URLS_FIELD = 'nc_img'
#  图片保存的路径
IMAGES_STORE = 'images'
# Enable and configure the AutoThrottle extension (disabled by default)
# See https://doc.scrapy.org/en/latest/topics/autothrottle.html
#AUTOTHROTTLE_ENABLED = True
# The initial download delay
#AUTOTHROTTLE_START_DELAY = 5
# The maximum download delay to be set in case of high latencies
#AUTOTHROTTLE_MAX_DELAY = 60
# The average number of requests Scrapy should be sending in parallel to
# each remote server
#AUTOTHROTTLE_TARGET_CONCURRENCY = 1.0
# Enable showing throttling stats for every response received:
#AUTOTHROTTLE_DEBUG = False

# Enable and configure HTTP caching (disabled by default)
# See https://doc.scrapy.org/en/latest/topics/downloader-middleware.html#httpcache-middleware-settings
#HTTPCACHE_ENABLED = True
#HTTPCACHE_EXPIRATION_SECS = 0
#HTTPCACHE_DIR = 'httpcache'
#HTTPCACHE_IGNORE_HTTP_CODES = []
#HTTPCACHE_STORAGE = 'scrapy.extensions.httpcache.FilesystemCacheStorage'
↓↓↓数据存储界面↓↓↓
#敌敌畏图片数据 基本包含所有的信息了

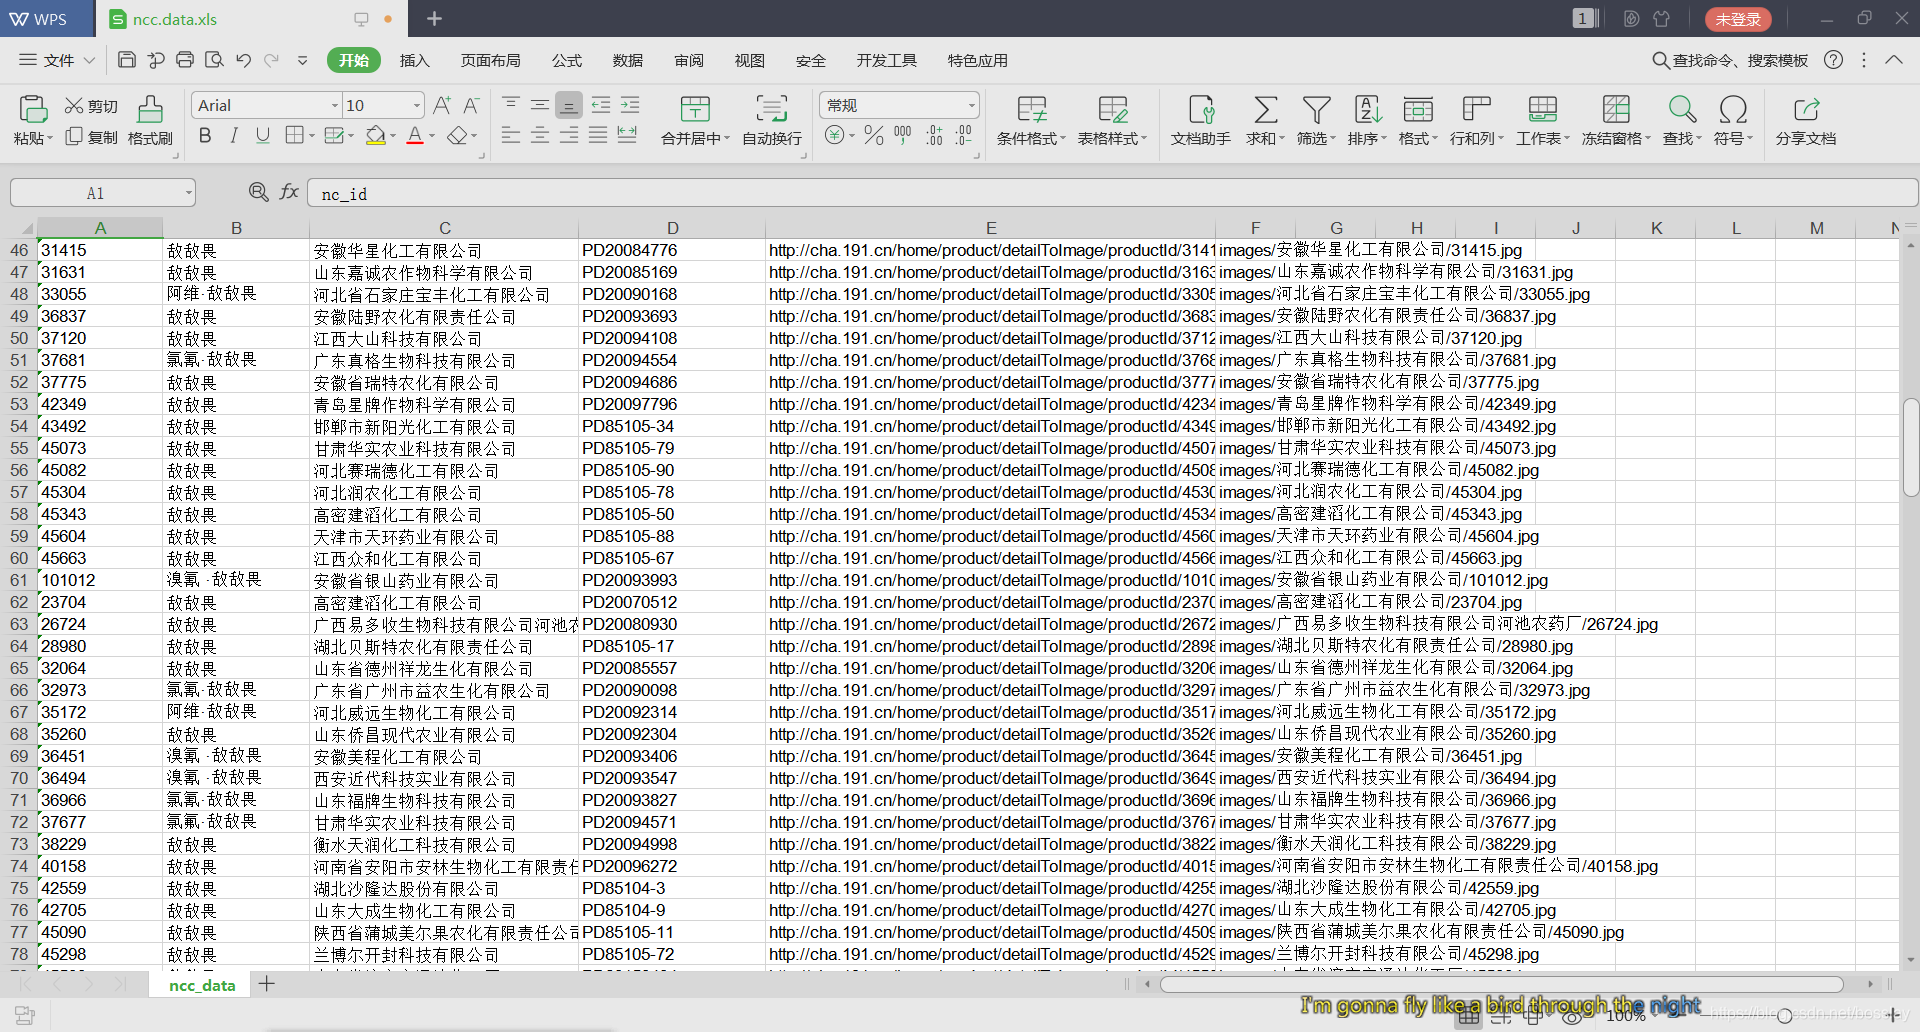
#EXCEL表单数据
#Mysql数据库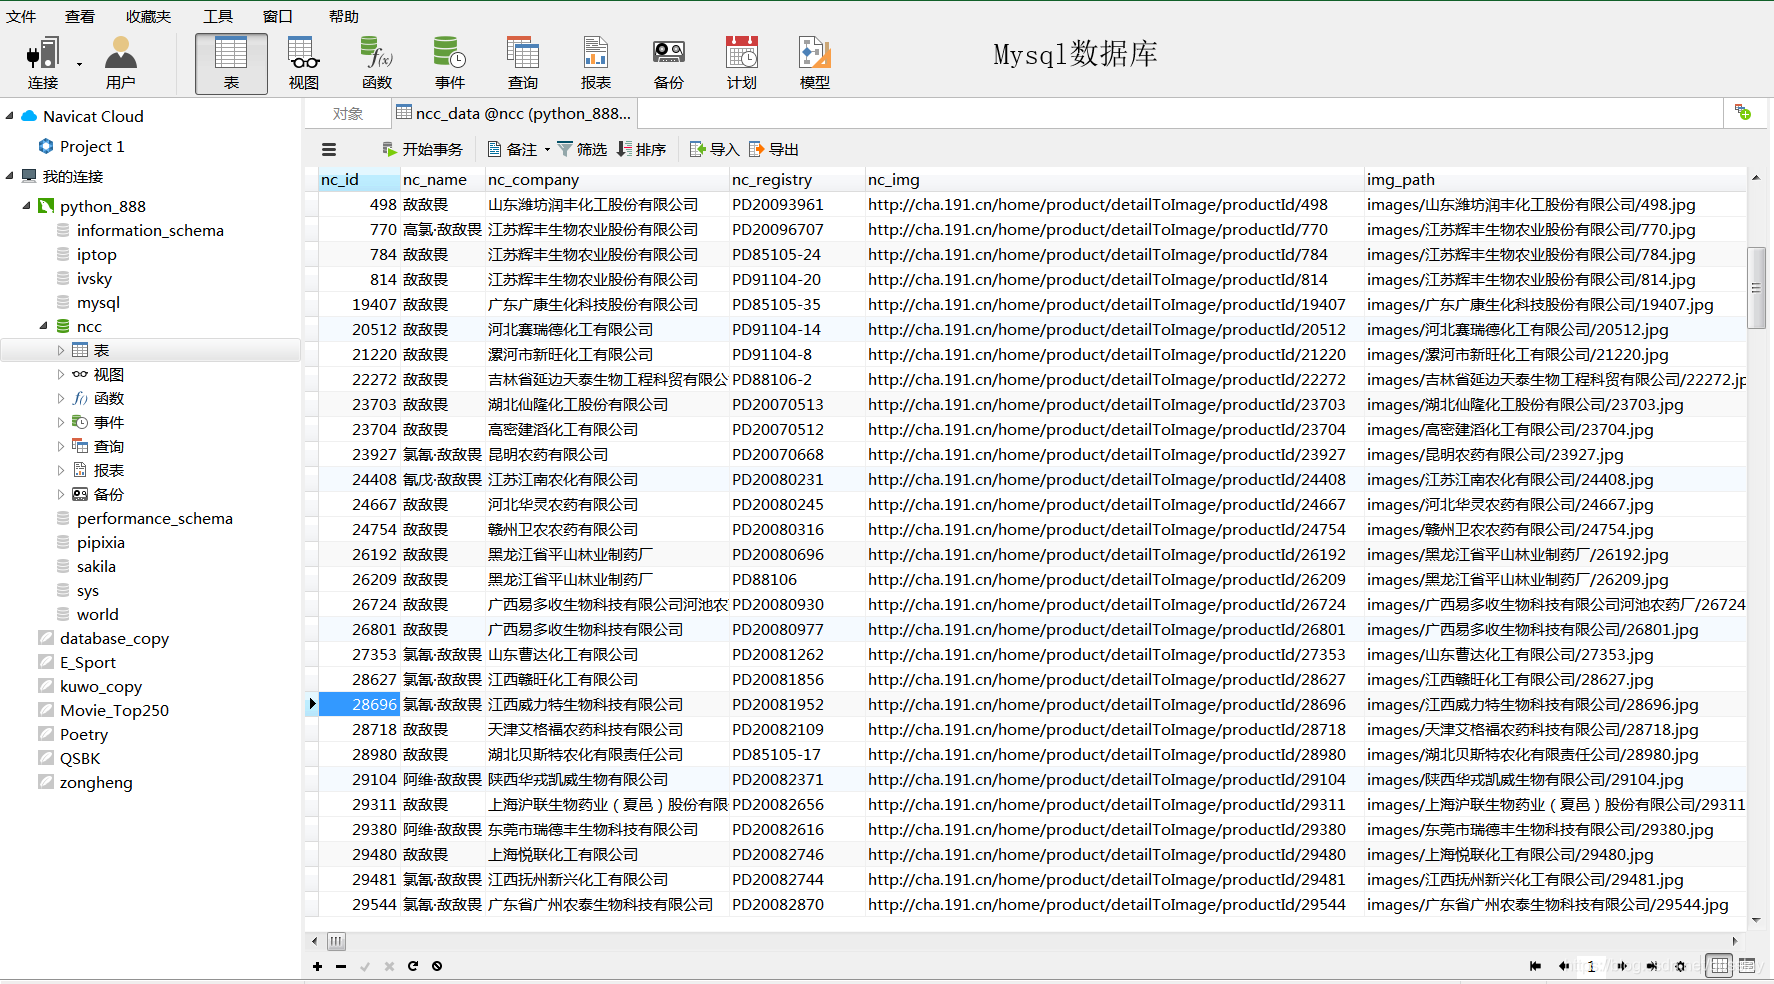
#就酱,欢迎一起研究,继续补习Typescript去啦~
