在Spring中实现依赖注入有两种方式,分别是通过注解的方式和通过xml的方式,以下案例是在Spring3.x版本进行讲解。
一、使用注解的方式实现IOC
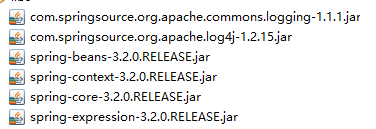
1.1、导入Spring类库
1.2、编写数据访问层DAO
这里面只是提供了一个空的类,我们的目的是为了测试在Service层中是否可以成功的将这个Dao类注入。通过@Repository注解来标注Dao
package com.dao;

import org.springframework.stereotype.Repository;

/**
 *
 * 配置DAO
 *
 * @author thinkpad
 *
 */
@Repository("userDao")
public class UserDao {

}
1.3、编写服务层Service
我们通过@Service注解来标注Service
package com.service;

import javax.annotation.PostConstruct;
import javax.annotation.PreDestroy;
import javax.annotation.Resource;

import org.springframework.beans.factory.annotation.Value;
import org.springframework.context.annotation.Scope;
import org.springframework.stereotype.Service;

import com.dao.UserDao;

/**
 * 配置Service
 *
 * @author thinkpad
 *
 */
@Service("userService")
@Scope("singleton") //单实例
//@Scope("prototype") //多实例
public class UserService {

	@Value("用户服务")
	private String info;

	// @Autowired
	// @Qualifier("userDao")
	@Resource(name = "userDao")
	private UserDao dao;

	/**
	 * 初始化注解
	 */
	@PostConstruct
	public void setup() {
		System.out.println("对象初始化");
	}

	/**
	 * 销毁注解
	 */
	@PreDestroy
	public void teardown() {
		System.out.println("对象销毁");
	}

	@Override
	public String toString() {
		return "info:" + this.info + ",dao:" + this.dao;
	}
}
1.4、在applicationContext.xml中配置注解扫描
<?xml version="1.0" encoding="UTF-8"?>
<beans
    xmlns="http://www.springframework.org/schema/beans"
	xmlns:xsi="http://www.w3.org/2001/XMLSchema-instance"
	xmlns:context="http://www.springframework.org/schema/context"
	xsi:schemaLocation="
http://www.springframework.org/schema/beans http://www.springframework.org/schema/beans/spring-beans.xsd
http://www.springframework.org/schema/context http://www.springframework.org/schema/context/spring-context.xsd">

	<!--
		在是用xml+注解混合开发时,必须配置annotation-config,完全使用注解开发,是不需要配置的
		<context:annotation-config/>
	-->
	<!-- 扫描entity包下的所有类,寻找注解 -->
	<context:component-scan base-package="com" />
</beans>
1.5、测试
package test;

import org.junit.Test;
import org.springframework.context.support.ClassPathXmlApplicationContext;

import com.service.UserService;

public class JTest {

	@Test
	public void test1() {
		ClassPathXmlApplicationContext ctx = new ClassPathXmlApplicationContext("applicationContext.xml");
		UserService en = (UserService) ctx.getBean("userService");
		System.out.println(en);

		UserService en2 = (UserService) ctx.getBean("userService");
		System.out.println(en.equals(en2));
		ctx.close();
	}

}
1.6、运行结果

二、使用XML的方式实现IOC
1.1、导入Spring类库
1.2、要注入的实体对象
package test.entity;

public class EntityInner {

	private String name;

	public void setName(String name) {
		this.name = name;
	}

	public String getName() {
		return name;
	}

	@Override
	public String toString() {
		return "Inner姓名:" + this.name;
	}

}

package test.entity;

public class Entity1 {

	private String name;

	public Entity1(String name) {
		this.name = name;
	}

	@Override
	public String toString() {
		return "姓名:" + this.name;
	}
}

package test.entity;

public class Entity2 {

	private String name;

	public void setName(String name) {
		this.name = name;
	}

	@Override
	public String toString() {
		return "姓名:" + this.name;
	}
}

package test.entity;

public class Entity3 {

	private String name;

	private EntityInner inner;

	public void setName(String name) {
		this.name = name;
	}

	public void setInner(EntityInner inner) {
		this.inner = inner;
	}

	@Override
	public String toString() {
		return "姓名:"+this.name + ",inner:"+this.inner.toString();
	}
}

package test.entity;

import java.util.List;
import java.util.Map;
import java.util.Properties;

public class Entity4 {

	private List<String> cities;
	private Map<String, Integer> persons;
	private Properties users;

	public List<String> getCities() {
		return cities;
	}

	public void setCities(List<String> cities) {
		this.cities = cities;
	}

	public Map<String, Integer> getPersons() {
		return persons;
	}

	public void setPersons(Map<String, Integer> persons) {
		this.persons = persons;
	}

	public Properties getUsers() {
		return users;
	}

	public void setUsers(Properties users) {
		this.users = users;
	}

}
1.3、在applicationContext.xml中配置注解扫描
applicationContext.xml
<?xml version="1.0" encoding="UTF-8"?>
<beans
    xmlns="http://www.springframework.org/schema/beans"
	xmlns:p="http://www.springframework.org/schema/p"
	xmlns:xsi="http://www.w3.org/2001/XMLSchema-instance"
	xsi:schemaLocation="http://www.springframework.org/schema/beans http://www.springframework.org/schema/beans/spring-beans.xsd"
	>
	<!--
    		bean标签的属性:
    		id:遵守xml约束的id约束,id约束保证这个属性值是唯一的,而且必须以字母开始,可以使用字母、数字、连接符、下划线、句号、冒号
    		name:功能和id属性一直,但是name属性没有xml的id约束,如果bean中没有配置id,则name属性可以代替id
    		scope:类的作用域,
    			-singleton:(默认)表示以单实例的方式来创建该类的实例
    			-prototype:多实例
    			-request:web开发中,创建了一个对象,将这个对象存入request范围,相当于request.setAttribute()
    			-session:web开发中,创建了一个对象,将这个对象存入session范围,相当于session.setAttribute()
    			-globalSession:web开发,一般用于Porlet应用环境,指的是分布式开发,不是Porlet环境,globalSession相当于session
     -->
	<!-- 使用setter方法注入 -->
	<bean id="entity1" class="test.entity.Entity2" scope="singleton">
		<property name="name" value="张三" />
	</bean>

	<!-- 使用构造器注入 -->
	<bean id="entity2" class="test.entity.Entity1" scope="prototype">
		<constructor-arg index="0" value="李四" />
	</bean>

	 <!-- 使用setter方法注入实体 -->
	<bean id="entity3" class="test.entity.Entity3">
		<property name="inner" ref="entity_innner"/>
	</bean>
	<bean id="entity_innner" class="test.entity.EntityInner">
	    <property name="name" value="嘿嘿嘿"/>
	</bean>

	<!--
		通过名称空间(2.5以后),使用setter方法注入实体
		注意:
			使用名称控件,需要在<beans>标签中引入p空间属性
	-->
	<bean id="entity4" class="test.entity.Entity3" p:name="王五" p:inner-ref="entity_innner"/>


	<!--
		通过SpEL(3.0以后)[Spring表达式语言],使用setter方法注入实体
	-->
	<bean id="entity5" class="test.entity.Entity3">
		<property name="name" value="#{entity_innner.name}"/>
		<property name="inner" value="#{entity_innner}"/>
	</bean>

	<!-- 引入外部配置文件 -->
	<import resource="applicationContext2.xml"/>
</beans>
applicationContext2.xml
<?xml version="1.0" encoding="UTF-8"?>
<beans
    xmlns="http://www.springframework.org/schema/beans"
	xmlns:p="http://www.springframework.org/schema/p"
	xmlns:xsi="http://www.w3.org/2001/XMLSchema-instance"
	xsi:schemaLocation="http://www.springframework.org/schema/beans http://www.springframework.org/schema/beans/spring-beans.xsd"
	>

	<!-- 注入集合 -->
	<bean id="entity6" class="test.entity.Entity4">
	    <property name="cities">
	        <list>
	            <value>北京</value>
	            <value>上海</value>
	            <value>杭州</value>
	        </list>
	    </property>
	    <property name="persons">
	         <map>
	            <entry key="张三" value="18" value-type="int"/>
	            <entry key="李四" value="23" value-type="int"/>
	            <entry key="王五" value="19" value-type="int"/>
	        </map>
	    </property>
	    <property name="users">
	        <props>
	            <prop key="张三">admin</prop>
	            <prop key="李四">123456</prop>
	        </props>
	    </property>
	</bean>
</beans>
1.4、测试
package test;

import org.junit.Test;
import org.springframework.context.ApplicationContext;
import org.springframework.context.support.ClassPathXmlApplicationContext;

import test.entity.Entity1;
import test.entity.Entity2;
import test.entity.Entity3;
import test.entity.Entity4;

public class JTest {

	/**
	 * 通过Setter方法注入依赖对象
	 */
	@Test
	public void test1() {
		ApplicationContext cxt = new ClassPathXmlApplicationContext("applicationContext.xml");
		Entity1 en = (Entity1) cxt.getBean("entity2");
		System.out.println(en.toString());
	}

	/**
	 * 通过构造器注入依赖对象
	 */
	@Test
	public void test1_1() {
		ApplicationContext cxt = new ClassPathXmlApplicationContext("applicationContext.xml");
		Entity2 en = (Entity2) cxt.getBean("entity1");
		System.out.println(en.toString());
	}

	/**
	 * 注入实体
	 */
	@Test
	public void test2() {
		ApplicationContext cxt = new ClassPathXmlApplicationContext("applicationContext.xml");
		Entity3 en = (Entity3) cxt.getBean("entity5");
		System.out.println(en.toString());
	}

	/**
	 * 注入集合
	 */
	@Test
	public void test3() {
		ApplicationContext cxt = new ClassPathXmlApplicationContext("applicationContext.xml");
		Entity4 en = (Entity4) cxt.getBean("entity6");
		System.out.println(en.getCities());
		System.out.println(en.getPersons());
		System.out.println(en.getUsers());
	}
}
四、源代码