(p5.js部分可以参考前面案例)
1. 基于神经网络的线性回归
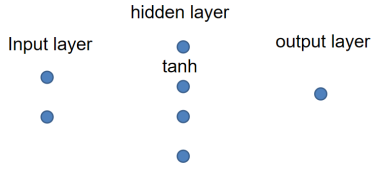
神经网络模型

线性方程如何用神经网络表示呢?

使用tf.sequential (简单的一层一层网络叠加)
官网:https://js.tensorflow.org/api/latest/#sequential
效果:鼠标点击屏幕出现点,训练之后线性拟合


代码以及设计思路:test.js
xs = [];
ys = [];

// 1. 搭建神经网络结构
const model = tf.sequential();
model.add(tf.layers.dense({     // 添加神经网络层;dense层相当于FC(全连接层)
        units: 1,    // 输出层神经元的个数
        inputShape: [2]      // 输入层神经元个数,只在第一层使用
    }));
// model.predict(tf.ranndomNormal([1,2])).print()

// 2.训练准备工作:声明optimizer和loss
const Optimizer = tf.train.sgd(0.2)      // learning rating=0.2
const config = {
    optimizer: Optimizer,
    loss: tf.losses.meanSquaredError,    // 自带的loss函数
}
model.compile(config);

// 3. 输入点
function mousePressed() {
    let x = map(mouseX, 0, width, 0, 1);      // format
    let y = map(mouseY, 0, height, 0, 1);
    xs.push([x, 1]);  // 鼠标点击值x1,以及一个不变量1
    ys.push(y);
    console.log(xs);
}


function setup() {
    createCanvas(400, 400);     // 创建画布
    background(0);   // 设置背景颜色
}

function draw() {
    background(0, 0, 0);
    stroke(255, 255, 255);
    strokeWeight(15);

    // 4. 在画布上画点
    for (let i = 0; i < xs.length; i++) {
        let x = map(xs[i][0], 0, 1, 0, width);
        let y = map(ys[i], 0, 1, 0, height);
        point(x, y);
    }


    if (xs.length >= 5) {  // 输入数据大于5才进行操作
        // 把xs,ys转化为tensor类型
        const inputs = tf.tensor2d(xs);
        outputs = tf.tensor1d(ys);

    // 5. 使用fit训练模型
    async function train() {
        for (let i = 1; i < 500; i++) {
            const h = await model.fit(inputs, outputs,{
            // await:下一个的结果是在上一个结果的基础上进行优化
            // (如果没有await就会有多个fit线程)
                batchSize: 2,      // 一次训练的数目
                epochs: 1          // 所有数据训练一遍
            });
            console.log("Loss after Epoch " + i + " : " + h.history.loss[0]);
        }
    }

    // 6. 画线(训练完成之后才会进行其他操作)
    train().then(() => {
        linex = [[0, 1], [1, 1]];
        tflinex = tf.tensor2d(linex);
        output_tem = model.predict(tflinex);
        output_tem = output_tem.dataSync();     // 类型转换
        x1 = map(linex[0][0], 0, 1, 0, width);
        x2 = map(linex[1][0], 0, 1, 0, width);
        y1 = map(output_tem[0], 0, 1, 0, height);
        y2 = map(output_tem[1], 0, 1, 0, height);
        strokeWeight(5);
        line(x1, y1, x2, y2);
    })
    noLoop()
    }


}
index.html
<!DOCTYPE html>
<html lang="">
  <head>
    <meta charset="utf-8">
    <meta name="viewport" content="width=device-width, initial-scale=1.0">
    <title>p5.js example</title>
    <style> body {padding: 0; margin: 0;} </style>
	<script src="https://cdn.jsdelivr.net/npm/@tensorflow/[email protected]/dist/tf.min.js">
	</script>

    <script src="../p5.js"></script>
    <script src="../addons/p5.sound.js"></script>
    <script src="test.js"></script>
  </head>
  <body>
  </body>
</html>
2.使用神经网络做多项式回归
思路:中间隐藏节点变多(最主要的是激活函数)

添加一个隐藏层


化简和合并同类项后其实还是线性的模型,没有实际意义,因此需要激活函数。

调节参数观察变化:
- 调整activator激活函数sigmoid,relu,tanh
- 改变learning rate学习率0.2,0.1,0.01
- 调整optimizer:sgd,adam
- 增加网络层数
(Relu 不够平滑;添加很多层之后,使用relu折线变多,使用Sigmoid可能会出现梯度消失;也并不是越复杂的网络就越好)
效果展示:
1. 使用relu,adam,learning rate=0.01
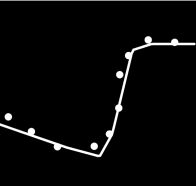
2. 使用relu,adam,learning rate=0.1

3. 使用tanh,adam,learning rate=0.01
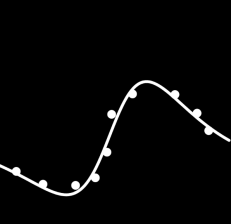
4. 使用sigmoid,adam,learning rate=0.01
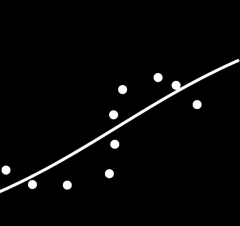
5. tanh,sgd,learning rate=0.01
xs = [];
ys = [];
// 1. 搭建神经网络结构
const model = tf.sequential();
model.add(tf.layers.dense({
units: 10,
inputShape: [2],
activation: 'sigmoid' // 激活函数可以选择sigmoid,relu,tanh
}));
model.add(tf.layers.dense({
units: 10,
activation: 'sigmoid'
}));
model.add(tf.layers.dense({
units: 1, // 输出为一维
}));
// 2.训练准备工作:声明optimizer和loss
const Optimizer = tf.train.sgd(0.01) // learning rating=0.2
/* 注意:
sgd一般没有adam好
1. sgd收敛慢 抖动较大 但是比较通用
2. adam对于训练数据的拟合能力比较强 */
const config = {
optimizer: Optimizer,
loss: tf.losses.meanSquaredError, // 自带的loss函数
}
model.compile(config);
// 3. 输入点
function mousePressed() {
let x = map(mouseX, 0, width, 0, 1); // format
let y = map(mouseY, 0, height, 0, 1);
xs.push([x, 1]); // 鼠标点击值x1,以及一个不变量1
ys.push(y);
console.log(xs);
}
function setup() {
createCanvas(400, 400); // 创建画布
background(0); // 设置背景颜色
}
function draw() {
background(0, 0, 0);
stroke(255, 255, 255);
strokeWeight(15);
// 4. 在画布上画点
for (let i = 0; i < xs.length; i++) {
let x = map(xs[i][0], 0, 1, 0, width);
let y = map(ys[i], 0, 1, 0, height);
point(x, y);
}
if (xs.length >= 10) { // 输入数据大于5才进行操作
// 把xs,ys转化为tensor类型
const inputs = tf.tensor2d(xs);
outputs = tf.tensor1d(ys);
// 5. 使用fit训练模型
async function train() {
for (let i = 1; i < 500; i++) {
const h = await model.fit(inputs, outputs,{
// await:下一个的结果是在上一个结果的基础上进行优化
// (如果没有await就会有多个fit线程)
batchSize: 2, // 一次训练的数目
epochs: 1 // 所有数据训练一遍
});
console.log("Loss after Epoch " + i + " : " + h.history.loss[0]);
}
}
// 6. 画线
train().then(() => {
let linex = [];
for (let x = 0; x < 1; x += 0.01) {
linex.push([x, 1]);
}
tflinex = tf.tensor2d(linex);
output_tem = model.predict(tflinex);
output_tem = output_tem.dataSync(); // 类型转换
beginShape();
noFill();
stroke(255);
strokeWeight(5);
for (let i = 0; i < linex.length; i++) {
let x = map(linex[i][0], 0, 1, 0, width);
let y = map(output_tem[i], 0, 1, 0, height);
vertex(x, y);
}
endShape();
})
noLoop()
}
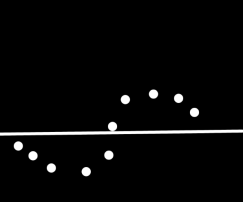
}3. 使用神经网络做分类

对于圆形尽量拟合输出为1,三角形的输出为0
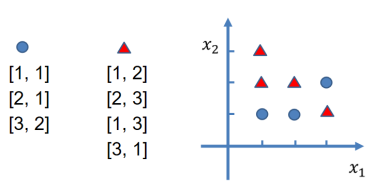
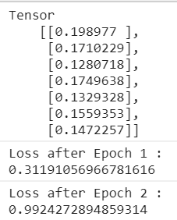
目标:前三个拟合效果接近于1,后四个拟合效果接近于0

结果展示:

xs = [];
ys = [];

const model = tf.sequential();
model.add(tf.layers.dense({
    units: 10,
    inputShape: [2],
    activation: 'sigmoid'
}));
model.add(tf.layers.dense({
    units: 10,
    activation: 'sigmoid'
}));
model.add(tf.layers.dense({
    units: 1,
}));

const Optimizer = tf.train.adam(0.1)
const config = {
    optimizer: Optimizer,
    loss: tf.losses.meanSquaredError,
}
model.compile(config);

const inputs = tf.tensor2d([[1, 1], [2, 1], [3, 2], [1, 2],[2, 3], [1, 3], [3, 1]]);
const outputs = tf.tensor2d([[1], [1], [1], [0], [0], [0], [0]]);   // 标签

function setup() {
    createCanvas(400, 400);
    background(0);
}

function draw() {
    model.predict(inputs).print();
    async function train() {
        for (let i = 1; i < 500; i++) {
            const h = await model.fit(inputs, outputs,{
                batchSize: 100,
                epochs: 1
            });
            console.log("Loss after Epoch " + i + " : " + h.history.loss[0]);
        }
    }

    train().then(() => {
        model.predict(inputs).print();      // 输出预测结果
    })
    noLoop()
}