1.消息渠道stream是什么?
消息渠道简单点说就是利用rabbitmq和kafka发送消息的。
2.Stream解决了什么问题?

Stream解决了开发人员无感知使用消息中间件的问题。
因为Stream对消息中间件的进一步封装,可以做到代码层面对中间件的无感知,甚至于动态的切换中间件(例如rabbitmq和kafka)。使得微服务开发的高度解耦,服务可以关注更多自己的业务流程。(仅修改pom和properties文件)
简单的入门例子
我们需要2个项目,一个sender和一个receiver。
receiver项目结构

pom文件的依赖:
<dependencies>
		<dependency>
			<groupId>org.springframework.boot</groupId>
			<artifactId>spring-boot-starter-web</artifactId>
		</dependency>
	    <dependency>
			<groupId>org.springframework.cloud</groupId>
			<artifactId>spring-cloud-starter-stream-rabbit</artifactId>
		</dependency>
		<dependency>
			<groupId>org.springframework.boot</groupId>
			<artifactId>spring-boot-starter-test</artifactId>
			<scope>test</scope>
		</dependency>
	</dependencies>
配置文件的代码:
spring.application.name=stream-receiver
server.port=9041
eureka.client.serviceUrl.defaultZone=http://user:test@eureka2:8762/eureka/,http://user:test@eureka1:8761/eureka/
eureka.instance.perferIpAddress=true
#spring.cloud.config.server.git.uri=https://gitee.com/agan_jiagou/config
spring.cloud.config.server.git.uri=https://gitee.com/Xinyangyunyang/config
spring.cloud.config.server.git.username=997355706@qq.com
spring.cloud.config.server.git.password=wen1314520++
spring.rabbitmq.host=192.168.23.131
spring.rabbitmq.port=5672
spring.rabbitmq.username=agan
spring.rabbitmq.password=123456
spring.rabbitmq.virtualHost=/
StreamReceiverApplication代码:
@SpringBootApplication
@EnableEurekaClient
@EnableBinding({IReceiveService.class})
public class StreamReceiverApplication {
	public static void main(String[] args) {
		SpringApplication.run(StreamReceiverApplication.class, args);
	}
}
IReceiveService代码:
public interface IReceiveService {
	@Input("me-exchange")
	SubscribableChannel receive();
}
ReceiveService代码:
@Service
@EnableBinding({IReceiveService.class})
public class ReceiveService {
	@StreamListener("me-exchange")
	public void onReceive(byte[] msg) {
		System.out.println("receive:" + new String(msg));
	}
}
sender项目目录结构

pom文件依赖和配置文件都是一样的,就是加上rabbitmq和依赖和配置就OK了,可以参考上面。然后sender中多了一个测试类。
StreamSenderApplication代码:
@SpringBootApplication
@EnableEurekaClient
@EnableBinding({ISendService.class})
public class StreamSenderApplication {
	public static void main(String[] args) {
		SpringApplication.run(StreamSenderApplication.class, args);
	}
}
ISendService代码:
public interface ISendService {
	@Output("me-exchange")
	SubscribableChannel send();
}
测试StreamTests代码:
@RunWith(SpringRunner.class)
@SpringBootTest(classes = StreamSenderApplication.class)
public class StreamTests {
	@Autowired
	private ISendService send;
	@Test
	public void send() throws InterruptedException {
		String msg = "agan..........";
		Message message = MessageBuilder.withPayload(msg.getBytes()).build();
		this.send.send().send(message);
	}
}
然后启动receiver进行测试:
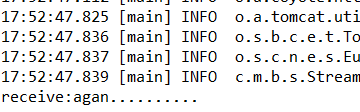
接收消息成功

消息的分组
消息的分组解决了临时队列的问题使队列持久化。
我们还是利用上面的项目改造,上面我们发送的是string,这回发送一个对象product,然后修改一下配置文件就OK了。下面我只讲到需要修改的地方。
group-receiver项目目录结构

添加的Product类:
public class Product implements Serializable{
    private Integer id;
    private String name;
    private Byte status;
    private Integer price;
    private Byte deleted;
    private Date createTime;
    private Date updateTime;
    private String detail;
    public Product() {  //构造函数
		super();
	}
    public Product(Integer id, String name) {
		super();
		this.id = id;
		this.name = name;
	}
	public Integer getId() {
        return id;
    }
    public void setId(Integer id) {
        this.id = id;
    }
    public String getName() {
        return name;
    }
    public void setName(String name) {
        this.name = name == null ? null : name.trim();
    }
    public Byte getStatus() {
        return status;
    }
    public void setStatus(Byte status) {
        this.status = status;
    }
    public Integer getPrice() {
        return price;
    }
    public void setPrice(Integer price) {
        this.price = price;
    }
    public Byte getDeleted() {
        return deleted;
    }
    public void setDeleted(Byte deleted) {
        this.deleted = deleted;
    }
    public Date getCreateTime() {
        return createTime;
    }
    public void setCreateTime(Date createTime) {
        this.createTime = createTime;
    }
    public Date getUpdateTime() {
        return updateTime;
    }
    public void setUpdateTime(Date updateTime) {
        this.updateTime = updateTime;
    }
    public String getDetail() {
        return detail;
    }
    public void setDetail(String detail) {
        this.detail = detail == null ? null : detail.trim();
    }
	@Override
	public String toString() {
		return "Product [id=" + id + ", name=" + name + "]";
	}
}
当然你们可以自己定义。
IReceiveService代码:
public interface IReceiveService {
	String INPUT="inputProduct";
	@Input(INPUT)
	SubscribableChannel receive();
}
ReceiveService代码:
@Service
@EnableBinding({IReceiveService.class})
public class ReceiveService {
	@StreamListener(IReceiveService.INPUT)
	public void onReceive(Product obj) {
		System.out.println("receive:" + obj.toString());
	}
}
配置文件添加的代码,其他和上面的一样:
# 对应 MQ 是 exchange
spring.cloud.stream.bindings.inputProduct.destination=exchangeProduct
# 具体分组 对应 MQ 是 队列名称 并且持久化队列
spring.cloud.stream.bindings.inputProduct.group=groupProduct
这个bindings后面的值就是IReceiveService 里面的INPUT值,然后这个交换器的名字叫做exchangeProduct。
group-sender项目目录结构

这个也是和上面一样,添加了一个类,和上面一样的。然后修改了配置文件的代码。
ISendService代码:
public interface ISendService {
	String OUTPUT="outputProduct";
	@Output(OUTPUT)
	SubscribableChannel send();
}
StreamTests代码:
@RunWith(SpringRunner.class)
@SpringBootTest(classes = StreamSenderApplication.class)
public class StreamTests {
@Autowired
private ISendService send;
@Test
public void send() throws InterruptedException {
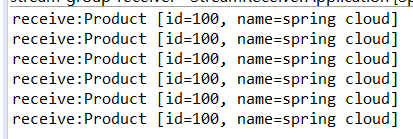
Product obj = new Product();
obj.setId(100);
obj.setName("spring cloud");
for (int i = 0; i < 10; i++) {
Message message = MessageBuilder.withPayload(obj).build();
this.send.send().send(message);
}
}
}
配置文件中添加的代码:
# 对应 MQ 是 exchange
spring.cloud.stream.bindings.outputProduct.destination=exchangeProduct
同样的bindings后面的outputProduct是ISendService 里面的OUTPUT,交换器名称都是exchangeProduct。
启动项目测试:

接收成功。
消息分区
消息分区在消息分组之后,如果有多个消息发送,也有多个服务,那么这个消息会被发送到2个服务上面。如果添加消息分区,消息只被分配到集群的同一个节点上面。
我们还是利用上面的项目,将receiver复制一份修改一下端口,启动2个项目。
测试:
发送了10次receiver1中6次,receiver2中4次。

所以不是讲消息发给同一个集群节点。然后我们只需要在配置文件中修改一下就可以起到消息分区的效果。
我们需要2个receiver端,复制分组的项目,然后只需要修改一下配置文件。
在receiver1的配置文件中添加:
#开启消费者分区功能
spring.cloud.stream.bindings.inputProduct.consumer.partitioned=true
#指定了当前消费者的总实例数量
spring.cloud.stream.instanceCount=2
#设置当前实例的索引号,从0开始
spring.cloud.stream.instanceIndex=0
在receiver2的配置文件中添加:
#开启消费者分区功能
spring.cloud.stream.bindings.inputProduct.consumer.partitioned=true
#指定了当前消费者的总实例数量
spring.cloud.stream.instanceCount=2
#设置当前实例的索引号,从0开始
spring.cloud.stream.instanceIndex=1
在sender项目文件额配置文件中添加:
#通过该参数指定了分区键的表达式规则
spring.cloud.stream.bindings.outputProduct.producer.partitionKeyExpression=payload
#指定了消息分区的数量。
spring.cloud.stream.bindings.outputProduct.producer.partitionCount=2
然后启动项目测试,测试类利用循环发送多条消息。
测试:

receiver2接收到了10条消息。
感谢大家的观看,如果有什么问题或者交流的可以加我qq997355706,么么哒。
