话不多说,先上效果图:

没做动图,大致效果也就是从一个完整的画面逐渐呈圆形缩放至指定大小,最后再放大为一个完整画面的效果。
大概的思路就是,在shader中设置一个固定的uv坐标为圆心,设置一个可变的半径_Radius。然后在C#中动态为_Radius赋值。
然后在shader内通过判断当前传入的uv坐标和圆心坐标的关系,距离大于半径_Radius,则设置目标颜色为纯黑(第一次写shader,不晓得这么说对不对。。。):
至于上图的_ScreenParams.x /和_ScreenParams.y,暂时没搞清楚什么意思,但是不这么写。圆就会被拉伸为椭圆
= =。
最后呢,unity会调用自带的API:OnRenderImage(RenderTexture source, RenderTexture destination),将源贴图向目标贴图进行融合,这个过程是unity自己去调用的。我们不需要手动调用。
具体的使用方法就是,讲下面的脚本挂载到主相机就ok。

刚开始写博客,难免吧啦吧啦说一堆废话,多担待,多担待。。
C#脚本:
using UnityEngine;
using System.Collections;
public class SceneFadeInOut : MonoBehaviour
{
public static SceneFadeInOut Instance;
public Material ma;
public float ChangeSpeed = 1.0f;
public float waitTime = 0.8f;
private float count;
private void Awake()
{
Instance = this;
}
// Use this for initialization
void Start()
{
if (ma == null)
{
ma = new Material(Shader.Find("MyShader/BlackScreen"));
}
}
//测试效果的代码,可以忽略
private void Update()
{
//if (Input.GetKeyDown(KeyCode.Space))
//{
// StartCoroutine(ChangeEffect());
//}
}
void OnRenderImage(RenderTexture source, RenderTexture destination)
{
Graphics.Blit(source, destination, ma);
}
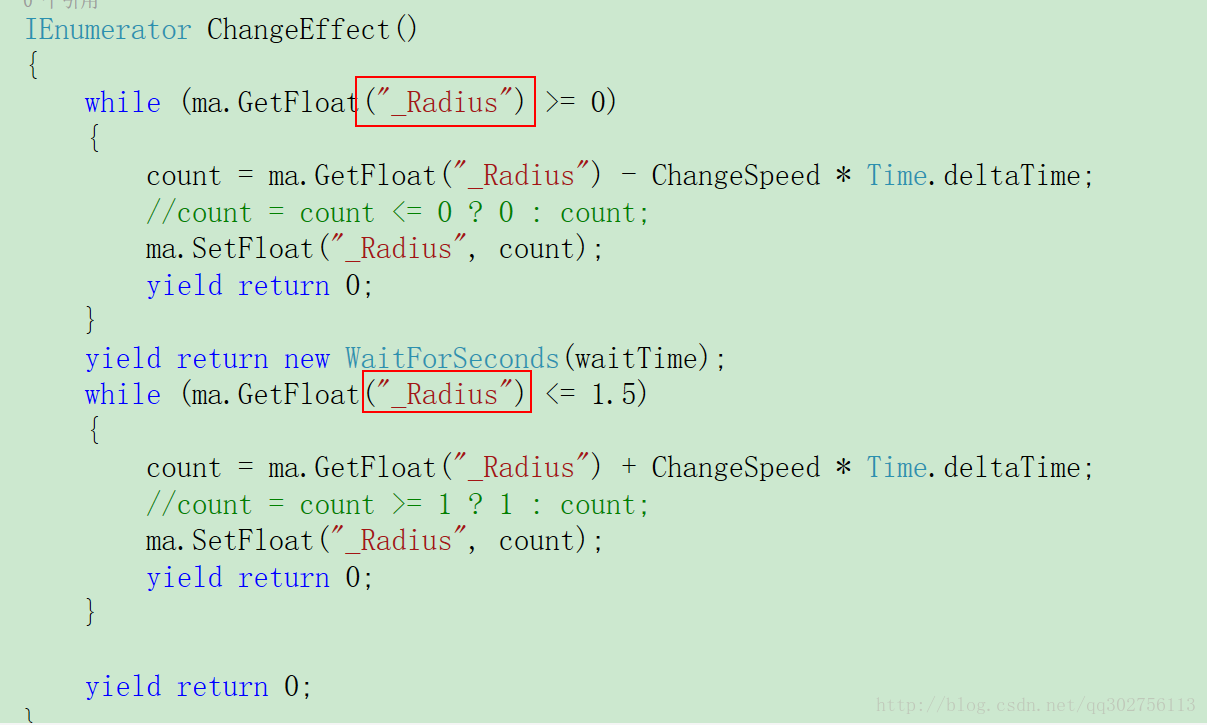
IEnumerator ChangeEffect()
{
while (ma.GetFloat("_Radius") >= 0)
{
count = ma.GetFloat("_Radius") - ChangeSpeed * Time.deltaTime;
//count = count <= 0 ? 0 : count;
ma.SetFloat("_Radius", count);
yield return 0;
}
yield return new WaitForSeconds(waitTime);
while (ma.GetFloat("_Radius") <= 1.5)
{
count = ma.GetFloat("_Radius") + ChangeSpeed * Time.deltaTime;
//count = count >= 1 ? 1 : count;
ma.SetFloat("_Radius", count);
yield return 0;
}
yield return 0;
}
}
Shader:
Shader "MyShader/BlackScreen" {
Properties
{
_Color("Main Color", Color) = (1,1,1,1)
_ChangeFloat("改变颜色",Range(0,1)) = 1.0
_MainTex("Base (RGB)", 2D) = "white" {}
_Radius("Radius",float)=1.5
_Center_X("Center_X", float) =0.95
_Center_Y("Center_Y", float) = 0.5
}
SubShader
{
Pass
{
CGPROGRAM
#pragma vertex vert_img
#pragma fragment frag
#include "UnityCG.cginc"
fixed4 _Color;
sampler2D _MainTex;
float1 _ChangeFloat;
float _Radius;
float _Center_X;
float _Center_Y;
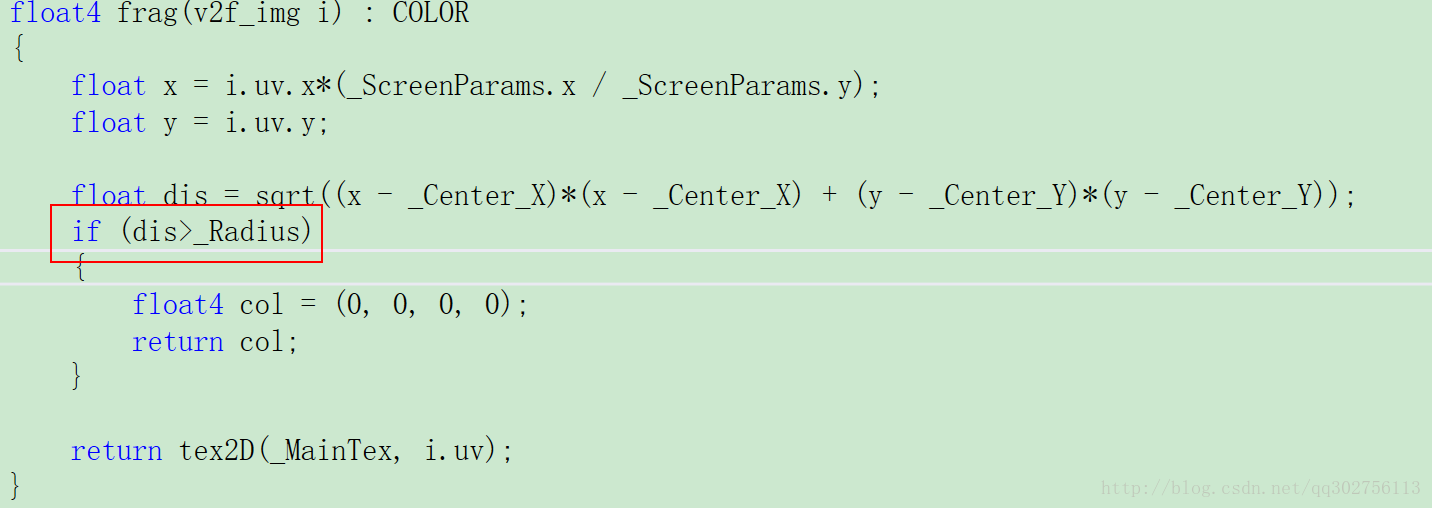
float4 frag(v2f_img i) : COLOR
{
float x = i.uv.x*(_ScreenParams.x / _ScreenParams.y);
float y = i.uv.y;
float dis = sqrt((x - _Center_X)*(x - _Center_X) + (y - _Center_Y)*(y - _Center_Y));
if (dis>_Radius)
{
float4 col = (0, 0, 0, 0);
return col;
}
return tex2D(_MainTex, i.uv);
}
ENDCG
}
}
Fallback off
}
代码是有参考他人的,一时半会找不到链接了,尴尬。
总之感谢他们。。。
最后,动态设置上述的圆心坐标,可以实现追光灯的效果,具体实现,待我去研究一下。。
--------------------------------------------------分割线-----------------------------------------------------
其实frag函数内没必要用if判断的,而且改成下面的实现方法,会有边缘平滑渐变的一个效果,看起来更舒服些:
		float dis = sqrt((x - _Center_X)*(x - _Center_X) + (y - _Center_Y)*(y - _Center_Y));
		float t = _Radius - dis;
		float rt = 0.5f + _tanh(t * _Sharp) * 0.5f;
		float col = float4(rt, rt, rt, rt);
		return tex2D(_MainTex, i.uv) * col;
--------------------------------------------------分割线-----------------------------------------------------
修改后的shader:
Shader "MyShader/BlackScreen" {
	Properties
	{
		_Color("Main Color", Color) = (1,1,1,1)
		_ChangeFloat("改变颜色",Range(0,1)) = 1.0
		_MainTex("Base (RGB)", 2D) = "white" {}
		_Radius("Radius",float)=1.5
		_Center_X("Center_X", float) =0.5
		_Center_Y("Center_Y", float) =0.5
		_Sharp("Sharp", float) = 10.0
	}
		SubShader
	{
		Pass
	{
			ZTest Always Cull Off ZWrite Off
			Fog{ Mode off }

CGPROGRAM
#pragma vertex vert_img
#pragma fragment frag
#include "UnityCG.cginc"

	fixed4 _Color;
	sampler2D _MainTex;
	float1 _ChangeFloat;
	float _Radius;
	float _Center_X;
	float _Center_Y;
	float _Sharp;

	float _tanh(float x)
	{
		return 2.0f / (1.0f + exp(-2.0f * x)) - 1.0f;
	}

	float4 frag(v2f_img i) : COLOR
	{
		_Center_X=_Center_X*(_ScreenParams.x / _ScreenParams.y);
		float x = i.uv.x*(_ScreenParams.x / _ScreenParams.y);
		float y = i.uv.y;

		float dis = sqrt((x - _Center_X)*(x - _Center_X) + (y - _Center_Y)*(y - _Center_Y));
		float t = _Radius - dis;
		float rt = 0.5f + _tanh(t * _Sharp) * 0.5f;
		float col = float4(rt, rt, rt, rt);
		return tex2D(_MainTex, i.uv) * col;
	}
		ENDCG
	}
	}
		Fallback off
}