前台系统顾名思义就是展示给顾客或浏览的人员,给人们提供展示等的功能,前台系统和后台系统并没有之间的关系,他们是分开的,但是他们使用同一个数据库,接下来分析一下前台系统的搭建:
工程分析:
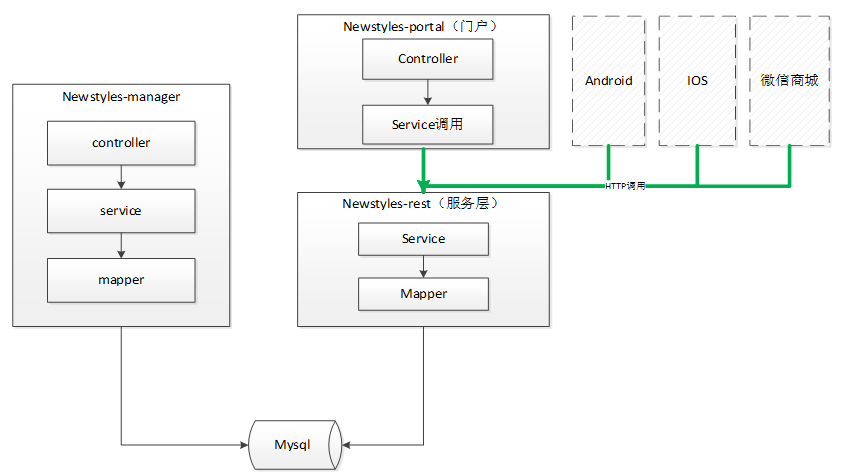
在图中可以看到,我们的后台系统通过mapper映射到mysql数据库,而前台系统也是通过mapper映射到数据库,那么为什么呢?虽然到后来会有较多的扩展,但是,他们调用的服务是相同的,好比如,他们所调用的数据库的内容是不变的,所以,变化的仅仅是不同的终端,而其服务完全可以基于一组服务,没必要将服务重复开发三遍,所以我们可以将共有的服务部分单独抽离出来形成一个发布服务的工程,便于后面不同的终端的使用。而对于后台来说,较多的是自己内部人员的使用。正因为有了这个服务层,降低了服务和终端之间的耦合程度,提高了代码的复用程度,同时可扩展性也大大的增加。
再一个,灵活性,当我们的终端的数量增多,服务器的压力增大时,我们完全可以扩展服务,增加服务的数量,灵活性较强,能够较好的缓解由于终端产生的对服务的压力。我们这节采用rest轻量级的服务,其效率较高。
开发时,前台界面和服务的开发能够分开同时开发,能够最大程度的减小前台工程之间的 依赖程度,同时也能够较大的提高开发的效率。当请求的压力增大时,我们可以扩展服务。其隐含的缺点也较为明显,我们都需要服务之间要进行通讯,通讯是同基于接口的通讯,开发的工作量就会增大。
一般的服务的发布可以有服务层统一管理服务,并进行统一的服务发布,我们的前台门户系统通过调用服务层来实现,并且其它的扩扩展的也可以通过直接调用服务实现服务的调用。
工程搭建:
前台的工程在属性上属于一个web工程,所以我们在工程的管理上应该建立一个web工程,体现在maven管理中,我们需要建立一个war工程,所以根据上面的分析,我们需要搭建两个工程,一个用于发布服务,另一个用于发布服务(RESTful服务风格):
搭建Rest服务层:

注意搭建的工程为war工程,同时,一定记得继承我们的管理依赖的父工程:newstyles-parent;
分析工程的依赖关系:
首先,服务层需要连接到数据库,所以会使用mybatis框架,以及其mapper映射;直接使用之前的代码就可以,没必要再创建一个。
其次,服务的发布,我们可以使用springmvc发布服务。
之后,我们同时也需要使用spring来管理bean。
我们的工程没有页面,所以jstl相关的可以不再使用,文件上传的功能也不需要。
同时为了能够正常的发布服务,需要将工程运行到服务器上,所以需要引用一个tomcat服务器来发布,端口号修改为8081,这个具体的配置参考下面的pom.xml文件的配置。
pom文件的修改:
<project xmlns="http://maven.apache.org/POM/4.0.0" xmlns:xsi="http://www.w3.org/2001/XMLSchema-instance" xsi:schemaLocation="http://maven.apache.org/POM/4.0.0 http://maven.apache.org/xsd/maven-4.0.0.xsd">
  <modelVersion>4.0.0</modelVersion>
  <parent>
    <groupId>com.newstyles</groupId>
    <artifactId>newstyles-parent</artifactId>
    <version>0.0.1-SNAPSHOT</version>
  </parent>
  <groupId>com.newstyles</groupId>
  <artifactId>newstyles-rest</artifactId>
  <version>0.0.1-SNAPSHOT</version>
  <packaging>war</packaging>
  <dependencies>
<!--   Mapper映射依赖 ,依赖对应的mapper工程-->
  <dependency>
    <groupId>com.newstyles</groupId>
  <artifactId>newstyles-manager-mapper</artifactId>
  <version>0.0.1-SNAPSHOT</version>
  </dependency>
		<!-- Spring -->
		<dependency>
			<groupId>org.springframework</groupId>
			<artifactId>spring-context</artifactId>
		</dependency>
		<dependency>
			<groupId>org.springframework</groupId>
			<artifactId>spring-beans</artifactId>
		</dependency>
<!-- 		springmvc -->
		<dependency>
			<groupId>org.springframework</groupId>
			<artifactId>spring-webmvc</artifactId>

		</dependency>
		<dependency>
			<groupId>org.springframework</groupId>
			<artifactId>spring-jdbc</artifactId>
		</dependency>
		<dependency>
			<groupId>org.springframework</groupId>
			<artifactId>spring-aspects</artifactId>
		</dependency>
<!-- 		Servlet -->
				<dependency>
			<groupId>javax.servlet</groupId>
			<artifactId>servlet-api</artifactId>
			<scope>provided</scope>
		</dependency>
		<dependency>
			<groupId>javax.servlet</groupId>
			<artifactId>jsp-api</artifactId>
			<scope>provided</scope>
		</dependency>
  </dependencies>
    <build>
		<!-- 配置插件,服务的发布需要运行在服务器上 -->
		<plugins>
			<plugin>
				<groupId>org.apache.tomcat.maven</groupId>
				<artifactId>tomcat7-maven-plugin</artifactId>
				<configuration>
					<port>8081</port>
					<path>/</path>
				</configuration>
			</plugin>
		</plugins>
	</build>
</project>
newstyles-rest的web.xml文件修改,servlet所拦截的路经修改为/rest/*:
<?xml version="1.0" encoding="UTF-8"?>
<web-app xmlns:xsi="http://www.w3.org/2001/XMLSchema-instance"
	xmlns="http://java.sun.com/xml/ns/javaee" xmlns:web="http://java.sun.com/xml/ns/javaee/web-app_3_0.xsd"
	xsi:schemaLocation="http://java.sun.com/xml/ns/javaee http://java.sun.com/xml/ns/javaee/web-app_3_0.xsd"
	id="WebApp_ID" version="3.0">

	<display-name>newstyles-rest</display-name>
	<welcome-file-list>
		<welcome-file>index.html</welcome-file>
		<welcome-file>index.htm</welcome-file>
		<welcome-file>index.jsp</welcome-file>
		<welcome-file>default.html</welcome-file>
		<welcome-file>default.htm</welcome-file>
		<welcome-file>default.jsp</welcome-file>
	</welcome-file-list>

	<!-- 加载spring容器 -->
	<context-param>
		<param-name>contextConfigLocation</param-name>
		<param-value>classpath:spring/applicationContext*.xml</param-value>
	</context-param>
	<listener>
		<listener-class>org.springframework.web.context.ContextLoaderListener</listener-class>
	</listener>

	<!-- 解决post乱码 -->
	<filter>
		<filter-name>CharacterEncodingFilter</filter-name>
		<filter-class>org.springframework.web.filter.CharacterEncodingFilter</filter-class>
		<init-param>
			<param-name>encoding</param-name>
			<param-value>utf-8</param-value>
		</init-param>
		<!-- <init-param>
			<param-name>forceEncoding</param-name>
			<param-value>true</param-value>
		</init-param> -->
	</filter>
	<filter-mapping>
		<filter-name>CharacterEncodingFilter</filter-name>
		<url-pattern>/*</url-pattern>
	</filter-mapping>


	<!-- springmvc的前端控制器 -->
	<servlet>
		<servlet-name>newstyles-rest</servlet-name>
		<servlet-class>org.springframework.web.servlet.DispatcherServlet</servlet-class>
		<!-- contextConfigLocation不是必须的, 如果不配置contextConfigLocation, springmvc的配置文件默认在:WEB-INF/servlet的name+"-servlet.xml" -->
		<init-param>
			<param-name>contextConfigLocation</param-name>
			<param-value>classpath:spring/springmvc.xml</param-value>
		</init-param>
		<load-on-startup>1</load-on-startup>
	</servlet>
	<servlet-mapping>
		<servlet-name>newstyles-rest</servlet-name>
		<url-pattern>/rest/*</url-pattern>
	</servlet-mapping>

</web-app>
框架整合,添加配置文件,资源文件(可以参考之前的manager工程中的文件的配置):
第一个mybatis文件的配置,基本上不需要改动,因为需要连接数据库,同时提供mapper映射。<?xml version="1.0" encoding="UTF-8" ?> <!DOCTYPE configuration PUBLIC "-//mybatis.org//DTD Config 3.0//EN" "http://mybatis.org/dtd/mybatis-3-config.dtd"> <configuration> <!-- 配置分页插件 pagehelper --> <plugins> <plugin interceptor="com.github.pagehelper.PageHelper"> <!-- 设置数据库的类型,Oracle,Mysql,MariaDB,SQLite,Hsqldb,PostgreSQL六种数据库 --> <property name="dialect" value="mysql"/> </plugin> </plugins> </configuration>因为使用的spring框架,并且还需要spring框架来管理数据库,所以分析之后,dao层基本不需要改变。
<beans xmlns="http://www.springframework.org/schema/beans"
	xmlns:context="http://www.springframework.org/schema/context" xmlns:p="http://www.springframework.org/schema/p"
	xmlns:aop="http://www.springframework.org/schema/aop" xmlns:tx="http://www.springframework.org/schema/tx"
	xmlns:xsi="http://www.w3.org/2001/XMLSchema-instance"
	xsi:schemaLocation="http://www.springframework.org/schema/beans http://www.springframework.org/schema/beans/spring-beans-4.0.xsd
	http://www.springframework.org/schema/context http://www.springframework.org/schema/context/spring-context-4.0.xsd
	http://www.springframework.org/schema/aop http://www.springframework.org/schema/aop/spring-aop-4.0.xsd http://www.springframework.org/schema/tx http://www.springframework.org/schema/tx/spring-tx-4.0.xsd
	http://www.springframework.org/schema/util http://www.springframework.org/schema/util/spring-util-4.0.xsd">

	<!-- 数据库连接池 -->
	<!-- 加载配置文件 -->
	<context:property-placeholder location="classpath:resource/*.properties" />
	<!-- 数据库连接池 -->
	<bean id="dataSource" class="com.alibaba.druid.pool.DruidDataSource"
		destroy-method="close">
		<property name="url" value="${jdbc.url}" />
		<property name="username" value="${jdbc.username}" />
		<property name="password" value="${jdbc.password}" />
		<property name="driverClassName" value="${jdbc.driver}" />
		<property name="maxActive" value="10" />
		<property name="minIdle" value="5" />
	</bean>
	<!-- 让spring管理sqlsessionfactory 使用mybatis和spring整合包中的 -->
	<bean id="sqlSessionFactory" class="org.mybatis.spring.SqlSessionFactoryBean">
		<!-- 数据库连接池 -->
		<property name="dataSource" ref="dataSource" />
		<!-- 加载mybatis的全局配置文件 -->
		<property name="configLocation" value="classpath:mybatis/sqlMapConfig.xml" />
	</bean>
	<!-- 	添加对应的Mapper接口,实现代理查找对应接口和对应的xml配置文件 -->
	<bean class="org.mybatis.spring.mapper.MapperScannerConfigurer">
		<property name="basePackage" value="com.newstyles.mapper" />
	</bean>
</beans>
之后,service层,则需要我们新建立一个扫描位置,在rest工程中的:
<beans xmlns="http://www.springframework.org/schema/beans"
	xmlns:context="http://www.springframework.org/schema/context" xmlns:p="http://www.springframework.org/schema/p"
	xmlns:aop="http://www.springframework.org/schema/aop" xmlns:tx="http://www.springframework.org/schema/tx"
	xmlns:xsi="http://www.w3.org/2001/XMLSchema-instance"
	xsi:schemaLocation="http://www.springframework.org/schema/beans http://www.springframework.org/schema/beans/spring-beans-4.0.xsd
	http://www.springframework.org/schema/context http://www.springframework.org/schema/context/spring-context-4.0.xsd
	http://www.springframework.org/schema/aop http://www.springframework.org/schema/aop/spring-aop-4.0.xsd http://www.springframework.org/schema/tx http://www.springframework.org/schema/tx/spring-tx-4.0.xsd
	http://www.springframework.org/schema/util http://www.springframework.org/schema/util/spring-util-4.0.xsd">

<!--     扫描包,加载实线类 -->
	<context:component-scan base-package="com.newstyles.rest.service"></context:component-scan>

</beans>
事务的管理,因为我们访问数据库,可能对数据库进行修改,所以保留事务的配置:
<beans xmlns="http://www.springframework.org/schema/beans"
	xmlns:context="http://www.springframework.org/schema/context" xmlns:p="http://www.springframework.org/schema/p"
	xmlns:aop="http://www.springframework.org/schema/aop" xmlns:tx="http://www.springframework.org/schema/tx"
	xmlns:xsi="http://www.w3.org/2001/XMLSchema-instance"
	xsi:schemaLocation="http://www.springframework.org/schema/beans http://www.springframework.org/schema/beans/spring-beans-4.0.xsd
	http://www.springframework.org/schema/context http://www.springframework.org/schema/context/spring-context-4.0.xsd
	http://www.springframework.org/schema/aop http://www.springframework.org/schema/aop/spring-aop-4.0.xsd http://www.springframework.org/schema/tx http://www.springframework.org/schema/tx/spring-tx-4.0.xsd
	http://www.springframework.org/schema/util http://www.springframework.org/schema/util/spring-util-4.0.xsd">

<!-- 	配置事务 -->

	<!-- 事务管理器 -->
	<bean id="transactionManager"
		class="org.springframework.jdbc.datasource.DataSourceTransactionManager">
		<!-- 数据源 -->
		<property name="dataSource" ref="dataSource" />
	</bean>
	<!-- 通知 -->
	<tx:advice id="txAdvice" transaction-manager="transactionManager">
		<tx:attributes>
			<!-- 传播行为 -->
			<tx:method name="save*" propagation="REQUIRED" />
			<tx:method name="insert*" propagation="REQUIRED" />
			<tx:method name="add*" propagation="REQUIRED" />
			<tx:method name="create*" propagation="REQUIRED" />
			<tx:method name="delete*" propagation="REQUIRED" />
			<tx:method name="update*" propagation="REQUIRED" />
			<tx:method name="find*" propagation="SUPPORTS" read-only="true" />
			<tx:method name="select*" propagation="SUPPORTS" read-only="true" />
			<tx:method name="get*" propagation="SUPPORTS" read-only="true" />
		</tx:attributes>
	</tx:advice>
	<!-- 切面 -->
	<aop:config>
		<aop:advisor advice-ref="txAdvice"
<!-- 		修改切点,扫面位置变为 com.newstyles.rest.service -->
			pointcut="execution(* com.newstyles.rest.service.*.*(..))" />
	</aop:config>


</beans>
之后是,我们分析还要使用springmvc,所以我们以需要一个springmvc的配置文件:
<?xml version="1.0" encoding="UTF-8"?>
<beans xmlns="http://www.springframework.org/schema/beans"
	xmlns:xsi="http://www.w3.org/2001/XMLSchema-instance" xmlns:p="http://www.springframework.org/schema/p"
	xmlns:context="http://www.springframework.org/schema/context"
	xmlns:mvc="http://www.springframework.org/schema/mvc"
	xsi:schemaLocation="http://www.springframework.org/schema/beans http://www.springframework.org/schema/beans/spring-beans.xsd
        http://www.springframework.org/schema/mvc http://www.springframework.org/schema/mvc/spring-mvc-4.0.xsd
        http://www.springframework.org/schema/context http://www.springframework.org/schema/context/spring-context.xsd">


<context:component-scan base-package="com.newstyles.rest.controller" />
<mvc:annotation-driven/>

<!--     如果不配置,则会调用默认的视图解析器 -->
	<bean
		class="org.springframework.web.servlet.view.InternalResourceViewResolver">
		<property name="prefix" value="/WEB-INF/jsp/" />
		<property name="suffix" value=".jsp" />
	</bean>

<!-- 		由于在web.xml中定义的url拦截形式为“/”表示拦截所有的url请求,包括静态资源例如css、js等。所以需要在springmvc.xml中添加资源映射标签: -->
<!-- 		不必迎合rest服务修改映射 -->
		<mvc:resources location="/WEB-INF/js/" mapping="/js/**"/>
	<mvc:resources location="/WEB-INF/css/" mapping="/css/**"/></bean>
我们在测试工程的时候,需要将newstyles-manager完全的安装到本地仓库即可,防止在测试rest工程时缺少必要的依赖和缺少对应的工程以来。同时还需要测试时跳过test测试的内容,所以,可以将测试上面的@Test标记注释掉,或者使用命令:install -DskipTests。