Unity3d的ugui如果用得不好,非常的影响性能,可能很多人都不知道,其实ugui是基于网格模型渲染的,一个ugui组件就是一个Mesh,ui组件的Material为空,其实他是用了默认的Material,我们在运行游戏的时候Canvas回把所有ui的Mesh合并成一个大的ShareMesh,用于渲染。所以一般情况下,ui的DrawCall会比较少,但是不一般的情况下,我们会用到动态的ui,导致cpu实时在合并网格顶点,gup重新渲染整个ShareMesh,这就很卡了,所以我们要尽量不要用动态的ui,这怎么可能
扯了一下不相干的事,接下来我们来讲讲怎么来写一个简单的ui系统。
一个好的框架,底层少不了接口,所以我们创建一个UI的接口IView。
// **********************************************************************
// Copyright (C) XM
// Author: 吴肖牧
// Date: 2018-04-15
// Desc:
// **********************************************************************

using System.Collections;
using System.Collections.Generic;
using UnityEngine;

public interface IView {

    /// <summary>
    /// 绑定组件
    /// </summary>
    void BindComponent();

    /// <summary>
    /// 注册事件
    /// </summary>
    void RegistrationEvent();

    /// <summary>
    /// 注销事件
    /// </summary>
    void UnregisterEvent();

    /// <summary>
    /// 初始化
    /// </summary>
    void Init();

    /// <summary>
    /// 关闭
    /// </summary>
    void Close();
}
2.接下来我们来创建一个ui的基类UIBase。
// **********************************************************************
// Copyright (C) XM
// Author: 吴肖牧
// Date: 2018-04-15
// Desc:
// **********************************************************************

using System;
using System.Collections;
using System.Collections.Generic;
using UnityEngine;

public class UIBase : Base, IView
{
    public object[] param;

    public UIType uiType;

    public PanelType panelType;

    protected void Awake()
    {
        BindComponent();
        RegistrationEvent();
        XMAwake();
    }
    protected void Start()
    {
        Init();
    }

    public virtual void XMAwake()
    {
    }

    /// <summary>
    /// 绑定组件
    /// </summary>
    public virtual void BindComponent()
    {
    }

    /// <summary>
    /// 注册事件
    /// </summary>
    public virtual void RegistrationEvent()
    {
    }

    /// <summary>
    /// 注销事件
    /// </summary>
    public virtual void UnregisterEvent()
    {
    }

    /// <summary>
    /// 关闭
    /// </summary>
    public virtual void Close()
    {
    }

    /// <summary>
    /// 初始化
    /// </summary>
    public virtual void Init()
    {

    }

    private void OnDestroy()
    {
        UnregisterEvent();
        Close();
        param = null;
        XMUtil.ClearMemory();
        //Debug.Log("~" + name + " was destroy!");
    }
}
UIBase根据你们的需求可以相应的扩展,这里只写了ui类型和层级类型。
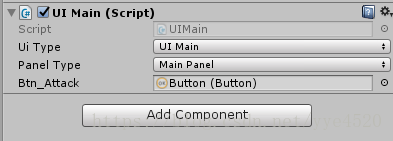
3.然后我们随便创建一个界面UIMain
// **********************************************************************
// Copyright (C) XM
// Author: 吴肖牧
// Date: 2018-04-18
// Desc:
// **********************************************************************

using System;
using System.Collections;
using System.Collections.Generic;
using UnityEngine;
using UnityEngine.UI;

public class UIMain : UIBase {

    public Button btn_Attack;

    public override void BindComponent()
    {
        base.BindComponent();
    }

    public override void RegistrationEvent()
    {
        base.RegistrationEvent();
        btn_Attack.onClick.AddListener(Attack);
    }

    public override void UnregisterEvent()
    {
        base.UnregisterEvent();
        btn_Attack.onClick.RemoveListener(Attack);
    }

    public override void Close()
    {
        base.Close();
    }

    public override void Init()
    {
        base.Init();
    }


    private void Attack()
    {
        SendMessage(BattleEvent.Attack);
    }
}
每次创建新的界面我们都在UIType上添加新的类型,用于界面的创建和销毁。
public enum UIType
{
    UIMain,
}
4.最后我们写一个UIManager来管理所有的ui。
using System.Collections;
// **********************************************************************
// Copyright (C) XM
// Author: 吴肖牧
// Date: 2018-04-13
// Desc:
// **********************************************************************

using System.Collections.Generic;
using UnityEngine;

/// <summary>
/// 界面类型
/// </summary>
public enum PanelType
{
    MainPanel,
    BottomPanel,
    TopPanel,
    TipPanel,
}

public class UIManager : Manager {

    Dictionary<UIType, GameObject> uiMap = new Dictionary<UIType, GameObject>();

    Transform MainPanel;
    Transform BottomPanel;
    Transform TopPanel;
    Transform TipPanel;

    void Awake()
    {
        Transform tr = AppFacade.Instance.GetManager<GameManager>(ManagerName.Game).uiRoot.transform;
        MainPanel = tr.Find("MainPanel");
        BottomPanel = tr.Find("BottomPanel");
        TopPanel = tr.Find("TopPanel");
        TipPanel = tr.Find("TipPanel");
    }

    /// <summary>
    /// 打开界面
    /// </summary>
    /// <param name="path"></param>
    /// <returns></returns>
    public GameObject Show(string path,object[] param = null)
    {
        GameObject ui = ResManager.CreateAsset(path);
        UIBase uibase = ui.GetComponent<UIBase>();
        uibase.param = param;
        SetPanelParent(uibase);
        ui.transform.localScale = Vector3.one;
        ui.transform.localPosition = Vector3.zero;
        ui.transform.rectTransform().sizeDelta = new Vector2(0, 0);
        ui.transform.rectTransform().anchoredPosition = new Vector2(0, 0);
        AddUI(uibase.uiType, ui);
        return ui;
    }

    /// <summary>
    /// 设置ui的父对象
    /// </summary>
    /// <param name="go"></param>
    void SetPanelParent(UIBase uibase)
    {
        if (uibase.panelType == PanelType.MainPanel)
        {
            uibase.transform.SetParent(MainPanel);
        }
        else if (uibase.panelType == PanelType.BottomPanel)
        {
            uibase.transform.SetParent(BottomPanel);
        }
        else if (uibase.panelType == PanelType.TopPanel)
        {
            uibase.transform.SetParent(TopPanel);
        }
        else if (uibase.panelType == PanelType.TipPanel)
        {
            uibase.transform.SetParent(TipPanel);
        }
    }


    void AddUI(UIType uiType, GameObject ui)
    {
        uiMap.Add(uiType, ui);
    }

    void RemoveUI(UIType uiType)
    {
        if (uiMap.ContainsKey(uiType))
        {
            Destroy(uiMap[uiType]);
            uiMap.Remove(uiType);
        }
        else
        {
            Debug.LogError("CloseUI Fail  >>>>  Not Find " + name);
        }
    }

    /// <summary>
    /// 关闭面板
    /// </summary>
    /// <param name="name"></param>
    public void Close(UIType uiType)
    {
        RemoveUI(uiType);
    }

    void OnDestroy()
    {
        //Debug.Log("~UIManager was destroy!");
    }
}
我写的这个ui系统是很简单的,主要就是面向对象的思路展示,并不是作为一个框架中完整的UI系统来写的,所以有需要的朋友可以自行拓展。
如果有关注我的朋友,应该看过另一篇文章《Unity3D创建C#自定义模板快速实现基类接口》,我们可以创建一个UI的模版,每次创建新的界面都会自动帮我们实现基类的方法。