在之前的《SpringBoot整合Spring Security安全框架(一)》中用户权限使用的是@PreAuthorize硬编码,无法动态的进行权限的配置,本节基于扩展access()的SpEL表达式实现URL动态权限。
SpringBoot整合Spring Security安全框架(一)https://blog.csdn.net/weixin_43424932/article/details/104433071。
获取登录用户
为了方便看到当前登录的是哪个用户,在原有基础上先做如下修改。同时顺便去掉之前的@PreAuthorize注解。
修改controller中的首页接口index,使用security的上下文环境获取登录用户信息,关键是这句话SecurityContextHolder.getContext().getAuthentication().getPrincipal()。然后将用户名返回到thymeleaf模板。
package com.security.demo.controller;

import org.springframework.security.access.prepost.PreAuthorize;
import org.springframework.security.core.context.SecurityContextHolder;
import org.springframework.security.core.userdetails.User;
import org.springframework.stereotype.Controller;
import org.springframework.ui.Model;
import org.springframework.web.bind.annotation.GetMapping;
import org.springframework.web.bind.annotation.ResponseBody;

@Controller
public class HelloController {

    @GetMapping("/helloAdmin")
    @ResponseBody
    public String helloAdmin() {
        return "I am Admin";
    }

    @GetMapping("/helloUser")
    @ResponseBody
    public String helloUser() {
        return "I am User";
    }

    @GetMapping("/login")
    public String login() {
        return "login";
    }

    @GetMapping({"/index","/"})
    public String index(Model model) {
        Object principal = SecurityContextHolder.getContext().getAuthentication().getPrincipal();
        //anonymousUser表示匿名用户
        if("anonymousUser".equals(principal)) {
            model.addAttribute("name","当前未登录");
        }else {
            User user = (User)principal;
            model.addAttribute("name","Welcome "+user.getUsername());
        }
        return "index";
    }
}
修改首页页面
<!DOCTYPE html>
<html xmlns="http://www.w3.org/1999/xhtml" xmlns:th="http://www.thymeleaf.org" >
<head>
    <title>HelloWorld</title>
</head>
<body>
<h1>HelloWorld!
    <label th:text="${name}"></label>
    !
</h1>
<p><a th:href="@{/helloUser}">I am User</a></p>
<p><a th:href="@{/helloAdmin}">I am Admin</a></p>

<form th:action="@{/logout}" method="post">
    <input type="submit" value="退出登录"/>
</form>
</body>
</html>
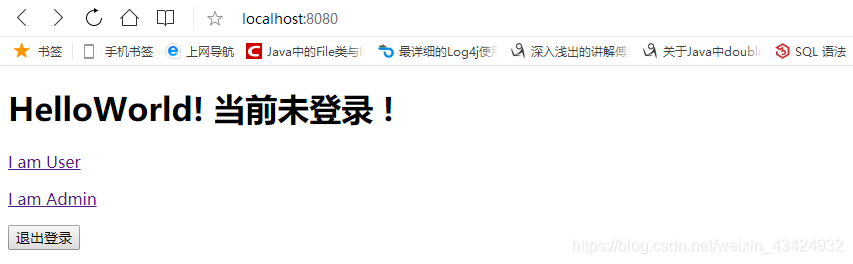
运行项目请求http://localhost:8080。出现下面的页面,效果显而易见。
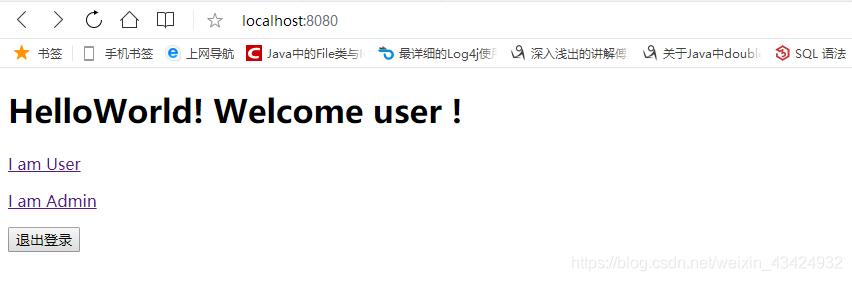
登录user用户,admin用户效果也是一样的,这里就不展示了。
扩展access()的SpEL表达式实现URL动态权限
编辑代码
引入lombok包简化代码。感觉之前粘贴上去代码太多了。
<dependency>
    <groupId>org.projectlombok</groupId>
    <artifactId>lombok</artifactId>
    <version>1.18.4</version>
</dependency>
新建Permission 实体类。
package com.security.demo.bean;

import lombok.Data;

import java.util.List;
import javax.persistence.Entity;
import javax.persistence.FetchType;
import javax.persistence.GeneratedValue;
import javax.persistence.Id;
import javax.persistence.JoinColumn;
import javax.persistence.JoinTable;
import javax.persistence.ManyToMany;

@Entity
@Data
public class Permission {
    @Id @GeneratedValue
    private long id;//主键.
    private String url;//授权链

    // 角色 - 权限是多对多的关系
    @ManyToMany(fetch=FetchType.EAGER)
    @JoinTable(name="RolePermission",joinColumns= {@JoinColumn(name="permission_id")} , inverseJoinColumns= {@JoinColumn(name="role_id")})
    private List<Role> roles;
}
修改Role 实体类。
package com.security.demo.bean;

import lombok.Data;

import javax.persistence.Entity;
import javax.persistence.GeneratedValue;
import javax.persistence.Id;

@Entity
@Data
public class Role {
    @Id @GeneratedValue
    private long rid;//主键.
    private String name;//角色名称.
    private String description;//角色描述.
}
修改UserInfo 实体类。
package com.security.demo.bean;

import lombok.Data;

import java.util.List;
import javax.persistence.Entity;
import javax.persistence.FetchType;
import javax.persistence.GeneratedValue;
import javax.persistence.Id;
import javax.persistence.JoinColumn;
import javax.persistence.JoinTable;
import javax.persistence.ManyToMany;

@Entity
@Data
public class UserInfo {

    @Id @GeneratedValue
    private long uid;//主键.
    private String username;//用户名.
    private String password;//密码.

    //用户--角色:多对多的关系.
    @ManyToMany(fetch=FetchType.EAGER)//立即从数据库中进行加载数据;
    @JoinTable(name = "UserRole", joinColumns = { @JoinColumn(name = "uid") }, inverseJoinColumns ={@JoinColumn(name = "role_id") })
    private List<Role> roles;
}
修改WebSecurityConfig中重写的configure方法。这句是关键.access("@authService.canAccess(request,authentication)")。
@Override
protected void configure(HttpSecurity http) throws Exception {
    // 定义哪些URL需要被保护、哪些不需要被保护
    http.authorizeRequests()
            // 设置所有人都可以访问登录页面
            .antMatchers("/login").permitAll()
            .antMatchers("/index","/").permitAll()
            // 任何请求,登录后需要权限验证才能访问
            .anyRequest().access("@authService.canAccess(request,authentication)")
            .and()
            .formLogin().loginPage("/login")
    ;
}
新建AuthService 类。在这里面实现权限分配。
package com.security.demo.config;

import com.security.demo.bean.Permission;
import com.security.demo.bean.Role;
import com.security.demo.repository.PermissionReporitory;
import org.springframework.beans.factory.annotation.Autowired;
import org.springframework.security.access.ConfigAttribute;
import org.springframework.security.access.SecurityConfig;
import org.springframework.security.core.Authentication;
import org.springframework.security.core.GrantedAuthority;
import org.springframework.stereotype.Component;

import javax.servlet.http.HttpServletRequest;
import java.util.*;

@Component
public class AuthService {

    @Autowired
    private PermissionReporitory permissionReporitory;

    /**
     * 权限校验
     */
    public boolean canAccess(HttpServletRequest request, Authentication authentication) {
        boolean b = false;
        System.out.println(authentication);

        //判断是否登录
        Object principal = authentication.getPrincipal();
        if(principal == null || "anonymousUser".equals(principal)) {
            return b;
        }

        Map<String,Collection<ConfigAttribute>> map =  getPermissionMap();

        //String uri = request.getRequestURI();
        //Collection<ConfigAttribute> configAttributes = map.get(uri);

        Collection<ConfigAttribute> configAttributes = null;
        String resUrl;
        //URL规则匹配.//可支持通配符
        AntPathRequestMatcher matcher;
        for(Iterator<String> it  = map.keySet().iterator();it.hasNext();) {
            resUrl = it.next();
            matcher = new AntPathRequestMatcher(resUrl);
            if(matcher.matches(request)) {
                configAttributes =  map.get(resUrl);
                break;
            }
        }

        if(configAttributes == null || configAttributes.size() ==0) {
            return b;
        }

        String needRole = null;
        for (ConfigAttribute configAttribute : configAttributes) {
            //拥有当前权限的角色
            needRole = configAttribute.getAttribute();
            System.out.println("needRole = " + needRole);

            String hasRole=null;
            for (GrantedAuthority grantedAuthority : authentication.getAuthorities()) {
                //当前用户拥有的角色
                hasRole=grantedAuthority.getAuthority();
                System.err.println("hasRole = " + hasRole);
                if (needRole.equals(hasRole)) {
                    b = true;
                    break;
                }
            }
        }
        return b;
    }

    /**
     * 获取权限集合
     */
    private Map<String, Collection<ConfigAttribute>> getPermissionMap() {
        Map<String, Collection<ConfigAttribute>> permissionMap = new HashMap<>();
        Collection<ConfigAttribute> collection;
        ConfigAttribute cfg;

        List<Permission> permissions = permissionReporitory.findAll();
        for(Permission p:permissions) {
            collection = new ArrayList<>();
            for(Role r:p.getRoles()) {
                cfg = new SecurityConfig("ROLE_"+r.getName());
                collection.add(cfg);
            }
            permissionMap.put(p.getUrl(),collection);
        }
        System.out.println(permissionMap);
        return permissionMap;
    }
}
测试和分析
原理分析
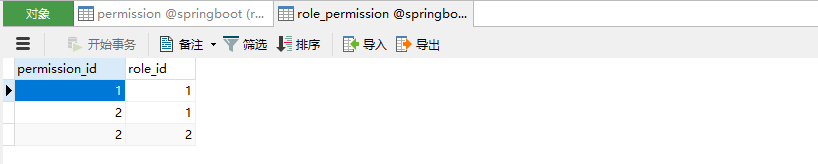
运行项目,jpa会为我们自动生成权限信息表和权限角色关联表,多对多的关系。当前手动添加两条权限信息,权限1为/helloAdmin,权限2为/helloUser。

当前自己手动填写权限和角色关系。当前表示角色1拥有权限1和权限2,角色2只拥有权限2。
在来看看用户表,当前拥有用户1/admin,用户2/user。

角色表,当前拥有角色1/admin,角色2/user。

五个表连起来看,就是admin用户拥有角色1/admin,所以admin用户拥有权限1/helloAdmin和权限2/helloUser。而user用户拥有角色2/user,所以user用户只拥有权限2/helloUser。

可以看出本次采用的是RBAC模式建立数据库。RBAC 是基于角色的访问控制(Role-Based Access Control )在 RBAC 中,权限与角色相关联,用户通过成为适当角色的成员而得到这些角色的权限。这就极大地简化了权限的管理。这样管理都是层级相互依赖的,权限赋予给角色,而把角色又赋予用户,这样的权限设计很清楚,管理起来很方便。表也就比较简单。
测试效果展示
当前登录admin。
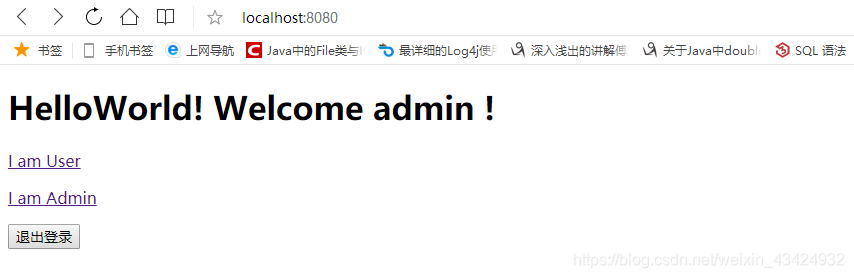
admin用户可以访问helloUser和helloAdmin两个接口。


当前登录user用户。

user用户只能访问helloUser接口。


至此,加上上一篇文章,SpringBoot整合Spring Security安全框架的动态权限管理就全部实现了。
完整项目资源链接https://download.csdn.net/download/weixin_43424932/12182847。
