绪论
本文基于使用MobileNet-SSD v2迁移学习实现在Android端的实时视频目标检测。一开始有考虑直接调用tensorlfow for Android 的接口来加载模型,但是这样在安卓端的图片预处理就会很麻烦(好吧,其实是我看不懂官方代码,哈哈哈。。。)。所以最后选择使用OpenCV for Android 的DNN模块加载模型,实时预测。
环境配置
- Android studio 3.0开发环境搭建:https://blog.csdn.net/Jarvis_lele/article/details/103637156
- OpenCV 3.3.0+(win版 与 Android版)
由于直接官网和GitHub上下载贼慢,所以这里给出了C站某大神整理的百度云盘链接,如果过期了,可以进行找其他大神。 - MobileNet object detection model
可从Tensorflow detection model zoo中下载
1、OpenCV DNN模块
Deep Neural Network - DNN 是OpenCV中的深度神经网络模块,支持基于深度学习模块前馈网络运行、实现图像与视频场景中的
- 图像分类
- 对象检测
- 图像分割
OpenCV3.4.1以上版本支持tensorflow1.11版本以上的对象检测框架(object detetion)模型导出使用。其模型导入与加载的相关API支持以下深度学习框架:
- tensorflow - readNetFromTensorflow
- caffe - readNetFromCaffe
- pytorch - readNetFromTorch
- darknet - readNetFromDarknet
OpenCV3.4.1以上版本支持tensorflow1.11版本以上的对象检测框架(object detetion)模型导出使用,当前支持的模型包括以下: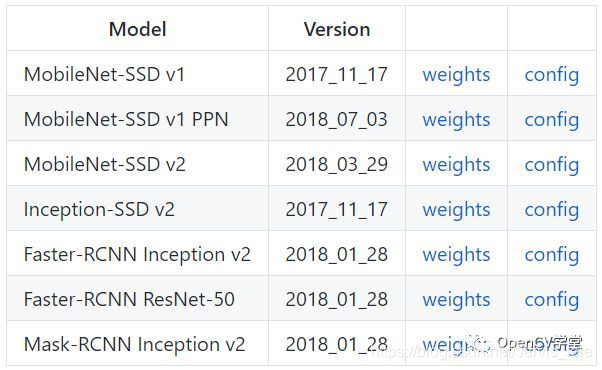
也就是说通过tensorflow object detection API框架进行迁移学习训练模型,导出预测图之后,可以通过OpenCV3.4.1以上版本提供几个python脚本导出graph配置文件,然后就可以在OpenCV DNN模块中使用tensorflow相关的模型了。
2、加载迁移模型
使用OpenCV DNN模块加载tensorflow模型需要frozen_inference_graph.pb与graph.pbtxt文件。这是因为,OpenCV DNN需要根据text版本的模型描述文件来解析tensorflow的pb文件,实现网络模型加载。
一般graph.pbtxt文件需要使用OpenCV DNN模块的python脚本生成对象的图配置文件graph.pbtxt。根据tensorflow中迁移学习或者下载预训练模型不同,OpenCV DNN 模块提供如下可以使用脚本生成对应的模型配置文件
- tf_text_graph_ssd.py
- tf_text_graph_faster_rcnn.py
- tf_text_graph_mask_rcnn.py
对SSD对象检测模型,生成模型描述文件运行以下命令行即可(在一行执行):
python tf_text_graph_ssd.py

--input /path/to/model.pb

--config /path/to/example.config

--output /path/to/graph.pbtxt
以MobileNet-SSD v2版本为例,首先下载该模型,解压缩以后会发现里面有一个frozen_inference_graph.pb文件
- 使用tensorflow加载预测图进行预测的代码如下:
import tensorflow as tf
import cv2 as cv

# Read the graph.
model_dir = 'D:/tensorflow/ssd_mobilenet_v2_coco_2018_03_29/frozen_inference_graph.pb'

withtf.gfile.FastGFile(model_dir, 'rb') asf:
graph_def = tf.GraphDef()
graph_def.ParseFromString(f.read())
with tf.Session() as sess:
	# Restore session
	sess.graph.as_default()
	tf.import_graph_def(graph_def, name= '')

	# Read and preprocess an image.
	img = cv.imread( 'D:/images/objects.jpg')
	rows = img.shape[ 0]
	cols = img.shape[ 1]

	inp = cv.resize(img, ( 300, 300))

	inp = inp[:, :, [ 2, 1, 0]] # BGR2RGB

	# Run the model
	out = sess.run([sess.graph.get_tensor_by_name( 'num_detections:0'),
	sess.graph.get_tensor_by_name( 'detection_scores:0'),
	sess.graph.get_tensor_by_name( 'detection_boxes:0'),
	sess.graph.get_tensor_by_name( 'detection_classes:0')],
	feed_dict={ 'image_tensor:0': inp.reshape( 1, inp.shape[ 0], inp.shape[ 1], 3)})

	# Visualize detected bounding boxes.
	num_detections = int(out[ 0][ 0])
	for i in range(num_detections):
		classId = int(out[ 3][ 0][i])
		score = float(out[ 1][ 0][i])
		bbox = [float(v) forv inout[ 2][ 0][i]]

		if score > 0.3:

			x = bbox[ 1] * cols
			y = bbox[ 0] * rows
			right = bbox[ 3] * cols
			bottom = bbox[ 2] * rows

		cv.rectangle(img, (int(x), int(y)), (int(right), int(bottom)), ( 125, 255, 51), thickness= 2)

	cv.imshow( 'TensorFlow MobileNet-SSD', img)
	cv.waitKey()
运行结果如下(跟tensorflow中的运行结果完全一致,OpenCV DNN果然靠谱):
- 使用OpenCV DNN模块加载tensorflow模型(frozen_inference_graph.pb与graph.pbtxt),实现预测图使用的代码如下(注意此时不需要依赖tensorflow):
运行结果如下(跟tensorflow中的运行结果完全一致,OpenCV DNN果然靠谱):
