Binding源数据对数据类型没有太多的要求,只要满足是对象就可以了。要想实现对象具有自动通知Binding的属性值已经变化的能力,必须让类实现INotifyPropertyChanged接口并在属性的set语句中激发PropertyChanged事件。除了这种方式,还有很多作为数据源的方式,如下:
1 把控件当作源及Binding标记扩展
大多数情况下Binding源都是来自逻辑层,又是UI元素也需要产生联动。如把一个TextBox的Text属性关联在Slider的Value属性上:
<
Window
x:Class=
"Demo01.Window1"
xmlns=
"http://schemas.microsoft.com/winfx/2006/xaml/presentation"
xmlns:x=
"http://schemas.microsoft.com/winfx/2006/xaml"
Title=
"Control as Sourse"
Height=
"110"
Width=
"300"
>
<
StackPanel
>
<
TextBox
x:Name=
"textBox1"
Text=
"{Binding Path=Value,ElementName=slider1}"
BorderBrush=
"Black"
Margin=
"5"
/>
<
Slider
Margin=
"5"
x:Name=
"slider1"
Maximum=
"100"
Minimum=
"0"
/>
</
StackPanel
>
</
Window
>
运行效果如下:
注意:在C#代码中可以访问XAML中声明的变量,但XAML代码无法访问C#中声明的变量。 |
<
TextBox
x:Name=
"textBox1"
Text=
"{Binding Path=Value,ElementName=slider1}"
BorderBrush=
"Black"
Margin=
"5"
/>
与之等价的C#代码:
this.
textBox1.
SetBinding(
TextBox.
TextProperty,
new
Binding(
"Value") {
ElementName =
"slider1" });
// ElementName是获取或设置要用作绑定源对象的元素的名称
Binding类构造器本身就可以接收Path参数,因此可以简写如下:
<
TextBox
x:Name=
"textBox1"
Text=
"{Binding Value,ElementName=slider1}"
BorderBrush=
"Black"
Margin=
"5"
/>
注意:C#代码可以直接访问控件对象,所以一般不使用Binding的ElementName属性,而是直接把对象复制给Binding的Source属性。 |
“Text="{BindingPath=Value,ElementName=slider1}"实际就是Binding的简单标记扩展,其实简单理解这条语句,就是赋值。但是可以理解为“为Text属性设置Binding为……”。
2 控制Binding的方向及数据更新
Binding可以理解为桥梁,你就是桥梁上总都督。有时只需要把数据展示给用户,不允许修改,可修改Binding模式为单向沟通。并且支持数据流通次数。通过属性值Mode控制数据流向,它的参数值如下:
//描述绑定中数据流的方向。
public
enum
BindingMode
{
//导致对源属性或目标属性的更改可自动更新对方。此绑定类型适用于可编辑窗体或其他完全交互式 UI 方案。
TwoWay =
0,
//当绑定源(源)更改时,更新绑定目标(目标)属性。如果要绑定的控件为隐式只读控件,则适用此绑定类型。
//例如,可以绑定到如股市代号之类的源。或者,可能目标属性没有用于进行更改(例如表的数据绑定背景色)的控件接口。
//如果不需要监视目标属性的更改,则使用
//System.Windows.Data.BindingMode.OneWay 绑定模式可避免 System.Windows.Data.BindingMode.TwoWay
//绑定模式的系统开销。
OneWay =
1,
//当应用程序启动或数据上下文更改时,更新绑定目标。此绑定类型适用于以下情况:
//使用当前状态的快照适合使用的或数据状态实际为静态的数据。
//如果要从源属性初始化具有某个值的目标属性,并且事先不知道数据上下文,则也可以使用此绑定类型。实质上,这是
//System.Windows.Data.BindingMode.OneWay 绑定的较简单的形式,它在不更改源值的情况下可提供更好的性能。
OneTime =
2,
//当目标属性更改时更新源属性。
OneWayToSource =
3,
//使用绑定目标的默认 System.Windows.Data.Binding.Mode 值。
//每个依赖项属性的默认值都不同。一般情况下,用户可编辑控件属性(例如文本框和复选框的属性)默认为双向绑定,
//而多数其他属性默认为单向绑定。确定依赖项属性绑定在默认情况下是单向还是双向的编程方法是:使用
//System.Windows.DependencyProperty.GetMetadata(System.Type) 来获取属性的属性元数据,然后检查
//System.Windows.FrameworkPropertyMetadata.BindsTwoWayByDefault 属性的布尔值。
Default =
4,
}
Default指Binding模式根据目标的实际情况来确定,比如可编辑的(TextBox.Text属性),Default采用双向模式;若是只读的(TextBlock.Text)则采用单向模式。
以上程序例子中,当拖动Slider,TextBox就会显示Slider当前的值。在TextBox里输入一个恰当的值,然后按一下Tab键,焦点离开TextBox,Slider会跳到相应的值。可以通过UpdateSourceTrigger属性改变,如下:
//描述绑定源更新的执行时间。
public
enum
UpdateSourceTrigger
{
//绑定目标属性的默认 System.Windows.Data.UpdateSourceTrigger 值。多数依赖项属性的默认值为
//System.Windows.Data.UpdateSourceTrigger.PropertyChanged,而
//System.Windows.Controls.TextBox.Text 属性的默认值为 System.Windows.Data.UpdateSourceTrigger.LostFocus。
Default =
0,
//当绑定目标属性更改时,立即更新绑定源。
PropertyChanged =
1,
//当绑定目标元素失去焦点时,更新绑定源。
LostFocus =
2,
//仅在调用 System.Windows.Data.BindingExpression.UpdateSource() 方法时更新绑定源。
Explicit =
3,
}
Binding还有NotifyOnSourceUpdated和NotifyOnTargetUpdated是bool类型,设置为true,则当数据源或者目标被更新,Binding会激发SourceUpdated和TargetUpdated事件。可以通过侦查这两个事件来找出那些源数据或UI被更新了。
3 Binding的Path
Binding源对象可能有很多属性,通过Path指定需要绑定的属性。如下创建Path来应对不同的情况:
3.1 通常情况,把Binding关联在Binding源的属性上
<
TextBox
x:Name=
"textBox1"
Text=
"{Binding Path=Value,ElementName=slider1}"
/>
C#等效代码如下:
Binding binding =
new
Binding(){
Path =
new
PropertyPath(
"Value"),
Source =
this.
slider1};
this.
textBox1.
SetBinding(
TextBox.
TextProperty,
binding);
或用Binding构造器简写:
Binding binding =
new
Binding(
"Value"){
Source =
this.
slider1};
this.
textBox1.
SetBinding(
TextBox.
TextProperty,
binding);
3.2 Binding支持多级路径
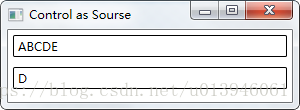
如在一个TextBox显示另一个TextBox的文本长度:
<
StackPanel
>
<
TextBox
Margin=
"5"
BorderBrush=
"Black"
Name=
"textBox1"
Text=
"ABCDE"
/>
<
TextBox
Margin=
"5"
BorderBrush=
"Black"
Name=
"textBox2"
Text=
"{Binding Path=Text.Length,
ElementName=textBox1,
Mode=OneWay}"
/>
</
StackPanel
>
C#等效代码如下:
this.
textBox2.
SetBinding(
TextBox.
TextProperty,
new
Binding(
"Text.Length") {
Source =
this.
textBox1,
Mode =
BindingMode.
OneWay});
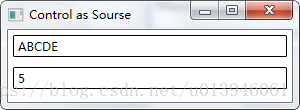
集合类型具有索引器功能,而且其实就是带参属性,既然是属性,因此也可以作为Path来使用。
如让TextBox显示另一个TextBox文本的第四个字符:
<
StackPanel
>
<
TextBox
Margin=
"5"
BorderBrush=
"Black"
Name=
"textBox1"
Text=
"ABCDE"
/>
<
TextBox
Margin=
"5"
BorderBrush=
"Black"
Name=
"textBox2"
Text=
"{Binding Path=Text[3],
ElementName=textBox1,
Mode=OneWay}"
/>
</
StackPanel
>
C#等效代码如下:
this.
textBox2.
SetBinding(
TextBox.
TextProperty,
new
Binding(
"Text[3]") {
Source =
this.
textBox1,
Mode =
BindingMode.
OneWay });
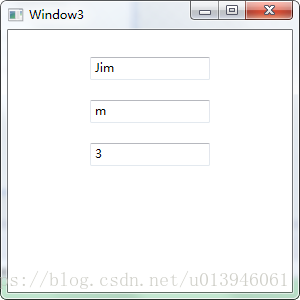
3.3 使用一个集合或者DataView作为Binding源
<
Window
x:Class=
"Demo01.Window3"
xmlns=
"http://schemas.microsoft.com/winfx/2006/xaml/presentation"
xmlns:x=
"http://schemas.microsoft.com/winfx/2006/xaml"
Title=
"Window3"
Height=
"300"
Width=
"300"
>
<
StackPanel
Height=
"229"
Name=
"stackPanel1"
Width=
"252"
>
<
TextBox
Height=
"23"
Name=
"textBox1"
Width=
"120"
Margin=
"10"
/>
<
TextBox
Height=
"23"
Name=
"textBox2"
Width=
"120"
Margin=
"10"
/>
<
TextBox
Height=
"23"
Name=
"textBox3"
Width=
"120"
Margin=
"10"
/>
</
StackPanel
>
</
Window
>
后台代码如下:
public
Window3()
{
InitializeComponent();
List<
string> infos =
new
List<
string>() {
"Jim",
"Darren",
"Jacky" };
textBox1.
SetBinding(
TextBox.
TextProperty,
new
Binding(
"/") {
Source =
infos });
textBox2.
SetBinding(
TextBox.
TextProperty,
new
Binding(
"/[2]") {
Source =
infos,
Mode =
BindingMode.
OneWay });
textBox3.
SetBinding(
TextBox.
TextProperty,
new
Binding(
"/Length") {
Source =
infos,
Mode =
BindingMode.
OneWay });
}
如果集合元素下还是一个集合元素,用斜杠选择下一级。
再举一例:
<
Window
x:Class=
"Demo01.Window4"
xmlns=
"http://schemas.microsoft.com/winfx/2006/xaml/presentation"
xmlns:x=
"http://schemas.microsoft.com/winfx/2006/xaml"
Title=
"Window4"
Height=
"300"
Width=
"300"
>
<
StackPanel
Margin=
"10,10,12,12"
Name=
"stackPanel1"
>
<
TextBox
Height=
"23"
Margin=
"10"
Name=
"textBox1"
Width=
"120"
/>
<
TextBox
Height=
"23"
Margin=
"10"
Name=
"textBox2"
Width=
"120"
/>
<
TextBox
Height=
"23"
Margin=
"10"
Name=
"textBox3"
Width=
"120"
/>
</
StackPanel
>
</
Window
>
后台代码如下:
public
partial
class
Window4 :
Window
{
public
Window4()
{
InitializeComponent();
List<
Contry> infos =
new
List<
Contry>() {
new
Contry() {
Name =
"中国",
Provinces=
new
List<
Province>()
{
new
Province(){
Name=
"四川",
Citys=
new
List<
City>(){
new
City(){
Name=
"绵阳市"}}}}}};
this.
textBox1.
SetBinding(
TextBox.
TextProperty,
new
Binding(
"/Name")
{
Source =
infos });
this.
textBox2.
SetBinding(
TextBox.
TextProperty,
new
Binding(
"/Provinces/Name")
{
Source =
infos });
this.
textBox3.
SetBinding(
TextBox.
TextProperty,
new
Binding(
"/Provinces/Citys/Name")
{
Source =
infos });
}
}
class
City
{
public
string Name {
set;
get; }
}
class
Province
{
public
string Name {
set;
get; }
public
List<
City> Citys {
set;
get; }
}
class
Contry
{
public
string Name {
set;
get; }
public
List<
Province> Provinces {
get;
set; }
}
运行效果如下:
4 自动寻找数据源
Binding本身就是数据且不需要Path指明。如string、int等基本类型,它们本身就是数据,没有属性,因此可以把Path的值设置为“.”。在XAML中可以省略“.”,但在C#代码中不可省略。如下举例:
<
Window
x:Class=
"Demo01.Window5"
xmlns=
"http://schemas.microsoft.com/winfx/2006/xaml/presentation"
xmlns:x=
"http://schemas.microsoft.com/winfx/2006/xaml"
xmlns:Str=
"clr-namespace:System;assembly=mscorlib"
Title=
"Window5"
Height=
"110"
Width=
"300"
>
<
StackPanel
>
<
StackPanel.Resources
>
<
Str:String
x:Key=
"myString"
>
菩提本无树,何处染尘埃。
</
Str:String
>
</
StackPanel.Resources
>
<
TextBlock
x:Name=
"textBlock1"
TextWrapping=
"Wrap"
Text=
"{Binding Path=.,Source=
{StaticResource ResourceKey=myString}}"
FontSize=
"30"
/>
</
StackPanel
>
</
Window
>
运行效果如下:
<
TextBlock
x:Name=
"textBlock1"
TextWrapping=
"Wrap"
Text=
"{Binding .,
Source={StaticResource ResourceKey=myString}}"
FontSize=
"30"
/>
或:
<
TextBlock
x:Name=
"textBlock1"
TextWrapping=
"Wrap"
Text=
"{Binding Source={StaticResource ResourceKey=myString}}"
FontSize=
"30"
/>
用C#代码替代:
string myString =
"菩萨本无树,明镜亦非台。本来无一物,何处惹尘埃。";
this.
textBlock1.
SetBinding(
TextBlock.
TextProperty,
new
Binding(
".") {
Source =
myString });
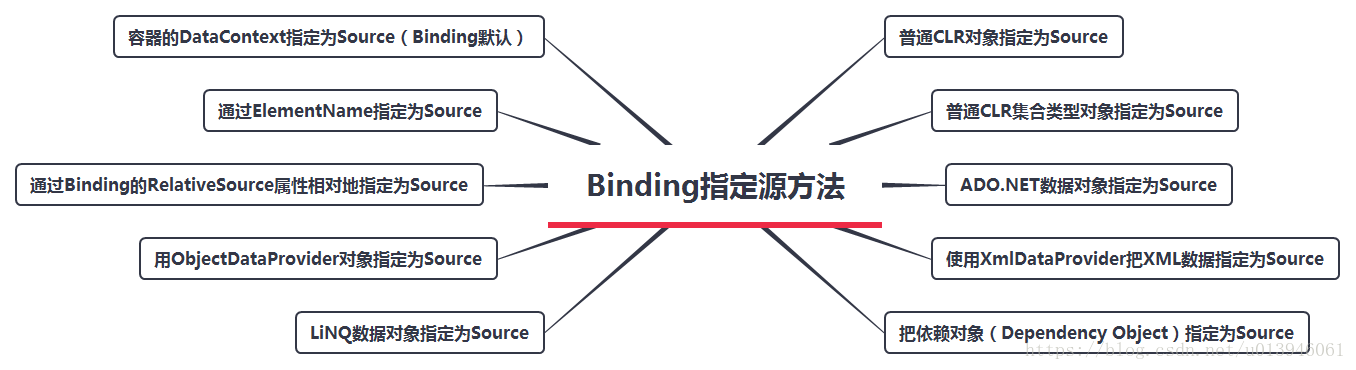
5 为Binding指定源的几种方法
Binding的源其实只要一个对象包含数据并通过属性把数据暴露出来,它就能当作Binding的源来使用。常见的方法有:
- 普通CLR对象指定为Source,包括.NETFramework自带类型对象和用户自定义对象。类实现INotifyPropertyChanged接口,可以通过在属性的set语句里激发PropertyChanged事件来通知Bingding数据更新。
- 普通CLR集合类型对象指定为Source,包括数组、List、ObservableCollection等集合类型。通常把集合作为ItemsControl派生类的数据来源使用
- ADO.NET数据对象指定为Source,包括DataTable和DataView等。
- 使用XmlDataProvider把XML数据指定为Source。如一些WPF级联式控件(TreeView和Menu),可以把树状结构的XML与之关联。
- 把依赖对象(Dependency Object)指定为数据源。既可以做数据源又可以做目标,因此可以形成Binding链。
- 容器的DataContext指定为数据源(Binding默认)。如有时不明确源但明确属性,即只设置Path不设置Source。Binding会沿着控件树一层一层的找属性,并把DataContext当作自己的Source。
- 通过ElementName指定Source。但在C#代码中可以直接把对象指定Source。
- 通过Binding的RelativeSource属性相对地指定Source。控件只关心自己或自己的容器及内部元素时用该方法。
- 用ObjectDataProvider对象指定为Source。当数据源的数据不是通过属性而是通过方法的时候使用。
- 把LiNQ检索得到的数据对象作为数据源。
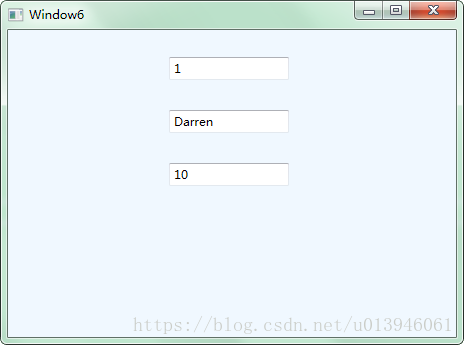
5.1 使用DataContext作为Binding的源(无Source)
DataContext属于FrameworkElement类,这个类是WPF控件的基类,因此基本所有的WPF控件都具备这个属性。WPF的UI布局是树形结构。因此Binding会沿着树节点一个一个的找,找到Path指定的属性了,才把该对象当成Source。否则会一路找下去,如果到根节点还没找到,则不会赋值给Source。
如下例子所示,先创建一个StudentInfo类:
public
class
StudentInfo
{
public
int Id {
get;
set; }
public
string Name {
get;
set; }
public
int Age {
get;
set; }
}
UI端代码:
<
Window
x:Class=
"Demo01.Window6"
xmlns=
"http://schemas.microsoft.com/winfx/2006/xaml/presentation"
xmlns:x=
"http://schemas.microsoft.com/winfx/2006/xaml"
xmlns:Stu=
"clr-namespace:Demo01"
Title=
"Window6"
Height=
"345"
Width=
"464"
>
<
StackPanel
Background=
"AliceBlue"
>
<
StackPanel.DataContext
>
<
Stu:StudentInfo
Id=
"1"
Name=
"Darren"
Age=
"10"
></
Stu:StudentInfo
>
</
StackPanel.DataContext
>
<
Grid
>
<
StackPanel
Height=
"283"
HorizontalAlignment=
"Left"
Margin=
"12,12,0,0"
Name=
"stackPanel1"
VerticalAlignment=
"Top"
Width=
"418"
>
<
TextBox
Height=
"23"
Name=
"textBox1"
Width=
"120"
Margin=
"15"
Text=
"{Binding Path=Id}"
/>
<
TextBox
Height=
"23"
Name=
"textBox2"
Width=
"120"
Margin=
"15"
Text=
"{Binding Path=Name}"
/>
<
TextBox
Height=
"23"
Name=
"textBox3"
Width=
"120"
Margin=
"15"
Text=
"{Binding Path=Age}"
/>
</
StackPanel
>
</
Grid
>
</
StackPanel
>
</
Window
>
UI布局如下所示:
使用xmlns:Stu=使用“clr-namespace:Demo01”就可以在XAML中使用Student类了。对DataContext进行赋值——它是一个Student对象。
<
StackPanel.DataContext
>
<
Stu:StudentInfo
Id=
"1"
Name=
"Darren"
Age=
"10"
></
Stu:StudentInfo
>
</
StackPanel.DataContext
>
三个TextBox的Text通过Binding获取值,但只为Binding指定了Path、没有指定Source。可以简写为:
<
TextBox
Height=
"23"
Name=
"textBox1"
Width=
"120"
Margin=
"15"
Text=
"{Binding Id}"
/>
<
TextBox
Height=
"23"
Name=
"textBox2"
Width=
"120"
Margin=
"15"
Text=
"{Binding Name}"
/>
<
TextBox
Height=
"23"
Name=
"textBox3"
Width=
"120"
Margin=
"15"
Text=
"{Binding Age}"
/>
TextBox的Binding会自动向UI元素树的上层去寻找Path匹配的DataContext对象,效果如下:
前面部分已经指出Binding如果关联基本数据类型时,就不需要指定Path了。同理,当某个DataContext是一个简单类型对象的时候,就可以既不设置Path也不设置Source了。
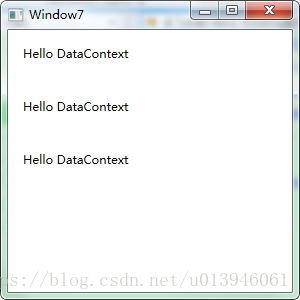
<
Window
x:Class=
"Demo01.Window7"
xmlns=
"http://schemas.microsoft.com/winfx/2006/xaml/presentation"
xmlns:x=
"http://schemas.microsoft.com/winfx/2006/xaml"
xmlns:Str=
"clr-namespace:System;assembly=mscorlib"
Title=
"Window7"
Height=
"300"
Width=
"300"
>
<
Grid
>
<
Grid.DataContext
>
<
Str:String
>Hello DataContext
</
Str:String
>
</
Grid.DataContext
>
<
StackPanel
>
<
TextBlock
Height=
"23"
HorizontalAlignment=
"Left"
Margin=
"15"
Name=
"textBlock1"
Text=
"{Binding}"
VerticalAlignment=
"Top"
/>
<
TextBlock
Height=
"23"
HorizontalAlignment=
"Left"
Margin=
"15"
Name=
"textBlock2"
Text=
"{Binding}"
VerticalAlignment=
"Top"
/>
<
TextBlock
Height=
"23"
HorizontalAlignment=
"Left"
Margin=
"15"
Name=
"textBlock3"
Text=
"{Binding}"
VerticalAlignment=
"Top"
/>
</
StackPanel
>
</
Grid
>
</
Window
>
运行效果如下:
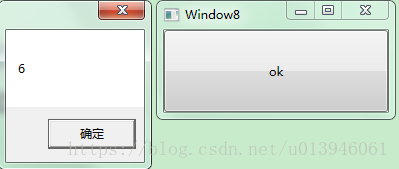
Binding为什么会自动沿着UI树查找DataContext呢?其实并不是它智能,而是DataContext是一个“依赖属性”。通过字面意思也很好理解,当你不给依赖属性显示赋值的时候,它就会把自己容器的属性借过来,因此它会一层一层的寻找。如下面的例子所示:
<
Window
x:Class=
"Demo01.Window8"
xmlns=
"http://schemas.microsoft.com/winfx/2006/xaml/presentation"
xmlns:x=
"http://schemas.microsoft.com/winfx/2006/xaml"
Title=
"Window8"
Height=
"120"
Width=
"240"
>
<
Grid
DataContext=
"6"
>
<
Grid
>
<
Grid
>
<
Grid
>
<
Button
x:Name=
"btn"
Content=
"ok"
Click=
"btn_Click"
/>
</
Grid
>
</
Grid
>
</
Grid
>
</
Grid
>
</
Window
>
Button的Click事件如下:
private
void
btn_Click(
object sender,
RoutedEventArgs e)
{
MessageBox.
Show(
btn.
DataContext.
ToString());
}
点击Button运行效果如下:
由此可见,DataContext是非常灵活的。当UI上多个控件都使用Binding关心同一个对象时,可以用DataContext代替;当作为Source的对象不能被直接访问,如B窗体想把A窗体内的控件作为Source,但是A窗体的控件为private访问级别。可以把控件作为窗体A的DataContext。可以理解为DataContext就是一座探照塔,只要数据上去,他就问别的元素放出照明光线,别的元素就都能看见了。DataContext就是一个依赖属性。用Binding可以直接把它关联到一个数据源上。
5.2 集合对象作为列表控件的ItemsSource
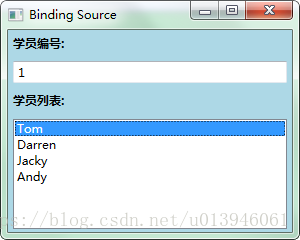
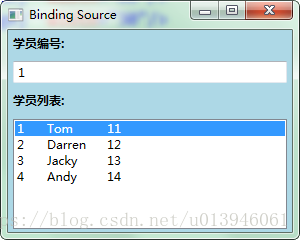
WPF列表式控件继承ItemsConrol类,因此也拥有ItemsSouece属性。ItemsSouece可接受IEnumerable接口派生类赋值(所以迭代遍历集合,包括数组、List等)。每个ItemsControl的派生类具有自己对应的条目容器。例如ListBox对应ListBoxItem、ComboBox对应ConboBoxItem。如何Binding呢?只要为ItemsControl设置ItemsSource属性值就可以了。如下所示:
<
Window
x:Class=
"Demo01.Window9"
xmlns=
"http://schemas.microsoft.com/winfx/2006/xaml/presentation"
xmlns:x=
"http://schemas.microsoft.com/winfx/2006/xaml"
Title=
"Binding Source"
Height=
"240"
Width=
"300"
>
<
StackPanel
x:Name=
"stackPanel"
Background=
"LightBlue"
>
<
TextBlock
Margin=
"5"
FontWeight=
"Bold"
x:Name=
"textBlock1"
Text=
"学员编号:"
/>
<
TextBox
Margin=
"5"
x:Name=
"txtStudentId"
/>
<
TextBlock
Margin=
"5"
FontWeight=
"Bold"
x:Name=
"textBlock2"
Text=
"学员列表:"
/>
<
ListBox
x:Name=
"lbStudent"
Height=
"110"
Margin=
"5"
/>
</
StackPanel
>
</
Window
>
后台代码实现把List<StudentInfo>的实例作为ListBox的ItemSource,ListBox显示StudentInfo的Name属性并使用TextBox显示当前选中条目的Id。后台代码如下:
namespace
Demo01
{
public
partial
class
Window9 :
Window
{
public
Window9()
{
InitializeComponent();
List<
StudentInfo> listStu =
new
List<
StudentInfo>() {
new
StudentInfo(){
Id=
1,
Age=
11,
Name=
"Tom"},
new
StudentInfo(){
Id=
2,
Age=
12,
Name=
"Darren"},
new
StudentInfo(){
Id=
3,
Age=
13,
Name=
"Jacky"},
new
StudentInfo(){
Id=
4,
Age=
14,
Name=
"Andy"}
};
// 为ListBox设置Binding
this.
lbStudent.
ItemsSource =
listStu;
this.
lbStudent.
DisplayMemberPath =
"Name";
// 为TextBox设置Binding
Binding bind =
new
Binding(
"SelectedItem.Id") {
Source =
this.
lbStudent };
this.
txtStudentId.
SetBinding(
TextBox.
TextProperty,
bind);
}
}
}
DisplayMemberPath就相当于Binding的Path。ListBox在获得ItemsSource的时候就会创建等量的ListBoxItem并以DisPlayMemberPath属性值为Path创建Binding,Binding的目标就是ListBoxItem的内容插件。运行效果如下:
ItemsControl创建Binding的过程是在DisplayMemberTemplateSelector类的SelectTemplate方法里完成的。格式如下:
public
override
DataTemplate
SelectTemplate(
object item,
DependencyObject container)
{
//......
}
它的返回值很重要,它基本上是数据的外壳。当没有为ItemsControl显式地指定DataTemplate时SelectTemplate方法就会为我们创建一个默认DataTemplate。SelectTemplate与创建Binding相关代码如下:
FrameworkElementFactory text=
ContentPresenter
Create
TextBlockFactory();
Binding binding=
new
Binding();
Binding.
Path=
new
Property
Path( _displayMemberPath);
binding.
StringFormat=
_stringFormat;
text.
SetBinding(
TextBlock.
TextProperty,
binding);
通过上述代码,Binding设置了Path而没有指定Source,并关联到TextBlock控件上。所以Binding是通过UI树寻找_displayMemberPath指定属性的DataContext。
也可以显式设置DataTemplate。把"this.lbStudent.DisplayMemberPath = "Name";"删除。在XAML中,添加ListBox的ItemTemplate属性(派生于ItemsControl类),它就是DataTemplate类型。如:
<
Window
x:Class=
"Demo01.Window10"
xmlns=
"http://schemas.microsoft.com/winfx/2006/xaml/presentation"
xmlns:x=
"http://schemas.microsoft.com/winfx/2006/xaml"
Title=
"Binding Source"
Height=
"240"
Width=
"300"
>
<
StackPanel
x:Name=
"stackPanel"
Background=
"LightBlue"
>
<
TextBlock
Margin=
"5"
FontWeight=
"Bold"
x:Name=
"textBlock1"
Text=
"学员编号:"
/>
<
TextBox
Margin=
"5"
x:Name=
"txtStudentId"
/>
<
TextBlock
Margin=
"5"
FontWeight=
"Bold"
x:Name=
"textBlock2"
Text=
"学员列表:"
/>
<
ListBox
x:Name=
"lbStudent"
Height=
"110"
Margin=
"5"
>
<
ListBox.ItemTemplate
>
<
DataTemplate
>
<
StackPanel
Name=
"stackPanel2"
Orientation=
"Horizontal"
>
<
TextBlock
Text=
"{Binding Path= Id}"
Width=
"30"
/>
<
TextBlock
Text=
"{Binding Path= Name}"
Width=
"60"
/>
<
TextBlock
Text=
"{Binding Path= Age}"
Width=
"30"
/>
</
StackPanel
>
</
DataTemplate
>
</
ListBox.ItemTemplate
>
</
ListBox
>
</
StackPanel
>
</
Window
>
运行结果如下:
| 注意:推荐ObservableCollection<T>代替List<T>,因为ObservableCollection<T>类实现了INotifyCollectionChanged和INotifyPropertyChanged接口,集合数据变化立刻通知列表控件并显式出来。 |
5.3 使用ADO.NET对象作为Binding的源
经常会使用ADO.NET类对数据库进行操作。比如把数据库中的数据读取到DataTable中,同时显示在UI列表控件。但目前通常都是用LINQ等手段把DataTable里的数据转换成用户自定义类型集合。但Binding支持绑定DataTable。
UI代码如下:
<
Window
x:Class=
"Demo01.Window11"
xmlns=
"http://schemas.microsoft.com/winfx/2006/xaml/presentation"
xmlns:x=
"http://schemas.microsoft.com/winfx/2006/xaml"
Title=
"DataTable Source"
Height=
"206"
Width=
"250"
>
<
StackPanel
Background=
"LightBlue"
>
<
ListBox
Height=
"130"
Margin=
"5"
x:Name=
"listBoxStudents"
/>
<
Button
Content=
"Load"
Height=
"25"
Margin=
"5,0"
Click=
"Button_Click"
/>
</
StackPanel
>
</
Window
>
后台代码如下:
public
partial
class
Window11 :
Window
{
public
Window11()
{
InitializeComponent();
}
private
DataTable
CreateDataTable()
{
DataTable dt =
new
DataTable(
"newtable");
DataColumn[] columns =
new
DataColumn[] {
new
DataColumn(
"Id"),
new
DataColumn(
"Name"),
new
DataColumn(
"Age"),
new
DataColumn(
"Sex") };
dt.
Columns.
AddRange(
columns);
return
dt;
}
private
void
Button_Click(
object sender,
RoutedEventArgs e)
{
DataTable dtInfo =
CreateDataTable();
for (
int i =
0;
i <
5;
i++)
{
DataRow dr =
dtInfo.
NewRow();
dr[
0] =
i;
dr[
1] =
"猴王" +
i;
dr[
2] =
i +
10;
dr[
3] =
"男";
dtInfo.
Rows.
Add(
dr);
}
this.
listBoxStudents.
DisplayMemberPath =
"Name";
this.
listBoxStudents.
ItemsSource =
dtInfo.
DefaultView;
}
}
点击按钮,运行效果如下:
后台代码中DataTable的DefaultView属性是一个DataView类型的对象,DataView类实现了IEnumerable接口,所以可以被赋值给ListBox.ItemsSource属性。
通常情况下会选择ListView控件来显示DataTable。如下:
<
Window
x:Class=
"Demo01.Window12"
xmlns=
"http://schemas.microsoft.com/winfx/2006/xaml/presentation"
xmlns:x=
"http://schemas.microsoft.com/winfx/2006/xaml"
Title=
"DataTable Source"
Height=
"206"
Width=
"250"
>
<
StackPanel
Background=
"LightBlue"
>
<
ListView
x:Name=
"listViewStudents"
Height=
"130"
Margin=
"5"
>
<
ListView.View
>
<
GridView
>
<
GridViewColumn
Header=
"Id"
DisplayMemberBinding=
"{Binding Id}"
Width=
"60"
>
</
GridViewColumn
>
<
GridViewColumn
Header=
"Name"
DisplayMemberBinding=
"{Binding Name}"
Width=
"80"
>
</
GridViewColumn
>
<
GridViewColumn
Header=
"Age"
DisplayMemberBinding=
"{Binding Age}"
Width=
"60"
>
</
GridViewColumn
>
<
GridViewColumn
Header=
"Sex"
DisplayMemberBinding=
"{Binding Sex}"
Width=
"60"
>
</
GridViewColumn
>
</
GridView
>
</
ListView.View
>
</
ListView
>
<
Button
Content=
"Load"
Height=
"25"
Margin=
"5,0"
Click=
"Button_Click"
/>
</
StackPanel
>
</
Window
>
注意:1、初学者经常把ListView和GridView认为是同一级别的控件,实际是错误的!ListView继承ListBox而GridView继承ViewBase。ListView的View属性是一个ViewBase类型,因此GridView可以作为ListView的View类使用,而不能当做独立的控件使用。但ListView的View不代表只能用GridView。 2、GridView的内容属性是Columns,它是GridViewColumnCollection类型。因为XAML语法支持简写,所以省略了<GridView.Columns>...</GridView.Columns>这层标签,而是直接在<GridView>下定义了三个GridViewColumn对象,用DisPlayMemberBinding(类型为BindingBase)属性指定Binding关联的数据。它与ListBox不同,ListBox使用的是DisplayMemberPath属性。如果想用复杂结构表示,则可谓GridViewColumn设置HeaderTemplate和CellTemplate属性,它们的类型是DataTemplate。 |
后台代码如下:
public
partial
class
Window12 :
Window
{
public
Window12()
{
InitializeComponent();
}
private
DataTable
CreateDataTable()
{
DataTable dt =
new
DataTable(
"newtable");
DataColumn[] columns =
new
DataColumn[] {
new
DataColumn(
"Id"),
new
DataColumn(
"Name"),
new
DataColumn(
"Age"),
new
DataColumn(
"Sex") };
dt.
Columns.
AddRange(
columns);
return
dt;
}
private
void
Button_Click(
object sender,
RoutedEventArgs e)
{
DataTable dtInfo =
CreateDataTable();
for (
int i =
0;
i <
5;
i++)
{
DataRow dr =
dtInfo.
NewRow();
dr[
0] =
i;
dr[
1] =
"猴王" +
i;
dr[
2] =
i +
10;
dr[
3] =
"男";
dtInfo.
Rows.
Add(
dr);
}
this.
listViewStudents.
ItemsSource =
dtInfo.
DefaultView;
}
}
点击按钮运行效果如下:

如果把程序改写,拿DataTable直接作为ItemsSource会报错。

this.
listViewStudents.
ItemsSource =
dtInfo;
不过,将DataTable对象放在一个对象的DataContext属性里,并把ItemsSource与一个既没有指定Source又没有指定Path的Binding关联起来,Binding会自动找到DefaultView。这里不做解释了,前面已经提到DataContext的寻找方式及原因。
this.
listViewStudents.
DataContext =
dtInfo;
this.
listViewStudents.
SetBinding(
ListView.
ItemsSourceProperty,
new
Binding());
5.4 XML作为源
.NET Framework基本上用两种处理XML的方式:
- DOM(Document Object Model 文档对象模型)类库:包括XMLDocument、XmlElement、XmlNode、XmlAttribute等类。它的优点是中规中矩喝功能强大,缺点是使用时有很多XML的传统和复杂。
- LINQ(Language Integrated Qurey 语言集成查询)类库:包括XDocument、XElement、XNode、XAttribute等类。它主要能使用LINQ查询和操作,比DOM的方式简单很多。
先总结DOM操作XML的类库。为什么XML在现在开发中比较常用呢?因为绝大部分的传输协议都是基于SOAP(Simple Object Access Protocol简单对象访问协议)相关协议,SOAP就是通过将对象序列化XXML进行传输的。XML是树形结构,很方便表示线性集合(如Array、List等)和树形结构的数据。
| 注意:使用XML作为Binding数据源时,Path是XPath来指定属性。 |
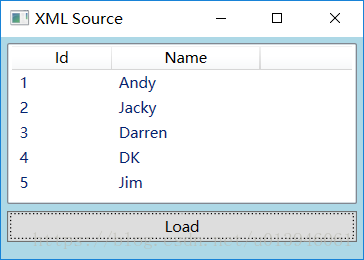
下面是一个简单XML文本表示学生信息:
<?
xml
version=
"1.0"
encoding=
"utf-8"
?>
<
StudentList
>
<
Student
id=
"1"
>
<
Name
>Andy
</
Name
>
</
Student
>
<
Student
id=
"2"
>
<
Name
>Jacky
</
Name
>
</
Student
>
<
Student
id=
"3"
>
<
Name
>Darren
</
Name
>
</
Student
>
<
Student
id=
"4"
>
<
Name
>DK
</
Name
>
</
Student
>
<
Student
id=
"5"
>
<
Name
>Jim
</
Name
>
</
Student
>
</
StudentList
>
UI部分代码:
<
Window
x:Class=
"Demo01.Window13"
xmlns=
"http://schemas.microsoft.com/winfx/2006/xaml/presentation"
xmlns:x=
"http://schemas.microsoft.com/winfx/2006/xaml"
Title=
"XML Source"
Height=
"205"
Width=
"240"
>
<
StackPanel
Background=
"LightBlue"
>
<
ListView
x:Name=
"listViewStudents"
Height=
"130"
Margin=
"5"
>
<
ListView.View
>
<
GridView
>
<
GridViewColumn
Header=
"Id"
DisplayMemberBinding=
"{Binding XPath=@id}"
Width=
"80"
>
</
GridViewColumn
>
<
GridViewColumn
Header=
"Name"
DisplayMemberBinding=
"{Binding XPath=Name}"
Width=
"120"
>
</
GridViewColumn
>
</
GridView
>
</
ListView.View
>
</
ListView
>
<
Button
Content=
"Load"
Height=
"25"
Margin=
"5,0"
Click=
"Button_Click"
/>
</
StackPanel
>
</
Window
>
后台的Button事件:
private
void
Button_Click(
object sender,
RoutedEventArgs e)
{
XmlDocument doc =
new
XmlDocument();
doc.
Load(
@"..\..\StudentData.xml");
XmlDataProvider xdp =
new
XmlDataProvider();
xdp.
Document =
doc;
// 选择要暴露的数据
xdp.
XPath =
@"StudentList/Student";
this.
listViewStudents.
DataContext =
xdp;
this.
listViewStudents.
SetBinding(
ListView.
ItemsSourceProperty,
new
Binding());
}
点击Button运行效果如下:
XmlDataProvider还有一个Source的属性,可以指定XML文档的位置,如:
private
void
Button_Click(
object sender,
RoutedEventArgs e)
{
XmlDataProvider dp =
new
XmlDataProvider();
dp.
Source =
new
Uri(
@"..\..\StudentData.xml",
UriKind.
Relative);
dp.
XPath =
@"StudentList/Student";
this.
listViewStudents.
DataContext =
dp;
this.
listViewStudents.
SetBinding(
ListView.
ItemsSourceProperty,
new
Binding());
}
上述XAML代码中你会发现关键代码“<GridViewColumn Header="Id"DisplayMemberBinding="{Binding XPath=@id}" Width="80">”和“<GridViewColumn Header="Name"DisplayMemberBinding="{Binding XPath=Name}”这里‘@’符号代表的XML元素的Attribute,不加‘@’符合的字符串表示的是子级元素。
XML可以方便的表示树形结构,下面例子是使用TreeView控件来显示文件系统目录,下面直接把代码写在XAML中。代码中用到了HierarchicalDataTemplate类,这个类有ItemsSource属性,因此这种类型是可以拥有子集集合的。
<
Window
x:Class=
"Demo01.Window14"
xmlns=
"http://schemas.microsoft.com/winfx/2006/xaml/presentation"
xmlns:x=
"http://schemas.microsoft.com/winfx/2006/xaml"
Title=
"Xml Source"
Height=
"210"
Width=
"260"
>
<
Window.Resources
>
<
XmlDataProvider
x:Key=
"xdp"
XPath=
"FileSystem/Folder"
>
<
x:XData
>
<
FileSystem
xmlns=
""
>
<
Folder
Name=
"Books"
>
<
Folder
Name=
"Programming"
>
<
Folder
Name=
"Windows"
>
<
Folder
Name=
"WPF"
>
</
Folder
>
<
Folder
Name=
"Winform"
>
</
Folder
>
<
Folder
Name=
"ASP.NET"
>
</
Folder
>
</
Folder
>
</
Folder
>
</
Folder
>
<
Folder
Name=
"Tools"
>
<
Folder
Name=
"Development"
/>
<
Folder
Name=
"Designment"
/>
<
Folder
Name=
"Players"
/>
</
Folder
>
</
FileSystem
>
</
x:XData
>
</
XmlDataProvider
>
</
Window.Resources
>
<
Grid
>
<
TreeView
Height=
"283"
HorizontalAlignment=
"Left"
Name=
"treeView1"
VerticalAlignment=
"Top"
Width=
"511"
ItemsSource=
"{Binding Source={StaticResource ResourceKey=xdp}}"
>
<
TreeView.ItemTemplate
>
<
HierarchicalDataTemplate
ItemsSource=
"{Binding XPath=Folder}"
>
<
TextBlock
Height=
"23"
HorizontalAlignment=
"Left"
Name=
"textBlock1"
Text=
"{Binding XPath=@Name}"
VerticalAlignment=
"Top"
/>
</
HierarchicalDataTemplate
>
</
TreeView.ItemTemplate
>
</
TreeView
>
</
Grid
>
</
Window
>
| 注意:XmlDataProvider直接写在XAML里,XML数据要放在<x:XData>...</x:XData>里。 |
代码中涉及StaticResouce和HierarchicalDataTemplate,暂时不做详细说明,在这里只需简单理解即可。
运行效果如下:

5.5 使用LINQ检索结果作为Binding数据源
.NET Framework提供LINQ(Language-Integrated Query 语言集成查询),可以方便操作集合对象、DataTable对象和XML对象。并且LINQ查询结果就是一个IRnumerable<T>类型对象,IRnumerable<T>继承于IRnumerable,所以它可以作为列表控件的ItemsSource来使用。
之前已经写过StudentInfo的类了,现在根据这个类设计一个单击Button显示一个Students集合类型对象。
<
Window
x:Class=
"Demo01.Window15"
xmlns=
"http://schemas.microsoft.com/winfx/2006/xaml/presentation"
xmlns:x=
"http://schemas.microsoft.com/winfx/2006/xaml"
Title=
"LINQ Source"
Height=
"220"
Width=
"280"
>
<
StackPanel
Background=
"LightBlue"
>
<
ListView
Height=
"143"
Margin=
"5"
Name=
"listViewStudents"
>
<
ListView.View
>
<
GridView
>
<
GridViewColumn
Header=
"Id"
DisplayMemberBinding=
"{Binding Id}"
Width=
"60"
/>
<
GridViewColumn
Header=
"Name"
DisplayMemberBinding=
"{Binding Name}"
Width=
"100"
/>
<
GridViewColumn
Header=
"Age"
DisplayMemberBinding=
"{Binding Age}"
Width=
"80"
/>
</
GridView
>
</
ListView.View
>
</
ListView
>
<
Button
Content=
"Load"
Height=
"25"
Margin=
"5,0"
Click=
"Button_Click"
/>
</
StackPanel
>
</
Window
>
下面是button事件,从StudentInfo列表中检索出所有名字以'T'开头的学生。
private
void
Button_Click(
object sender,
RoutedEventArgs e)
{
List<
StudentInfo> infos =
new
List<
StudentInfo>()
{
new
StudentInfo(){
Id=
1,
Age=
29,
Name=
"Tim"},
new
StudentInfo(){
Id=
1,
Age=
28,
Name=
"Tom"},
new
StudentInfo(){
Id=
1,
Age=
27,
Name=
"Kyle"},
new
StudentInfo(){
Id=
1,
Age=
26,
Name=
"Tony"},
new
StudentInfo(){
Id=
1,
Age=
25,
Name=
"Vina"},
new
StudentInfo(){
Id=
1,
Age=
24,
Name=
"Mike"}
};
this.
listViewStudents.
ItemsSource =
from stu
in
infos
where
stu.
Name.
StartsWith(
"T")
select
stu;
}
运行效果如下:
如果是DataTable对象,则代码如下:
private
void
Button_Click1(
object sender,
RoutedEventArgs e)
{
DataTable dtInfo =
CreateDataTable();
for (
int i =
0;
i <
5;
i++)
{
DataRow dr =
dtInfo.
NewRow();
dr[
0] =
i;
if (
0 ==
i %
2)
{
dr[
1] =
"T猴王" +
i;
}
else
{
dr[
1] =
"猴王" +
i;
}
dr[
2] =
i +
10;
dtInfo.
Rows.
Add(
dr);
}
this.
listViewStudents.
ItemsSource =
from row
in
dtInfo.
Rows.
Cast<
DataRow>()
where
Convert.
ToString(
row[
"Name"]).
StartsWith(
"T")
select
new
StudentInfo()
{
Id =
Convert.
ToInt32(
row[
"Id"]),
Name =
Convert.
ToString(
row[
"Name"]),
Age =
Convert.
ToInt32(
row[
"Age"])
};
}
private
DataTable
CreateDataTable()
{
DataTable dt =
new
DataTable(
"newtable");
DataColumn[] columns =
new
DataColumn[] {
new
DataColumn(
"Id"),
new
DataColumn(
"Name"),
new
DataColumn(
"Age") };
dt.
Columns.
AddRange(
columns);
return
dt;
}
}
运行效果如下:
如果是XML文件,代码如下:
<?
xml
version=
"1.0"
encoding=
"utf-8"
?>
<
StudentList
>
<
Class
>
<
Student
Id=
"0"
Age=
"29"
Name=
"Tim"
/>
<
Student
Id=
"1"
Age=
"28"
Name=
"Tom"
/>
<
Student
Id=
"2"
Age=
"27"
Name=
"Mess"
/>
</
Class
>
<
Class
>
<
Student
Id=
"3"
Age=
"26"
Name=
"Tony"
/>
<
Student
Id=
"4"
Age=
"25"
Name=
"Vina"
/>
<
Student
Id=
"5"
Age=
"24"
Name=
"Emily"
/>
</
Class
>
</
StudentList
>
后台代码如下:
private
void
Button_Click2(
object sender,
RoutedEventArgs e)
{
XDocument xd =
XDocument.
Load(
@"..\..\testDate.xml");
this.
listViewStudents.
ItemsSource =
from element
in
xd.
Descendants(
"Student")
where
element.
Attribute(
"Name").
Value.
StartsWith(
"T")
select
new
StudentInfo()
{
Name =
element.
Attribute(
"Name").
Value,
Id =
Convert.
ToInt32(
element.
Attribute(
"Id").
Value),
Age =
Convert.
ToInt32(
element.
Attribute(
"Age").
Value)
};
}
运行效果如下:
5.6 使用ObjectDataProvider对象作为Binding
使用Binding很多时候很难保证一个类所有数据都用属性暴露出来,如我们需要的数据是方法的而返回值。重新设计底层类的风险会很高,比如是黑盒引用类库是无法编辑源码的,现在就可以用ObjectDataProvider作为Binding源了。其实就是把对象作为数据源的意思,如还有XmlDataProvider,就是把XML数据作为源。这两个类的父类都是DataSourceProvider抽象类。
新建一个Caculate类,目前只有加法运算:
public
class
Caculate
{
public
string
Add(
string arg1,
string arg2)
{
double x =
0;
double y =
0;
double z =
0;
if(
double.
TryParse(
arg1,
out
x)&&
double.
TryParse(
arg2,
out
y))
{
z =
x +
y;
return
z.
ToString();
}
return
"Iput Error";
}
//其它方法省略
}
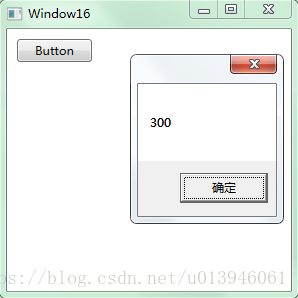
先用一个很简单的小例子使用ObjectDataProvider类,界面上只有一个button,前台代码如下:
<
Window
x:Class=
"Demo01.Window16"
xmlns=
"http://schemas.microsoft.com/winfx/2006/xaml/presentation"
xmlns:x=
"http://schemas.microsoft.com/winfx/2006/xaml"
Title=
"Window16"
Height=
"300"
Width=
"300"
>
<
Grid
>
<
Button
Content=
"Button"
Height=
"23"
HorizontalAlignment=
"Left"
Margin=
"10,10,0,0"
Name=
"button1"
VerticalAlignment=
"Top"
Width=
"75"
Click=
"button1_Click"
/>
</
Grid
>
</
Window
>
button的Click事件处理器如下:
private
void
button1_Click(
object sender,
RoutedEventArgs e)
{
ObjectDataProvider odp =
new
ObjectDataProvider();
odp.
ObjectInstance =
new
Caculate();
odp.
MethodName =
"Add";
odp.
MethodParameters.
Add(
"100");
odp.
MethodParameters.
Add(
"200");
MessageBox.
Show(
odp.
Data.
ToString());
}
点击button,运行效果如下:
通过上面举的例子,相信菜鸟们也能理解ObjectDataProvider的使用,其实也就通过它的几个属性进行操作,如包装的对象(ObjectInstance)、传入参数(MethodParameters)、方法名称(MethodName)、返回结果(Data)进行组合操作。详细操作,请看下面的例子:
<
Window
x:Class=
"Demo01.Window17"
xmlns=
"http://schemas.microsoft.com/winfx/2006/xaml/presentation"
xmlns:x=
"http://schemas.microsoft.com/winfx/2006/xaml"
Title=
"ObjectDataProvider Source"
Height=
"300"
Width=
"300"
>
<
StackPanel
Background=
"LightBlue"
>
<
TextBox
Name=
"textBoxArg1"
Margin=
"5"
/>
<
TextBox
Name=
"textBoxArg2"
Margin=
"5"
/>
<
TextBox
Name=
"textBoxResult"
Margin=
"5"
/>
</
StackPanel
>
</
Window
>
这个例子要实现的逻辑是在前两个TextBox输入数字后,第三个TextBox能实时显示数字的和。后台代码如下:
public
partial
class
Window17 :
Window
{
public
Window17()
{
InitializeComponent();
SetBinding();
}
private
void
SetBinding()
{
ObjectDataProvider objpro =
new
ObjectDataProvider();
objpro.
ObjectInstance =
new
Caculate();
objpro.
MethodName =
"Add";
objpro.
MethodParameters.
Add(
"0");
objpro.
MethodParameters.
Add(
"0");
Binding bindingToArg1 =
new
Binding(
"MethodParameters[0]") {
Source =
objpro,
BindsDirectlyToSource =
true,
UpdateSourceTrigger =
UpdateSourceTrigger.
PropertyChanged };
Binding bindingToArg2 =
new
Binding(
"MethodParameters[1]") {
Source =
objpro,
BindsDirectlyToSource =
true,
UpdateSourceTrigger =
UpdateSourceTrigger.
PropertyChanged };
Binding bindToResult =
new
Binding(
".") {
Source =
objpro };
this.
textBoxArg1.
SetBinding(
TextBox.
TextProperty,
bindingToArg1);
this.
textBoxArg2.
SetBinding(
TextBox.
TextProperty,
bindingToArg2);
this.
textBoxResult.
SetBinding(
TextBox.
TextProperty,
bindToResult);
}
}
运行效果如下:
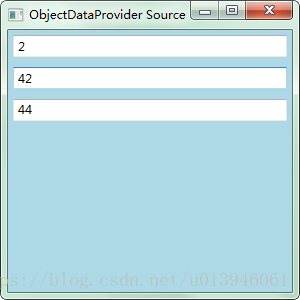
ObjectDataProvider类的作用是用来包装一个以方法暴露数据的对象,将Calculate对象赋值给ObjectInstance属性。还有另外一种办法创建被包装的对象,告诉ObjectDataProvider将被包装对象的类型{odp.ObjectType = typeof(YourClass)}和希望调用的构造器。如果指定的MethodName是一个重载函数,但是通过MethodParameters就可以指定参数了,该例子就是调用两个String类型参数的Add方法。最后就是创建Binding了,参数中索引器作为Path,第一个元素指定数据源是ObjectDataProvider对象,第二个元素BindsDirectlyToSource = true,意思是Binding对象只负责从UI元素收集到数据写入Source(ObjectDataProvider对象)而不是被ObjectDataProvider包装的Calculate对象。第三个元素UpdateSourceTrigger = UpdateSourceTrigger.PropertyChanged,意思是一有更新立刻将值传回Source。bindToResult实例,创建Binding用“.”是指定自己本身为Path。
这个例子,三个TextBox都以ObjectDataProvider对象作为数据源,只是前两个TextBox在Binding的数据流向上做了限制。因为ObjectDataProvider的MethodParameters不是依赖属性,不能作为Binding的目标。数据驱动UI的理念要求尽可能使用数据对象作为Binding的Source而把UI元素当作目标。
5.7 使用Binding的RelativeSource
我们经常通过Source或ElementName指定Source,有时目标的对象在UI布局上有相对关系,比如控件关联自己某级容器的数据。RelativeSource属性的数据类型为RelativeSource类,通过它的属性控制搜索相对数据源。下面多层布局控件内放置一个TextBox,如下:
<
Window
x:Class=
"Demo01.Window18"
xmlns=
"http://schemas.microsoft.com/winfx/2006/xaml/presentation"
xmlns:x=
"http://schemas.microsoft.com/winfx/2006/xaml"
Title=
"RelativeSource"Height=
"210"
Width=
"210"
>
<
GridBackground=
"Red"
Margin=
"10"
x:Name=
"gd1"
>
<
DockPanel
x:Name=
"dp1"
Margin=
"10"
Background=
"Orange"
>
<
Grid
Background=
"Yellow"
Margin=
"10"
x:Name=
"gd2"
>
<
DockPanel
Name=
"dp2"Margin=
"10"
Background=
"LawnGreen"
>
<
TextBox
Name=
"textBox1"
Margin=
"10"
FontSize=
"24"
/>
</
DockPanel
>
</
Grid
>
</
DockPanel
>
</
Grid
>
</
Window
>
运行效果如下:
把Text属性关联到外层容器的Name属性上。如下:
public
Window18()
{
InitializeComponent();
RelativeSource rs =
new
RelativeSource(
RelativeSourceMode.
FindAncestor);
rs.
AncestorLevel =
1;
rs.
AncestorType =
typeof(
Grid);
Binding bind =
new
Binding(
"Name") {
RelativeSource =
rs };
this.
textBox1.
SetBinding(
TextBox.
TextProperty,
bind);
}
XAML等效代码如下:
<
TextBox
Name=
"textBox1"
Margin=
"10"
FontSize=
"24"
Text=
"{Binding RelativeSource=
{RelativeSource FindAncestor,
AncestorType={x:Type Grid}, AncestorLevel=1}, Path=Name}"
/>
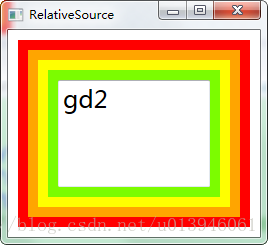
AncestorLevel属性指的是以Binding目标控件为起点的层级偏移量。如dp2的偏移量是1,gd2的偏移量是2.AncestorType属性指定Binding寻找对应类型的Source,不是这个类型就会被跳过。因此上述代码会跳过第一层的DockPanel,而是找到第一个Grid类型对象后当作自己的源。
运行效果如下:
如果把代码改成:
public
Window19()
{
InitializeComponent();
RelativeSource rs =
new
RelativeSource(
RelativeSourceMode.
FindAncestor);
rs.
AncestorLevel =
2;
rs.
AncestorType =
typeof(
DockPanel);
Binding bind =
new
Binding(
"Name") {
RelativeSource =
rs };
this.
textBox1.
SetBinding(
TextBox.
TextProperty,
bind);
}
XAML替换代码如下:
<
TextBox
Name=
"textBox1"
Margin=
"10"
FontSize=
"24"
Text=
"{Binding RelativeSource=
{RelativeSource FindAncestor,
AncestorType={x:Type DockPanel}, AncestorLevel=2}, Path=Name}"
/>
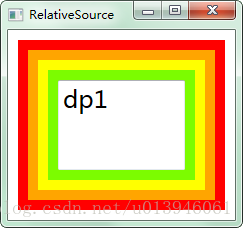
运行效果如下:
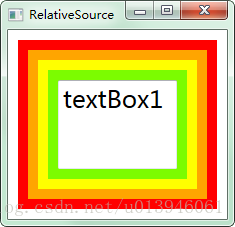
如果TextBox需要关联自身的Name属性,则前台代码如下:
<
Window
x:Class=
"Demo01.Window20"
xmlns=
"http://schemas.microsoft.com/winfx/2006/xaml/presentation"
xmlns:x=
"http://schemas.microsoft.com/winfx/2006/xaml"
Title=
"RelativeSource"
Height=
"210"
Width=
"210"
>
<
Grid
Background=
"Red"
Margin=
"10"
x:Name=
"gd1"
>
<
DockPanel
x:Name=
"dp1"
Margin=
"10"
Background=
"Orange"
>
<
Grid
Background=
"Yellow"
Margin=
"10"
x:Name=
"gd2"
>
<
DockPanel
Name=
"dp2"
Margin=
"10"
Background=
"LawnGreen"
>
<
TextBox
Name=
"textBox1"
Margin=
"10"
FontSize=
"24"
/>
</
DockPanel
>
</
Grid
>
</
DockPanel
>
</
Grid
>
</
Window
>
后台代码如下:
public
Window20()
{
InitializeComponent();
RelativeSource rs =
new
RelativeSource();
rs.
Mode =
RelativeSourceMode.
Self;
Binding bind =
new
Binding(
"Name") {
RelativeSource =
rs };
this.
textBox1.
SetBinding(
TextBox.
TextProperty,
bind);
}
运行效果如下:
RelativeSource类的Modw属性类型是RelativeSourceMode枚举类型,包括:PreviousData、TemplatedParent、Self和FindAncestor。RelativeSource类还有3个静态属性PreviousData、TemplatedParent、Self,类型均是RelativeSource类。实际上是创建一个RelativeSource实例,把实例的Mode属性设置相应的值,然后返回。准备这三个实例是方便XAML直接获取RelativeSource实例。在DataTemplate中会经常用到这三个静态属性,下面是源码:
public
static
RelativeSource
PreviousData
{
get
{
if(
s_previousData==
null)
{
s_previousData =
new
RelativeSource(
RelativeSourceMode.
PreviousData);
}
return
s_previousData;
}
}
public
static
RelativeSource
TemplatedParent
{
get
{
if (
s_templatedParent ==
null)
{
s_templatedParent =
new
RelativeSource(
RelativeSourceMode.
TemplatedParent);
}
return
s_templatedParent;
}
}
public
static
RelativeSource
Self
{
get
{
if (
s_self ==
null)
{
s_self =
new
RelativeSource(
RelativeSourceMode.
Self);
}
return
s_self;
}
}