四、实战:展示一个圆柱体
4.1 圆柱体分解
我们知道,3D模型是用三角形表示的,那一个圆该如何表示呢?其实用的就是割圆法,也就是用一个近似的多边形就表示一个圆。下图展示了10、20、50个顶点的正多边形,可以看出,正50边形看上去跟圆已经很接近了。我们的例子就是用正50边形。

切分之后,圆柱体变成了如下所示的三棱体的组合:

我们需要描述这个三棱体的三个面,共4个三角形(侧面是一个矩形,需要两个三角形)。
4.2 三角网格构建
这是最重要的一部分。示例代码打算让三个面渲染出不同颜色,所以需要构造三个三角网格。
代码如下:
-
//底面三角网格
-
MeshGeometry3D bottom_mesh =
new MeshGeometry3D() { Positions =
new Point3DCollection(), TriangleIndices =
new Int32Collection() };
-
//顶面三角网格
-
MeshGeometry3D top_mesh =
new MeshGeometry3D() { Positions =
new Point3DCollection(), TriangleIndices =
new Int32Collection() };
-
//侧面三角网格
-
MeshGeometry3D side_mesh =
new MeshGeometry3D() { Positions =
new Point3DCollection(), TriangleIndices =
new Int32Collection() };
-
-
Point3D bottom_center =
new Point3D(
0,
0,
0);
//底面中心
-
Point3D top_center =
new Point3D(
0,
2,
0);
//顶面中心
-
top_mesh.Positions.Add(top_center);
-
bottom_mesh.Positions.Add(bottom_center);
-
-
int parts =
50;
//把圆切成50份
-
double angle = Math.PI *
2 / parts;
-
for (
int i =
0; i < parts; i++)
-
{
-
double x1 =
1 * Math.Cos(angle * i);
-
double z1 =
1 * Math.Sin(angle * i);
-
double x2 =
1 * Math.Cos(angle * (i +
1));
-
double z2 =
1 * Math.Sin(angle * (i +
1));
-
-
Point3D bottom1 =
new Point3D(x1,
0, z1);
//底面
-
Point3D bottom2 =
new Point3D(x2,
0, z2);
-
Point3D top1 =
new Point3D(x1,
2, z1);
-
Point3D top2 =
new Point3D(x2,
2, z2);
-
-
//底面
-
bottom_mesh.Positions.Add(bottom1);
-
bottom_mesh.Positions.Add(bottom2);
-
-
bottom_mesh.TriangleIndices.Add(i *
2 +
1);
-
bottom_mesh.TriangleIndices.Add(i *
2 +
2);
-
bottom_mesh.TriangleIndices.Add(
0);
-
-
//顶面
-
top_mesh.Positions.Add(top1);
-
top_mesh.Positions.Add(top2);
-
-
top_mesh.TriangleIndices.Add(i *
2 +
2);
-
top_mesh.TriangleIndices.Add(i *
2 +
1);
-
top_mesh.TriangleIndices.Add(
0);
-
-
//侧面
-
if (i ==
0)
-
{
-
side_mesh.Positions.Add(bottom1);
-
side_mesh.Positions.Add(top1);
-
}
-
side_mesh.Positions.Add(bottom2);
-
side_mesh.Positions.Add(top2);
-
-
side_mesh.TriangleIndices.Add(i *
2 +
1);
-
side_mesh.TriangleIndices.Add(i *
2 +
3);
-
side_mesh.TriangleIndices.Add(i *
2 +
2);
-
-
side_mesh.TriangleIndices.Add(i *
2 +
1);
-
side_mesh.TriangleIndices.Add(i *
2 +
2);
-
side_mesh.TriangleIndices.Add(i *
2 +
0);
-
}
-
-
DiffuseMaterial bottom_material =
new DiffuseMaterial(Brushes.Green);
//底面绿色
-
DiffuseMaterial top_material =
new DiffuseMaterial(Brushes.Blue);
//顶面蓝色
-
DiffuseMaterial side_material =
new DiffuseMaterial(Brushes.Red);
//侧面红色
-
-
GeometryModel3D top =
new GeometryModel3D(top_mesh, top_material);
-
GeometryModel3D bottom =
new GeometryModel3D(bottom_mesh, bottom_material);
-
GeometryModel3D side =
new GeometryModel3D(side_mesh, side_material);
4.3 相机、光源和其他代码
首先看我们在XAML文件里定义的画布:
-
<Viewport3D Name=
"view">
-
</Viewport3D>
代码是非常简单的。然后我们把定义好的圆柱体三角网格、相机、光源都放进画布中:
-
//相机
-
Camera camera =
new PerspectiveCamera(
new Point3D(
3,
6,
10),
new Vector3D(
-3,
-6,
-10),
new Vector3D(
0,
1,
0),
45);
-
//光源
-
Light light =
new AmbientLight(Colors.White);
-
-
Model3DGroup
group =
new Model3DGroup();
-
group.Children.Add(light);
-
group.Children.Add(top);
-
group.Children.Add(bottom);
-
group.Children.Add(side);
-
-
ModelVisual3D model =
new ModelVisual3D();
-
model.Content =
group;
-
-
view.Children.Add(model);
-
view.Camera = camera;
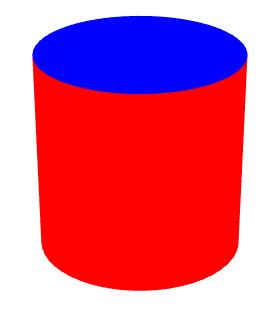
如此一来,圆柱体就能正常显示了,如下图所示:
我们把相机的Position和LookDirection改成如下,从下面瞄一眼:
Camera camera = new PerspectiveCamera(new Point3D(3, -6, 10), new Vector3D(-3, 6, -10), new Vector3D(0, 1, 0), 45);
图像是:
