GUI编程
1.简介
GUI的核心技术:
Swing
AWT(Abstract Window Toolkit)抽象窗口工具包
缺点:
-
界面不美观
-
需要jre环境
为什么我们要学习?
了解MVC架构,了解监听
2.Awt组件和容器
2.1.Frame
展示一个窗口
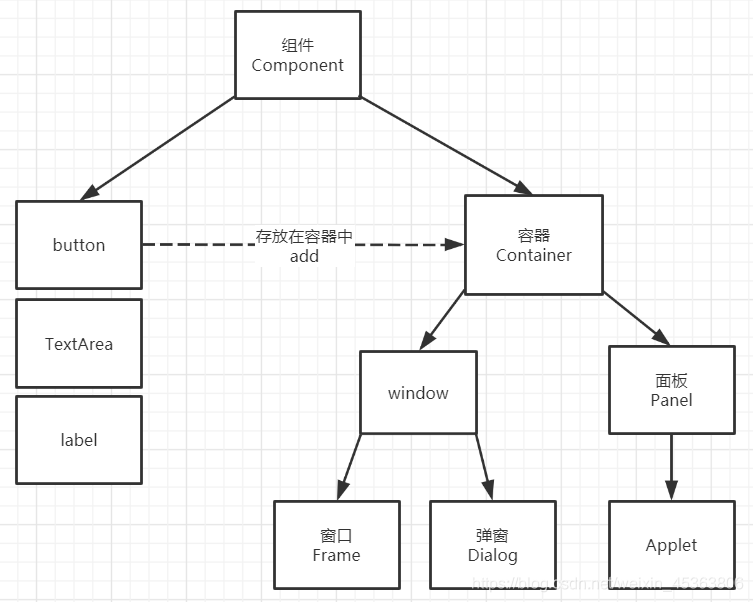
public class Test1 {
    public static void main(String[] args) {

        //Frame,JDK,看源码!
        Frame frame = new Frame("我的第一个JAVA图像界面窗口");

        //需要设置可见性
        frame.setVisible(true);

        //设置窗口大小
        frame.setSize(400,400);

        //设置背景颜色
        frame.setBackground(new Color(163, 63, 68));

        //弹出的初始位置
        frame.setLocation(500,500);

        //设置大小固定
        frame.setResizable(false);
    }
}
问题:发现窗口关闭不掉
停止java程序
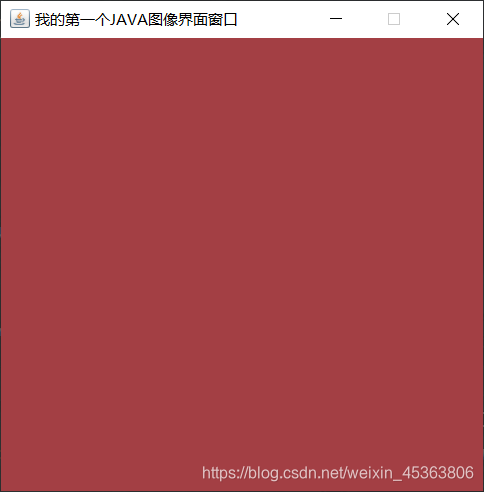
展示多个窗口
public class test2{
    public static void main(String[] args) {
        //展示多个窗口
        Frame myFrame1 = new MyFrame(500,200,300,300,new Color(109,1, 8));
        Frame myFrame2 = new MyFrame(800,200,300,300,new Color(109, 81, 47));
        Frame myFrame3 = new MyFrame(500,500,300,300,new Color(43, 87, 109));
        Frame myFrame4 = new MyFrame(800,500,300,300,new Color(18, 109, 19));
    }
}

class MyFrame extends Frame{

    //可能存在多个窗口,我们需要一个计数器
    static int id = 0;

    public MyFrame(int x,int y,int w,int h,Color color){
        //调用父类Frame的构造函数
        super("MyFrame"+(++id));

        setBackground(color);
        setBounds(x,y,w,h);
        setVisible(true);
    }
}
2.2.Panel
在这里同时解决了窗口关闭的问题
public class TestPanel {
    public static void main(String[] args) {
        Frame frame = new Frame();

        //Panel可以看成一个空间,但是不能单独存在,必须添加到容器中
        Panel panel = new Panel();

        //设置布局,不设置Frame会置顶
        frame.setLayout(null);

        frame.setBounds(200,200,200,200);
        frame.setBackground(new Color(62, 163, 171));
        frame.setVisible(true);

        panel.setBounds(100,100,100,100);
        panel.setBackground(new Color(103, 188, 47));

        frame.add(panel);

        //监听事件,监听窗口关闭时间 System.exit(0)
        //适配器模式 不直接new WindowListener(){},直接new它的实现类 可以避免需要实现其所有办法
        frame.addWindowListener(new WindowAdapter() {
            @Override//窗口点击关闭时,需要做的事情
            public void windowClosing(WindowEvent e) {
                System.exit(0);
            }
        });
    }
}

2.3.布局管理器
-
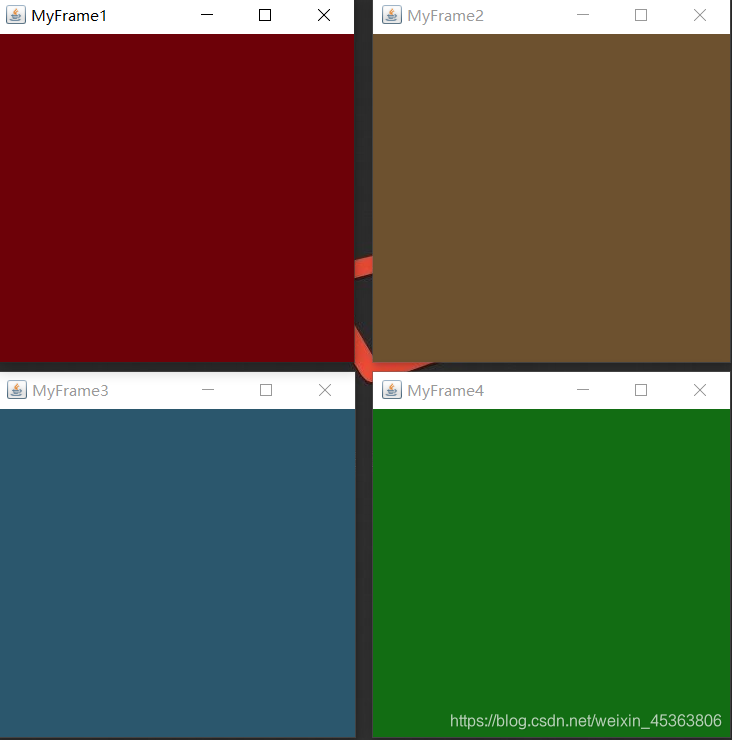
流式布局
public class TestFlowLayout {
    public static void main(String[] args) {
        Frame frame = new Frame();

        frame.setBounds(300,300,300,300);
        frame.setBackground(new Color(22, 173, 134));
        frame.setVisible(true);

        //组件-按钮
        Button button1 = new Button("button1");
        Button button2 = new Button("button2");
        Button button3 = new Button("button3");

        //添加按钮
        frame.add(button1);
        frame.add(button2);
        frame.add(button3);

        //设置为流式布局,不添加参数默认为FlowLayout.CENTER
        frame.setLayout(new FlowLayout(FlowLayout.RIGHT));
    }
}
-
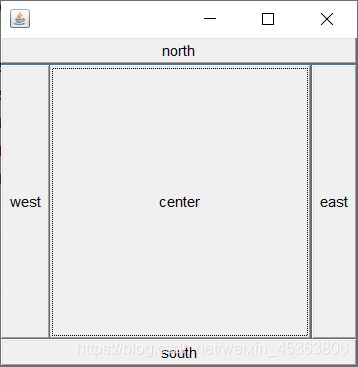
东西南北中
public class TestBorderLayout {
    public static void main(String[] args) {
        Frame frame = new Frame();

        frame.setBounds(300,300,300,300);
        frame.setBackground(new Color(60, 121, 173));
        frame.setVisible(true);

        Button east = new Button("east");
        Button west = new Button("west");
        Button south = new Button("south");
        Button north = new Button("north");
        Button center = new Button("center");

        frame.add(east,BorderLayout.EAST);
        frame.add(west,BorderLayout.WEST);
        frame.add(south,BorderLayout.SOUTH);
        frame.add(north,BorderLayout.NORTH);
        frame.add(center,BorderLayout.CENTER);
    }
}
-
表格布局
public class TestGridLayout {
    public static void main(String[] args) {
        Frame frame = new Frame();

        frame.setBounds(200,200,200,200);
        frame.setVisible(true);

        Button button1 = new Button("button1");
        Button button2 = new Button("button2");
        Button button3 = new Button("button3");
        Button button4 = new Button("button4");
        Button button5 = new Button("button5");
        Button button6 = new Button("button6");

        frame.add(button1);
        frame.add(button2);
        frame.add(button3);
        frame.add(button4);
        frame.add(button5);
        frame.add(button6);

        //第一个参数rows为行,第二个参数cols为列
        frame.setLayout(new GridLayout(3,2));
    }
}

2.4布局练习
如何得到一个这样的图?
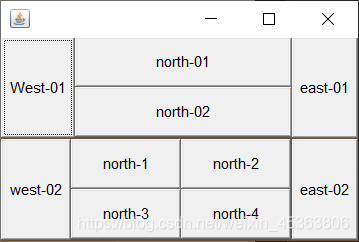
答案:
public class Test01 {
    public static void main(String[] args) {

        Frame frame = new Frame();
        frame.setBounds(500,200,300,200);
        frame.setBackground(new Color(109, 81, 47));
        frame.setVisible(true);
        //整体布局为两行一列的表格
        frame.setLayout(new GridLayout(2,1));

        //上面
        Panel panel = new Panel(new BorderLayout());
        Panel pane2 = new Panel(new GridLayout(2,1));

        panel.add(new Button("West-01"),BorderLayout.WEST);
        panel.add(new Button("east-01"),BorderLayout.EAST);
        pane2.add(new Button("north-01"));
        pane2.add(new Button("north-02"));

        //将面板二添加到面板一的CENTER中
        panel.add(pane2,BorderLayout.CENTER);

        //下面
        Panel pane3 = new Panel(new BorderLayout());
        Panel pane4 = new Panel(new GridLayout(2,2));

        pane3.add(new Button("west-02"),BorderLayout.WEST);
        pane3.add(new Button("east-02"),BorderLayout.EAST);
        for (int i = 1; i < 5; i++) {
            pane4.add(new Button("north-"+i));
        }

        //将面板四添加到面板三的CENTER中
        pane3.add(pane4,BorderLayout.CENTER);

        //将面板一和面板三添加到窗口中
        frame.add(panel);
        frame.add(pane3);
    }
}
