用一个小栗子描述MVC、MVP和MVVM之间的关系

项目结构:

这是一个非常简单的例子,点击按钮,查询现在广州的天气信息。
MVC
什么是MVC?(来自百度百科的回答)
MVC全名是Model View Controller,是模型(model)-视图(view)-控制器(controller)的缩写,一种软件设计典范,用一种业务逻辑、数据、界面显示分离的方法组织代码,将业务逻辑聚集到一个部件里面,在改进和个性化定制界面及用户交互的同时,不需要重新编写业务逻辑。MVC被独特的发展起来用于映射传统的输入、处理和输出功能在一个逻辑的图形化用户界面的结构中。
在Android中,Model、View和Controller的描述:
- 模型层 Model
针对业务模型,建立的数据结构和相关的类,提供接口操作数据和处理业务逻辑。 - 视图层 View
显示数据和用户交互的界面,一般采用xml文件进行界面描述,可以理解为Android APP中的View,Activity或者Fragment。 - 控制层 Controller
作为Model和View之间的桥梁,来控制View层和Model层之间的通讯,从而达到分离视图显示和业务逻辑层。但是通常这部分都写在了Activity之上,所以Activity里面的代码会非常臃肿。
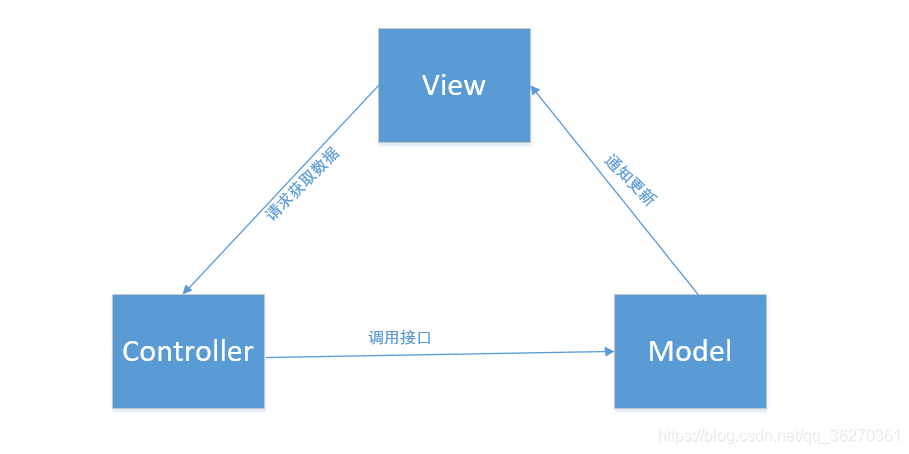
当View需要更新时,首先去找Controller,然后Controller去找Model获取数据,Model获取数据之后,通知View更新UI。
例子说明

先定义一个获取天气预报的接口
public interface IWeatherModel {
    void getWeather(OnWeatherListener onWeatherListener);
}
需要定义个接口监听天气信息是否获取成功
public interface OnWeatherListener
{
    void onSuccess(WeatherBean weather);
    void onError();
}
实现获取天气预报接口
public class WeatherModelImpl implements IWeatherModel
{
    @Override
    public void getWeather(final OnWeatherListener onWeatherListener) {
        String url = "http://www.weather.com.cn/data/sk/101280101.html";
        OkHttpClient okHttpClient = new OkHttpClient();
        Request request = new Request.Builder()
                .url(url)
                .get()
                .build();
        Call call = okHttpClient.newCall(request);
        call.enqueue(new Callback() {
            @Override
            public void onFailure(Call call, IOException e) {
                onWeatherListener.onError();
            }

            @Override
            public void onResponse(Call call, Response response) throws IOException {
                String body = response.body().string();
                Gson gson = new Gson();
                WeatherBean weather = gson.fromJson(body, WeatherBean.class);
                onWeatherListener.onSuccess(weather);
            }
        });

    }
}
到这里,Model层已经写好了,提供了getWeather()方法获取天气信息。
View层
<?xml version="1.0" encoding="utf-8"?>
<android.support.constraint.ConstraintLayout xmlns:android="http://schemas.android.com/apk/res/android"
    xmlns:tools="http://schemas.android.com/tools"
    android:layout_width="match_parent"
    android:layout_height="match_parent"
    xmlns:app="http://schemas.android.com/apk/res-auto"
    tools:context=".mvc.MvcActivity">

    <TextView
        android:id="@+id/tv_weather_info"
        android:layout_width="wrap_content"
        android:layout_height="wrap_content"
        app:layout_constraintTop_toTopOf="parent"
        app:layout_constraintBottom_toBottomOf="parent"
        app:layout_constraintStart_toStartOf="parent"
        app:layout_constraintEnd_toEndOf="parent"
        android:textSize="28sp"
        />

    <Button
        android:id="@+id/bt_query"
        android:layout_width="150dp"
        android:layout_height="50dp"
        android:layout_marginTop="10dp"
        app:layout_constraintTop_toBottomOf="@id/tv_weather_info"
        app:layout_constraintStart_toStartOf="parent"
        app:layout_constraintEnd_toEndOf="parent"
        android:text="@string/bt_query_text"
        />


</android.support.constraint.ConstraintLayout>
Controller层, 这里的Controller就是weatherModel.getWeather(this)
@OnClick(R.id.bt_query)
    public void onQueryClick() {
        weatherModel.getWeather(this);
    }
View & Controller 全部代码
package com.act.androidarchtest.mvc;


import android.os.Handler;
import android.os.Message;
import android.widget.TextView;
import android.widget.Toast;

import com.act.androidarchtest.R;
import com.act.androidarchtest.base.BaseActivity;
import com.act.androidarchtest.bean.WeatherBean;
import com.act.androidarchtest.mvc.model.IWeatherModel;
import com.act.androidarchtest.mvc.model.OnWeatherListener;
import com.act.androidarchtest.mvc.model.WeatherModelImpl;

import butterknife.BindView;
import butterknife.OnClick;

public class MvcActivity extends BaseActivity implements OnWeatherListener {

    @BindView(R.id.tv_weather_info)
    TextView mTvWeatherInfo;

    private static final int QUERY_WEATHER_SUCCESS = 1;
    private static final int QUERY_WEATHER_FAIL = 0;

    private IWeatherModel weatherModel;
    private WeatherBean weather;
    private Handler mHandler = new Handler(new Handler.Callback() {
        @Override
        public boolean handleMessage(Message msg) {
            switch (msg.what) {
                case QUERY_WEATHER_FAIL:
                    Toast.makeText(getApplicationContext(), "获取天气信息失败", Toast.LENGTH_SHORT).show();
                    break;
                case QUERY_WEATHER_SUCCESS:
                    mTvWeatherInfo.setText(weather.toString());
                    break;
            }
            return false;
        }
    });


    @Override
    protected void initActivity() {
        weatherModel = new WeatherModelImpl();
    }


    @OnClick(R.id.bt_query)
    public void onQueryClick() {
        weatherModel.getWeather(this);
    }


    @Override
    public void onSuccess(WeatherBean weather) {
        this.weather = weather;
        mHandler.sendEmptyMessage(QUERY_WEATHER_SUCCESS);
    }

    @Override
    public void onError() {
        mHandler.sendEmptyMessage(QUERY_WEATHER_FAIL);
    }

    @Override
    protected int bindActivityLayout() {
        return R.layout.activity_mvc;
    }

}
当用户点击查询按钮,这里的Activity既作为Controller去找到WeatherModel,并调用它的getWeather()方法去获取天气信息,这里的Activity又作为View,当WeatherModel处理完成之后,通过接口OnWeatherListener通知View视图数据获取成功,并更新数据显示。
到这里,整个MVC架构就可以体现出来了。
MVP
为什么要用MVP呢?
从上面的Activity代码中可以看出,Model层可以直接更新View层,而且Activity既充当了View层,又充当了Controller层,如果Controller层业务变得越来越多,那么Activity引入的代码量是比较大的,后期难于维护,因此引入了MVP架构,其实MVP更是一种思想,完全解耦Model层与View层之间的联系。
所谓MVP就是 Model、View和Presenter。注意这里引入了Presenter。
- Model
跟MVC的中的Model一样,负责存储、检索、操纵数据(有时也实现一个Model interface用来降低耦合) - View
跟MVC中的View一样,负责界面显示和用户交互 - Presenter
作为View与Model交互的中间纽带,处理用户交互带来的业务。

当View需要更新数据时,首先去找Presenter,然后Presenter去找Model请求数据,Model获取数据之后通知Presenter,Presenter再通知View更新数据。这样Model和View就不会直接交互了,所有的交互由Presenter进行,Presenter充当桥梁角色。因此,Presenter必须持有View和Model对象的引用,才能在这两者之间进行通信。
将上面的例子改成MVP架构
改一下IWeatherModel接口,取消getWeather()方法里面的参数,增加一个onCancel()取消方法。
public interface IWeatherModel {
    void getWeather();
    void onCancel();
}
改一下IWeatherModel接口实现类WeatherModelImpl
public class WeatherModelImpl implements IWeatherModel
{
    private static final int QUERY_WEATHER_SUCCESS = 1;
    private static final int QUERY_WEATHER_FAIL = 0;

    private OnWeatherListener onWeatherListener;

    private Handler mHandler = new Handler(new Handler.Callback() {
        @Override
        public boolean handleMessage(Message msg) {
            if (null == onWeatherListener) return false;
            switch (msg.what) {

                case QUERY_WEATHER_SUCCESS:
                    WeatherBean weather = (WeatherBean) msg.obj;
                    onWeatherListener.onSuccess(weather);
                    break;

                case QUERY_WEATHER_FAIL:
                    onWeatherListener.onError();
                    break;
            }
            return false;
        }
    });

    public WeatherModelImpl(OnWeatherListener onWeatherListener) {
        this.onWeatherListener = onWeatherListener;
    }

    @Override
    public void getWeather() {
        String url = "http://www.weather.com.cn/data/sk/101280101.html";
        OkHttpClient okHttpClient = new OkHttpClient();
        Request request = new Request.Builder()
                .url(url)
                .get()
                .build();
        Call call = okHttpClient.newCall(request);
        call.enqueue(new Callback() {
            @Override
            public void onFailure(Call call, IOException e) {
                Message message = new Message();
                message.what = QUERY_WEATHER_FAIL;
                mHandler.sendMessage(message);
            }

            @Override
            public void onResponse(Call call, Response response) throws IOException {
                String body = response.body().string();
                Gson gson = new Gson();
                WeatherBean weather = gson.fromJson(body, WeatherBean.class);
                Message message = new Message();
                message.what = QUERY_WEATHER_SUCCESS;
                message.obj = weather;
                mHandler.sendMessage(message);
            }
        });

    }

    @Override
    public void onCancel() {
        mHandler.removeMessages(mHandler.obtainMessage().what);
    }
}
使用OnWeatherListener接口回调,如果获取天气信息成功,回调onWeatherListener.onSuccess(weather),请求失败回调onWeatherListener.onError();实现onCancel(),取消Handler里面的任务,防止Activity被回收掉了,请求数据将变得没有任何意义。
创建一个IWeatherView接口,用来更新View上的天气信息
public interface IWeatherView {
    void updateWeather(WeatherBean weatherBean);
    void updateError();
}
创建一个Presenter,作为IWeatherView 和WeatherModelImpl之间通信的桥梁
public class WeatherPresenter {

    private IWeatherModel weatherModel;
    private IWeatherView weatherView;

    public WeatherPresenter(IWeatherView weatherView) {
        this.weatherView = weatherView;
        weatherModel = new WeatherModelImpl(new OnWeatherListener() {
            @Override
            public void onSuccess(WeatherBean weather) {
                WeatherPresenter.this.weatherView.updateWeather(weather);
            }

            @Override
            public void onError() {
                WeatherPresenter.this.weatherView.updateError();
            }
        });
    }

    public void getWeather() {
        weatherModel.getWeather();
    }

    public void detachedView() {
        weatherView = null;
        weatherModel.onCancel();
    }

}
从这里就可以看出来,当外部调用weatherPresenter.getWeather()时,WeatherPresenter就会去找weatherModel,就是调用它的getWeather()方法,当weatherModel获取数据之后,通知weatherPresenter,由weatherPresenter去通知weatherView进行UI更新,就是调用weatherView.updateWeather(weather)
在这里增加了detachView(),防止Activity被回收的时候,Presenter还持有它的引用,防止内存泄露。
View层
public class MvpActivity extends BaseActivity implements IWeatherView {


    @BindView(R.id.tv_weather_info)
    TextView mTvWeatherInfo;

    private WeatherPresenter weatherPresenter;

    @Override
    protected void initActivity() {
        weatherPresenter = new WeatherPresenter(this);
    }

    @OnClick(R.id.bt_query)
    public void onQuery() {
        weatherPresenter.getWeather();
    }

    @Override
    public void updateWeather(WeatherBean weatherBean) {
        mTvWeatherInfo.setText(weatherBean.toString());
    }

    @Override
    public void updateError() {
        Toast.makeText(this, "获取天气信息失败", Toast.LENGTH_SHORT).show();
    }

    @Override
    protected int bindActivityLayout() {
        return R.layout.activity_mvp;
    }

    @Override
    protected void onDestroy() {
        weatherPresenter.detachedView();
        super.onDestroy();
    }
上面的Activity实现了IWeatherView接口,Presenter就可以通过调用IWeatherView接口更新UI,并且持有这个View的引用。
View本身只用于数据显示,并不处理任何数据业务。在这里View不再依赖于Model,View不参与决策,View与Model不能直接交互,Presenter是整个MVP体系的控制中心。View通过Presenter与Model打交道。Presenter接受View的UI请求,完成简单的UI处理逻辑,并调用Model进行业务处理,并调用View将相应的结果反映出来,这就是MVP架构思想。
MVVM
其实MVVM也是一种思想,是MVP的升级版,其中VM指的是ViewModel。实现MVVM也有很多种方法,下面我用的是比较普遍的DataBinding方式。DataBinding可以实现双向的交互,这就使得视图和控制层之间的耦合程度进一步降低,关注点分离更为彻底,同时减轻了Activity的压力。
官方是支持MVVM模式框架的,可以在xml中直接绑定数据,无需再用ButterKnife或者findViewById手动设置数据,实现UI与功能的解耦。
用MVVM实现上面的例子
首先在app/build.gradle配置
android {
   ...
   dataBinding {
        enabled = true
    }
}
在原来的layout文件上面添加layout标签,把原来的布局放到里面。注意是小写的layout哦!不然使用data标签会报错的。
<?xml version="1.0" encoding="utf-8"?>
<layout xmlns:android="http://schemas.android.com/apk/res/android"
    xmlns:app="http://schemas.android.com/apk/res-auto">

    <data>
        <import type="android.view.View"/>
        <variable
            name = "weatherModel" type = "com.act.androidarchtest.mvvm.model.WeatherModelImpl"/>
    </data>

    <android.support.constraint.ConstraintLayout
        android:layout_width="match_parent"
        android:layout_height="match_parent">

        <TextView
            android:id="@+id/tv_weather_info"
            android:layout_width="wrap_content"
            android:layout_height="wrap_content"
            android:visibility="@{weatherModel.querySuccess ? View.VISIBLE : View.GONE}"
            app:layout_constraintTop_toTopOf="parent"
            app:layout_constraintBottom_toBottomOf="parent"
            app:layout_constraintStart_toStartOf="parent"
            app:layout_constraintEnd_toEndOf="parent"
            android:textSize="28sp"
            android:text="@{weatherModel.weatherInfo}"
            />

        <Button
            android:id="@+id/bt_query"
            android:layout_width="150dp"
            android:layout_height="50dp"
            android:layout_marginTop="10dp"
            app:layout_constraintTop_toBottomOf="@id/tv_weather_info"
            app:layout_constraintStart_toStartOf="parent"
            app:layout_constraintEnd_toEndOf="parent"
            android:text="@string/bt_query_text"
            android:onClick="@{() -> weatherModel.getWeather()}"
            />

    </android.support.constraint.ConstraintLayout>


</layout>
修改WeatherModelImpl类,取消原来的接口回调,使用观察者模式。
public class WeatherModelImpl implements IWeatherModel
{

    public final ObservableBoolean querySuccess = new ObservableBoolean(false);

    public final ObservableField<String> weatherInfo = new ObservableField<>();

    private Call mCall;

    public WeatherModelImpl() { }

    @Override
    public void getWeather() {
        String url = "http://www.weather.com.cn/data/sk/101280101.html";
        OkHttpClient okHttpClient = new OkHttpClient();
        Request request = new Request.Builder()
                .url(url)
                .get()
                .build();
        mCall = okHttpClient.newCall(request);
        mCall.enqueue(new Callback() {
            @Override
            public void onFailure(Call call, IOException e) {
                querySuccess.set(false);
            }

            @Override
            public void onResponse(Call call, Response response) throws IOException {
                String body = response.body().string();
                Gson gson = new Gson();
                WeatherBean weather = gson.fromJson(body, WeatherBean.class);
                querySuccess.set(true);
                weatherInfo.set(weather.toString());
            }
        });

    }

    @Override
    public void onCancel() {
        if (null != mCall) {
            mCall.cancel();
        }
    }
}
由于之前的layout文件已经直接绑定了weatherModel.weatherInfo数据,所以一旦weatherInfo数据发生变化,绑定数据的View视图则会自动刷新UI。
View层代码
public class MvvmActivity extends AppCompatActivity {

    private WeatherModelImpl weatherModel;

    private ActivityMvvmBinding mMvvmBinding;

    @Override
    protected void onCreate(Bundle savedInstanceState) {
        super.onCreate(savedInstanceState);
        mMvvmBinding = DataBindingUtil.setContentView(this, R.layout.activity_mvvm);
        weatherModel = new WeatherModelImpl();
        mMvvmBinding.setWeatherModel(weatherModel);
    }

    @Override
    protected void onDestroy() {
        super.onDestroy();
        weatherModel.onCancel();
    }
}
通过上面代码可以看出,用了MVVM之后,Activity整体的代码量少了很多,不用处理View刷新问题。
上面例子的全部代码 GitHub传送门

