前置:最好使用对象池;
前文:https://blog.csdn.net/jaihk662/article/category/8688031(UGUI)
实现效果在这~:

第一步:制作UI
很简单的,一张背景图一段文字,背景图可以半透明
![]()

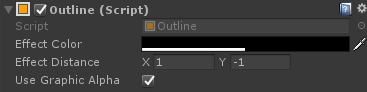
可以给文字加上Outline组件,也就是字体边框,用作UI美化,调整下边框的颜色和透明度
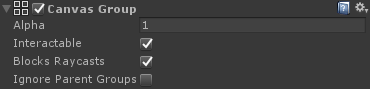
给图片加上CanvasGroup组件,用于管理整个UI
- Alpha:整体透明度(0~1的浮点数,0为完全透明)
- Interactable:是否禁用交互功能(比如输入框和按钮监听),为false时为禁用
- Blocks Raycasts:是否接受射线检测,不会作用于Physics.Raycast
- Ignore Parent Groups:是否受到父级CanvasGroup的影响
第二步:安装DOTween插件,编写对象池脚本
DOTween安装:直接官方商城

对象池作用:因为在短时间可能会出现多个提示框,要实现UI复用
对象池参考:https://blog.csdn.net/Jaihk662/article/details/88770183
DOTween教程:https://blog.csdn.net/iFasWind/article/details/81452516
第三步:编写脚本,封装
目的:使用一行语句唤醒提示框,还有提示框的特效
- LuXun.Say.Ever(string, "hint"):生成一个提示框,提示框的内容为string
提示框预制体代码如下:

using System.Collections;
using System.Collections.Generic;
using UnityEngine;
using System.Text;
using UnityEngine.SceneManagement;
using UnityEngine.UI;
using UnityEngine.EventSystems;
using DG.Tweening;
public class HintUI : MonoBehaviour
{
    public Text hint;
    public Image hintGround;
    public CanvasGroup hintGroup;
    public GameObject thisObject;
    private Color beginColor;          //原始颜色
    private Vector3 beginPos;          //原始坐标
    private Sequence sequence;          //动画顺序表(Dotween封装)
    public void GetHint(string message)
    {
        hint.text = message;
        hintGroup.alpha = 0;
        RectTransform now = hintGround.rectTransform;
        thisObject.GetComponent<RectTransform>().anchoredPosition3D = new Vector3(0, -280, 0);

        sequence = DOTween.Sequence();
        Tweener move1 = now.DOMoveY(now.position.y + 30, 0.5f);         //now.DOMoveY(Y轴变化,在多少秒内完成,是否只取整数值(默认为false)),返回一段动画
        Tweener move2 = now.DOMoveY(now.position.y + 60, 0.5f);

        //DOTween.To()使用了Lambda表达式,DOTween.To(() => now, x => now = x, 100, 2.5) 表示给变量now添加一个动画,让它从默认值在2.5秒内变化到100
        Tweener alpha1 = DOTween.To(() => hintGroup.alpha, x => hintGroup.alpha = x, 1, 0.6f);
        Tweener alpha2 = DOTween.To(() => hintGroup.alpha, x => hintGroup.alpha = x, 0, 0.6f);

        sequence.Append(move1);                 //将动画加入动画顺序表,如果动画没有加入顺序表会被默认直接执行
        sequence.Join(alpha1);
        sequence.AppendInterval(0.5f);          //停滞0.5秒
        sequence.Append(move2);
        sequence.Join(alpha2);
        sequence.OnComplete(Init);
    }
    public void Init()
    {
        Pool.Return(thisObject);
    }
}
封装调用如下(在其它脚本内实现,一般是一个单例的控制器):
public void Ever(string message, string type)
{
    switch (type)
    {
        case "hint":
            hintUI = Pool.Get("HintImage", "UI/HintImage", new Vector3(0, 0, 0), Quaternion.identity);
            hintUI.transform.SetParent(GetTran, false);         //GetTran为生成的提示框需要挂载的父物体
            hintUI.GetComponent<HintUI>().GetHint(message);
            break;
    }
}
一个使用的例子(实现上面的效果):
void PassIt()
{
    TheGod.myID = usernameText.text;
    LuXun.Say.Ever("欢迎回来," + usernameText.text, "hint");
    ShuRuPanel.SetActive(false);
    XuanFuPanel.SetActive(true);
}
搞定!
