关于AIDL的介绍网上有很多很好的资料,这里就不多介绍。这段时间在网上看到一些有关Android进程间通信的东西就想着来做一下。好了,直接看代码:
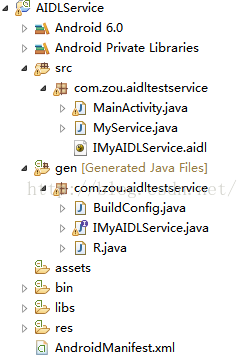
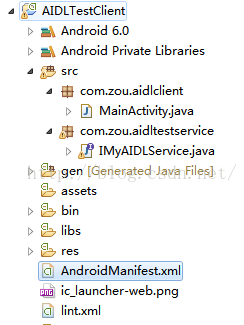
要做AIDL必须得有一个service和client 看项目结构
这是service端 这是client端
第一步:在service端创建AIDL文件,后缀为*.aidl
aidl类容实际为定义的一个对外公开的接口,里面放需要提供的方法,除了常见的数据类型(int、String、boolean、……Map、List)之外的其他类型都需要导入包
package com.zou.aidltestservice;

interface IMyAIDLService{
	int getCount(int cnt);
}
保存后Eclipse将自动为我们在gen目录下生成对应的.java文件
这里会生成一个Stub的abstract抽象类,这个类继承了android.os.Binder,同时实现了我们定了aidl接口。
大家可以看看他的代码
/*
 * This file is auto-generated.  DO NOT MODIFY.
 * Original file: E:\\Eclipseworkspace\\AIDLTestService\\src\\com\\zou\\aidltestservice\\IMyAIDLService.aidl
 */
package com.zou.aidltestservice;
public interface IMyAIDLService extends android.os.IInterface
{
/** Local-side IPC implementation stub class. */
public static abstract class Stub extends android.os.Binder implements com.zou.aidltestservice.IMyAIDLService
{
private static final java.lang.String DESCRIPTOR = "com.zou.aidltestservice.IMyAIDLService";
/** Construct the stub at attach it to the interface. */
public Stub()
{
this.attachInterface(this, DESCRIPTOR);
}
/**
 * Cast an IBinder object into an com.zou.aidltestservice.IMyAIDLService interface,
 * generating a proxy if needed.
 */
public static com.zou.aidltestservice.IMyAIDLService asInterface(android.os.IBinder obj)
{
if ((obj==null)) {
return null;
}
android.os.IInterface iin = obj.queryLocalInterface(DESCRIPTOR);
if (((iin!=null)&&(iin instanceof com.zou.aidltestservice.IMyAIDLService))) {
return ((com.zou.aidltestservice.IMyAIDLService)iin);
}
return new com.zou.aidltestservice.IMyAIDLService.Stub.Proxy(obj);
}
@Override public android.os.IBinder asBinder()
{
return this;
}
@Override public boolean onTransact(int code, android.os.Parcel data, android.os.Parcel reply, int flags) throws android.os.RemoteException
{
switch (code)
{
case INTERFACE_TRANSACTION:
{
reply.writeString(DESCRIPTOR);
return true;
}
case TRANSACTION_getCount:
{
data.enforceInterface(DESCRIPTOR);
int _arg0;
_arg0 = data.readInt();
int _result = this.getCount(_arg0);
reply.writeNoException();
reply.writeInt(_result);
return true;
}
}
return super.onTransact(code, data, reply, flags);
}
private static class Proxy implements com.zou.aidltestservice.IMyAIDLService
{
private android.os.IBinder mRemote;
Proxy(android.os.IBinder remote)
{
mRemote = remote;
}
@Override public android.os.IBinder asBinder()
{
return mRemote;
}
public java.lang.String getInterfaceDescriptor()
{
return DESCRIPTOR;
}
@Override public int getCount(int cnt) throws android.os.RemoteException
{
android.os.Parcel _data = android.os.Parcel.obtain();
android.os.Parcel _reply = android.os.Parcel.obtain();
int _result;
try {
_data.writeInterfaceToken(DESCRIPTOR);
_data.writeInt(cnt);
mRemote.transact(Stub.TRANSACTION_getCount, _data, _reply, 0);
_reply.readException();
_result = _reply.readInt();
}
finally {
_reply.recycle();
_data.recycle();
}
return _result;
}
}
static final int TRANSACTION_getCount = (android.os.IBinder.FIRST_CALL_TRANSACTION + 0);
}
public int getCount(int cnt) throws android.os.RemoteException;
}
到这里服务端的代码写完了,接下来就是在配置文件中写入服务的相关配置
        <service
            android:name="com.zou.aidltestservice.MyService"
            android:process=":romote" >
            <intent-filter>
                <action android:name="com.zou.aidltestservice.IMyAIDLService" />
            </intent-filter>
        </service>
OK!完成服务器的工作。
接下来就是client,将在服务端自动生成的复制到客户端
删除其他的东西,只留下定义的接口即可。
然后就是客户端的绑定
package com.zou.aidlclient;

import com.zou.aidltestservice.IMyAIDLService;

import android.app.Activity;
import android.content.ComponentName;
import android.content.Intent;
import android.content.ServiceConnection;
import android.os.Bundle;
import android.os.Handler;
import android.os.IBinder;
import android.os.Message;
import android.os.RemoteException;
import android.widget.TextView;

public class MainActivity extends Activity {

	private IMyAIDLService mService;

	private ServiceConnection conn = new ServiceConnection() {

		@Override
		public void onServiceDisconnected(ComponentName name) {

		}

		@Override
		public void onServiceConnected(ComponentName name, IBinder service) {
			System.out.println("连接成功");
			mService = IMyAIDLService.Stub.asInterface(service);
			System.out.println("获取服务:" + mService);
			try {
				int c = mService.getCount(0);
				System.out.println("调用方法:" + c);
				mHandler.obtainMessage(0x00, c + "").sendToTarget();
			} catch (RemoteException e) {
				e.printStackTrace();
			}
		}
	};

	@Override
	protected void onCreate(Bundle savedInstanceState) {
		super.onCreate(savedInstanceState);
		setContentView(R.layout.activity_main);
		boolean isBinded = bindService(new Intent("com.zou.aidltestservice.IMyAIDLService"), conn, BIND_AUTO_CREATE);
		System.out.println("绑定是否成功:" + isBinded);
	}

	private Handler mHandler = new Handler() {

		@Override
		public void handleMessage(Message msg) {
			super.handleMessage(msg);
			((TextView) findViewById(R.id.textview)).setText(msg.obj + "");
		}
	};

}
OK,这样就可以运行了。切记先安装service 再安装client才行。
注:我之前运行一直提示绑定失败,就是绑定的时候返回false,后来折腾了好久才发现在client配置里面targetSdkVersion版本写了21,改到低一些(我改的14)就OK了,原因不明。希望知道的童鞋们可以告知。