项目目录
一、需求分析
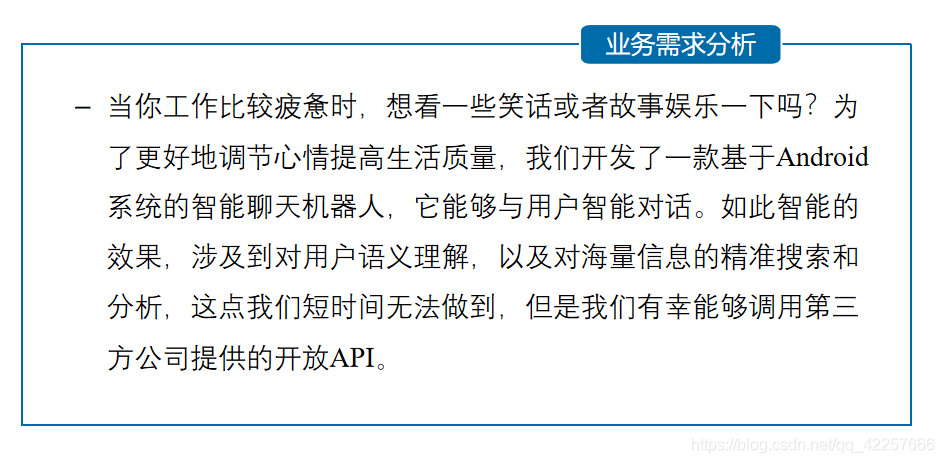
1、业务需求分析
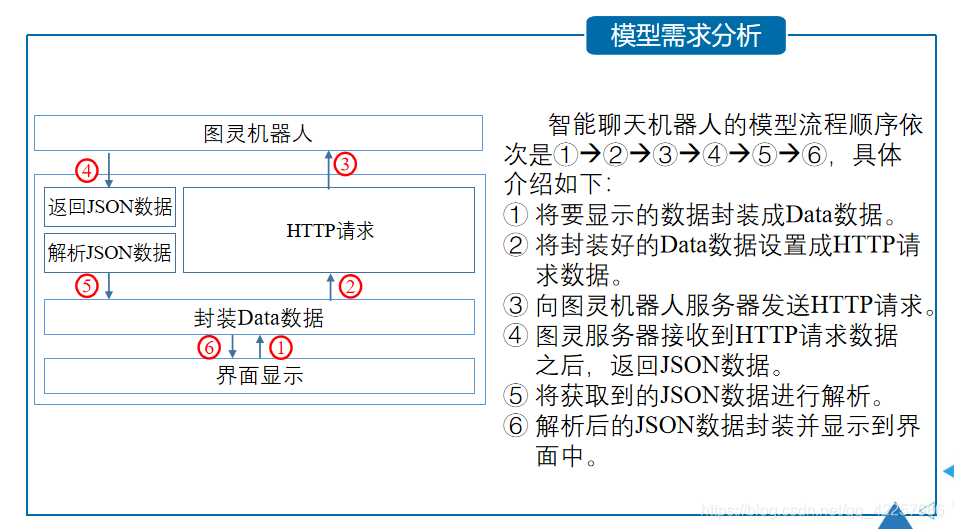
2、模型需求分析
3、界面需求分析

二、开发环境介绍

三、聊天功能业务实现
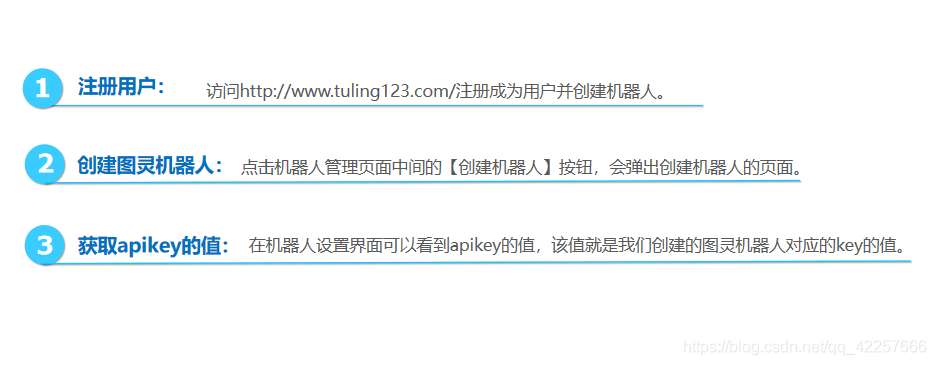
1、申请机器人身份标识
2、搭建聊天界面布局
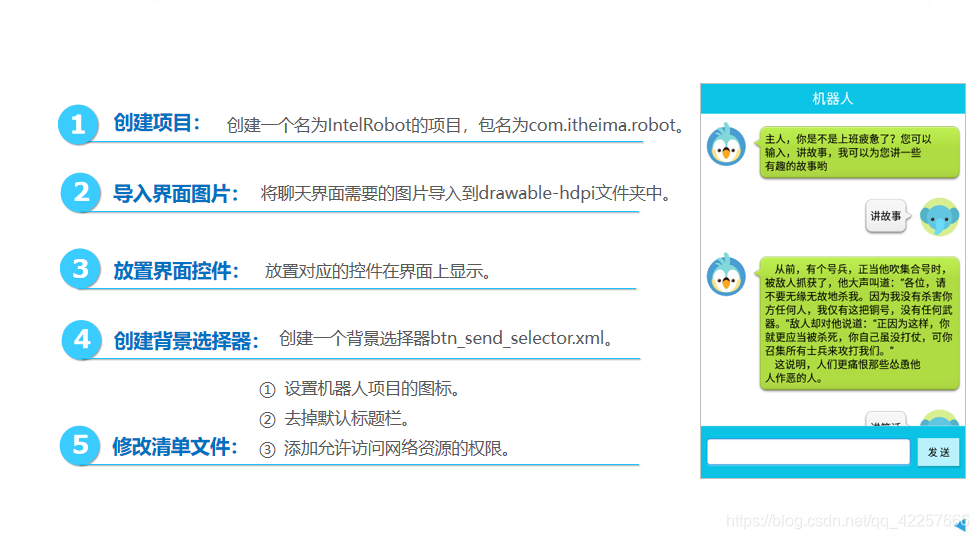
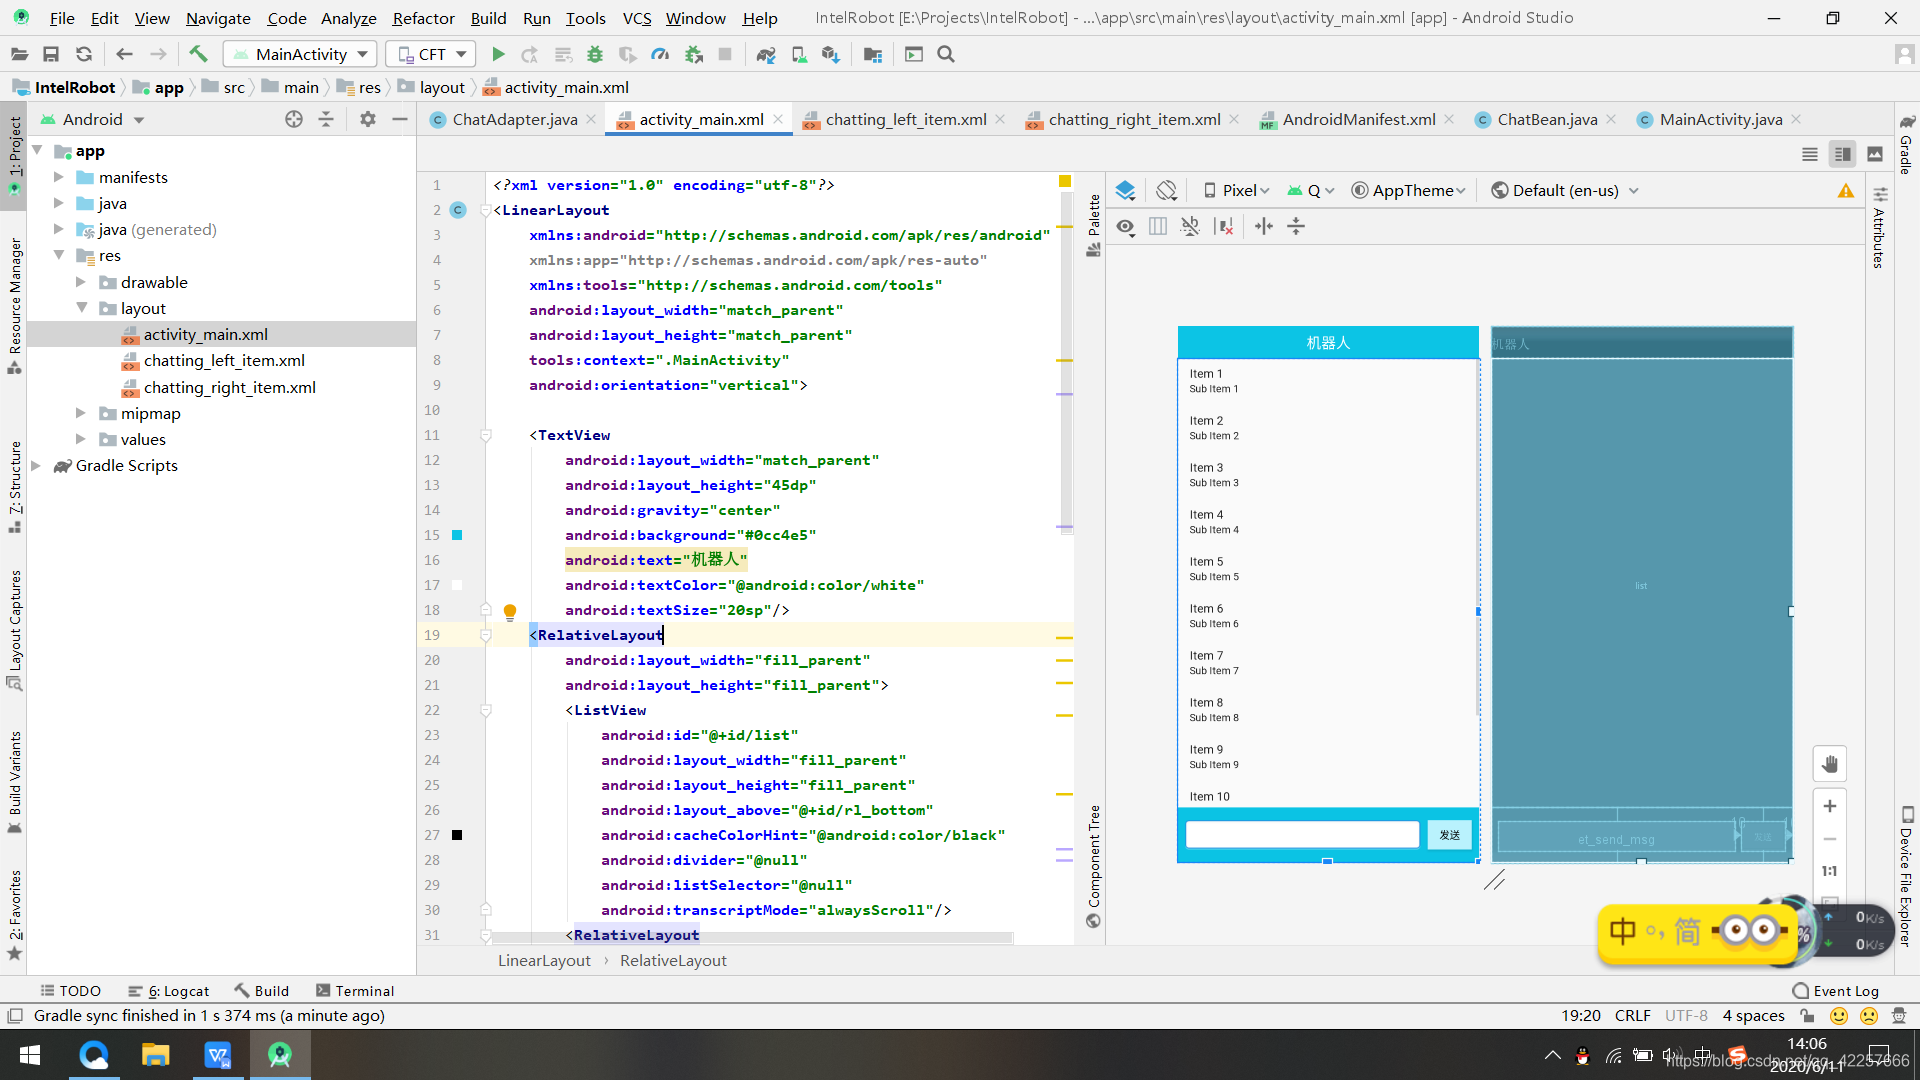
整个界面最外层采用线性布局,在最大的LinearLayout中先设置了一个TextView用来显示聊天窗口的文本为机器人。
接着在TextView下面放置了一个RelativeLayout,在它里面先放置了一个ListView,用于显示聊天消息列表。
然后放置了一个小的RelativeLayout,里面放置了一个Button和一个EditText,Button在EditText右侧,文本为“发送”,作为发送按钮,EditText则是聊天输入框,在里面输入聊天内容。
这样整个聊天界面的布局文件就搭建好了。如图所示:
activity_main的代码如下:
<?xml version="1.0" encoding="utf-8"?>
<LinearLayout
    xmlns:android="http://schemas.android.com/apk/res/android"
    xmlns:app="http://schemas.android.com/apk/res-auto"
    xmlns:tools="http://schemas.android.com/tools"
    android:layout_width="match_parent"
    android:layout_height="match_parent"
    tools:context=".MainActivity"
    android:orientation="vertical">

    <TextView
        android:layout_width="match_parent"
        android:layout_height="45dp"
        android:gravity="center"
        android:background="#0cc4e5"
        android:text="机器人"
        android:textColor="@android:color/white"
        android:textSize="20sp"/>
    <RelativeLayout
        android:layout_width="fill_parent"
        android:layout_height="fill_parent">
        <ListView
            android:id="@+id/list"
            android:layout_width="fill_parent"
            android:layout_height="fill_parent"
            android:layout_above="@+id/rl_bottom"
            android:cacheColorHint="@android:color/black"
            android:divider="@null"
            android:listSelector="@null"
            android:transcriptMode="alwaysScroll"/>
        <RelativeLayout
            android:id="@+id/rl_bottom"
            android:layout_width="fill_parent"
            android:layout_height="wrap_content"
            android:layout_alignParentBottom="true"
            android:background="@drawable/bottom_bg">
            <Button
                android:id="@+id/btn_send"
                android:layout_width="60dp"
                android:layout_height="40dp"
                android:layout_alignParentRight="true"
                android:layout_centerVertical="true"
                android:layout_marginRight="10dp"
                android:background="@drawable/btn_send_selector"
                android:text="发送"
                android:textColor="@android:color/black"
                android:textSize="14sp"/>
            <EditText
                android:id="@+id/et_send_msg"
                android:layout_width="fill_parent"
                android:layout_height="40dp"
                android:layout_centerVertical="true"
                android:layout_marginLeft="10dp"
                android:layout_marginRight="10dp"
                android:layout_toLeftOf="@+id/btn_send"
                android:background="@drawable/send_msg_bg"
                android:singleLine="true"
                android:textColor="@android:color/black"
                android:textSize="18sp"/>
        </RelativeLayout>
    </RelativeLayout>
</LinearLayout>
3、搭建聊天条目布局

chatting_left_item文件为机器人聊天头像和聊天框显示文件,用于显示机器人的聊天内容。
主要是在RelativeLayout中放置了一个ImageView和一个TextView,ImageView为机器人的头像图片robot_head,TextView 中的 style 设置为 style 文件夹中写好的格式文件 chat_content_style , background选择drawable中的chat_left_selector【鼠标选中消息,背景显示为深绿色,默认显示为绿色】。效果如图:

chatting_left_item代码如下:
<?xml version="1.0" encoding="utf-8"?>
<RelativeLayout
    xmlns:android="http://schemas.android.com/apk/res/android"
    android:layout_width="fill_parent"
    android:layout_height="wrap_content"
    android:padding="6dp">
    <ImageView
        android:id="@+id/iv_head"
        android:layout_width="65dp"
        android:layout_height="65dp"
        android:layout_alignParentLeft="true"
        android:layout_alignParentTop="true"
        android:layout_marginTop="5dp"
        android:background="@drawable/robot_head"
        android:focusable="false"/>
    <TextView
        android:id="@+id/tv_chat_content"
        style="@style/chat_content_style"
        android:layout_width="wrap_content"
        android:layout_height="wrap_content"
        android:layout_marginLeft="5dp"
        android:layout_toRightOf="@+id/iv_head"
        android:background="@drawable/chat_left_selector" />
</RelativeLayout>
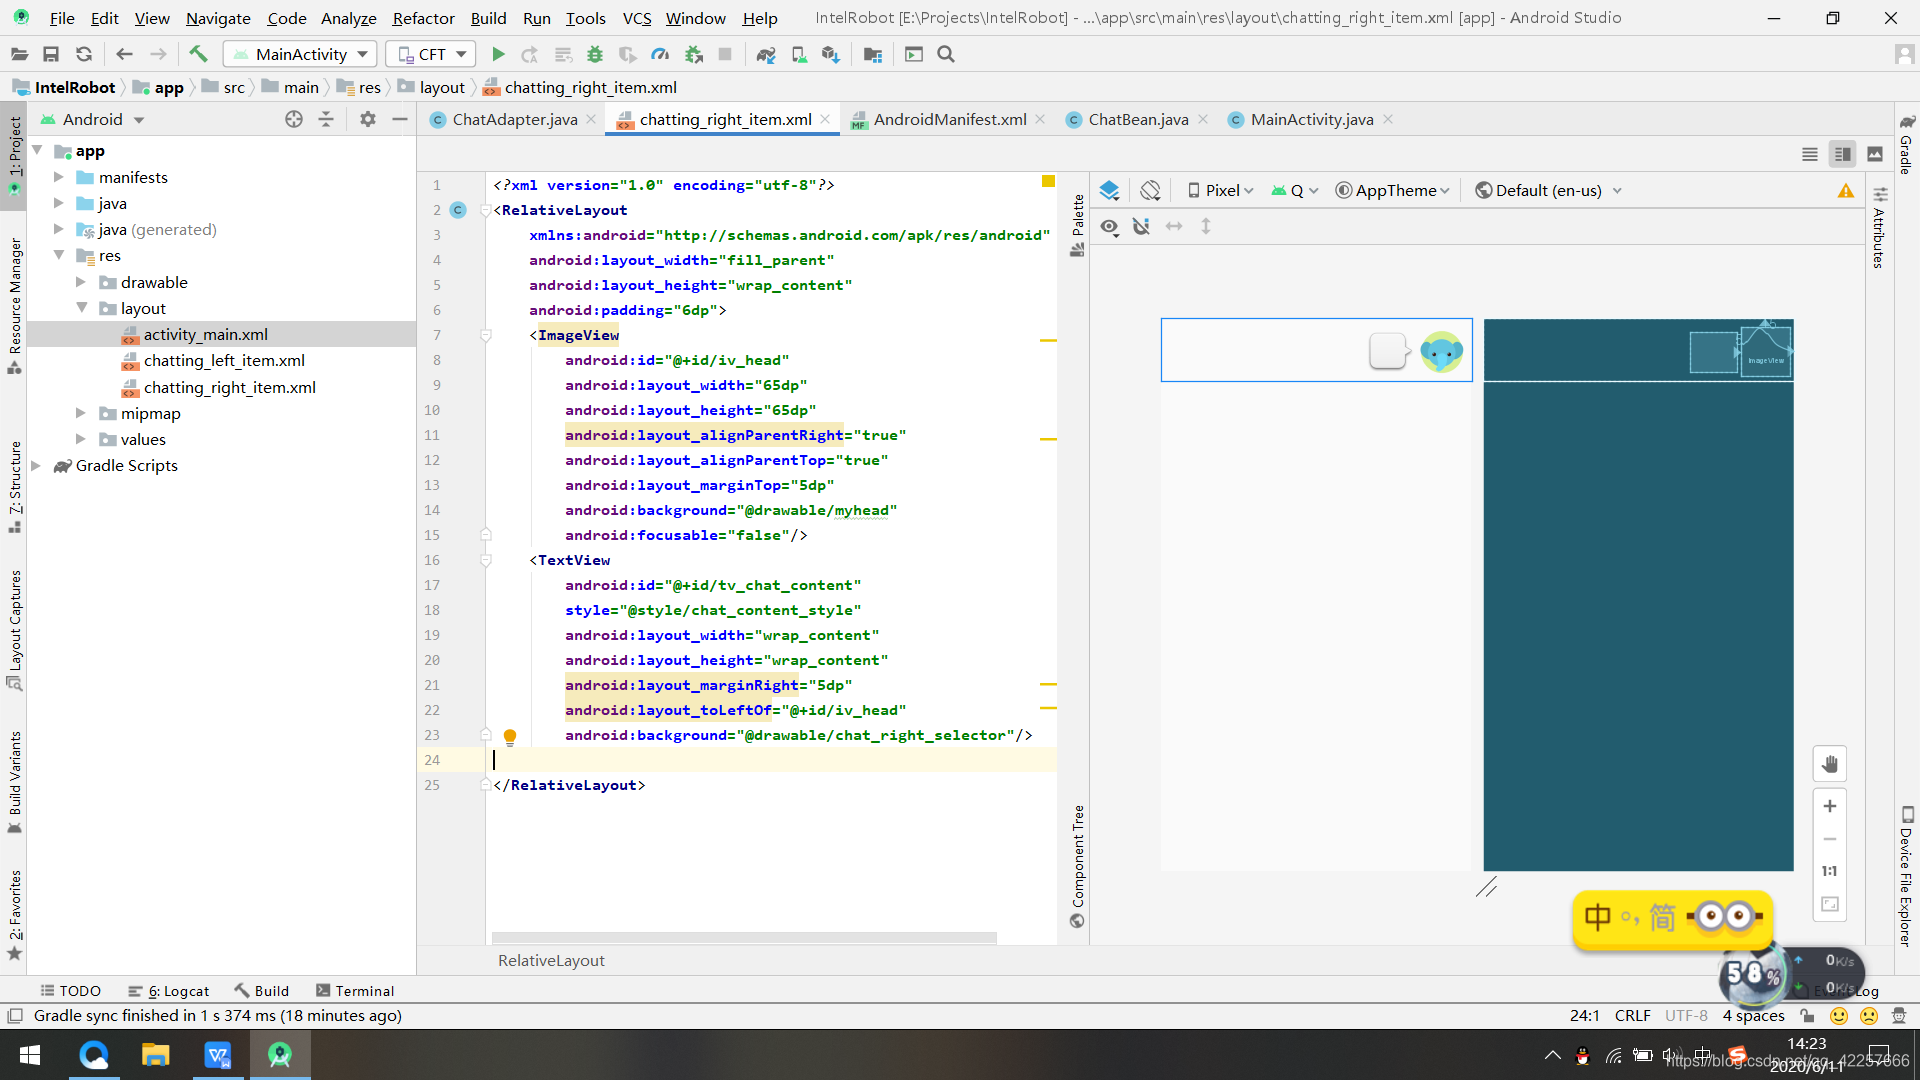
chatting_right_item文件为用户聊天头像和聊天框显示文件,用于显示用户的聊天内容。
和机器人的聊天条目相同。主要是在RelativeLayout中放置了一个ImageView和一个TextView,ImageView 为用户的头像图片 myhead ,TextView中的 style 为 style 中 chat_content_style ,
background选择drawable中的chat_right_selector【鼠标选中消息,背景显示为灰色,默认显示为白色】。效果如图:
chatting_right_item代码如下:
<?xml version="1.0" encoding="utf-8"?>
<RelativeLayout
    xmlns:android="http://schemas.android.com/apk/res/android"
    android:layout_width="fill_parent"
    android:layout_height="wrap_content"
    android:padding="6dp">
    <ImageView
        android:id="@+id/iv_head"
        android:layout_width="65dp"
        android:layout_height="65dp"
        android:layout_alignParentRight="true"
        android:layout_alignParentTop="true"
        android:layout_marginTop="5dp"
        android:background="@drawable/myhead"
        android:focusable="false"/>
    <TextView
        android:id="@+id/tv_chat_content"
        style="@style/chat_content_style"
        android:layout_width="wrap_content"
        android:layout_height="wrap_content"
        android:layout_marginRight="5dp"
        android:layout_toLeftOf="@+id/iv_head"
        android:background="@drawable/chat_right_selector"/>

</RelativeLayout>
4、封装聊天信息实体类

在该类中创建机器人与用户聊天信息的属性。重写了get和set方法,消息的状态设为state,发送消息值设为1,接受消息值设为2。
public class ChatBean {
    public static final int SEND=1;//发送消息
    public static final int RECEIVE=2;//接收消息
    private int state;//消息的状态(是接收还是发送)
    private String message;//消息的内容

    public int getState() {
        return state;
    }

    public void setState(int state) {
        this.state = state;
    }

    public String getMessage() {
        return message;
    }

    public void setMessage(String message) {
        this.message = message;
    }
}
5、编写聊天列表适配器
由于聊天界面用了ListView控件显示聊天信息,因此需要创建一个数据适配器ChatAdapter对ListView控件进行数据适配。所以要创建一个ChatAdapter类。
getView方法内用if和else语句判断当前的消息是发送的消息还是接收到的消息,不同消息加载不同的view。如果是接收消息,说明就是机器人发的消息,那就加载左边布局;如果是发送消息,说明就是用户发的消息,则加载右边布局。
@Override
    public View getView(int position, View contentView, ViewGroup viewGroup) {
        Holder holder = new Holder();
        //判断当前信息是发送信息还是接收信息,根据不同信息加载不同布局文件
        if (chatBeanList.get(position).getState() == ChatBean.RECEIVE) {
        	//加载机器人对应的布局文件
            contentView = layoutInflater.inflate(R.layout.chatting_left_item, null);
        } else {
        	//加载用户对应的布局文件
           contentView = layoutInflater.inflate(R.layout.chatting_right_item,null);
        }
        //获取聊天内容控件,并设置控件的文本信息
        holder.tv_chat_content = (TextView) contentView.findViewById(R.id. tv_chat_content);
        holder.tv_chat_content.setText(chatBeanList.get(position).getMessage());
        return contentView;
    }
6、实现智能机器人通信

在RobotActivity中,创建了5个方法:
(1)initView( ) 用于获取界面控件并初始化界面数据;

(2)showData( ) 用于显示欢迎信息到界面上;

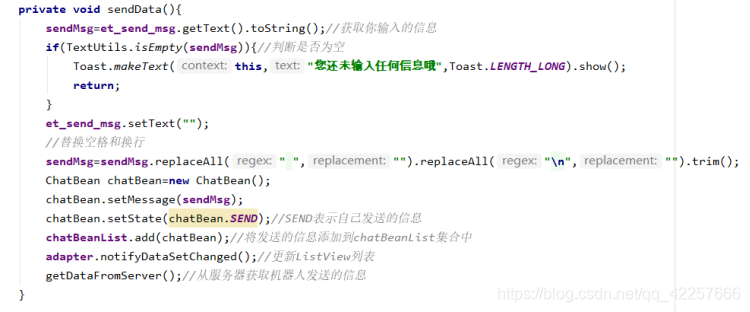
(3)sendData ( ) 用于用户发送信息;
(4)getDataFromServer( ) 从服务器获取机器人的回复信息;

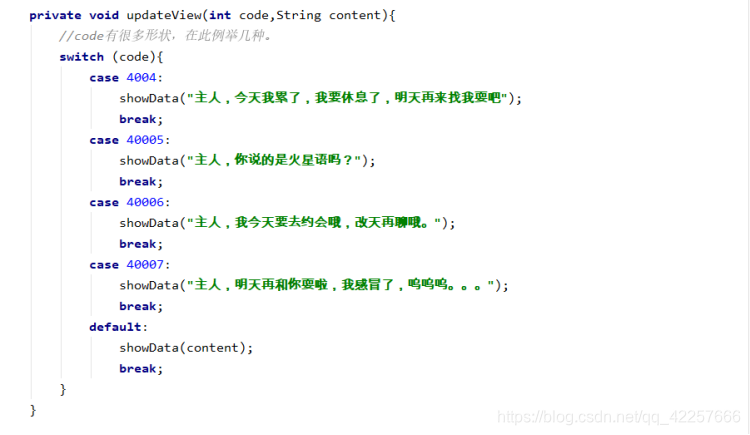
(5)updateView( ) 更新界面信息;
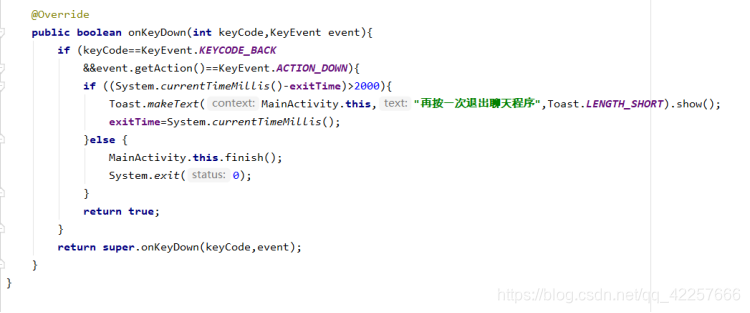
最后重写onKeyDown( )方法,在该方法中实现点击后退键退出智能聊天程序的功能。
四、项目效果
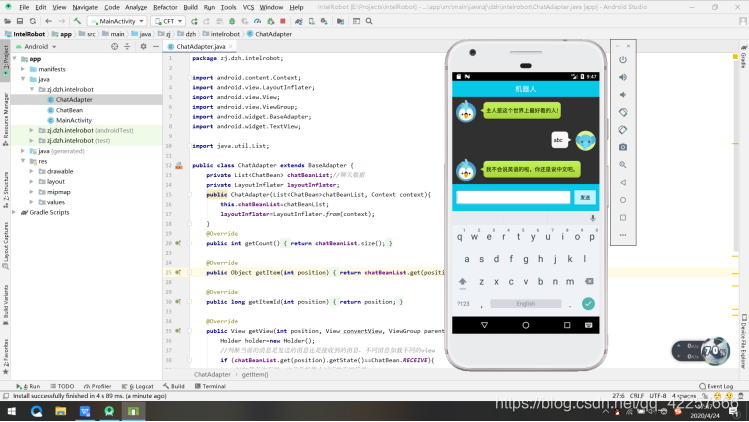
1、进来会有随机的欢迎消息,可以在回复设置里面自定义。
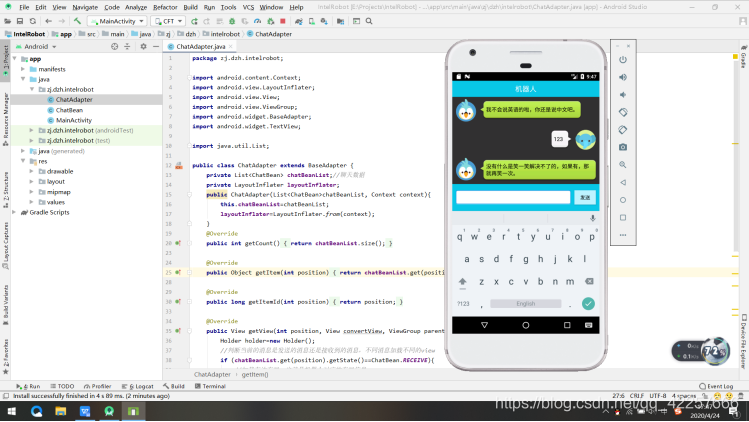
2、没有装中文输入法,所以就发个数字先,它会自动回复。
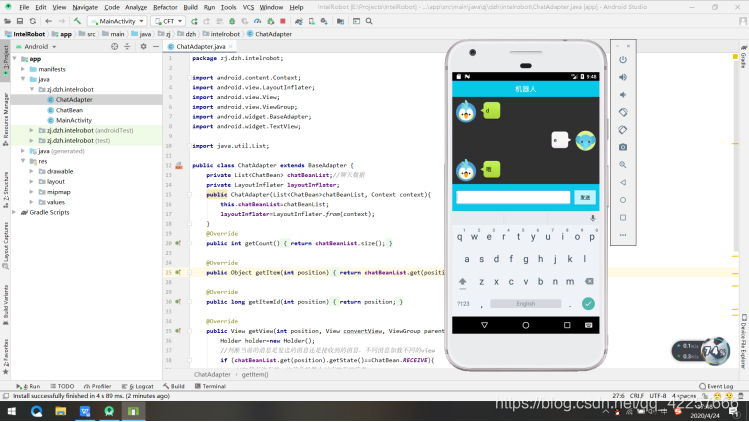
3、发英文字母a,b,c,它会自动往下接,发e它会回句“额”。
五、项目总结
在本项目的实现过程中,熟悉了网络请求、JSON解析、Handler处理等知识点,这些知识点会在后来Android项目中经常使用,因此希望读者可以按照步骤完成此项目,通过熟练掌握本项目中的这些知识点,方便以后开发其他项目。
你遇见了什么人,什么时候找到一份工作,在哪里做了什么事,是努力还是堕落,事到如今,你回头想想,这些其实都是你对自己的安排。所有的昨日,才有了你所有的今日。