每天学一点2020.6.17(Android-3)
Android中使用indexablerecyclerview以及右侧字母索引基本使用
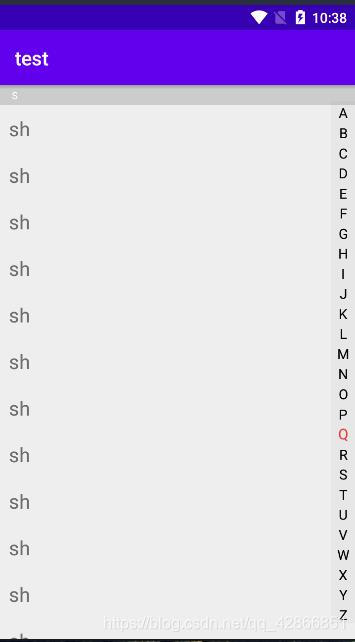
今天所要分享的是Android中实现显示右侧字母索引条,通过该索引条能够根据字母进行,跳转到所对应的数据。显示效果如下所示:
下面开始介绍如何实现该效果.。
1. 添加依赖
    implementation 'me.yokeyword:indexablerecyclerview:1.3.0'
    implementation 'com.android.support:appcompat-v7:自己的版本号'
    implementation 'com.android.support:recyclerview-v7:自己的版本号'
2. 布局设置
    <me.yokeyword.indexablerv.IndexableLayout
        android:id="@+id/indexAble"
        android:layout_width="match_parent"
        android:layout_height="match_parent"
        app:indexBar_background="#08000000"
        app:indexBar_layout_width="24dp"
        app:indexBar_selectedTextColor="#f33737"
        app:indexBar_textColor="#000000"
        app:indexBar_textSize="14sp"
        app:indexBar_textSpace="6dp" />
其中app:indexBar_background属性为设置右侧索引栏背景色,app:indexBar_selectedTextColor为设置右侧索引栏的选中时的字体颜色,app:indexBar_textColor为设置字体颜色。
3. 设置IndexableLayout相关属性
    private IndexableLayout mIndexAble;
    private List<CityEntity> mDatas;

    protected void onCreate(Bundle savedInstanceState) {
        super.onCreate(savedInstanceState);
        setContentView(R.layout.activity_indexable);
        mIndexAble = findViewById(R.id.indexAble);
        mDatas = new ArrayList<>();
        mDatas.add(new CityEntity("bj", "ad"));//创建数据
        ...

        mIndexAble.setLayoutManager(new LinearLayoutManager(this));
        CityAdapter adapter = new CityAdapter(this,mDatas);
        mIndexAble.setAdapter(adapter); //设置适配器
        adapter.setDatas(mDatas); //添加数据
    }
CityEntity类为实体类,可以自己定义所需要的数据。如下是我的定义:
public class CityEntity implements IndexableEntity {
    private String name;
    private String pinyin;

    public CityEntity(String name, String pinyin) {
        this.name = name;
        this.pinyin = pinyin;
    }

    @Override
    public String getFieldIndexBy() {
        return name;  // return 你需要根据该属性排序的field
    }

    @Override
    public void setFieldIndexBy(String indexByField) {
        this.name = indexByField; // 同上
    }

    @Override
    public void setFieldPinyinIndexBy(String pinyin) {
        this.pinyin = pinyin; // 保存排序field的拼音,在执行比如搜索等功能时有用 (若不需要,空实现该方法即可)
    }

    public String getName() {
        return name;
    }

    public void setName(String name) {
        this.name = name;
    }

    public String getPinyin() {
        return pinyin;
    }

    public void setPinyin(String pinyin) {
        this.pinyin = pinyin;
    }
}
4. 适配器创建
适配器需要继承IndexableAdapter类,如下所示
public class CityAdapter extends IndexableAdapter<CityEntity> {
    private Context mContext;
    private List<CityEntity> mData;

    public CityAdapter(Context mContext, List<CityEntity> data) {
        this.mContext = mContext;
        this.mData = data;
    }

    @Override
    public RecyclerView.ViewHolder onCreateTitleViewHolder(ViewGroup parent) {
        // 创建 TitleItem 布局
        View view = LayoutInflater.from(mContext).inflate(R.layout.mine_head_item, null);
        return new IndexVH(view);
    }

    @Override
    public RecyclerView.ViewHolder onCreateContentViewHolder(ViewGroup parent) {
        // 创建 内容Item 布局
        View view = LayoutInflater.from(mContext).inflate(R.layout.item_contact, null);
        return new ContentVH(view);
    }

    @Override
    public void onBindTitleViewHolder(RecyclerView.ViewHolder holder, String indexTitle) {
        // 填充 TitleItem 布局
        final IndexVH holderTemp =(IndexVH)holder;
        holderTemp.tv.setText(indexTitle);
    }

    @Override
    public void onBindContentViewHolder(RecyclerView.ViewHolder holder, CityEntity entity) {
        // 填充 内容Item 布局
        final ContentVH holderTemp =(ContentVH)holder;
        holderTemp.title.setText(entity.getName());
    }

	//获取数据布局组件
    public static class ContentVH extends RecyclerView.ViewHolder {
        TextView title;
        public ContentVH(View itemView) {
            super(itemView);
            title = itemView.findViewById(R.id.title);
        }
    }

	//获取提示栏布局组件
    private static class IndexVH extends RecyclerView.ViewHolder {
        TextView tv;
        public IndexVH(View itemView) {
            super(itemView);
            tv = (TextView) itemView.findViewById(R.id.tv_index);
        }
    }
}
其中mine_head_item.xml布局如下:
<?xml version="1.0" encoding="utf-8"?>
<LinearLayout xmlns:android="http://schemas.android.com/apk/res/android"
    android:orientation="vertical" android:layout_width="match_parent"
    android:layout_height="wrap_content">

    <TextView
        android:id="@+id/tv_index"
        android:layout_width="match_parent"
        android:layout_height="20dp"
        android:text="城市"
        android:background="#ccc"
        android:textSize="10sp"
        android:textColor="@android:color/white"
        android:gravity="center_vertical"
        android:paddingLeft="13dp"/>
</LinearLayout>
item_contact.xml的布局如下
<?xml version="1.0" encoding="utf-8"?>
<LinearLayout xmlns:android="http://schemas.android.com/apk/res/android"
    android:layout_width="match_parent"
    android:layout_height="50dp"
    android:orientation="horizontal"
    android:padding="10dp">

    <TextView
        android:id="@+id/title"
        android:layout_width="wrap_content"
        android:layout_height="wrap_content"
        android:text="hello"
        android:textSize="20sp"/>
</LinearLayout>
到此就能够实现如上展示的效果,同时可以对IndexableLayout添加事件监听,能够实现索栏上的点击等事件监听。demo做的较为粗糙,希望所分享得能够帮到你们。