NSD2005班第二次串讲笔记
一、配置主机名
1.1、通过更改配置文件的方式更改主机名
[root@localhost ~]# vim /etc/hostname
[root@localhost ~]# cat /etc/hostname
svr7.tedu.com
[root@localhost ~]# reboot

[root@svr7 ~]#
1.2、通过命令行的方式修改主机名
[root@localhost ~]# hostnamectl set-hostname pc207.tedu.cn
[root@localhost ~]# exit

[root@pc207 ~]#
二、Linux网络配置
2.1、修改网卡的命名规则
- 在配置文件/etc/default/grub的第六行的末尾添加net.ifnames=0 biosdevname=0
[root@svr7 ~]# vim /etc/default/grub 		#grub为引导内核的程序
[root@svr7 ~]# cat -n /etc/default/grub
     1	GRUB_TIMEOUT=5
     2	GRUB_DISTRIBUTOR="$(sed 's, release .*$,,g' /etc/system-release)"
     3	GRUB_DEFAULT=saved
     4	GRUB_DISABLE_SUBMENU=true
     5	GRUB_TERMINAL_OUTPUT="console"
     6	GRUB_CMDLINE_LINUX="crashkernel=auto rd.lvm.lv=centos/root rd.lvm.lv=centos/swap rhgb quiet net.ifnames=0 biosdevname=0"
     7	GRUB_DISABLE_RECOVERY="true"
- 重新生成grub配置文件
[root@svr7 ~]# grub2-mkconfig -o /boot/grub2/grub.cfg   #重新生成grub配置文件
Generating grub configuration file ...
Found linux image: /boot/vmlinuz-3.10.0-862.el7.x86_64
Found initrd image: /boot/initramfs-3.10.0-862.el7.x86_64.img
Found linux image: /boot/vmlinuz-0-rescue-0f6343e968a8476a8f163ca1fe496347
Found initrd image: /boot/initramfs-0-rescue-0f6343e968a8476a8f163ca1fe496347.img
done

[root@svr7 ~]# reboot
- 查看网卡信息
[root@svr7 ~]# ifconfig  | head -1
eth0: flags=4163<UP,BROADCAST,RUNNING,MULTICAST>  mtu 1500
- 删除识别错误的网络配置
[root@svr7 ~]# nmcli connection show
NAME        UUID                                  TYPE      DEVICE
virbr0      ec16c733-7362-4abd-8df3-8d4c546fc8ca  bridge    virbr0
有线连接 1  05b18026-1467-3fea-959e-4d15da5056c5  ethernet  eth0
ens33       986f20e6-0e25-4fb2-8017-078eea789342  ethernet  --

[root@svr7 ~]# nmcli connection delete ens33
成功删除连接 'ens33'(986f20e6-0e25-4fb2-8017-078eea789342)。
[root@localhost ~]# nmcli connection delete 有线连接\ 1
成功删除连接 '有线连接 1'(05b18026-1467-3fea-959e-4d15da5056c5)。

[root@svr7 ~]# nmcli connection show
NAME    UUID                                  TYPE    DEVICE
virbr0  ec16c733-7362-4abd-8df3-8d4c546fc8ca  bridge  virbr0
- 添加新的网卡名
[root@svr7 ~]# nmcli connection add ifname eth0 con-name eth0 type ethernet
连接“eth0”(fe42c860-fec1-427d-81bc-45bb16b75b15) 已成功添加。

[root@svr7 ~]# nmcli connection show
NAME    UUID                                  TYPE      DEVICE
eth0    fe42c860-fec1-427d-81bc-45bb16b75b15  ethernet  eth0
virbr0  ec16c733-7362-4abd-8df3-8d4c546fc8ca  bridge    virbr0
2.2、配置新的IP地址
- IP地址配置为192.168.4.7
- 子网掩码24位
- 网关192.168.4.254
- 开机自动连接
[root@svr7 ~]# nmcli connection modify eth0 ipv4.method manual ipv4.addresses 192.168.4.7/24 ipv4.gateway 192.168.4.254 connection.autoconnect yes
- 激活上述配置,立即生效
[root@svr7 ~]# nmcli connection up eth0
[root@svr7 ~]# ifconfig   |   head   -2
- 查看Linux系统路由表,查看网关地址
[root@svr7 ~]# route -n
Kernel IP routing table
Destination     Gateway         Genmask         Flags Metric Ref    Use Iface
0.0.0.0         192.168.4.254   0.0.0.0         UG    100    0        0 eth0
192.168.4.0     0.0.0.0         255.255.255.0   U     100    0        0 eth0
192.168.122.0   0.0.0.0         255.255.255.0   U     0      0        0 virbr0
2.3、指定DNS服务器地址
-
DNS服务器:将域名解析为对应的IP地址
-
配置完成理解生效
[root@svr7 ~]# echo nameserver 8.8.8.8  >> /etc/resolv.conf
[root@svr7 ~]# cat /etc/resolv.conf
# Generated by NetworkManager
nameserver 8.8.8.8
2.4、SSH远程管理Linux主机
-
SSH协议,Secure Shell
- 为客户机提供安全的 Shell 环境
- 默认端口:TCP 22
-
Linux远程Linux
- 常用选项 -X(大写) 开启对方的图形程序
[root@svr7 ~]# ssh [email protected]

Are you sure you want to continue connecting (yes/no)? yes
# 您确定要继续连接(是/否)吗?是的
[email protected]'s password:

Last login: Sun Jun 14 16:00:07 2020 from 192.168.4.1
[root@pc207 ~]#
- 实现ssh远程登录无密码验证
- 虚拟机A生成公钥和私钥
- 将公钥传递个虚拟机
[root@svr7 ~]# ssh-keygen    # 一路回车

[root@svr7 ~]# ssh-copy-id [email protected]
[email protected]'s password:

[root@svr7 ~]# ssh [email protected]
Last login: Sun Jun 14 16:42:19 2020 from 192.168.4.7
[root@pc207 ~]#
- xshell远程连接Linux
[c:\~]$ ssh 192.168.4.7
2.5、SCP安全复制工具
- 基于ssh
- 命令格式:
- –scp [-r] 用户名@服务器:路径 本地路径
- –scp [-r] 本地路径 用户名@服务器:路径
[root@svr7 ~]# scp /etc/passwd [email protected]:/root/
passwd                                       100% 2192     1.8MB/s   00:00

[root@svr7 ~]# scp [email protected]:/etc/hostname  /root/
hostname                                     100%   14    17.6KB/s   00:00
[root@svr7 ~]# cat hostname
pc207.tedu.cn
2.6、网络管理的工具
- 查看IP地址
[root@svr7 ~]# ip address show
[root@svr7 ~]# ip a s
- 给网卡添加临时的IP地址
[root@svr7 ~]# ip address add 192.168.100.100/24 dev eth0
[root@svr7 ~]# ip a s
- ping命令,测试网络连接的
- -c 指定包的个数
[root@svr7 ~]# ping -c 4 192.168.4.207
PING 192.168.4.207 (192.168.4.207) 56(84) bytes of data.
64 bytes from 192.168.4.207: icmp_seq=1 ttl=64 time=0.240 ms
64 bytes from 192.168.4.207: icmp_seq=2 ttl=64 time=0.249 ms
64 bytes from 192.168.4.207: icmp_seq=3 ttl=64 time=0.207 ms
64 bytes from 192.168.4.207: icmp_seq=4 ttl=64 time=0.361 ms

--- 192.168.4.207 ping statistics ---
4 packets transmitted, 4 received, 0% packet loss, time 3000ms
rtt min/avg/max/mdev = 0.207/0.264/0.361/0.059 ms
三、源码编译安装
- 提前准备软件包
[root@svr7 ~]# ls /tools/inotify-tools-3.13.tar.gz
/tools/inotify-tools-3.13.tar.gz
- 解压
[root@svr7 ~]# tar -xf /tools/inotify-tools-3.13.tar.gz -C /usr/local/

[root@svr7 ~]# ls /usr/local/
inotify-tools-3.13
- 安装开发工具
- 准备编译的环境
[root@svr7 ~]# yum -y install gcc make
- 运行configure脚本程序
- 会检查系统是否安装gcc、make等工具
- 指定安装位置
- 有些软件可以通过执行这个脚本的时候选择是否安装附加的功能,或是禁用某些功能
[root@svr7 ~]# cd /usr/local/inotify-tools-3.13/
[root@svr7 inotify-tools-3.13]# ./configure --prefix=/opt/myrpm
- 编译安装
[root@svr7 inotify-tools-3.13]# make && make intall
[root@svr7 inotify-tools-3.13]# ls /opt/myrpm/
bin  include  lib  share
四、自定义yum仓库
- 将自己下载的RPM包构建为仓库
[root@svr7 ~]# ls /tools/other/
boxes-1.1.1-4.el7.x86_64.rpm        oneko-1.2-19.fc24.x86_64.rpm
cmatrix-1.2a-1.i386.rpm
ntfs-3g-2014.2.15-6.el6.x86_64.rpm  sl-5.02-1.el7.x86_64.rpm
- 生成仓库数据文件
- 会产生一个repodata的目录
[root@svr7 ~]# createrepo  /tools/other/     #生成仓库数据文件
[root@svr7 ~]# ls /tools/other/repodata/
-other.sqlite.bz2
-primary.xml.gz			#软件包的主要信息
-filelists.xml.gz		#软件包的文件安装清单
-filelists.sqlite.bz2
-other.xml.gz			#软件包的其他信息
-primary.sqlite.bz2
repomd.xml				#提供.xml.gz  下载和校验信息
- 配置yum仓库
[root@svr7 ~]# cat /etc/yum.repos.d/other.repo
[other]
name = other
baseurl = file:///tools/other
enabled = 1
gpgcheck = 0

[root@svr7 ~]# yum repolist
已加载插件:fastestmirror, langpacks
Determining fastest mirrors
mydvd                                                   | 3.6 kB     00:00
other                                                   | 2.9 kB     00:00
(1/3): mydvd/group_gz                                     | 166 kB   00:00
(2/3): other/primary_db                                   | 4.8 kB   00:00
(3/3): mydvd/primary_db                                   | 5.9 MB   00:00
源标识                               源名称                               状态
mydvd                                mydvd                                9,911
other                                other                                    5
repolist: 9,916
五、日志管理
-
系统和程序的“日记本”
- 记录系统、程序运行中发生的各种事件
- 通过查看日志,了解及排除故障
- 信息安全控制的“依据”
-
由系统服务rsyslog统一记录/管理
-
日志消息采用文本格式
-
主要记录事件发生的时间、主机、进程、内容
-
-
常见的日志文件
| 日志文件 | 主要用途 |
|---|---|
| /var/log/messages | 记录内核消息、各种服务的公共消息 |
| /var/log/dmesg | 记录系统启动过程的各种消息 |
| /var/log/cron | 记录与cron计划任务相关的消息 |
| /var/log/maillog | 记录邮件收发相关的消息 |
| /var/log/secure | 记录与访问限制相关的安全消息 |
-
通用分析工具
- tail、tailf、less、grep等文本浏览/检索命令
- tailf 命令会占用终端(实时跟踪日志消息)
- awk、sed等格式化过滤工具
-
查看已登录的用户信息
- users、who、w 命令,详细度不同
[root@svr7 ~]# users
root root
[root@svr7 ~]# who			# pts:图形命令行终端
root     pts/0        2020-06-14 15:53 (192.168.4.1)
root     pts/1        2020-06-14 15:58 (192.168.4.1)
[root@svr7 ~]# w
 17:02:34 up  1:09,  2 users,  load average: 0.00, 0.01, 0.05
USER     TTY      FROM             LOGIN@   IDLE   JCPU   PCPU WHAT
root     pts/0    192.168.4.1      15:53    1:09m  0.02s  0.02s -bash
root     pts/1    192.168.4.1      15:58    2.00s  0.22s  0.00s w
- 查看最近登录成功/失败的用户信息
- last、lastb 命令
[root@svr7 ~]# last -2 		 #最近登录成功两条信息
root     pts/1        192.168.4.1      Sun Jun 14 15:58   still logged in
root     pts/0        192.168.4.1      Sun Jun 14 15:53   still logged in

wtmp begins Sun Jun 14 18:14:15 2020
[root@svr7 ~]# lastb -2 	#最近登录失败两条信息
root     ssh:notty    192.168.4.1      Sun Jun 14 10:52 - 10:52  (00:00)

btmp begins Sun Jun 14 10:52:10 2020
- Linux内核定义的事件紧急程度
- 分为 0~7 共8种优先级别
- 其数值越小,表示对应事件越紧急/重要
-
提取由 systemd-journal 服务搜集的日志
- 主要包括内核/系统日志、服务日志
-
常见用法
- journalctl | grep 关键词
- journalctl -u 服务名 [-p 优先级]
- journalctl -n 消息条数
六、SELinux 系统防护
-
SELinux的运行模式
-
enforcing(强制)、permissive(宽松)
-
disabled(彻底禁用)
-
任何默认变成disabled(彻底禁用)模式,都要经历重启系统
-
-
命令行临时切换运行模式
[root@svr7 ~]# setenforce 1
[root@svr7 ~]# getenforce
Enforcing

[root@svr7 ~]# setenforce 0
[root@svr7 ~]# getenforce
Permissive
- 固定配置:修改/etc/selinux/config第七行
[root@svr7 ~]# cat -n /etc/selinux/config
     7	SELINUX=enforcing
七、破解Linux系统root密码
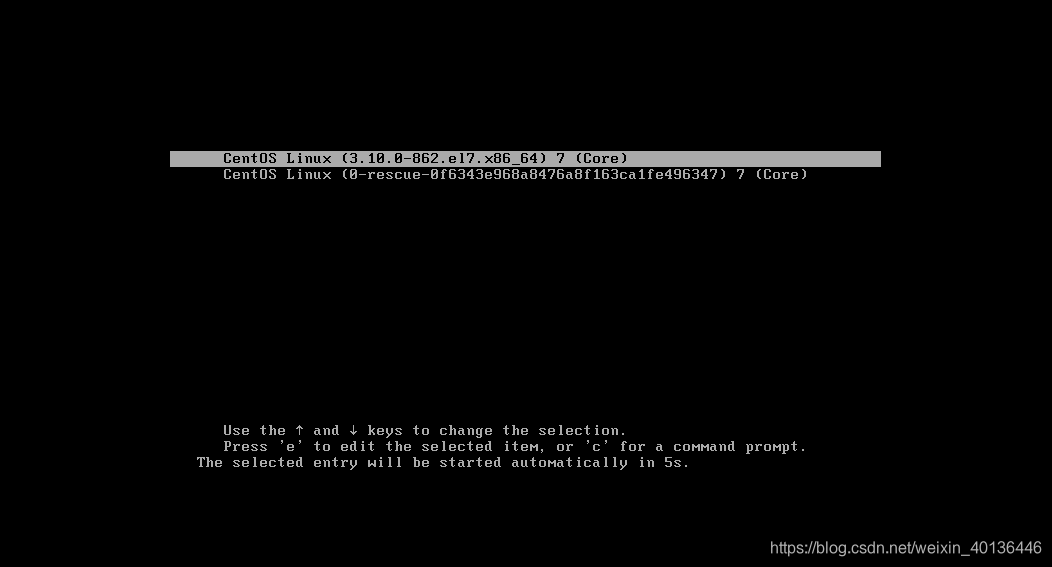
7.1、重启系统进入恢复模式
- 开机进入到这个界面是,按e键。
- press “e” to edit the selected item.
- 可以看到下方写着 “按“e”键编辑所选项目。”
- 找到linux16 这行,在行尾输入 rd.break console=tty0
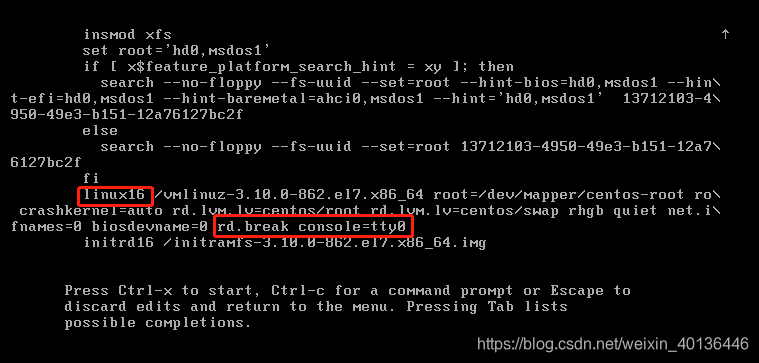
- 按Ctrl+X启动。
- Press Ctrl-x to start .
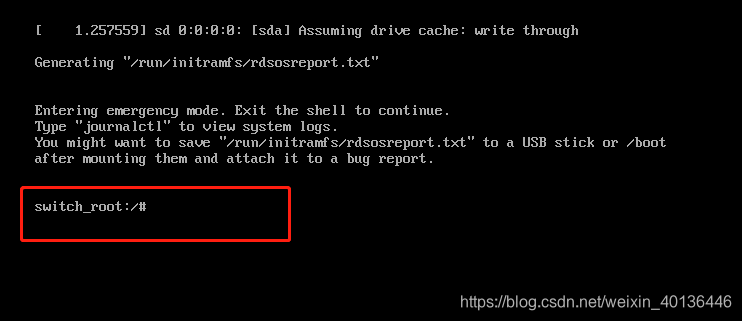
7.2、以可写方式重新挂载/, 并切换到此环境
switch_root# chroot   /sysroot               #切换环境,切换到硬盘操作系统的环境
sh-4.4# mount    -o    remount,rw      /     #让根目录下所有数据,可以读也可以写入
7.3、重新设置root 密码
sh-4.4# echo 1 | passwd --stdin root
7.4、selinux设置
sh-4.4# vim   /etc/selinux/config    #查看SELinux开机的运行模式
sh-4.4# touch     /.autorelabel      #标记下一次启动重做 SELinux 标记
#或者将selinux修改为宽松模式
7.5、强制重启系统完成修复
sh-4.4# reboot -f
八、防火墙的策略管理
-
Linux中的软件防火墙firewalld
- /etc/firewalld/
-
预设安全区域
- public:仅允许访问本机的ssh、dhcp、ping等服务,其他都拒绝
- trusted:允许任何访问
- block:拒绝任何来访请求,会回应客户端
- drop:丢弃任何来访的数据包,不会回应客户端
-
配置规则的位置
- 运行时(runtime)
- 永久(permanent)
-
防火墙判断进入区域的原则
- 查看客户端请求中源IP地址,然后查看所有区域中规则,那个区域有该源IP地址的规则,则进入该区域
- 进入默认区域(默认情况下为public)
8.1、查看防火墙规则列表
[root@svr7 ~]# firewall-cmd --list-all    [--zone=区域名]
# 加上[--zone=区域名]  表示查看指定区域的详细信息,不加表示查看当前默认区域

[root@svr7 ~]# firewall-cmd --list-all-zones #查看全部区域
[root@svr7 ~]# firewall-cmd --get-zones		#查看firewalld所有的区域
block dmz drop external home internal public trusted work

[root@svr7 ~]# firewall-cmd --get-services	#查看firewalld支持的所有服务

[root@svr7 ~]# firewall-cmd --get-default-zone #查看默认的区域
8.2、修改防火墙的默认区域
[root@svr7 ~]# firewall-cmd --get-default-zone 		#查看默认区域
public
[root@svr7 ~]# firewall-cmd --set-default-zone=trusted 	#修改默认区域为trusted
success
[root@svr7 ~]# firewall-cmd --get-default-zone
trusted
[root@svr7 ~]# firewall-cmd --set-default-zone=public
success
8.3、添加允许的协议
[root@svr7 ~]# firewall-cmd  --zone=public --add-service=http	#添加允许http协议
success
[root@svr7 ~]# firewall-cmd  --zone=public --list-all	#查看区域规则
- 防火墙区域中添加永久规则
- –permanent 永久规则选项
[root@svr7 ~]# firewall-cmd  --zone=public --remove-service=http  #删除临时设置

[root@svr7 ~]# firewall-cmd --permanent --zone=public --add-service=http
success		#添加永久规则

[root@svr7 ~]# firewall-cmd --reload  	#重新加载规则,使其生效
8.4、单独拒绝一个IP地址
[root@svr7 ~]# firewall-cmd --zone=block --add-source=192.168.4.207
success
九、服务的基础管理
-
主要管理工具:systemctl
-
–配置目录:/etc/systemd/system/
-
服务目录:/lib/systemd/system/
-
systemctl restart 服务名 #重起服务
-
systemctl start 服务名 #开启服务
-
systemctl stop 服务名 #停止服务
-
systemctl status 服务名 #查看服务当前的状态
-
systemctl enable 服务名 #设置服务开机自启动
-
systemctl disable 服务名 #设置服务禁止开机自启动
-
systemctl is-enabled 服务名 #查看服务是否开机自启
-
systemctl -t service --all #列出所有的服务
-
-
当前直接切换到字符模式
[root@svr7 ~]# systemctl isolate multi-user.target
- 当前直接切换到图形模式
[root@svr7 ~]# systemctl isolate graphical.target
- 查看每次开机默认进入模式
[root@svr7 ~]# systemctl get-default
- 修改开机自动进入的模式
[root@svr7 ~]# systemctl   set-default    multi-user.target
[root@svr7 ~]# reboot