Activity

主acitivity:程序运行起来首先启动的activity
manifest
<?xml version="1.0" encoding="utf-8"?>
<manifest xmlns:android="http://schemas.android.com/apk/res/android"
    package="com.example.activitytest">

    <application
        android:allowBackup="true"
        android:icon="@mipmap/ic_launcher"
        android:label="@string/app_name"
        android:roundIcon="@mipmap/ic_launcher_round"
        android:supportsRtl="true"
        android:theme="@style/AppTheme">
        <activity android:name=".ThirdActivity">
            //设置可以响应打开网页的intent
            <intent-filter tools:ignore="AppLinkUrlError">//将警告忽略
                <action android:name="android.intent.action.VIEW" />//配置能够响应的action
                <category android:name="android.intent.category.DEFAULT" />//指定默认的category
                <data android:scheme="https" />//指定数据的协议必须是https
            </intent-filter>
        </activity>
        <activity android:name=".SecondActivity">
        <intent-filter>//要设置响应哪个activity,就在哪个activity的标签中设置intent过滤器
                <action android:name="com.example.activitytest.ACTION_START"/>//指明当前Activity可以响应com.example.activitytest.ACTION_START这个action
                <category android:name="android.intent.category.DEFAULT"/>//包含一些附加信息,更精确的指明了当前Activity能够响应的Intent中还可能带有的category,隐式Intent:只有<action>和<category>中的内容同时匹配Intent中指定的actio和category时,这个Activity才能响应该Intent
                //android.intent.category.DEFAULT是一种默认的category,在调用startActivity()方法的时候会自动将这个category添加到Intent中
                <category android:name="com.example.activitytest.MY_CATEGORY"/>//用于响应在主程序中添加的category
            </intent-filter>


        </activity>
        <activity android:name=".FirstActivity">
            <intent-filter>
                <action android:name="com.example.activitytest.ACTION_START" />

                <category android:name="android.intent.category.DEFAULT" />
                <action android:name="android.intent.action.MAIN" />

                <category android:name="android.intent.category.LAUNCHER" />
            </intent-filter>

        </activity>
    </application>

</manifest>
FirstActivity.kt
package com.example.activitytest

import android.app.Activity
import android.content.Intent
import android.net.Uri
import androidx.appcompat.app.AppCompatActivity
import android.os.Bundle
import android.util.Log
import android.view.Menu
import android.view.MenuItem
import android.widget.Button
import android.widget.Toast
import kotlinx.android.synthetic.main.first_layout.*
import java.net.HttpCookie.parse
import java.net.URI
import java.util.logging.Level.parse

class FirstActivity : AppCompatActivity() {

    override fun onCreate(savedInstanceState: Bundle?) {
        super.onCreate(savedInstanceState)
        setContentView(R.layout.first_layout)//加载布局
        //val button1 :Button = findViewById(R.id.button)//:的作用是:是强行指定他是什么类型的

        button.setOnClickListener {//可以使用kotlin的插件,直接使用相同名称的组件,就不用findviewByid来进行获取
            Toast.makeText(this,"你点击了按钮",Toast.LENGTH_SHORT).show()//activity本身就是context对象,直接传this
        }
        button2.setOnClickListener {
            Toast.makeText(this,"你销毁了activity",Toast.LENGTH_SHORT).show()//activity本身就是context对象,直接传this
            finish()//销毁当前的activity,效果和按back键一样
        }
        //显形intent的跳转
        StartSecondActivity.setOnClickListener {
            val intent = Intent(this,SecondActivity::class.java)//第一个参数Context要求提供一个启动Activity的上下文,this代表当前的activity
            // ;第二个参数class,用于指定要启动目标的Activity
            //跳转后要回到上个activity,只要按back来进行销毁当前的activity
            //::就相当于.
            startActivity(intent)
        }
        button4.setOnClickListener {
            val intent = Intent("com.example.activitytest.ACTION_START")//匹配Manifest中设置的action
            intent.addCategory("com.example.activitytest.MY_CATEGORY")//每个intent只能指定一个action,但能指定多个category,调用addCategory来添加一个Category
            startActivity(intent)
        }
        button3.setOnClickListener {
            val intent =Intent(Intent.ACTION_VIEW)//指定intent的action
            intent.data= Uri.parse("https://www.baidu.com")//将网址字符串解析成一个Uri对象,里面调用intent的setData方法传入Uri对象
            startActivity(intent)
        }
        button6.setOnClickListener {
            val intent = Intent(Intent.ACTION_DIAL)//设置intent的动作是拨打电话
            intent.data= Uri.parse("tel:10086")//设置响应intent动作的号码
            startActivity(intent)//启动隐式intent
        }
        button7.setOnClickListener {
            val data="Hello SecondActivity"
            val intent =Intent(this,SecondActivity::class.java)//用显式intent启动activity,::相当于.
            intent.putExtra("extra_data",data)//tongguo putExtr()方法传递一个字符串,第一个参数是键,用于之后从Intent取值,第二个参数才是真正要传递的数据
            startActivity(intent)
        }
        button8.setOnClickListener {
            val intent = Intent(this,SecondActivity::class.java)//用显式intent来启动另一个activity
            startActivityForResult(intent,1)//启动Activity并在Activity销毁的时候返回一个结果给上一个Activity,第一个参数是跳转的intent,第二个参数是请求吗。用于回调中判断数据的来源

        }

    }
//重写方法来得到返回的数据
    override fun onActivityResult(requestCode: Int, resultCode: Int, data: Intent?) {//第一个参数为启动Activity传入的请求码,第二个参数是返回数据时传入的处理结果,第三个参数data,即携带返回数据的Intent
        super.onActivityResult(requestCode, resultCode, data)
        when(requestCode){//通过请求吗来判断数据来源
            1->if (resultCode == Activity.RESULT_OK){//判断结果是否成功+
                val returnedData= data?.getStringExtra("data_return")//如果不为空,就执行getStringExtra方法,通过键来取值
                Log.d("FirstActivity","returned data is $returnedData")
            }
        }
    }

    override fun onCreateOptionsMenu(menu: Menu?): Boolean {
         menuInflater.inflate(R.menu.menu,menu)//调用父类的getMenuInflater()方法,得到MenuInflater对象,,再调用inflate方法创建菜单,
        //第一个参数是指定我通过哪一个资源文件来创建菜单,第二个参数指定我们的菜单项将添加到哪一个Menu对象当中
        return true//允许创建的菜单显示出来
    }

    override fun onOptionsItemSelected(item: MenuItem): Boolean {
        when(item.itemId){//通过id来判断要对那个菜单做出操作
            R.id.add_item ->Toast.makeText(this,"你点击了添加菜单",Toast.LENGTH_SHORT).show()
            R.id.remove_item ->Toast.makeText(this,"你点击了移除菜单",Toast.LENGTH_SHORT).show()
        }
        return true
    }
    /*

    val book =Book();
    book.pages=500  //作用类似于set 赋值的方法
    val bookPages=book.pages  //作用类似于get 读取的方法
     */
}
first_layout.xml
<?xml version="1.0" encoding="utf-8"?>
<LinearLayout xmlns:android="http://schemas.android.com/apk/res/android"
    android:orientation="vertical"
    android:layout_width="match_parent"
    android:layout_height="match_parent">

    <Button
        android:id="@+id/button"
        android:layout_width="match_parent"
        android:layout_height="wrap_content"
        android:text="Button" />

    <Button
        android:id="@+id/button2"
        android:layout_width="match_parent"
        android:layout_height="wrap_content"
        android:text="销毁activity" />

    <Button
        android:id="@+id/StartSecondActivity"
        android:layout_width="match_parent"
        android:layout_height="wrap_content"
        android:text="显式启动另一个activity" />

    <Button
        android:id="@+id/button4"
        android:layout_width="match_parent"
        android:layout_height="wrap_content"
        android:text="隐式启动另一个activity" />

    <TextView
        android:id="@+id/textView2"
        android:layout_width="match_parent"
        android:layout_height="wrap_content"
        android:text="第一个activity" />

    <Button
        android:id="@+id/button3"
        android:layout_width="match_parent"
        android:layout_height="wrap_content"
        android:text="打开百度" />

    <Button
        android:id="@+id/button6"
        android:layout_width="match_parent"
        android:layout_height="wrap_content"
        android:text="调用系统拨号" />

    <Button
        android:id="@+id/button7"
        android:layout_width="match_parent"
        android:layout_height="wrap_content"
        android:text="向SecondActivity赋值" />

    <Button
        android:id="@+id/button8"
        android:layout_width="match_parent"
        android:layout_height="wrap_content"
        android:text="返回数据给上一个Activity" />
</LinearLayout>
SecondActivity.kt
package com.example.activitytest

import android.app.Activity
import android.content.Intent
import androidx.appcompat.app.AppCompatActivity
import android.os.Bundle
import android.util.Log
import kotlinx.android.synthetic.main.second_layout.*

class SecondActivity : AppCompatActivity() {

    override fun onCreate(savedInstanceState: Bundle?) {
        super.onCreate(savedInstanceState)
        setContentView(R.layout.second_layout)
        val extraData=intent.getStringExtra("extra_data")//intent实际上调用父类的getIntent()方法获取启动SecondActivity的intent,调用getStringExtra根据键获取值
        Log.d("SecondActivity","extra data is $extraData")
        button10.setOnClickListener {
            val intent = Intent()//intent用于传递数据
            intent.putExtra("data_return","Hello FirstActivity")//给intent设置要传递的数据,用键值对的方式进行设置
            setResult(Activity.RESULT_OK,intent)//向上一个Activity返回数据,第一个参数用于向上一个Acitivty返回处理结果,第二个参数是返回数据的intent
            finish()//销毁当前的Activity
        }


    }

    override fun onBackPressed() {//在返回键按下后执行的方法
        val intent =Intent()//intent用于传递数据
        intent.putExtra("data_return","Hello FirstActivity")//给intent设置要传递的数据,用键值对的方式进行设置
        setResult(Activity.RESULT_OK,intent)//向上一个Activity返回数据,第一个参数用于向上一个Acitivty返回处理结果,第二个参数是返回数据的intent
        finish()//销毁当前的Activity
    }
}
second_layout.xml
<?xml version="1.0" encoding="utf-8"?>
<LinearLayout xmlns:android="http://schemas.android.com/apk/res/android"
    xmlns:app="http://schemas.android.com/apk/res-auto"
    xmlns:tools="http://schemas.android.com/tools"
    android:orientation="vertical"
    android:layout_width="match_parent"
    android:layout_height="match_parent"
    tools:context=".SecondActivity">


    <Button
        android:id="@+id/button2"
        android:layout_width="wrap_content"
        android:layout_height="wrap_content"
        android:layout_weight="1"
        android:text="Button 2" />


    <Button
        android:id="@+id/button10"
        android:layout_width="match_parent"
        android:layout_height="wrap_content"
        android:layout_weight="1"
        android:text="返回值给上一个activity并销毁此activity" />
</LinearLayout>
ThirdActivity.kt
package com.example.activitytest

import androidx.appcompat.app.AppCompatActivity
import android.os.Bundle

class ThirdActivity : AppCompatActivity() {

    override fun onCreate(savedInstanceState: Bundle?) {
        super.onCreate(savedInstanceState)
        setContentView(R.layout.third_layout)
    }
}
third_layout.xml
<?xml version="1.0" encoding="utf-8"?>
<LinearLayout xmlns:android="http://schemas.android.com/apk/res/android"
    xmlns:app="http://schemas.android.com/apk/res-auto"
    android:orientation="vertical"
    xmlns:tools="http://schemas.android.com/tools"
    android:layout_width="match_parent"
    android:layout_height="match_parent"
    tools:context=".ThirdActivity">

    <Button
        android:id="@+id/button5"
        android:layout_width="match_parent"
        android:layout_height="wrap_content"
        android:text="Button 3" />
</LinearLayout>
menu.xml
<?xml version="1.0" encoding="utf-8"?>
<menu xmlns:android="http://schemas.android.com/apk/res/android">
<item
    android:id="@+id/add_item"
    android:title="Add"
    />
    <item
        android:id="@+id/remove_item"
        android:title="Remove"/>

</menu>
创建菜单文件:在res目录下新建menu文件夹,右击res目录->new->Directory,输入文件夹名menu,在这个文件夹中右键->New->Menu resource file
可以在标签中配置标签,用于更精确地指定当前Activity能够响应地数据,只有当标签中指定地内容和Intent中携带地Data完全一致时,当前Activity才能够响应该Intent
要在某个部分实现就在那里重写方法
源码
链接:https://pan.baidu.com/s/1-a_yYYDkrIj75XVCuRBRSg
提取码:cul9
Activity的生命周期
manifest
<?xml version="1.0" encoding="utf-8"?>
<manifest xmlns:android="http://schemas.android.com/apk/res/android"
    package="com.example.activitylifecycletest">

    <application
        android:allowBackup="true"
        android:icon="@mipmap/ic_launcher"
        android:label="@string/app_name"
        android:roundIcon="@mipmap/ic_launcher_round"
        android:supportsRtl="true"
        android:theme="@style/AppTheme">
        <activity android:name=".DialogActivity"
            android:theme="@style/Theme.AppCompat.Dialog"//给当前Activity指定主题,采用对话框式主题
            >

        </activity>
        <activity android:name=".NormalActivity" />
        <activity android:name=".MainActivity">
            <intent-filter>
                <action android:name="android.intent.action.MAIN" />

                <category android:name="android.intent.category.LAUNCHER" />
            </intent-filter>
        </activity>
    </application>

</manifest>
MainActivity.kt
package com.example.activitylifecycletest

import android.content.Intent
import androidx.appcompat.app.AppCompatActivity
import android.os.Bundle
import android.os.PersistableBundle
import android.util.Log
import kotlinx.android.synthetic.main.activity_main.*

class MainActivity : AppCompatActivity() {
    private val tag="MainActivity"

    override fun onCreate(savedInstanceState: Bundle?) {
        super.onCreate(savedInstanceState)
        Log.d(tag,"onCreate")
        setContentView(R.layout.activity_main)
        if (savedInstanceState !=null){//如果重写的onSaveInstanceState方法保存的数据不为空
            val tempData =savedInstanceState.getString("data_key")//根据键来取值
            Log.d(tag,tempData)
        }

        startNormalActivity.setOnClickListener {
            val intent = Intent(this,NormalActivity::class.java)
            startActivity(intent)
        }
        startDialogActivity.setOnClickListener {
            val intent =Intent(this,DialogActivity::class.java)
            startActivity(intent)

        }

    }

    override fun onSaveInstanceState(outState: Bundle, outPersistentState: PersistableBundle) {//activity在回收前一定会被调用
        super.onSaveInstanceState(outState, outPersistentState)
        val tempData ="Something you just typed"//定义保存的数据
        outState.putString("data_key",tempData)//采用键值对的方式保存数据
    }

    override fun onStart() {
        super.onStart()
        Log.d(tag,"onStart")
    }

    override fun onResume() {
        super.onResume()
    Log.d(tag,"onResume")
    }

    override fun onPause() {
        super.onPause()
    Log.d(tag,"onPause")
    }

    override fun onStop() {
        super.onStop()
    Log.d(tag,"onStop")
    }

    override fun onDestroy() {
        super.onDestroy()
    Log.d(tag,"onDestory")
    }

    override fun onRestart() {
        super.onRestart()
    Log.d(tag,"onRestart")
    }
}
activity_main.xml
<?xml version="1.0" encoding="utf-8"?>
<LinearLayout xmlns:android="http://schemas.android.com/apk/res/android"
    xmlns:app="http://schemas.android.com/apk/res-auto"
    xmlns:tools="http://schemas.android.com/tools"
    android:orientation="vertical"
    android:layout_width="match_parent"
    android:layout_height="match_parent"
    tools:context=".MainActivity">


    <Button
        android:id="@+id/startNormalActivity"
        android:layout_width="match_parent"
        android:layout_height="wrap_content"
        android:text="Start NormalActivity" />

    <Button
        android:id="@+id/startDialogActivity"
        android:layout_width="match_parent"
        android:layout_height="wrap_content"
        android:text="Start DialogActivity" />
</LinearLayout>
NormalActivity.kt
package com.example.activitylifecycletest

import androidx.appcompat.app.AppCompatActivity
import android.os.Bundle

class NormalActivity : AppCompatActivity() {

    override fun onCreate(savedInstanceState: Bundle?) {
        super.onCreate(savedInstanceState)
        setContentView(R.layout.activity_normal)
    }
}
activity_normal.xml
<?xml version="1.0" encoding="utf-8"?>
<LinearLayout xmlns:android="http://schemas.android.com/apk/res/android"
    xmlns:app="http://schemas.android.com/apk/res-auto"
    xmlns:tools="http://schemas.android.com/tools"
    android:layout_width="match_parent"
    android:layout_height="match_parent"
    tools:context=".NormalActivity">


    <TextView
        android:id="@+id/textView"
        android:layout_width="match_parent"
        android:layout_height="wrap_content"
        android:text="This is a normal activity" />
</LinearLayout>
DialogActivity.kt
package com.example.activitylifecycletest

import androidx.appcompat.app.AppCompatActivity
import android.os.Bundle

class DialogActivity : AppCompatActivity() {

    override fun onCreate(savedInstanceState: Bundle?) {
        super.onCreate(savedInstanceState)
        setContentView(R.layout.activity_dialog)
    }
}
activity_dialog.xml
<?xml version="1.0" encoding="utf-8"?>
<LinearLayout xmlns:android="http://schemas.android.com/apk/res/android"
    xmlns:app="http://schemas.android.com/apk/res-auto"
    xmlns:tools="http://schemas.android.com/tools"
    android:layout_width="match_parent"
    android:layout_height="match_parent"
    tools:context=".DialogActivity">

    <TextView
        android:id="@+id/textView2"
        android:layout_width="match_parent"
        android:layout_height="wrap_content"
        android:text="This is a dialog activity"

       />
</LinearLayout>
源码
链接:https://pan.baidu.com/s/1gHJeaJBbkiD8U-bM-LO29w
提取码:tnes
Activity的启动模式
standard模式
作用
默认为standard启动模式,Activity在栈顶,再次启动还要创建一个新的Activity
部分代码
manifest
<?xml version="1.0" encoding="utf-8"?>
<manifest xmlns:android="http://schemas.android.com/apk/res/android"
    package="com.example.a20200604">

    <application
        android:allowBackup="true"
        android:icon="@mipmap/ic_launcher"
        android:label="@string/app_name"
        android:roundIcon="@mipmap/ic_launcher_round"
        android:supportsRtl="true"
        android:theme="@style/AppTheme">
        <activity android:name=".FirstActivity"></activity>
        <activity android:name=".MainActivity">
            <intent-filter>
                <action android:name="android.intent.action.MAIN" />

                <category android:name="android.intent.category.LAUNCHER" />
            </intent-filter>
        </activity>
    </application>

</manifest>
singleTop模式
作用
在启动Activity时如果发现返回栈的栈顶已经时该Activity,则认为可以直接使用它,不会再创建新的Activity实例。可以解决重复创建栈顶Activity的问题
部分代码
manifest
<?xml version="1.0" encoding="utf-8"?>
<manifest xmlns:android="http://schemas.android.com/apk/res/android"
    package="com.example.a20200604">

    <application
        android:allowBackup="true"
        android:icon="@mipmap/ic_launcher"
        android:label="@string/app_name"
        android:roundIcon="@mipmap/ic_launcher_round"
        android:supportsRtl="true"
        android:theme="@style/AppTheme">
        <activity android:name=".FirstActivity"
            android:launchMode="singleTop"//设置FirstActivity的启动模式是singleTop
            >
        </activity>
        <activity android:name=".MainActivity">
            <intent-filter>
                <action android:name="android.intent.action.MAIN" />

                <category android:name="android.intent.category.LAUNCHER" />
            </intent-filter>
        </activity>
    </application>

</manifest>
singleTask
作用
使某个Activity在整个应用程序的上下文只存在一个实例,可以理解为有多个相同的activity时会销毁其余的activity,只保留一个activity
部分代码
manifest
<?xml version="1.0" encoding="utf-8"?>
<manifest xmlns:android="http://schemas.android.com/apk/res/android"
    package="com.example.a20200604">

    <application
        android:allowBackup="true"
        android:icon="@mipmap/ic_launcher"
        android:label="@string/app_name"
        android:roundIcon="@mipmap/ic_launcher_round"
        android:supportsRtl="true"
        android:theme="@style/AppTheme">
        <activity android:name=".SecondActivity"></activity>
        <activity
            android:name=".FirstActivity"
            android:launchMode="singleTask">//设置FirstActivity的启动模式是singTask
        </activity>
        <activity android:name=".MainActivity">
            <intent-filter>
                <action android:name="android.intent.action.MAIN" />

                <category android:name="android.intent.category.LAUNCHER" />
            </intent-filter>
        </activity>
    </application>

</manifest>
singleInstance
作用
会启用一个新的返回栈来管理这个Activity,无论是哪个应用程序来访问这个Activity,都共用一个返回栈,解决共享Activity实例的问题,采用两套返回栈来管理activity,一个栈空了,就出另一个栈
返回栈空了就会退出程序
部分代码
<?xml version="1.0" encoding="utf-8"?>
<manifest xmlns:android="http://schemas.android.com/apk/res/android"
    package="com.example.a20200604">

    <application
        android:allowBackup="true"
        android:icon="@mipmap/ic_launcher"
        android:label="@string/app_name"
        android:roundIcon="@mipmap/ic_launcher_round"
        android:supportsRtl="true"
        android:theme="@style/AppTheme">
        <activity android:name=".ThirdActivity"></activity>
        <activity
            android:name=".SecondActivity"
            android:launchMode="singleInstance">//设置启动模式


        </activity>
        <activity android:name=".FirstActivity"></activity>
        <activity android:name=".MainActivity">
            <intent-filter>
                <action android:name="android.intent.action.MAIN" />

                <category android:name="android.intent.category.LAUNCHER" />
            </intent-filter>
        </activity>
    </application>

</manifest>
代码
MainActivity.kt
package com.example.a20200604

import android.content.Intent
import androidx.appcompat.app.AppCompatActivity
import android.os.Bundle
import kotlinx.android.synthetic.main.activity_first.*
import kotlinx.android.synthetic.main.activity_main.*

class MainActivity : BaseActivity() {

    override fun onCreate(savedInstanceState: Bundle?) {
        super.onCreate(savedInstanceState)
        setContentView(R.layout.activity_main)
        button.setOnClickListener {
            val intent = Intent(this,FirstActivity::class.java)
            startActivity(intent)
        }
    }
}
activity_ main.xml
<?xml version="1.0" encoding="utf-8"?>
<LinearLayout xmlns:android="http://schemas.android.com/apk/res/android"
    xmlns:app="http://schemas.android.com/apk/res-auto"
    xmlns:tools="http://schemas.android.com/tools"
    android:orientation="vertical"
    android:layout_width="match_parent"
    android:layout_height="match_parent"
    tools:context=".MainActivity">

    <Button
        android:id="@+id/button"
        android:layout_width="match_parent"
        android:layout_height="wrap_content"
        android:text="跳转到FirstActivity"
        tools:layout_editor_absoluteX="142dp"
        tools:layout_editor_absoluteY="33dp" />

    <TextView
        android:id="@+id/textView"
        android:layout_width="match_parent"
        android:layout_height="wrap_content"
        android:text="这是MainActivity" />
</LinearLayout>
SecondActivity.kt
package com.example.a20200604

import android.content.Context
import android.content.Intent
import androidx.appcompat.app.AppCompatActivity
import android.os.Bundle
import android.util.Log
import kotlinx.android.synthetic.main.activity_second.*

class SecondActivity : BaseActivity() {

    override fun onCreate(savedInstanceState: Bundle?) {
        super.onCreate(savedInstanceState)
        Log.d("SecondActivity","task id is $taskId")
        setContentView(R.layout.activity_second)
        button3.setOnClickListener {

            val intent = Intent(this,FirstActivity::class.java)
            startActivity(intent)
        }
        button4.setOnClickListener {
            val intent = Intent(this,ThirdActivity::class.java)
            startActivity(intent)
                    }
button6.setOnClickListener {
    SecondActivity.actionstart(this,"data1","data2")
}
    }

    companion object{//类似java的静态方法
        fun actionstart(context: Context, data1:String, data2: String){
            val  intent=Intent(context,SecondActivity::class.java)
            intent.putExtra("param1",data1)//将所需要的值存储在intent中
            intent.putExtra("param2",data2)//将所需要的值存储在intent中
            context.startActivity(intent)//启动SecondActivity
        /*
        可以用一行代码来启动SecondActivity

         */
        }
    }


    override fun onDestroy() {
        super.onDestroy()
        Log.d("SecondActivity","onDestroy")
    }
}
activity_ second.xml
<?xml version="1.0" encoding="utf-8"?>
<LinearLayout xmlns:android="http://schemas.android.com/apk/res/android"
    xmlns:app="http://schemas.android.com/apk/res-auto"
    xmlns:tools="http://schemas.android.com/tools"
    android:orientation="vertical"
    android:layout_width="match_parent"
    android:layout_height="match_parent"
    tools:context=".SecondActivity">

    <Button
        android:id="@+id/button3"
        android:layout_width="match_parent"
        android:layout_height="wrap_content"
        android:text="回到FirstActivity"
        tools:layout_editor_absoluteX="41dp"
        tools:layout_editor_absoluteY="17dp" />

    <Button
        android:id="@+id/button4"
        android:layout_width="match_parent"
        android:layout_height="wrap_content"
        android:text="启动ThirdActivity" />

    <TextView
        android:id="@+id/textView3"
        android:layout_width="match_parent"
        android:layout_height="wrap_content"
        android:text="这是SecondActivity" />

    <Button
        android:id="@+id/button6"
        android:layout_width="match_parent"
        android:layout_height="wrap_content"
        android:text="启动SecondActivity" />
</LinearLayout>
ThirdActivity.kt
package com.example.a20200604

import androidx.appcompat.app.AppCompatActivity
import android.os.Bundle
import android.util.Log
import kotlinx.android.synthetic.main.activity_third.*

class ThirdActivity : BaseActivity() {

    override fun onCreate(savedInstanceState: Bundle?) {
        super.onCreate(savedInstanceState)
        Log.d("ThirdActivity","Task id is $taskId")
        setContentView(R.layout.activity_third)
    button5.setOnClickListener {
        ActivityCollector.finishAll()
        android.os.Process.killProcess(android.os.Process.myPid())//杀掉当前进程的代码,killProcess()方法用于杀掉一个进程,接受一个进程id参数
        //通过myPid()方法来获取当前程序的进程id,killProcess()方法只能用于杀掉当前程序的进程,不能用于杀掉其他程序
    }
    }

}
activity_ third.xml
<?xml version="1.0" encoding="utf-8"?>
<LinearLayout xmlns:android="http://schemas.android.com/apk/res/android"
    xmlns:app="http://schemas.android.com/apk/res-auto"
    xmlns:tools="http://schemas.android.com/tools"
    android:layout_width="match_parent"
    android:layout_height="match_parent"
    android:orientation="vertical"
    tools:context=".ThirdActivity">


    <TextView
        android:id="@+id/textView4"
        android:layout_width="match_parent"
        android:layout_height="wrap_content"
        android:text="这是ThirdActivity" />

    <Button
        android:id="@+id/button5"
        android:layout_width="match_parent"
        android:layout_height="wrap_content"
        android:text="退出所有Activity" />
</LinearLayout>
BaseActivity.kt
package com.example.a20200604

import android.os.Bundle
import android.util.Log
import androidx.appcompat.app.AppCompatActivity
//目标:知晓当前是在哪一个activity
open class BaseActivity : AppCompatActivity() {//继承AppCompatActivity,设置为可被继承
    override fun onCreate(savedInstanceState: Bundle?) {//重写onCreate方法
        super.onCreate(savedInstanceState)
    Log.d("BaseActivity",javaClass.simpleName)//打印当前实例的类名,kotlin中javaClass表示获取当前实例的class对象,相当于java中调用getClass()方法
    //再调用simpleName获取当前实例的类名
ActivityCollector.addActivity(this)//将正在创建的Activity添加到集合里
    }

    override fun onDestroy() {
        super.onDestroy()
        ActivityCollector.removeActivity(this)//集合里移除一个马上要销毁的Activity
    }
}
ActivityCollector.kt
package com.example.a20200604

import android.app.Activity
//目标:随时随地退出程序
object ActivityCollector{
    private  val activities=ArrayList<Activity>()//一个专门的集合对所有的Activity进行管理,通过ArrayList来暂存Activity
    fun addActivity(activity: Activity){
        activities.add(activity)

    }
    fun removeActivity(activity: Activity){
        activities.remove(activity)
    }
    fun finishAll(){
        for (activity in activities){
           if (!activity.isFinishing){//判断Activity是否正在销毁中,如果没有正在销毁
               activity.finish()//销毁activites中的所有activity
           }
        }
        activities.clear()
    }
}
标准函数with、run和apply
with函数
格式
val result = with(obj){
// 这里是obj的上下文
"value"// with函数的返回值

}
作用
连续调用同一个对象的多个方法时,让代码变得更加精简
实例
fun main() {

    //with函数
    val list = listOf("Apple", "Banana", "Orange", "Pear", "Grape")
    val builder = StringBuilder()//采用StringBuilder来构建字符串
    builder.append("Start eating fruits,\n")
    for (fruit in list) {
        builder.append(fruit).append("\n")
    }
    builder.append("Ate all fruits.")
    val result = builder.toString()
    println(result)
    println("___________________________________________________________________")
    //可用with简化如下
    val list1 = listOf("Apple", "Banana", "Orange", "Pear", "Grape")
    val result2 = with(StringBuilder()) {//with第一个参数传入StringBuild对象,就是lambda表达式的上下文对象,所以添加字符串时就不用指定对象
        append("Start eating fruits,\n")
        for (fruit in list) {
            append(fruit).append("\n")
        }
        append("Ate all fruits.")
        toString()//lambda表达式的最后一行代码作为with函数的返回值返回
        //
        }
    println(result2)

}
run函数
格式
run函数不能直接调用,要调用某个对象的run方法,run函数只接受一个lambda参数,会再lambda表达式中提供调用对象的上下文
val result = obj.run{
// 这里是obj的上下文
"value"// with函数的返回值

}
实例
val list3 = listOf("Apple", "Banana", "Orange", "Pear", "Grape")
    val result3 = StringBuilder().run {//with第一个参数传入StringBuild对象,就是lambda表达式的上下文对象,所以添加字符串时就不用指定对象
        append("Start eating fruits,\n")
        for (fruit in list3) {
            append(fruit).append("\n")
        }
        append("Ate all fruits.")
        toString()//lambda表达式的最后一行代码作为with函数的返回值返回
        //
    }
    println(result3)
apply函数
格式
类似于run,但apply函数无法指定返回值,而是会自动返回调用对象本身
val result =obj.apply{
//这里是obj的上下文
}
//result==obj
实例
 val list4 = listOf("Apple", "Banana", "Orange", "Pear", "Grape")
    val result4 = StringBuilder().apply {//with第一个参数传入StringBuild对象,就是lambda表达式的上下文对象,所以添加字符串时就不用指定对象
        append("Start eating fruits,\n")
        for (fruit in list4) {
            append(fruit).append("\n")
        }
        append("Ate all fruits.")

        //
    }
    println(result4.toString())
/*
用Intent启动Activity和传值的时候也可以用apply函数
val intent = Intent(context,SecondActivity::class.java).apply{
putExtra("param1","data1")
putExtra("param2","data2")
}
context.startActivity(intent)
 */
定义静态方法
kotlin用单例来代替静态方法
目的:让类的某一个方法变成静态方法的调用方式
class  Util{//若是object为前缀则为单例,而class为前缀则为普通类
    fun doAction1(){//普通方法要用实例对象才能调用
        println("do action1")
    }
    companion object {//会自动在类中创建伴生类对象,代替类的实例
        fun doAction2(){//类似静态方法,可以用类名来调用,实际上就是伴生类对象.方法
            println("do action2")
        }
    }

}
实现静态方法—注解
加上@JvmStatic 注解,kotlin就会将这些方法编译成真正的静态方法,注解只能加在单例类或companion object中的方法
class  Util{//若是object为前缀则为单例,而class为前缀则为普通类
    fun doAction1(){//普通方法要用实例对象才能调用
        println("do action1")
    }
    companion object {//会自动在类中创建伴生类对象,代替类的实例
    @JvmStatic
        fun doAction2(){//类似静态方法,可以用类名来调用,实际上就是伴生类对象.方法
            println("do action2")
        }
    }

}
实现静态方法—顶层
`没有定义在任何类中的方法称为顶层方法,在kotlin中,所有的顶层方法都可以在任何位置被直接调用,直接键入顶层方法()即可,java没有顶层方法的概念,所有的方法必须定义在类中,kotlin会自动将顶层方法名kt定义成一个java类,而doSomething就是以静态方法的形式定义在HelperKt类里面,java只要用顶层方法名kt.静态方法进行调用
fun doSometing(){
    println("do something")
}
fun main() {
    doSometing()
    // Helperkt.doSomething()  java形式调用顶层方法
}
UI
采用androidx.constraintlayout.widget.ConstraintLayout布局就能用可视化用拖拽的方式添加组件,并且在旁边的设置面板上设置各种属性

文字的大小以sp为单位,组件大小以dp为单位
TextView
activity_main.xml
<TextView
        android:layout_width="match_parent"
        android:layout_height="wrap_content"
        android:text="Hello World!"
       android:gravity="center"//指定文字的对齐方式,可以用|来同时指定多个值
        />
Button
activity_main.xml
 <Button
        android:id="@+id/button"
        android:layout_width="match_parent"
        android:layout_height="wrap_content"
        android:textAllCaps="false"//保留指定的原始文字内容
        android:text="Button" />
可以用函数式API(lambda表达式)来写监听按钮的点击事件
button.setOnClickListener {

        }
实现接口的方式注册按钮
package com.example.uiwidgetest

import androidx.appcompat.app.AppCompatActivity
import android.os.Bundle
import android.view.View
import kotlinx.android.synthetic.main.activity_main.*

class MainActivity : AppCompatActivity(),View.OnClickListener {//实现View.OnClickListener接口

    override fun onCreate(savedInstanceState: Bundle?) {
        super.onCreate(savedInstanceState)
        setContentView(R.layout.activity_main)
       button.setOnClickListener(this)//this为MainActivity的实例
    }
    override fun onClick(v: View?){//重写onClick方法,?表明View类型的v变量可为空
        when(v?.id){//表示如果v对象不为空的时候,核对ID,如果ID适合就执行逻辑
            R.id.button->{//采用lambda表达式,如果id为button则

            }
        }

    }

}
EditText
常用的代码
android:maxLines:指定了EditText的最大行数为两行,这样当输入的内容超过两行,文本就会向上滚动,EditText则不会继续拉伸
val inputText=editText.text.toString():调用EditText的getText()方法获取输入内容,再调用toString()方法将内容转为字符串,text实际上调用的是getText()方法
可以在AndroidStudio的代码提示中显示使用语法糖后的优化代码调用
editText为EditText的id

ImageView
添加图片:将ImageView拖动到布局后,可以在提示框选中要添加的图片

通过点击按钮来动态改变ImageView中的图片
button.setOnClickListener{
          imageView2.setImageResource(R.drawable.tp1)
      }
ProgressBar
设置可见度,visible表示可见,invisible表示不可见但存在,gone表示不可见且不存在
android:visibility="visible"
设置为水平进度条,并设置最大的值
style="?android:attr/progressBarStyleHorizontal" android:max="100
获取进度条的当前进度,然后再现有的进度上加10作为更新的进度,progressBar为进度条的id
progressBar.progress=progressBar.progress+10
AlertDialog
能够弹出对话框,对话框置顶于所有界面元素之上,能够屏蔽其他控件的交互能力
         AlertDialog.Builder(this).apply {//构建一个对话框,采用apply标准函数
                setTitle("this is Dialog")//设置对话框的标题
                setMessage("Something important.")//设置对话框的内容
                setCancelable(false)//设置不可用Back键关闭对话框
                setPositiveButton("Ok"){ dialog, which ->//设置对话框的确定按钮的点击事件
                }
                setNegativeButton("Cancel"){ dialog, which ->//设置对话框的取消按钮的点击事件
                }
                show()//将对话框显示出来
            }
布局
采用androidx.constraintlayout.widget.ConstraintLayout
使用方法
https://www.bilibili.com/video/BV1F4411Y7it
其他技巧
自定义标题栏
activity_main.xml
<?xml version="1.0" encoding="utf-8"?>
<androidx.constraintlayout.widget.ConstraintLayout xmlns:android="http://schemas.android.com/apk/res/android"
    xmlns:app="http://schemas.android.com/apk/res-auto"
    xmlns:tools="http://schemas.android.com/tools"
    android:layout_width="match_parent"
    android:layout_height="match_parent"
    tools:context=".MainActivity">

   <include layout="@layout/title"/>//引入其他布局

</androidx.constraintlayout.widget.ConstraintLayout>
title.xml
<?xml version="1.0" encoding="utf-8"?>
<androidx.constraintlayout.widget.ConstraintLayout xmlns:android="http://schemas.android.com/apk/res/android"
    xmlns:app="http://schemas.android.com/apk/res-auto"
    xmlns:tools="http://schemas.android.com/tools"
    android:layout_width="match_parent"
    android:layout_height="match_parent">

    <Button
        android:id="@+id/BACK"
        android:layout_width="wrap_content"
        android:layout_height="wrap_content"
        android:layout_marginStart="16dp"
        android:layout_marginLeft="16dp"
        android:layout_marginTop="33dp"
        android:layout_marginEnd="18dp"
        android:layout_marginRight="18dp"
        android:text="BACK"
        app:layout_constraintEnd_toStartOf="@+id/textView"
        app:layout_constraintStart_toStartOf="parent"
        app:layout_constraintTop_toTopOf="parent" />

    <Button
        android:id="@+id/EDIT"
        android:layout_width="wrap_content"
        android:layout_height="wrap_content"
        android:layout_marginTop="33dp"
        android:layout_marginEnd="16dp"
        android:layout_marginRight="16dp"
        android:text="EDIT"
        app:layout_constraintEnd_toEndOf="parent"
        app:layout_constraintStart_toEndOf="@+id/textView"
        app:layout_constraintTop_toTopOf="parent" />

    <TextView
        android:id="@+id/textView"
        android:layout_width="0dp"
        android:layout_height="0dp"
        android:layout_marginEnd="19dp"
        android:layout_marginRight="19dp"
        app:layout_constraintBottom_toBottomOf="@+id/BACK"
        app:layout_constraintEnd_toStartOf="@+id/EDIT"
        app:layout_constraintStart_toEndOf="@+id/BACK"
        app:layout_constraintTop_toTopOf="@+id/BACK" />
</androidx.constraintlayout.widget.ConstraintLayout>
MainActivity.kt
package com.example.a20200610study2

import androidx.appcompat.app.AppCompatActivity
import android.os.Bundle

class MainActivity : AppCompatActivity() {

    override fun onCreate(savedInstanceState: Bundle?) {
        super.onCreate(savedInstanceState)
        setContentView(R.layout.activity_main)
        supportActionBar?.hide()//隐藏系统的标题栏,
        //调用getSupportActionBar()方法来获取ActionBar的实例
        //调用hide()方法隐藏起来
        //ActionBar可能为空,所以用?.修饰符
    }
}
自定义控件
过程:activity_main调用TitleLayout这个activity,然后TitleLayout的activity再调用title的布局,并设置布局的点击事件
MainActivity.kt
package com.example.a20200610study2

import androidx.appcompat.app.AppCompatActivity
import android.os.Bundle

class MainActivity : AppCompatActivity() {

    override fun onCreate(savedInstanceState: Bundle?) {
        super.onCreate(savedInstanceState)
        setContentView(R.layout.activity_main)
        supportActionBar?.hide()
    }
}
activity_main.xml
<?xml version="1.0" encoding="utf-8"?>
<androidx.constraintlayout.widget.ConstraintLayout xmlns:android="http://schemas.android.com/apk/res/android"
    xmlns:app="http://schemas.android.com/apk/res-auto"
    xmlns:tools="http://schemas.android.com/tools"
    android:layout_width="match_parent"
    android:layout_height="match_parent"
    tools:context=".MainActivity">

   <include
       android:id="@+id/include"
       layout="@layout/title" />

   <com.example.a20200610study2.TitleLayout
       android:layout_width="match_parent"
       android:layout_height="wrap_content" />

</androidx.constraintlayout.widget.ConstraintLayout>
TitleLayout.kt
package com.example.a20200610study2

import android.app.Activity
import android.content.Context
import android.util.AttributeSet
import android.view.LayoutInflater
import android.widget.Toast
import androidx.constraintlayout.widget.ConstraintLayout
import kotlinx.android.synthetic.main.title.view.*
//过程:activity_main调用TitleLayout这个activity,然后TitleLayout的activity再调用title的布局,并设置布局的点击事件
class TitleLayout(context: Context,attrs:AttributeSet): ConstraintLayout(context, attrs){//使用两个参数的构造方法,声明Context和AttributeSet这两个参数
//context为Activity的实例
    init{
    LayoutInflater.from(context).inflate(R.layout.title,this)//加载布局,通过LayoutInflater.from()方法来构建一个LayoutInflater对象
    //再调用inflate()方法来加载布局文件,inflate接受两个参数,第一个是加载的布局id,第二个是给加载好的布局再添加一个父布局
    BACK.setOnClickListener {
        val activity=context as Activity//用as关键字进行强制类型转换,转成Activity的类型
        activity.finish()
    }
    EDIT.setOnClickListener {
        Toast.makeText(context,"你点击了按钮",Toast.LENGTH_LONG).show()
    }
}
}
title.xml
<?xml version="1.0" encoding="utf-8"?>
<androidx.constraintlayout.widget.ConstraintLayout xmlns:android="http://schemas.android.com/apk/res/android"
    xmlns:app="http://schemas.android.com/apk/res-auto"
    xmlns:tools="http://schemas.android.com/tools"
    android:layout_width="match_parent"
    android:layout_height="match_parent">

    <Button
        android:id="@+id/BACK"
        android:layout_width="wrap_content"
        android:layout_height="wrap_content"
        android:layout_marginStart="16dp"
        android:layout_marginLeft="16dp"
        android:layout_marginTop="33dp"
        android:layout_marginEnd="18dp"
        android:layout_marginRight="18dp"
        android:text="BACK"
        app:layout_constraintEnd_toStartOf="@+id/textView"
        app:layout_constraintStart_toStartOf="parent"
        app:layout_constraintTop_toTopOf="parent" />

    <Button
        android:id="@+id/EDIT"
        android:layout_width="wrap_content"
        android:layout_height="wrap_content"
        android:layout_marginTop="33dp"
        android:layout_marginEnd="16dp"
        android:layout_marginRight="16dp"
        android:text="EDIT"
        app:layout_constraintEnd_toEndOf="parent"
        app:layout_constraintStart_toEndOf="@+id/textView"
        app:layout_constraintTop_toTopOf="parent" />

    <TextView
        android:id="@+id/textView"
        android:layout_width="0dp"
        android:layout_height="0dp"
        android:layout_marginEnd="19dp"
        android:layout_marginRight="19dp"
        app:layout_constraintBottom_toBottomOf="@+id/BACK"
        app:layout_constraintEnd_toStartOf="@+id/EDIT"
        app:layout_constraintStart_toEndOf="@+id/BACK"
        app:layout_constraintTop_toTopOf="@+id/BACK" />
</androidx.constraintlayout.widget.ConstraintLayout>
ListView
MainActivity.kt
package com.example.a20200610study3

import androidx.appcompat.app.AppCompatActivity
import android.os.Bundle
import android.widget.ArrayAdapter
import kotlinx.android.synthetic.main.activity_main.*

class MainActivity : AppCompatActivity() {
    private val data = listOf("1","2","3","4","5","6","7","8","9","10","11","12","13","14","15","16","17","18","19","20")//初始化集合
    override fun onCreate(savedInstanceState: Bundle?) {
        super.onCreate(savedInstanceState)
        setContentView(R.layout.activity_main)
        val adapter=ArrayAdapter<String>(this,android.R.layout.simple_list_item_1,data)//通过适配器来将数据传递给listView
        //指定泛型为String,第一个参数为activity的实例,第二个参数为list子项布局的id(android内置的布局文件,只有一个textview,可用于显示一段文本)
        // 第三个参数为数据源
        listView.adapter=adapter//调用ListView的setAdapter()的方法,传进适配器对象,建立ListView与数据的关联

    }
}
activity_main.xml
<?xml version="1.0" encoding="utf-8"?>
<androidx.constraintlayout.widget.ConstraintLayout xmlns:android="http://schemas.android.com/apk/res/android"
    xmlns:app="http://schemas.android.com/apk/res-auto"
    xmlns:tools="http://schemas.android.com/tools"
    android:layout_width="match_parent"
    android:layout_height="match_parent"
    tools:context=".MainActivity">

    <ListView
        android:id="@+id/listView"
        android:layout_width="match_parent"
        android:layout_height="match_parent"
        tools:layout_editor_absoluteX="1dp"
        tools:layout_editor_absoluteY="1dp" />

</androidx.constraintlayout.widget.ConstraintLayout>
定制ListView的界面
fruit_ item.xml
<?xml version="1.0" encoding="utf-8"?>
<LinearLayout
    xmlns:android="http://schemas.android.com/apk/res/android" android:layout_width="match_parent"
    android:layout_height="match_parent">
<ImageView
    android:layout_width="40dp"
    android:layout_height="40dp"
    android:layout_gravity="center_vertical"
    android:id="@+id/fruitImage"
    android:layout_marginLeft="10dp"
    />
    <TextView
        android:layout_width="wrap_content"
        android:layout_height="wrap_content"
        android:id="@+id/fruitName"
        android:layout_gravity="center_vertical"
        android:layout_marginLeft="10dp"/>
</LinearLayout>
MainActivity.kt
package com.example.a20200611study

import android.app.Activity
import androidx.appcompat.app.AppCompatActivity
import android.os.Bundle
import android.view.LayoutInflater
import android.view.View
import android.view.ViewGroup
import android.widget.ArrayAdapter
import android.widget.ImageView
import android.widget.TextView
import kotlinx.android.synthetic.main.activity_main.*
//目标:定制ListView界面
//todo 理解全部代码
class MainActivity : AppCompatActivity() {
    private val  fruitList= ArrayList<Fruit>()//定义list集合存储水果

    override fun onCreate(savedInstanceState: Bundle?) {
        super.onCreate(savedInstanceState)
        setContentView(R.layout.activity_main)
        initFruits()//初始化水果数据
        val adapter = FruitAdapter(this,R.layout.fruit_item,fruitList)//创建FruitAdapter对象
        listView.adapter=adapter//FruitAdapter对象作为适配器传递给ListView


    }
    private  fun initFruits(){//定义初始化水果的方法
        repeat(2){//执行添加数据两遍
            fruitList.add(Fruit("苹果",R.drawable.tp1))//使用构造函数将水果的名称和图片传入,然后把创建好的对象传入水果列表中
            fruitList.add(Fruit("香蕉",R.drawable.tp2))
            fruitList.add(Fruit("橘子",R.drawable.tp5))
            fruitList.add(Fruit("橙子",R.drawable.tp10))
            fruitList.add(Fruit("李子",R.drawable.tp11))
            fruitList.add(Fruit("桃",R.drawable.tp12))
            fruitList.add(Fruit("三明治",R.drawable.tp6))
            fruitList.add(Fruit("樱桃",R.drawable.tp7))
            fruitList.add(Fruit("甜品",R.drawable.tupian))
            fruitList.add(Fruit("沙琪玛",R.drawable.tp7))
        }
}

}
class Fruit(val name:String,val imageId:Int)//类有两个资源,一个是水果的名称,一个是图片的id
class FruitAdapter(activity: Activity,val resourceId:Int,data:List<Fruit>):ArrayAdapter<Fruit>(activity,resourceId,data){//定义主构造函数
    //将Activity的实例,listView子项布局的id和数据源传递进来
    override fun getView(position: Int, convertView: View?, parent: ViewGroup): View {//重写getView()方法,这个方法再每个子项被滚动到屏幕内的时候会被调用
        val view=LayoutInflater.from(context).inflate(resourceId,parent,false)//layoutInflater来为这个子项加载传入的的布局
    //inflate()方法传入三个参数;第一个是加载的布局id,第二个是给加载好的布局再添加一个父布局,第三个是false表示只让我们在父布局中声明layout属性生效,但不会为这个view
    //添加父布局
        val fruitImage:ImageView=view.findViewById(R.id.fruitImage)
        val fruitName:TextView=view.findViewById(R.id.fruitName)
        val fruit =getItem(position)//获取当前项的Fruit实例
        if (fruit !=null){
            fruitImage.setImageResource(fruit.imageId)//设置显示的图片
            fruitName.text=fruit.name//设置显示的文字

        }
        return view//将布局返回
    }
}
action_main.xml
<?xml version="1.0" encoding="utf-8"?>
<androidx.constraintlayout.widget.ConstraintLayout xmlns:android="http://schemas.android.com/apk/res/android"
    xmlns:app="http://schemas.android.com/apk/res-auto"
    xmlns:tools="http://schemas.android.com/tools"
    android:layout_width="match_parent"
    android:layout_height="match_parent"
    tools:context=".MainActivity">

    <ListView
        android:id="@+id/listView"
        android:layout_width="409dp"
        android:layout_height="729dp"
        tools:layout_editor_absoluteX="1dp"
        tools:layout_editor_absoluteY="1dp" />
</androidx.constraintlayout.widget.ConstraintLayout>
提升ListView的运行效率
MainActivity.kt
package com.example.a20200611study

import android.app.Activity
import androidx.appcompat.app.AppCompatActivity
import android.os.Bundle
import android.view.LayoutInflater
import android.view.View
import android.view.ViewGroup
import android.widget.ArrayAdapter
import android.widget.ImageView
import android.widget.TextView
import kotlinx.android.synthetic.main.activity_main.*
//目标:定制ListView界面
//todo 理解全部代码
class MainActivity : AppCompatActivity() {
    private val  fruitList= ArrayList<Fruit>()//定义list集合存储水果

    override fun onCreate(savedInstanceState: Bundle?) {
        super.onCreate(savedInstanceState)
        setContentView(R.layout.activity_main)
        initFruits()//初始化水果数据
        val adapter = FruitAdapter(this,R.layout.fruit_item,fruitList)//创建FruitAdapter对象
        listView.adapter=adapter//FruitAdapter对象作为适配器传递给ListView


    }
    private  fun initFruits(){//定义初始化水果的方法
        repeat(2){//执行添加数据两遍
            fruitList.add(Fruit("苹果",R.drawable.tp1))//使用构造函数将水果的名称和图片传入,然后把创建好的对象传入水果列表中
            fruitList.add(Fruit("香蕉",R.drawable.tp2))
            fruitList.add(Fruit("橘子",R.drawable.tp5))
            fruitList.add(Fruit("橙子",R.drawable.tp10))
            fruitList.add(Fruit("李子",R.drawable.tp11))
            fruitList.add(Fruit("桃",R.drawable.tp12))
            fruitList.add(Fruit("三明治",R.drawable.tp6))
            fruitList.add(Fruit("樱桃",R.drawable.tp7))
            fruitList.add(Fruit("甜品",R.drawable.tupian))
            fruitList.add(Fruit("沙琪玛",R.drawable.tp7))
        }
}

}
class Fruit(val name:String,val imageId:Int)//类有两个资源,一个是水果的名称,一个是图片的id
class FruitAdapter(activity: Activity,val resourceId:Int,data:List<Fruit>):ArrayAdapter<Fruit>(activity,resourceId,data){//定义主构造函数
    //将Activity的实例,listView子项布局的id和数据源传递进来
    inner class ViewHolder(val fruitImage:ImageView,val fruitName:TextView)//内部类ViewHolder,用于对ImageView和TextView的空间实例进行缓存
    // kotlin采用inner class关键字来定义内部类
    override fun getView(position: Int, convertView: View?, parent: ViewGroup): View {//重写getView()方法,这个方法再每个子项被滚动到屏幕内的时候会被调用
    val view:View
        val viewHolder:ViewHolder//用于缓存控件的实例
    //convertView将之前加载好的布局进行缓存,以便之后进行重用
    if (convertView==null){
view=LayoutInflater.from(context).inflate(resourceId,parent,false)//使用layoutInflater去加载布局
        val fruitImage:ImageView=view.findViewById(R.id.fruitImage)
        val fruitName:TextView=view.findViewById(R.id.fruitName)
        viewHolder=ViewHolder(fruitImage,fruitName)//创建ViewHolder对象,并将空间的实例存放在ViewHolder里
        view.tag=viewHolder//调用View的setTag()方法,把ViewHolder重新取出
    }else{//如果convertView不为空
        view=convertView//则直接对convertView进行重用
        viewHolder=view.tag as ViewHolder//view强制类型转换为ViewHolder
    }
//    val view=LayoutInflater.from(context).inflate(resourceId,parent,false)//layoutInflater来为这个子项加载传入的的布局
//    //inflate()方法传入三个参数;第一个是加载的布局id,第二个是给加载好的布局再添加一个父布局,第三个是false表示只让我们在父布局中声明layout属性生效,但不会为这个view
//    //添加父布局

        val fruit =getItem(position)//获取当前项的Fruit实例
        if (fruit !=null){
          viewHolder.fruitImage.setImageResource(fruit.imageId)
            viewHolder.fruitName.text=fruit.name

        }
        return view//将布局返回
    }
}
ListView的点击事件
指定需要声明参数的小技巧:按住Ctrl键点击所要编写的函数,来查看源码,查看待实现的方法中接收的参数就是我们在参数列表中声明的参数
     //点击事件
        listView.setOnItemClickListener { _, _, position, _ ->//为listView注册点击事件监听器,kotlin允许我们将没有用到的参数使用下划线来代替,参数位置不能改变
       // listView.setOnItemClickListener { parent, view, position, id ->//为listView注册点击事件监听器
            val fruit =fruitList[position]//通关position参数判断用户点击的是哪一个子项,获取相应的水果
            Toast.makeText(this,fruit.name,Toast.LENGTH_LONG).show()
        }
//
RecyclerView
RecycleRView为增强版的ListView
将RecyclerView库引入我们的项目中,当不能确定最新的版本号的时候,可以填入1.0.0,若有新的版本,AS会主动提醒你,并告诉你最新的版本号


dependencies {
    implementation 'androidx.recyclerview:recyclerview:1.0.0'
    implementation fileTree(dir: 'libs', include: ['*.jar'])
    implementation "org.jetbrains.kotlin:kotlin-stdlib-jdk7:$kotlin_version"
    implementation 'androidx.appcompat:appcompat:1.1.0'
    implementation 'androidx.core:core-ktx:1.3.0'
    implementation 'androidx.constraintlayout:constraintlayout:1.1.3'
    testImplementation 'junit:junit:4.12'
    androidTestImplementation 'androidx.test.ext:junit:1.1.1'
    androidTestImplementation 'androidx.test.espresso:espresso-core:3.2.0'
}
gradle修改完,要点击右上角的Sync Now进行同步
RecyclerView的基本使用
fruit_ item.xml
<?xml version="1.0" encoding="utf-8"?>
<LinearLayout xmlns:android="http://schemas.android.com/apk/res/android"
    android:layout_width="wrap_content"
    android:layout_height="wrap_content">

    <ImageView
        android:id="@+id/fruitImage"
        android:layout_width="40dp"
        android:layout_height="40dp"
        android:layout_gravity="center_vertical"
        android:layout_marginLeft="10dp" />

    <TextView
        android:id="@+id/fruitName"
        android:layout_width="wrap_content"
        android:layout_height="wrap_content"
        android:layout_gravity="center_vertical"
        android:layout_marginLeft="10dp" />
</LinearLayout>
MainActivity.kt
package com.example.a20200611study
//变量识别不了的原因:变量的位置放错误;方法的入口参数错误
import androidx.appcompat.app.AppCompatActivity
import android.os.Bundle
import android.view.LayoutInflater
import android.view.View
import android.view.ViewGroup
import android.widget.*
import androidx.recyclerview.widget.LinearLayoutManager
import androidx.recyclerview.widget.RecyclerView
import kotlinx.android.synthetic.main.activity_main.*
//目标:定制ListView界面

class MainActivity : AppCompatActivity() {
    private val  fruitList= ArrayList<Fruit>()//定义list集合存储水果

    override fun onCreate(savedInstanceState: Bundle?) {
        super.onCreate(savedInstanceState)
        setContentView(R.layout.activity_main)
        initFruits()//初始化水果数据
        val layoutManager= LinearLayoutManager(this)//创建LinearLayoutManager的对象,可以用于指定RecyclerView的布局方式
        recycleView.layoutManager=layoutManager//将LinearLayoutManager的对象设置到recycleView当中
        val  adapter = FruitAdapter(fruitList)//创建FruitAdapter的实例。并将水果数据传入FruitAdapter的构造函数中
        recycleView.adapter=adapter//调用RecyclerView的 setAdapter()方法来完成适配器设置,完成Recycler与数据之间的关联,数据通过adapter来进行传递

    }

    private  fun initFruits(){//定义初始化水果的方法
        repeat(2){//执行添加数据两遍
            fruitList.add(Fruit("苹果",R.drawable.tp1))//使用构造函数将水果的名称和图片传入,然后把创建好的对象传入水果列表中
            fruitList.add(Fruit("香蕉",R.drawable.tp2))
            fruitList.add(Fruit("橘子",R.drawable.tp5))
            fruitList.add(Fruit("橙子",R.drawable.tp10))
            fruitList.add(Fruit("李子",R.drawable.tp11))
            fruitList.add(Fruit("桃",R.drawable.tp12))
            fruitList.add(Fruit("三明治",R.drawable.tp6))
            fruitList.add(Fruit("樱桃",R.drawable.tp7))
            fruitList.add(Fruit("甜品",R.drawable.tupian))
            fruitList.add(Fruit("沙琪玛",R.drawable.tp7))

        }

    }
    class Fruit(val name:String,val imageId:Int)//类有两个资源,一个是水果的名称,一个是图片的id
    class FruitAdapter(val fruitList: List<Fruit>):RecyclerView.Adapter<FruitAdapter.ViewHolder>(){//适配器继承RecycleView.Adapter
        //并指定泛型为FruitAdapter.ViewHolder,viewHolder是FruitAdapter的一个内部类

        inner class ViewHolder(view:View): RecyclerView.ViewHolder(view){//内部类ViewHolder,用于对ImageView和TextView的空间实例进行缓存
        // kotlin采用inner class关键字来定义内部类,继承RecyclerView.ViewHolder,ViewHolder的主构造函数传入一个VIew参数,这个参数为RecyclerView子项的最外层布局
        val fruitImage:ImageView=view.findViewById(R.id.fruitImage)
            val fruitName:TextView=view.findViewById(R.id.fruitName)

        }
        override fun onCreateViewHolder(parent: ViewGroup, viewType: Int): ViewHolder {//用于创建ViewHolder实例,

            val view= LayoutInflater.from(parent.context).inflate(R.layout.fruit_item,parent,false)//加载fruit_item布局
            return ViewHolder(view)//将加载的布局传入到构造函数中,返回ViewHolder实例
        }

        override fun getItemCount()= fruitList.size//告诉Recycler一共有多少子项,直接返回数据源的长度


        override fun onBindViewHolder(holder: ViewHolder, position: Int) {//对RecycleView子项的数据进行赋值,会在每个子项被滚动到屏幕内的时候执行
            val fruit = fruitList[position]//通关position参数获取当前项Fruit实例
            holder.fruitImage.setImageResource(fruit.imageId)//将数据设置到ViewHolder的Imageview
            holder.fruitName.text=fruit.name//将数据设置到ViewHolder的Textview
        }

}
}
activity_main.xml
<?xml version="1.0" encoding="utf-8"?>
<androidx.constraintlayout.widget.ConstraintLayout xmlns:android="http://schemas.android.com/apk/res/android"
    xmlns:app="http://schemas.android.com/apk/res-auto"
    xmlns:tools="http://schemas.android.com/tools"
    android:layout_width="match_parent"
    android:layout_height="match_parent"
    tools:context=".MainActivity">

    <androidx.recyclerview.widget.RecyclerView
        android:id="@+id/recycleView"
        android:layout_width="match_parent"
        android:layout_height="match_parent"
        tools:layout_editor_absoluteX="1dp"
        tools:layout_editor_absoluteY="1dp" />
</androidx.constraintlayout.widget.ConstraintLayout>
实现横向滚动和瀑布流布局
横向滚动
MainActivity.kt
 override fun onCreate(savedInstanceState: Bundle?) {
        super.onCreate(savedInstanceState)
        setContentView(R.layout.activity_main)
        initFruits()//初始化水果数据
        val layoutManager= LinearLayoutManager(this)//创建LinearLayoutManager的对象,可以用于指定RecyclerView的布局方式
        layoutManager.orientation=LinearLayoutManager.HORIZONTAL//调用LinearLayoutManager的setOritation()方法设置布局的排列方向,默认是纵向,添加参数使其
        //横向滚动
        recycleView.layoutManager=layoutManager//将LinearLayoutManager的对象设置到recycleView当中
        val  adapter = FruitAdapter(fruitList)//创建FruitAdapter的实例。并将水果数据传入FruitAdapter的构造函数中
        recycleView.adapter=adapter//调用RecyclerView的 setAdapter()方法来完成适配器设置,完成Recycler与数据之间的关联,数据通过adapter来进行传递

    }
fruit_item.xml
<?xml version="1.0" encoding="utf-8"?>
<LinearLayout xmlns:android="http://schemas.android.com/apk/res/android"
    android:layout_width="80dp"
    android:orientation="vertical"
    android:layout_height="wrap_content">

    <ImageView
        android:id="@+id/fruitImage"
        android:layout_width="40dp"
        android:layout_height="40dp"
        android:layout_gravity="center_horizontal"
        android:layout_marginTop="10dp" />

    <TextView
        android:id="@+id/fruitName"
        android:layout_width="wrap_content"
        android:layout_height="wrap_content"
        android:layout_gravity="center_horizontal"
        android:layout_marginTop="10dp" />
</LinearLayout>
瀑布流布局
fruit_item.xml
<?xml version="1.0" encoding="utf-8"?>
<LinearLayout xmlns:android="http://schemas.android.com/apk/res/android"
    android:layout_width="match_parent"
    android:orientation="vertical"
    android:layout_height="wrap_content"
    android:layout_margin="5dp"
    >

    <ImageView
        android:id="@+id/fruitImage"
        android:layout_width="40dp"
        android:layout_height="40dp"
        android:layout_gravity="center_horizontal"
        android:layout_marginTop="10dp" />

    <TextView
        android:id="@+id/fruitName"
        android:layout_width="wrap_content"
        android:layout_height="wrap_content"
        android:layout_gravity="center_horizontal"
        android:gravity="left"
        android:layout_marginTop="10dp" />
</LinearLayout>
MainActivity.kt
package com.example.a20200611study
//变量识别不了的原因:变量的位置放错误;方法的入口参数错误
import androidx.appcompat.app.AppCompatActivity
import android.os.Bundle
import android.view.LayoutInflater
import android.view.View
import android.view.ViewGroup
import android.widget.*
import androidx.recyclerview.widget.LinearLayoutManager
import androidx.recyclerview.widget.RecyclerView
import androidx.recyclerview.widget.StaggeredGridLayoutManager
import kotlinx.android.synthetic.main.activity_main.*
//目标:定制ListView界面
class MainActivity : AppCompatActivity() {
    private val  fruitList= ArrayList<Fruit>()//定义list集合存储水果

    override fun onCreate(savedInstanceState: Bundle?) {
        super.onCreate(savedInstanceState)
        setContentView(R.layout.activity_main)
        initFruits()//初始化水果数据
  val layoutManager =StaggeredGridLayoutManager(3,StaggeredGridLayoutManager.VERTICAL)//创建StaggeredGridLayoutManager的实例
        //第一个参数为指定布局的列数,传入3表示会把布局分为3列;第二个参数用于指定布局的排列方向,表示布局纵向排列
        recycleView.layoutManager=layoutManager//将创建号的实例设置到RecyclerView当中
        val  adapter = FruitAdapter(fruitList)//创建FruitAdapter的实例。并将水果数据传入FruitAdapter的构造函数中
        recycleView.adapter=adapter//调用RecyclerView的 setAdapter()方法来完成适配器设置,完成Recycler与数据之间的关联,数据通过adapter来进行传递

    }

    private  fun initFruits(){//定义初始化水果的方法
        repeat(2){//执行添加数据两遍
            fruitList.add(Fruit(getRandomLengthString("苹果"),R.drawable.tp1))//使用构造函数将水果的名称和图片传入,然后把创建好的对象传入水果列表中
            //名字改为getRandomLengthString方法生成,保证各水果的名称长短差距比较大,子项的高度不同
            fruitList.add(Fruit(getRandomLengthString("香蕉"),R.drawable.tp2))
            fruitList.add(Fruit(getRandomLengthString("橘子"),R.drawable.tp5))
            fruitList.add(Fruit(getRandomLengthString("橙子"),R.drawable.tp10))
            fruitList.add(Fruit(getRandomLengthString("李子"),R.drawable.tp11))
            fruitList.add(Fruit(getRandomLengthString("桃"),R.drawable.tp12))
            fruitList.add(Fruit(getRandomLengthString("三明治"),R.drawable.tp6))
            fruitList.add(Fruit(getRandomLengthString("樱桃"),R.drawable.tp7))
            fruitList.add(Fruit(getRandomLengthString("甜品"),R.drawable.tupian))
            fruitList.add(Fruit(getRandomLengthString("沙琪玛"),R.drawable.tp7))

        }

    }
    private fun  getRandomLengthString(str:String):String{
        val n =(1..20).random()//调用range对象的random()函数来创造一个1到20之间的随机数
        val builder =StringBuilder()
        repeat(n){//重复随机数的次数
            builder.append(str)
        }
        return builder.toString()
    }

    class Fruit(val name:String,val imageId:Int)//类有两个资源,一个是水果的名称,一个是图片的id
    class FruitAdapter(val fruitList: List<Fruit>):RecyclerView.Adapter<FruitAdapter.ViewHolder>(){//适配器继承RecycleView.Adapter
        //并指定泛型为FruitAdapter.ViewHolder,viewHolder是FruitAdapter的一个内部类

        inner class ViewHolder(view:View): RecyclerView.ViewHolder(view){//内部类ViewHolder,用于对ImageView和TextView的空间实例进行缓存
        // kotlin采用inner class关键字来定义内部类,继承RecyclerView.ViewHolder,ViewHolder的主构造函数传入一个VIew参数,这个参数为RecyclerView子项的最外层布局
        val fruitImage:ImageView=view.findViewById(R.id.fruitImage)
            val fruitName:TextView=view.findViewById(R.id.fruitName)

        }
        override fun onCreateViewHolder(parent: ViewGroup, viewType: Int): ViewHolder {//用于创建ViewHolder实例,

            val view= LayoutInflater.from(parent.context).inflate(R.layout.fruit_item,parent,false)//加载fruit_item布局
            return ViewHolder(view)//将加载的布局传入到构造函数中,返回ViewHolder实例
        }

        override fun getItemCount()= fruitList.size//告诉Recycler一共有多少子项,直接返回数据源的长度


        override fun onBindViewHolder(holder: ViewHolder, position: Int) {//对RecycleView子项的数据进行赋值,会在每个子项被滚动到屏幕内的时候执行
            val fruit = fruitList[position]//通关position参数获取当前项Fruit实例
            holder.fruitImage.setImageResource(fruit.imageId)//将数据设置到ViewHolder的Imageview
            holder.fruitName.text=fruit.name//将数据设置到ViewHolder的Textview
        }

}
}
RecyclerView的点击事件
MainActivity.kt
  override fun onCreateViewHolder(parent: ViewGroup, viewType: Int): ViewHolder {//用于创建ViewHolder实例,
            //todo
            val view= LayoutInflater.from(parent.context).inflate(R.layout.fruit_item,parent,false)//加载fruit_item布局
            /********************************点击事件**************************************************/
            val viewHolder=ViewHolder(view)
            viewHolder.itemView.setOnClickListener {//itemView表示的是最外层布局
                val  position =viewHolder.adapterPosition//获取用户点击的postion
                val  fruit=fruitList[position]//通过postion拿到相应的Fruit实例
                Toast.makeText(parent.context,"你点击了项 ${fruit.name}",Toast.LENGTH_SHORT).show()
            }
            viewHolder.fruitImage.setOnClickListener {//给图片设置的单击事件监听器
                val  position =viewHolder.adapterPosition//获取用户点击的postion
                val  fruit=fruitList[position]//通过postion拿到相应的Fruit实例
                Toast.makeText(parent.context,"你点击了项 ${fruit.name}",Toast.LENGTH_SHORT).show()
            }

            return viewHolder//返回ViewHolder实例
            /********************************点击事件**********************************************/

        }
制作 9-Patch图片
注意:图片必须要png格式的
制作精美的聊天界面
build.gradle(Module:app)
apply plugin: 'com.android.application'
apply plugin: 'kotlin-android'
apply plugin: 'kotlin-android-extensions'

android {
    compileSdkVersion 29
    buildToolsVersion "29.0.3"

    defaultConfig {
        applicationId "com.example.a20200612study2"
        minSdkVersion 16
        targetSdkVersion 29
        versionCode 1
        versionName "1.0"

        testInstrumentationRunner "androidx.test.runner.AndroidJUnitRunner"
    }

    buildTypes {
        release {
            minifyEnabled false
            proguardFiles getDefaultProguardFile('proguard-android-optimize.txt'), 'proguard-rules.pro'
        }
    }

}

dependencies {
    implementation fileTree(dir: 'libs', include: ['*.jar'])
    implementation "org.jetbrains.kotlin:kotlin-stdlib-jdk7:$kotlin_version"
    implementation 'androidx.appcompat:appcompat:1.1.0'
    implementation 'androidx.core:core-ktx:1.3.0'
    implementation 'androidx.recyclerview:recyclerview:1.1.0'
    implementation 'androidx.constraintlayout:constraintlayout:1.1.3'
    testImplementation 'junit:junit:4.12'
    androidTestImplementation 'androidx.test.ext:junit:1.1.1'
    androidTestImplementation 'androidx.test.espresso:espresso-core:3.2.0'
}

msg_ left_ item.xml
<?xml version="1.0" encoding="utf-8"?>
<FrameLayout
    xmlns:android="http://schemas.android.com/apk/res/android" android:layout_width="match_parent"
    android:layout_height="wrap_content"
    android:orientation="vertical"
    android:padding="10dp"
    >
<LinearLayout
    android:layout_width="wrap_content"
    android:layout_height="wrap_content"
    android:layout_gravity="left"
    android:background="@drawable/qipaozuo"
    >
    <TextView
        android:layout_width="wrap_content"
        android:layout_height="wrap_content"
        android:layout_gravity="center"
        android:id="@+id/leftMsg"
        android:layout_margin="10dp"
        android:textColor="#000"
        />
</LinearLayout>
</FrameLayout>
msg_ right_ item.xml
<?xml version="1.0" encoding="utf-8"?>
<FrameLayout
    xmlns:android="http://schemas.android.com/apk/res/android" android:layout_width="match_parent"
    android:layout_height="wrap_content"
    android:orientation="vertical"
    android:padding="10dp"
    >
    <LinearLayout
        android:layout_width="wrap_content"
        android:layout_height="wrap_content"
        android:layout_gravity="right"
        android:background="@drawable/qipao"
        >
        <TextView
            android:layout_width="wrap_content"
            android:layout_height="wrap_content"
            android:layout_gravity="center"
            android:id="@+id/rightMsg"
            android:layout_margin="10dp"
            android:textColor="#000"
            />
    </LinearLayout>
</FrameLayout>
MainActivity.kt
package com.example.a20200612study2

import androidx.appcompat.app.AppCompatActivity
import android.os.Bundle
import android.view.LayoutInflater
import android.view.View
import android.view.ViewGroup
import android.widget.LinearLayout
import android.widget.TextView
import androidx.recyclerview.widget.LinearLayoutManager
import androidx.recyclerview.widget.RecyclerView
import kotlinx.android.synthetic.main.activity_main.*
import kotlinx.android.synthetic.main.msg_left_item.view.*
import kotlinx.android.synthetic.main.msg_right_item.view.*
import java.text.FieldPosition

class MainActivity : AppCompatActivity() ,View.OnClickListener{
    private val msgList=ArrayList<Msg>()
    private var adapter:MsgAdapter?=null

    override fun onCreate(savedInstanceState: Bundle?) {
        super.onCreate(savedInstanceState)
        setContentView(R.layout.activity_main)
        initMsg()
        val  layoutManager= LinearLayoutManager(this)
        recyclerView.layoutManager=layoutManager//给RecyclerView指定LayoutManager
        adapter=MsgAdapter(msgList)//给RecyclerView指定适配器
        recyclerView.adapter=adapter
        send.setOnClickListener(this)
    }
    class Msg(val content:String,val type:Int){//content为消息内容,Type表示消息的类型
        companion object{//定义常量的关键字是const,在单例类、companion object或顶层方法才能实用const关键字
            const val TYPE_RECEIVED=0//TYPE_RECEIVED表示收到消息
            const val TYPE_SENT=1;//TYPE_SENT表示发送消息
        }
    }
    class MsgAdapter(val msgList: List<Msg>):RecyclerView.Adapter<RecyclerView.ViewHolder>(){
        inner class LeftViewHolder(view: View):RecyclerView.ViewHolder(view){//创建viewHolder用于缓存布局的控件
            val leftMsg:TextView=view.findViewById(R.id.leftMsg)
        }
        inner class RightViewHolder(view:View):RecyclerView.ViewHolder(view){//创建viewHolder用于缓存布局的控件
            val rightMsg:TextView=view.findViewById(R.id.rightMsg)
        }
        override  fun  getItemViewType(position:Int):Int{
            val msg=msgList[position]//根据postion来获取消息
            return msg.type//返回消息的类型
        }
        override fun onCreateViewHolder(parent:ViewGroup,viewType:Int)=if (viewType==Msg.TYPE_RECEIVED){//根据不同的viewType创建不同的界面
            val view= LayoutInflater.from(parent.context).inflate(R.layout.msg_left_item,parent,false)
            LeftViewHolder(view)//根据不同的viewType来加载不同的ViewHolder
        }else{
            val view=LayoutInflater.from(parent.context).inflate(R.layout.msg_right_item,parent,false)
            RightViewHolder(view)//根据不同的viewType来加载不同的ViewHolder
        }
        override  fun onBindViewHolder(holder:RecyclerView.ViewHolder,position:Int){
            val msg=msgList[position]
            when(holder){//判断ViewHolder类型
                is LeftViewHolder->holder.leftMsg.text=msg.content//is相当于if,如果是leftViewHolder就将内容显示到左边的消息布局
                is RightViewHolder->holder.rightMsg.text=msg.content//is相当于if,如果是RightViewHolder就将内容显示到右边的消息布局
                else -> throw  IllegalArgumentException()
            }
        }
override  fun getItemCount()=msgList.size
    }

    override fun onClick(v: View?) {
     when(v){
         send->{
             val content=inputText.text.toString()//获取EditText中的内容
             if (content.isNotEmpty()){//如果内容不为空字符串
                 val msg = Msg(content,Msg.TYPE_SENT)//创建一个新的Msg对象
                 msgList.add(msg)//Msg对象添加到msgList列表中去
                 adapter?.notifyItemInserted(msgList.size-1)//调用适配器的方法,当有新消息时,刷新RecyclerView中的显示
                 //notifyDataSetChanged()方法,将RecyclerView 中所有可谏的元素全部刷新
                 recyclerView.scrollToPosition(msgList.size-1)//将RecyclerView定位到最后一行
                 inputText.setText("")//清空输入框中的内容
             }
         }
     }
    }
    private  fun initMsg(){//初始化几条数据在RecyclerView zhong xianshi
        val  msg1=Msg("你好",Msg.TYPE_RECEIVED)
        msgList.add(msg1)
        val msg2=Msg(" 你好,你是谁?",Msg.TYPE_SENT)
        msgList.add(msg2)
        val  msg3=Msg("我是tom,很高兴和你谈话",Msg.TYPE_RECEIVED)
        msgList.add(msg3)
    }
}
activity_main.xml
<?xml version="1.0" encoding="utf-8"?>
<LinearLayout xmlns:android="http://schemas.android.com/apk/res/android"
    xmlns:app="http://schemas.android.com/apk/res-auto"
    android:orientation="vertical"
    xmlns:tools="http://schemas.android.com/tools"
    android:layout_width="match_parent"
    android:layout_height="match_parent"
    android:background="@drawable/qipao"
    tools:context=".MainActivity">
    <androidx.recyclerview.widget.RecyclerView
        android:layout_width="match_parent"
        android:layout_height="0dp"
        android:id="@+id/recyclerView"
        android:layout_weight="1"
        />
  <LinearLayout
      android:layout_width="match_parent"
      android:layout_height="wrap_content">
      <EditText
          android:id="@+id/inputText"
          android:layout_height="wrap_content"
          android:layout_width="0dp"
          android:layout_weight="1"
          android:width="0dp"
          android:hint="请输入内容"
          android:maxLines="2"/>
      <Button
          android:layout_width="wrap_content"
          android:layout_height="wrap_content"
          android:id="@+id/send"
          android:text="send"/>
  </LinearLayout>


</LinearLayout>
Fragment
Fragment的简单使用
android:name属性来显式声明要添加的Fragment类名,注意一定要将类的包名也加上
left_ fragment.xml
<?xml version="1.0" encoding="utf-8"?>
<LinearLayout xmlns:android="http://schemas.android.com/apk/res/android"
    android:layout_width="match_parent"
    android:layout_height="match_parent"
    android:orientation="vertical">

    <Button
        android:layout_gravity="center_horizontal"
        android:id="@+id/left_button"
        android:layout_width="wrap_content"
        android:layout_height="wrap_content"
        android:text="Button" />
</LinearLayout>
LeftFragment.kt
package com.example.myapplication

import android.os.Bundle
import android.view.LayoutInflater
import android.view.View
import android.view.ViewGroup
import androidx.fragment.app.Fragment

//在这里一定要使用androidX的Fragment,因为他可以让Fragment的特性在所有Android系统中保持一致,系统内置的在9.0版本被废除。
class LeftFragment : Fragment() {
    //仅仅重写了onCreateView方法
    override fun onCreateView(
        inflater: LayoutInflater,
        container: ViewGroup?,
        savedInstanceState: Bundle?
    ): View? {
        //通过LayoutInflater将方才定义的left_fragment加载进来
        return inflater.inflate(R.layout.left_fragment, container, false)
    }
}
right_fragment.xml
<?xml version="1.0" encoding="utf-8"?>
<LinearLayout xmlns:android="http://schemas.android.com/apk/res/android"
    android:layout_width="match_parent"
    android:layout_height="match_parent"
    android:background="#00ff00"
    android:orientation="vertical">

    <TextView
        android:layout_width="wrap_content"
        android:layout_height="wrap_content"
        android:layout_gravity="center_horizontal"
        android:text="This is right fragment"
        android:textSize="24sp" />
</LinearLayout>
RightFragment.kt
package com.example.myapplication

import android.os.Bundle
import android.view.LayoutInflater
import android.view.View
import android.view.ViewGroup
import androidx.fragment.app.Fragment
//同样方式使用Fragment加载右布局
class RightFragment : Fragment() {
    override fun onCreateView(
        inflater: LayoutInflater,
        container: ViewGroup?,
        savedInstanceState: Bundle?
    ): View? {
        return inflater.inflate(R.layout.right_fragment, container, false)
    }
}
another_right_fragment.xml
<?xml version="1.0" encoding="utf-8"?>
<LinearLayout xmlns:android="http://schemas.android.com/apk/res/android"
    android:layout_width="match_parent"
    android:layout_height="match_parent"
    android:background="#ffff00"
    android:orientation="vertical">
    <TextView
        android:layout_width="wrap_content"
        android:layout_height="wrap_content"
        android:layout_gravity="center_horizontal"
        android:text="This is another right fragment"
        android:textSize="24sp" />
</LinearLayout>
AnotherRightFragment.kt
package com.example.myapplication

import android.os.Bundle
import android.view.LayoutInflater
import android.view.View
import android.view.ViewGroup
import androidx.fragment.app.Fragment

class AnotherRightFragment : Fragment() {
    override fun onCreateView(
        inflater: LayoutInflater,
        container: ViewGroup?,
        savedInstanceState: Bundle?
    ): View? {
        return inflater.inflate(R.layout.another_right_fragment, container, false)
    }
}
activity_main.xml
<?xml version="1.0" encoding="utf-8"?>
<LinearLayout xmlns:android="http://schemas.android.com/apk/res/android"
    android:layout_width="match_parent"
    android:layout_height="match_parent"
    android:orientation="horizontal">
    <!--使用Fragment标签在布局中添加Fragment,通过android:name来显式声明要添加的Fragment名,注意加上包名-->
    <fragment
        android:id="@+id/left_frag"
        android:name="com.example.myapplication.LeftFragment"
        android:layout_width="0dp"
        android:layout_height="match_parent"
        android:layout_weight="1" />
    <!--将右侧的Fragment替换为FrameLayout,默认摆在左上角,无需任何定位。-->
    <FrameLayout
        android:id="@+id/frame_layout"
        android:layout_width="0dp"
        android:layout_height="match_parent"
        android:layout_weight="1" />
</LinearLayout>
MainActivity.kt
package com.example.myapplication

import androidx.appcompat.app.AppCompatActivity
import android.os.Bundle
import androidx.fragment.app.Fragment
import kotlinx.android.synthetic.main.left_fragment.*
//完成动态添加Fragment的功能,五步走战略
class MainActivity : AppCompatActivity() {

    override fun onCreate(savedInstanceState: Bundle?) {
        super.onCreate(savedInstanceState)
        setContentView(R.layout.activity_main)
        //第一步,创建添加Fragment的实例
        left_button.setOnClickListener{
            replaceFragment(AnotherRightFragment())
        }
        replaceFragment(RightFragment())
    }

    fun replaceFragment(fragment:Fragment){
        //第二步,获取FragmentManager
        val fragmentManager = supportFragmentManager
        //第三步,开启一个事务
        val transaction = fragmentManager.beginTransaction()
        //第四步,向容器内添加或者替换Fragment,一般使用replace来代替,传递id和添加的Fragment实例
        transaction.replace(R.id.frame_layout,fragment)
        //第五步,提交事务
        transaction.commit()
    }
}
在Fragment中实现返回栈
MainActivity.kt
fun replaceFragment(fragment:Fragment){
        //第二步,获取FragmentManager
        val fragmentManager = supportFragmentManager
        //第三步,开启一个事务
        val transaction = fragmentManager.beginTransaction()
        //第四步,向容器内添加或者替换Fragment,一般使用replace来代替,传递id和添加的Fragment实例
        transaction.replace(R.id.frame_layout,fragment)
        transaction.addToBackStack(null)//将一个事物添加到返回栈中,接收一个名字用户描述返回栈的状态,一般传入null即可
        //第五步,提交事务
        transaction.commit()
    }
Fragment和Activity之间的交互
Activity调用Fragment里的方法
val fragment =supportFragmentManager.findFragmentById(R.id.left_frag) as LeftFragment//获取Fragment的实例
//可直接使用布局文件中定义的Fragment 的id名称来自动获取相应的Fragment实例
val  fragment2 =left_frag as LeftFragment
Fragment中调用Activity里面的方法
MainActivity.kt
 if (activity !=null){//由于getActivity()方法有可能返回null,需要判空处理
            val mainActivity=activity as MainActivity//调用getActivity()方法来得到和当前Fragment相关联的Activity实例
            //当Fragment中需要使用Context对象时,也可以调用getActivity()方法,因为获取到的Activity本身就是一个Context对象

        }
不同的Fragment之间的通信
Fragment找Activity,Activity获取另一个Fragment实例
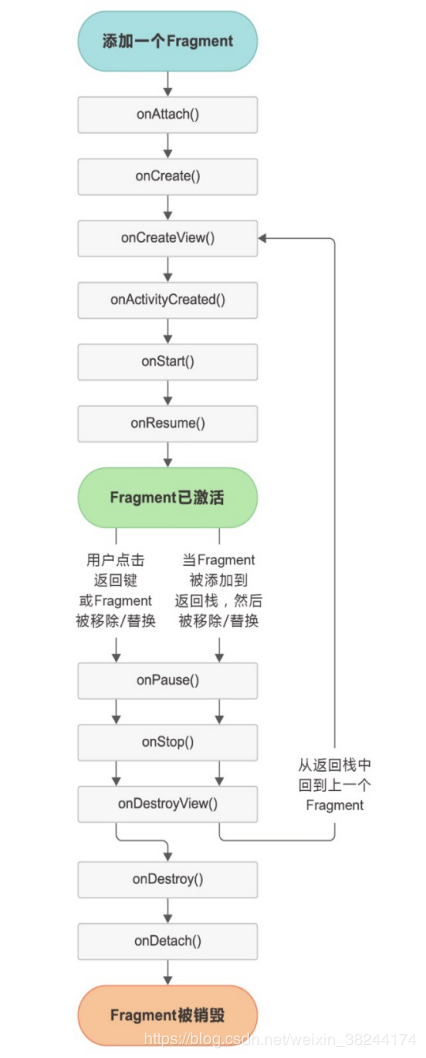
Fragment的生命周期
有四种状态:运行、暂停、停止和销毁四种状态。
运行状态:Fragment相关联的Activity正在运行;
暂停:当一个Activity进入暂停状态(另一个为占满屏幕的Activity进入栈顶),则与此相关联的Fragment也暂停;
停止:Activity停止或者FragmentTransaction的remove和replace移除被调用,但在此之间调用了addToBackStack方法;
终止:Activity被销毁或者FragmentTransaction的remove和replace移除被调用。未调用addToBackStack方法。
回调方法
onAttach:Fragment和Activity建立关联;
onCreateView:为Fragment创建视图时调用;
onActivityCreated:确保与Fragment相关联的Activity已经创建完毕时调用;
onDestroyView:与Fragment关联的视图被移除时调用;
onDetach:两者解除关联时调用。
体验Fragment的生命周期
RightFragment.kt
package com.example.myapplication

import android.content.Context
import android.nfc.Tag
import android.os.Bundle
import android.util.Log
import android.view.LayoutInflater
import android.view.View
import android.view.ViewGroup
import androidx.fragment.app.Fragment
import kotlin.math.log

//同样方式使用Fragment加载右布局
class RightFragment : Fragment() {
    companion object{//类似java的静态方法
        const val TAG="RightFragment"//用const关键字来定义常量


    }

    override fun onAttach(context: Context) {
        super.onAttach(context)
        Log.d(TAG,"onAttach")

    }

    override fun onCreate(savedInstanceState: Bundle?) {
        super.onCreate(savedInstanceState)
        Log.d(TAG,"onCreate")
    }

    override fun onCreateView(
        inflater: LayoutInflater,
        container: ViewGroup?,
        savedInstanceState: Bundle?
    ): View? {
        Log.d(TAG,"onCreateView")
        return inflater.inflate(R.layout.right_fragment, container, false)////通过LayoutInflater来加载.right_fragment布局
    }

    override fun onActivityCreated(savedInstanceState: Bundle?) {
        super.onActivityCreated(savedInstanceState)
        Log.d(TAG,"onActivityCreated")
    }

    override fun onStart() {
        super.onStart()
        Log.d(TAG,"onStart")
    }

    override fun onResume() {
        super.onResume()
        Log.d(TAG,"onResume")
    }

    override fun onPause() {
        super.onPause()
        Log.d(TAG,"onPause")
    }

    override fun onStop() {
        super.onStop()
        Log.d(TAG,"onStop")
    }

    override fun onDestroyView() {
        super.onDestroyView()
        Log.d(TAG,"onDestroyView")
    }

    override fun onDestroy() {
        super.onDestroy()
        Log.d(TAG,"onDestroy")
    }

    override fun onDetach() {
        super.onDetach()
        Log.d(TAG,"onDetach")
    }
}
日志运行结果见下图

在Fragment中可通过onSaveInstanceState()方法来保存数据
动态加载布局的技巧
使用限定符
在新建res目录下新建具有限定符的目录,用于根据不同的情况来加载不同的视图

layout-large目录下的activity_main.xml
<?xml version="1.0" encoding="utf-8"?>
<LinearLayout
    xmlns:android="http://schemas.android.com/apk/res/android" android:layout_width="match_parent"
    android:layout_height="match_parent">
    <!-- 包含两个Fragment,为双页模式-->
    <!--在布局文件中文件名带有 large ,large就是一个限定符,那些屏幕被认为是large的设备会自动加载layout-large文件夹的布局
    小屏幕的设备则会加载layout文件夹的布局-->
    <FrameLayout
        android:layout_width="0dp"
        android:id="@+id/leftFrag"
        android:name="com.example.myapplication.LeftFragment"
        android:layout_height="match_parent"
        android:background="@color/colorPrimaryDark"
        android:layout_weight="1"/>
    <FrameLayout
        android:layout_width="0dp"
        android:layout_height="match_parent"
        android:layout_weight="3"
        android:background="@color/colorAccent"
        android:name="com.example.myapplication.RightFragment"
        android:id="@+id/rightFrag"/>
</LinearLayout>
layout目录下的activity_main.xml
<?xml version="1.0" encoding="utf-8"?>
<LinearLayout xmlns:android="http://schemas.android.com/apk/res/android"
    android:layout_width="match_parent"
    android:layout_height="match_parent"
    android:orientation="horizontal">
    <!--使用Fragment标签在布局中添加Fragment,通过android:name来显式声明要添加的Fragment名,注意加上包名-->
    <!-- 只包含一个Fragment,为单页模式-->
    <fragment
        android:id="@+id/left_frag"
        android:name="com.example.myapplication.LeftFragment"
        android:layout_width="match_parent"
        android:layout_height="match_parent"
        />

</LinearLayout>
MainActivity.kt
package com.example.myapplication

import androidx.appcompat.app.AppCompatActivity
import android.os.Bundle
import androidx.fragment.app.Fragment
import kotlinx.android.synthetic.main.activity_main.*
import kotlinx.android.synthetic.main.left_fragment.*
//完成动态添加Fragment的功能,五步走战略
class MainActivity : AppCompatActivity() {

    override fun onCreate(savedInstanceState: Bundle?) {
        super.onCreate(savedInstanceState)
        setContentView(R.layout.activity_main)
        //第一步,创建添加Fragment的实例
//        left_button.setOnClickListener{
//            replaceFragment(AnotherRightFragment())
//        }
//        replaceFragment(RightFragment())
        /***************Fragment和Activity之间的交互*****************************/
//        val fragment =supportFragmentManager.findFragmentById(R.id.left_frag) as LeftFragment//获取Fragment的实例
//        //可直接使用布局文件中定义的Fragment 的id名称来自动获取相应的Fragment实例
//        val  fragment2 =left_frag as LeftFragment
        //____________________________________________________________
//        if (activity !=null){//由于getActivity()方法有可能返回null,需要判空处理
//            val mainActivity=activity as MainActivity//调用getActivity()方法来得到和当前Fragment相关联的Activity实例
//            //当Fragment中需要使用Context对象时,也可以调用getActivity()方法,因为获取到的Activity本身就是一个Context对象
//
//        }


        /***************Fragment和Activity之间的交互*****************************/
    }

//replaceFragment()方法用于替换Fragment 的视图
//    fun replaceFragment(fragment:Fragment){
//        //第二步,获取FragmentManager
//        val fragmentManager = supportFragmentManager
//        //第三步,开启一个事务
//        val transaction = fragmentManager.beginTransaction()
//        //第四步,向容器内添加或者替换Fragment,一般使用replace来代替,传递id和添加的Fragment实例
//        transaction.replace(R.id.frame_layout,fragment)
//        transaction.addToBackStack(null)//将一个事物添加到返回栈中,接收一个名字用户描述返回栈的状态,一般传入null即可
//        //第五步,提交事务
//        transaction.commit()
//    }
}
运行效果如图


Android中常见的限定符
板上是双屏,手机上是单屏。常用限定符如下:
屏幕大小的small、normal、large和xlarge;
分辨率大小的ldpi(<120)、mdpi(120160)、hdpi(160240)、xhdpi(240320)以及xxhdpi(320480);
方向land(横屏)和port(竖屏)
使用最小宽度限定符
使用large解决了单双页判断问题,但large多大是个问题?我们在这里使用最小宽度限定符来解决。其是对屏幕的宽度指定一个最小值(以dp为单位),然后以其为临界点。
我们建立layout-sw600dp文件夹和activity_main.xml布局,代码和上面的一模一样。此意味着,当屏幕宽度大于等于600dp时,会加载layout-sw600dp/activity_main布局,否则加载layout/activity_main布局。
声明
部分代码与文字源于《第一行代码》第三版之探究Fragment(六),若想看详情,请点击查看