1. 概述
一个好的前端,是能够在保住性能的同时,让用户有优质的使用体验感,其中,icon就是很重要的一部分
可是许多时候,都是直接用PS切图,然后 url 引用
现在,有了 canvas,或许你会有不同的选择
本文章主要讲述如何简单封装一个自己的icon库,如果对 canvas 非常陌生的朋友,可以看一下我的另一篇文章 《canvas 从入门到入坟》
2. 实验目标
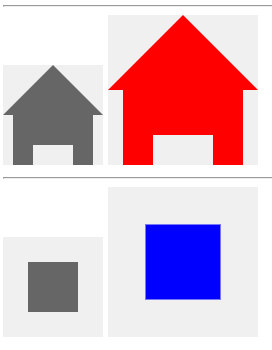
目标:制作如下图的图标封装,可自定义 width、height、color,

呦!搞错了,我没那么厉害,是下面这个~ [手动狗头 *3]
我个渣渣这里就做了2种类型的 icon,一种是 house 另一种是box [手动狗头 *3]
3. 实现思路解析与代码
3.1 创建文件
创建一个html和一个javascript
index.html
<span icon="house"></span>
<span icon="house" width="150" height="150" color="red"></span>

<span icon="box"></span>
<span icon="box" width="150" height="150" color="blue"></span>

<script src="demo.js"></script>
demo.js
// 选出所有有icon属性的span
let spanArray = document.querySelectorAll('[icon]')
let length = spanArray.length
3.2 实现思路
首先呢,应该把所有的带有icon属性的span选取出来
// 选出所有有icon属性的span
let spanArray = document.querySelectorAll('[icon]')
因为是简单封装,所有我并没有用到原型链,只用了基本的while语句循环 (可维护性、冗余量、性能等方面肯定会差些,不过没关系,我们只要思想就好了)
let length = spanArray.length

let index = 0
while (index < length) { }
由于canvas与svg不同,它是基于像素来绘制的,我用%的时候,js就给我报错了,所有我设置了比例,另外还定义了 color 这个属性以及默认值
// 参数和缩放比例
let [Width, Height, Color] = [span.getAttribute('width')||100, span.getAttribute('height')||100, span.getAttribute('color') || '#666']
let [dx, dy] = [Width / 100, Height / 100]
绘制过程种的 x y坐标都要 × 一个比例
ctx.fillRect(25 * dx, 25 * dy, 50 * dx, 50 * dy);
进行绘制之后,用appendchild把新建的元素塞进span里
let span = spanArray[index]
let c = document.createElement('canvas')
//这里是绘制过程
span.appendChild(c)
3.3 完整代码
index.html
<span icon="house"></span>
<span icon="house" width="150" height="150" color="red"></span>
<hr>
<span icon="box"></span>
<span icon="box" width="150" height="150" color="blue"></span>

<script src="demo.js"></script>
demo.js
// 选出所有有icon属性的span
let spanArray = document.querySelectorAll('[icon]')
let length = spanArray.length

let index = 0
while (index < length) {
  let span = spanArray[index]
  let icon = span.getAttribute('icon')
  // 参数和缩放比例
  let [Width, Height, Color] = [span.getAttribute('width')||100, span.getAttribute('height')||100, span.getAttribute('color') || '#666']
  let [dx, dy] = [Width / 100, Height / 100]

  let c = document.createElement('canvas')
  let ctx = c.getContext('2d')
  c.width = Width
  c.height = Height
  c.style.background = '#f0f0f0'

  if (icon == 'house') {
    ctx.beginPath();
    ctx.moveTo(50 * dx, 0 * dy);
    ctx.lineTo(100 * dx, 50 * dy);
    ctx.lineTo(90 * dx, 50 * dy)
    ctx.lineTo(90 * dx, 100 * dy)
    ctx.lineTo(70 * dx, 100 * dy)
    ctx.lineTo(70 * dx, 80 * dy)
    ctx.lineTo(30 * dx, 80 * dy)
    ctx.lineTo(30 * dx, 100 * dy)
    ctx.lineTo(10 * dx, 100 * dy)
    ctx.lineTo(10 * dx, 50 * dy)
    ctx.lineTo(0 * dx, 50 * dy);
    ctx.fillStyle = Color
    ctx.fill();
  }
  else if (icon = 'box') {
    ctx.fillStyle = Color
    ctx.fillRect(25 * dx, 25 * dy, 50 * dx, 50 * dy);
  }

  span.appendChild(c)

  index++
}
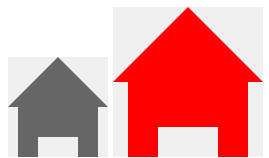
以house这个图标为例,左边的就是默认的,右边的就是自定义大小和颜色的。
4. end
最后,emmm,我自己画的就潦草了些哈,
这里附上Element-UI的icon库,喜欢自己捣鼓的朋友可以照着那里的来画
Element-UI官网 icon图标
如图是Element-UI官网 icon图库的一部分

加油!共勉~