一、技术选型
SSM+Dubbo+Mycat+Mysql+Nginx
二、搭建环境
2.1 配置sts
编码,jdk,mave
三、ssm的搭建
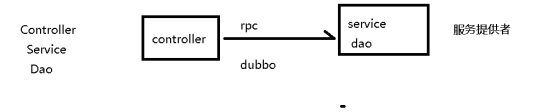
User-web 远程调用user-service
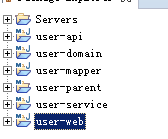
3.0 搭建user 父项目

3.1 搭建user-web


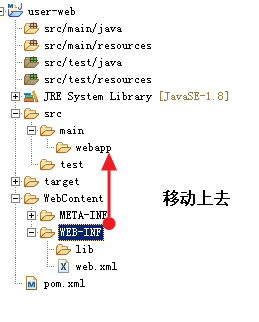
移动成功后,删除webContent目录
3.2 搭建user-service
四、配置文件
4.0 关联xml 的打开方式


4.1 web.xml(面试的重点)
1加载ioc 容器
2 加载springmvc
3 加载编码器
<?xml version="1.0" encoding="UTF-8"?>
<web-app xmlns:xsi="http://www.w3.org/2001/XMLSchema-instance"
	xmlns="http://java.sun.com/xml/ns/javaee"
	xsi:schemaLocation="http://java.sun.com/xml/ns/javaee http://java.sun.com/xml/ns/javaee/web-app_3_0.xsd"
	id="WebApp_ID" version="3.0">
	<!-- 1 加载ioc -->
	<context-param>
		<param-name>contextConfigLocation</param-name>
		<param-value>classpath:spring-*.xml</param-value>
	</context-param>
	<listener>
		<listener-class>org.springframework.web.context.ContextLoaderListener</listener-class>
	</listener>
	<!-- 2 加载springmvc 需要springmvc.xml -->
	<servlet>
		<servlet-name>springmvc</servlet-name>
		<servlet-class>org.springframework.web.servlet.DispatcherServlet</servlet-class>
		<init-param>
			<param-name>contextConfigLocation</param-name>
			<param-value>classpath:springmvc.xml</param-value>
		</init-param>
		<load-on-startup>0</load-on-startup>
	</servlet>
	<!-- 引用mvc -->
	<servlet-mapping>
		<servlet-name>springmvc</servlet-name>
		<url-pattern>/</url-pattern>
	</servlet-mapping>
	<!-- 3 加载编码器 -->
	<filter>
		<filter-name>encoding</filter-name>
		<filter-class>org.springframework.web.filter.CharacterEncodingFilter</filter-class>
		<init-param>
			<param-name>encoding</param-name>
			<param-value>utf-8</param-value>
		</init-param>
		<init-param>
			<param-name>forceRequestEncoding</param-name>
			<param-value>true</param-value>
		</init-param>
	</filter>
	<!-- 引用编码器  只对post 请求有效,get 无效-->
	<filter-mapping>
		<filter-name>encoding</filter-name>
		<servlet-name>springmvc</servlet-name>
	</filter-mapping>
</web-app>
4.2 springmvc.xml
1 包扫描
2 驱动开发
3 视图解析器
4 文件上传解析器
5 拦截器
6 静态资源

<beans xmlns="http://www.springframework.org/schema/beans"
	xmlns:xsi="http://www.w3.org/2001/XMLSchema-instance"
	xmlns:mvc="http://www.springframework.org/schema/mvc"
	xmlns:context="http://www.springframework.org/schema/context"
	xsi:schemaLocation="http://www.springframework.org/schema/mvc http://www.springframework.org/schema/mvc/spring-mvc-4.3.xsd
		http://www.springframework.org/schema/beans http://www.springframework.org/schema/beans/spring-beans-4.3.xsd
		http://www.springframework.org/schema/context http://www.springframework.org/schema/context/spring-context-4.3.xsd">
	<!-- 1 包扫描 -->
	<!-- 2 注解开发 -->
	<!-- 3 视图解析器 -->
	<!-- 4 文件上传解析器 -->
	<!-- 5 拦截器 -->
	<!-- 6 静态资源 -->
	<context:component-scan
		base-package="com.sxt.controller" />
	<mvc:annotation-driven />
	<bean id="viewResolver"
		class="org.springframework.web.servlet.view.InternalResourceViewResolver">
		<property name="prefix" value="/WEB-INF/"></property>
		<property name="suffix" value=".jsp"></property>
	</bean>
	<bean id="multipartResolver"
		class="org.springframework.web.multipart.commons.CommonsMultipartResolver">
		<property name="defaultEncoding" value="utf-8"></property>
		<!-- 使用的是字节 50M -->
		<property name="maxUploadSize" value="52428800"></property>
		<!-- 可以设置一个临时的目录 uploadTempDir,但是注意,我们以上文件不放在tomcat ,需要放在文件服务器里面,我们以后不需要设置这个值 -->
	</bean>
	<!-- <mvc:interceptors></mvc:interceptors> -->
	<mvc:resources location="/WEB-INF/statics/" mapping="/**"></mvc:resources>
</beans>
4.3 spring-dao.xml(面试多)

1 数据源
2 sqlSessionFactory
3 MapperScan
<!-- 数据源 -->
<!-- sqlSessionFactory -->
<!-- mapperScan -->
<beans xmlns="http://www.springframework.org/schema/beans"
	xmlns:xsi="http://www.w3.org/2001/XMLSchema-instance"
	xmlns:context="http://www.springframework.org/schema/context"
	xsi:schemaLocation="http://www.springframework.org/schema/beans http://www.springframework.org/schema/beans/spring-beans-4.3.xsd
		http://www.springframework.org/schema/context http://www.springframework.org/schema/context/spring-context-4.3.xsd">
	<bean id="dataSource"
		class="com.alibaba.druid.pool.DruidDataSource">
		<property name="username" value="${db.username}"></property>
		<property name="password" value="${db.password}"></property>
		<property name="url" value="${db.url}"></property>
		<property name="driverClassName"
			value="${db.driverClassName}"></property>
	</bean>
	<bean id="sqlSessionFactory"
		class="org.mybatis.spring.SqlSessionFactoryBean">
		<property name="dataSource" ref="dataSource"></property>
		<property name="configLocation" value="classpath:mybatis.cfg"></property>
	</bean>
	<bean id="mapperScan" class="org.mybatis.spring.mapper.MapperScannerConfigurer">
      <property name="basePackage" value="com.sxt.mapper"></property>
      <property name="sqlSessionFactoryBeanName" value="sqlSessionFactory"></property>
	</bean>
</beans>
4.4 spring-service.xml
配置事务时,需要spring-jdbc的依赖
1 包扫描
2 事务配置

<beans xmlns="http://www.springframework.org/schema/beans"
	xmlns:xsi="http://www.w3.org/2001/XMLSchema-instance"
	xmlns:context="http://www.springframework.org/schema/context"
	xmlns:tx="http://www.springframework.org/schema/tx"
	xsi:schemaLocation="http://www.springframework.org/schema/beans http://www.springframework.org/schema/beans/spring-beans-4.3.xsd
		http://www.springframework.org/schema/context http://www.springframework.org/schema/context/spring-context-4.3.xsd
		http://www.springframework.org/schema/tx http://www.springframework.org/schema/tx/spring-tx-4.3.xsd">
	<context:component-scan
		base-package="com.sxt.service.impl"></context:component-scan>
	<bean id="transactionManager"
		class="org.springframework.jdbc.datasource.DataSourceTransactionManager">
		<property name="dataSource" ref="dataSource"></property>
	</bean>
	<tx:annotation-driven transaction-manager="transactionManager"/>
</beans>