前提条件:已安装并配置好Tensorflow(GPU与CPU版本均可,但推荐GPU版本)的运行环境。
1. 前期准备
1.1 下载源码
facenet源码下载
目录如下(其中src目录中的内容是我们需要的):

src目录为:
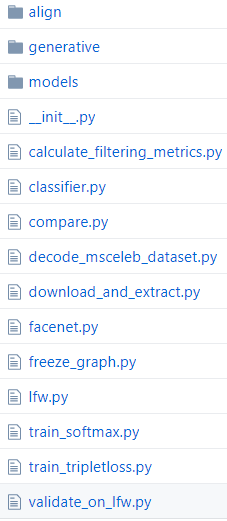
与我们直接相关的是compare.py,train_softmax.py,train_tripletloss.py以及align目录内容和facenet.py
1.2 下载与训练模型
facenet提供了两个预训练模型,分别是基于CASIA-WebFace和MS-Celeb-1M人脸库训练的,不过需要去谷歌网盘下载,这里给其中一个模型的百度网盘的链接:链接:下载链接(此处是较早期的模型) 密码: 12mh
模型目录为:

1.3 图像预处理(对齐等)
可能是我环境的问题(本人是Windows下的),命令行运行代码如下时需要改的东西比较多
cd my_deeplearning_work\facenet\src
python align\align_dataset_mtcnn.py data\CASIA-WebFace data\CASIA-WebFace-182 --image_size 182 --margin 44
此时data目录与align目录关系为:
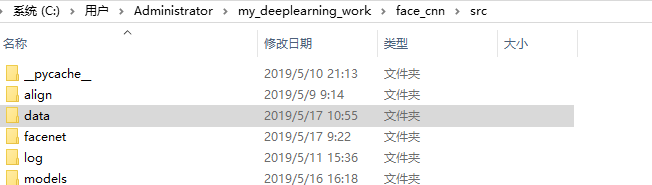
data目录为

此处使用webface作为数据集(因为挺大的),如果大家感兴趣这里是链接:数据链接提取码:qohu
需要修改的部分为
(1)将facenet.py复制一份放入align目录
(2)修改align_dataset_mtcnn.py文件内容如下

改为
import detect_face

改为
pnet, rnet, onet = detect_face.create_mtcnn(sess, None)
还有第102处改为
bounding_boxes, _ = detect_face.detect_face(img, minsize, pnet, rnet, onet, threshold, factor)
这些改动都是因为import align.detect_face这命令我的python环境无法正确识别
此外,还有一处比较重要的改动
facenet.store_revision_info(src_path, output_dir, ' '.join(sys.argv))
这一行代码需要注释掉或者删掉,不然会出bug
2. 使用facenet
2.1 使用人脸比对程序
compare.py这一文件可以直接比对两个人脸经过它的网络映射之后的特征并计算两者的欧氏距离,我也可以通过修改代码使其可以只生成特征或者实现直接比对整个目录内的图片。
compare.py的基本用法是
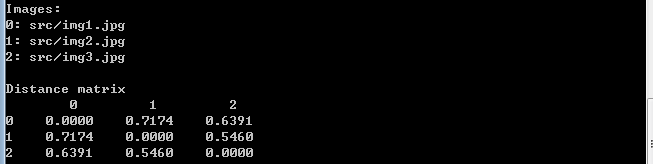
python compare.py pretrained_model\20170512-110547 src\img1.jpg src\img2.jpg src\img3.jpg
其中pretrained_model目录下存放我们之前下载的预训练模型20170512-110547,后面为我的三张测试图片,结果如下
因为这样的代码并不满足我的要求,于是做下面修改
parser.add_argument('image_files', type=str, nargs='+', help='Images to compare')
改为
parser.add_argument('image_files', type=str, help='Images to compare')
而
def main(args):

    images = load_and_align_data(args.image_files, args.image_size, args.margin, args.gpu_memory_fraction)
    with tf.Graph().as_default():

        with tf.Session() as sess:

            # Load the model
            facenet.load_model(args.model)

            # Get input and output tensors
            images_placeholder = tf.get_default_graph().get_tensor_by_name("input:0")
            embeddings = tf.get_default_graph().get_tensor_by_name("embeddings:0")
            phase_train_placeholder = tf.get_default_graph().get_tensor_by_name("phase_train:0")

            # Run forward pass to calculate embeddings
            feed_dict = { images_placeholder: images, phase_train_placeholder:False }
            emb = sess.run(embeddings, feed_dict=feed_dict)

            nrof_images = len(args.image_files)

            print('Images:')
            for i in range(nrof_images):
                print('%1d: %s' % (i, args.image_files[i]))
            print('')

            # Print distance matrix
            print('Distance matrix')
            print('    ', end='')
            for i in range(nrof_images):
                print('    %1d     ' % i, end='')
            print('')
            for i in range(nrof_images):
                print('%1d  ' % i, end='')
                for j in range(nrof_images):
                    dist = np.sqrt(np.sum(np.square(np.subtract(emb[i,:], emb[j,:]))))
                    print('  %1.4f  ' % dist, end='')
                print('')
改为
def main(args):
    img_list = os.listdir(args.image_files)
    feature = []

    with tf.Graph().as_default():
        with tf.Session() as sess:
            facenet.load_model(args.model)
            for img in img_list:
                print(img)
                img_path = os.path.join(args.image_files, img)
                img = misc.imread(img_path)
                img_rs = cv2.resize(img, (160, 160), interpolation=cv2.INTER_CUBIC)
                image = facenet.prewhiten(img_rs)
                img_scaled_reshape = image.reshape(-1,160,160,3)
                # Load the model


                # Get input and output tensors
                images_placeholder = tf.get_default_graph().get_tensor_by_name("input:0")
                embeddings = tf.get_default_graph().get_tensor_by_name("embeddings:0")
                phase_train_placeholder = tf.get_default_graph().get_tensor_by_name("phase_train:0")

                # Run forward pass to calculate embeddings
                feed_dict = {images_placeholder: img_scaled_reshape, phase_train_placeholder: False}
                emb = sess.run(embeddings, feed_dict=feed_dict)
                feature.append(emb)
    my_feature=np.asarray(feature)
    save_feature(my_feature)

#            nrof_images = len(args.image_files)
#
#            print('Images:')
#            for i in range(nrof_images):
#                print('%1d: %s' % (i, args.image_files[i]))
#            print('')
#
#            # Print distance matrix
#            print('Distance matrix')
#            print('    ', end='')
#            for i in range(nrof_images):
#                print('    %1d     ' % i, end='')
#            print('')
#            for i in range(nrof_images):
#                print('%1d  ' % i, end='')
#                for j in range(nrof_images):
#                    dist = np.sqrt(np.sum(np.square(np.subtract(emb[i, :], emb[j, :]))))
#                    print('  %1.4f  ' % dist, end='')
#                print('')


#def load_and_align_data(image_paths, image_size, margin, gpu_memory_fraction):
#
#    minsize = 20  # minimum size of face
#    threshold = [0.6, 0.7, 0.7]  # three steps's threshold
#    factor = 0.709  # scale factor
#
#    print('Creating networks and loading parameters')
#    with tf.Graph().as_default():
#        gpu_options = tf.GPUOptions(per_process_gpu_memory_fraction=gpu_memory_fraction)
#        sess = tf.Session(config=tf.ConfigProto(gpu_options=gpu_options, log_device_placement=False))
#        with sess.as_default():
#            pnet, rnet, onet = align.detect_face.create_mtcnn(sess, None)
#
#    nrof_samples = len(image_paths)
#    img_list = [None] * nrof_samples
#    for i in range(nrof_samples):
#        print( os.path.expanduser(image_paths[i]))
#        img = misc.imread(os.path.expanduser(image_paths[i]))
#        img_size = np.asarray(img.shape)[0:2]
#        bounding_boxes, _ = align.detect_face.detect_face(img, minsize, pnet, rnet, onet, threshold, factor)
#        det = np.squeeze(bounding_boxes[0, 0:4])
#        bb = np.zeros(4, dtype=np.int32)
#        bb[0] = np.maximum(det[0] - margin / 2, 0)
#        bb[1] = np.maximum(det[1] - margin / 2, 0)
#        bb[2] = np.minimum(det[2] + margin / 2, img_size[1])
#        bb[3] = np.minimum(det[3] + margin / 2, img_size[0])
#        cropped = img[bb[1]:bb[3], bb[0]:bb[2], :]
#        aligned = misc.imresize(cropped, (image_size, image_size), interp='bilinear')
#        prewhitened = facenet.prewhiten(aligned)
#        img_list[i] = prewhitened
#    images = np.stack(img_list)
#    return images
def save_feature(feature, outputfile = 'my_feature.pkl'):
    with open(outputfile, 'wb') as f:
        pickle.dump(feature, f)
    return
此处为了方便不在compare.py中进行人脸对齐与裁剪,而是添加了保存特征为pkl文件的内容,以方便我们提取特征。
此时运行时,在命令符输入
python compare.py pretrained_model\20170512-110547 data\test
即可运行
2.2 重新训练
首先cd到代码所在路径,在命令行输入
使用train_softmax.py训练
python train_softmax.py --models_base_dir facenet --data_dir data\CASIA_WebFace_182 --image_size 160 --model_def models.inception_resnet_v1 --optimizer RMSPROP --learning_rate -1 --max_nrof_epochs 80 --keep_probability 0.8 --random_crop --random_flip --learning_rate_schedule_file data\learning_rate_schedule_classifier_casia.txt --weight_decay 5e-5 --center_loss_factor 1e-2 --center_loss_alfa 0.9
使用train_tripletloss.py训练
python train_tripletloss.py --models_base_dir facenet --data_dir data\CASIA_WebFace_182 --model_def models.inception_resnet_v1 --image_size 160 --optimizer RMSPROP --learning_rate -1 --max_nrof_epochs 80 --keep_probability 0.8 --random_crop --random_flip --learning_rate_schedule_file data\learning_rate_schedule_classifier_casia.txt --weight_decay 5e-5 --alpha 0.1
与之前类似需要将
facenet.store_revision_info(src_path, log_dir, ' '.join(sys.argv))
一句代码注释掉或者删掉才可以运行,下面是一些参数说明
–logs_base_dir./logs:将会把训练日志保存到./logs中,在运行时,会在./logs文件夹下新建一个以当前时间命名的文讲夹。最终的日志会保存在这个文件夹中,所谓的日志文件,实际上指的是tf中的events文件,它主要包含当前损失、当前训练步数、当前学习率等信息。后面我们会使用TensorBoard查看这些信息;
–models_base_dir ./models:最终训练好的模型保存在./models文件夹下,在运行时,会在./models文件夹下新建一个以当前时间命名的文讲夹,并用来保存训练好的模型;
–data_dir …/datasets/casis/casia_maxpy_mtcnnpy_182:指定训练所使用的数据集的路径,这里使用的就是刚才对齐好的CASIA-WebFace人脸数据;
–image_size 160:输入网络的图片尺寸是160×160160×160大小;
–mode_def models.inception_resnet_v1:指定了训练所使用的卷积网络是inception_resnet_v1网络。项目所支持的网络在src/models目录下,包含inception_resnet_v1,inception_resnet_v2和squeezenet三个模型,前两个模型较大,最后一个模型较小。如果在训练时出现内存或者显存不足的情况可以尝试使用sequeezenet网络,也可以修改batch_size 大小为32或者64(默认是90);
–lfw_dir …/datasets/lfw/lfw_mtcnnpy_160:指定了LFW数据集的路径。如果指定了这个参数,那么每训练完一个epoch,就会在LFW数据集上执行一次测试,并将测试的准确率写入到日志文件中;
–optimizer RMSPROP :指定训练使用的优化方法;
–learning_rate -1:指定学习率,指定了负数表示忽略这个参数,而使用后面的–learning_rate_schedule_file参数规划学习率;
–max_nrof_epochs 80:指定训练轮数epoch;
–keep_probability 0.8:指定弃权的神经元保留率;
–random_crop:表明在数据增强时使用随机裁切;
–random_flip :表明在数据增强时使用随机随机翻转;
–learning_rate_schedule_file data/learning_rate_schedule_classifier_casia.txt:在之前指定了–learning_rate -1,因此最终的学习率将由参数–learning_rate_schedule_file决定。这个参数指定一个文件data/learning_rate_schedule_classifier_casia.txt,该文件内容如下:
0:  0.05
60: 0.005
80: 0.0005
91: -1
–weight_decay 5e-5:正则化系数;
–center_loss_factor 1e-2 :中心损失和Softmax损失的平衡系数;
–center_loss_alfa 0.9:中心损失的内部参数;
除了上面我们使用到的参数,还有许多参数,下面介绍一些比较重要的:
pretrained_model :预训练模型,使用预训练模型可以加快训练速度(微调时经常使用到),我们会在下一节详细讲这一个参数;
batch_size:batch大小,越大,需要的内存也会越大;
random_rotate:表明在数据增强时使用随机旋转;
2.3 加载预训练模型并接着训练
为了实现这一功能,我们发现原代码是有bug的,需要做一些修改。
我们需要将
               print('Restoring pretrained model: %s' % pretrained_model)
               saver.restore(sess, pretrained_model)
修改为
                print('Restoring pretrained model: %s' % pretrained_model)
                facenet.load_model(args.pretrained_model)
但此时还是有错误的,往往会提示facenet Assign requires shapes of both tensors to match.的类似错我于是我们还需要如下修改,将
saver = tf.train.Saver(tf.trainable_variables(), max_to_keep=3)
改为
        all_vars = tf.trainable_variables()
        var_to_restore = [v for v in all_vars if not v.name.startswith('Logits')]
        saver = tf.train.Saver(var_to_restore)
然后我们就可以接着预训练模型继续训练了,我们需要在命令行输入
python train_softmax.py --models_base_dir facenet --pretrained_model pretrained_model\20170512-110547 --model_def models.inception_resnet_v1 --data_dir data\CASIA_WebFace_182 --image_size 160 --optimizer RMSPROP --learning_rate -1 --max_nrof_epochs 80 --keep_probability 0.8 --random_crop --random_flip --learning_rate_schedule_file data\learning_rate_schedule_classifier_casia.txt --weight_decay 5e-5 --center_loss_factor 1e-2 --center_loss_alfa 0.9