SpringBoot优点
- 开箱即用,提供各种默认配置来简化项目配置
- 内嵌式容器简化Web项目
- 没有冗余代码生成和XML配置的要求
pom.xml 分析
<?xml version="1.0" encoding="UTF-8"?>
<project xmlns="http://maven.apache.org/POM/4.0.0" xmlns:xsi="http://www.w3.org/2001/XMLSchema-instance"
    xsi:schemaLocation="http://maven.apache.org/POM/4.0.0 https://maven.apache.org/xsd/maven-4.0.0.xsd">
    <modelVersion>4.0.0</modelVersion>

    <!--项目元数据信息:-->
    <parent>
        <groupId>org.springframework.boot</groupId>
        <artifactId>spring-boot-starter-parent</artifactId>
        <version>2.1.9.RELEASE</version>
        <relativePath/> <!-- lookup parent from repository -->
    </parent>

	<!--parent:-->
    <groupId>com.kuang</groupId>
    <artifactId>springboot-01-helloworld</artifactId>
    <version>0.0.1-SNAPSHOT</version>
    <name>springboot-01-helloworld</name>
    <description>springboot-01-helloworld</description>

    <dependencies>

        <dependency>
            <groupId>org.springframework.boot</groupId>
            <artifactId>spring-boot-starter</artifactId>
        </dependency>

        <dependency>
            <groupId>org.springframework.boot</groupId>
            <artifactId>spring-boot-starter-test</artifactId>
            <scope>test</scope>
        </dependency>

        <!--项目热部署依赖-->
         <dependency>
            <groupId>org.springframework.boot</groupId>
            <artifactId>spring-boot-devtools</artifactId>
        </dependency>

    </dependencies>

    <build>
        <plugins>
            <!--build-->
            <plugin>
                <groupId>org.springframework.boot</groupId>
                <artifactId>spring-boot-maven-plugin</artifactId>
            </plugin>

            <!--项目热部署开启-->
            <plugin>
                <groupId>org.springframework.boot</groupId>
                <artifactId>spring-boot-maven-plugin</artifactId>
                <configuration>
                    <fork>true</fork><!--必须添加这个配置-->
                </configuration>
            </plugin>

        </plugins>
    </build>
</project>
如上所示,主要有四个部分:
- 项目元数据信息:创建时候输入的Project Metadata部分,也就是Maven项目的基本元素,包括:groupId、artifactId、version、name、description等
- parent:继承
spring-boot-starter-parent的依赖管理,控制版本与打包等内容 - dependencies:项目具体依赖,这里包含了
spring-boot-starter-web用于实现HTTP接口(该依赖中包含了Spring MVC),官网对它的描述是:使用Spring MVC构建Web(包括RESTful)应用程序的入门者,使用Tomcat作为默认嵌入式容器。;spring-boot-starter-test用于编写单元测试的依赖包。更多功能模块的使用我们将在后面逐步展开。 - build:构建配置部分。默认使用了
spring-boot-maven-plugin,配合spring-boot-starter-parent就可以把Spring Boot应用打包成JAR来直接运行。
更改项目端口号

自动配置
基于java代码的bean配置

@Configuration&、@Bean这两个bean的注解一起使用就可以创建一个基于java代码的配置类,可以用来替代相应的xml配置文件
@Configuration注解的类可以看作是能生产让Spring IoC容器管理的Bean实例的工厂。
@Bean注解告诉Spring,一个带有@Bean的注解方法将返回一个对象,该对象应该被注册到spring容器中。
传统的基于xml的bean配置方法如下:
<beans>
    <bean id = "car" class="com.itpsc.Car">
        <property name="wheel" ref = "wheel"></property>
    </bean>
    <bean id = "wheel" class="com.itpsc.Wheel"></bean>
</beans>
相当于用基于java代码的配置方式:
@Configuration
public class Conf {
    @Bean
    public Car car() {
        Car car = new Car();
        car.setWheel(wheel());
        return car;
    }
    @Bean
    public Wheel wheel() {
        return new Wheel();
    }
}
所以上面的MybatisAutoConfiguration这个类,自动帮我们生成了SqlSessionFactory这些Mybatis的重要实例并交给spring容器管理,从而完成bean的自动注册。
原理初探
自动配置:
- spring-boot-dependencies:核心依赖在父工程中,
- 在引入依赖的时候,不需要指定版本,因为它有版本仓库
- 自动配好了资源过滤
启动器:
-
<dependency> <groupId>org.springframework.boot</groupId> <artifactId>spring-boot-starter</artifactId> </dependency> -
启动器:就是Springboot的启动场景
比如spring-boot-starter-web,他就会帮我们自动导入web环境所有的依赖!
springboot会将所有的功能场景,都变成一个个的启动器
我们要使用什么功能,就只需要找到对应的启动器就可以了
主程序:
//@SpringBootApplication 来标注一个主程序类,说明这是一个SpringBoot的应用
@SpringBootApplication
public class Springboot01HelloworldApplication {

   public static void main(String[] args) {
     //将SpringBoot应用启动 静态方法run
      SpringApplication.run(Springboot01HelloworldApplication.class, args); }}
- 注解
  - @SpringBootConfiguration : springboot的配置
 	  @Configuration : spring配置类
    	@Component : 说明这也是一个spring的组件

 -  @EnableAutoConfiguration : 自动配置
      @AutoConfigurationPackage : 自动配置包
        @Import(AutoConfigurationPackages.Registrar.class) : 自动配置包.包注册
  		@Import(AutoConfigurationImportSelector.class) : 自动配置导入选择器
           //获取所有的配置 : List<String> configurations = 获取候选的配置(元注解,属性)
           List<String> configurations = getCandidateConfigurations(annotationMetadata, attributes);
META-INF/spring.factories : 自动配置的核心文件
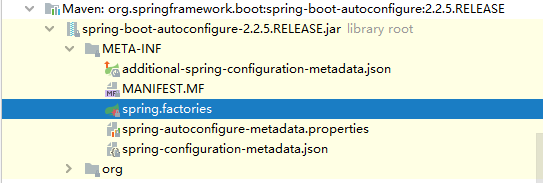
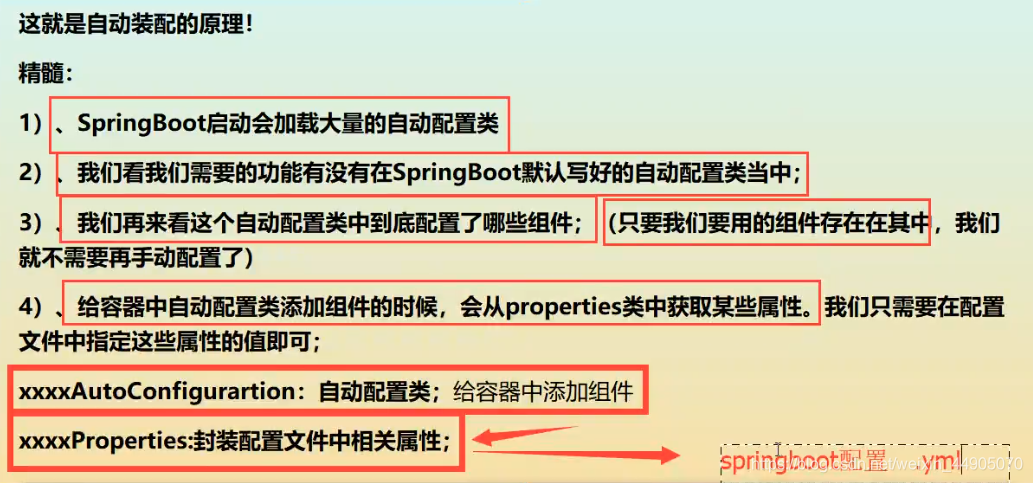
结论:springboot所有自动配置都是在启动的时候扫描并加载:spring.factories(工厂)所有的自动配置类都在这里面,但是不一定都生效,要判断条件是否成立,只要导入了对应的start,就有对应的启动器了,有了启动器,我们自动装配就会生效,然后就配置成功!
- springboot在启动的时候,从类路径下
/META-INF/spring.factories获取指定的值 - 将这些自动配置的类导入容器,自动配置就会生效,帮我们进行自动配置
- 以前我们需要自动配置的东西,现在springboot帮我们做了
- 整个javaEE,解决方案和自动装配的东西都在
spring-boot-autoconfigure-2.2.5.RELEASE.jar这个包下 - 它会把所有需要导入的组件,以类名的方式返回,这些组件就会被添加到容器
- 容器中存在非常多的xxxAutoConfiguration文件,就是这些类给容器中导入了这个场景需要的所有组件,并自动装配
- 有个自动配置类,免去了手动编写配置文件的工作!
run():
- 判断是普通项目还是web项目,如果是普通项目就直接结束啦
- 推断当前的主类,知道了主类才能加载
- run方法里边的监听器是全局存在的,它会获取上下文处理bean
@Conditional派生注解 : 必须是@Conditional指定的条件成立,才给容器中添加组件,配置类里面的所有内容才生效

配置文件
Springboot使用一个全局的配置文件,配置文件名称是固定的
- application.properties
- 语法接口 : key=value
- application.yaml(推荐使用)
- 语法结构 : key: 空格value
配置文件的作用: 修改springboot自动配置的默认值.
yaml
yaml可以给实体类赋值,也可以成为JavaConfiguration配置

但是不影响程序的运行

@ConfigurationProperties(prefix = “person”)
将配置文件中配置的每一个属性的值,映射到这个组件中
告诉springboot将本类中的所有属性和配置文件中相关的配置绑定,可以修改springboot属性的默认值
只有这个组件是容器中的组件,才能使用容器提供的@ConfigurationProperties功能
一但配置类生效,这个配置类就会给容器中添加各种组件,这些组件的属性是从对应的properties(属性)类中获取的,这些类里面的每一个属性又是和配置文件绑定的
占位符:
person:
  name: ${random.uuid}
  	 result: name='46df8e31-7c35-4873-9f09-52d46d5bbc71'
  age: ${random.int}
  	 result: age=1569119886
  happy: true
  birth: 2020/1/1
  maps: {k1: v1, k2: v2}
  lists:
    - code
    - music
    - girl
  dog:
    name: ${person.happy}_旺财
    age: 3
      result: dog=Dog{name='true_旺财', age=3}
   ---
   server:
     port: 8081
   spring:
     profiles:
       active: dev 激活dev端口 修改springboot默认值
   --- 分割线
    server:
      port: 8082
    spring:
      profiles: dev
JSR303 数据校验常用注解
@Validated : 在类上开启数据校验

静态资源导入


-
在springboot中,我们可以使用以下方式请求静态资源
- webjars(不推荐)
localhost:8080/webjars/ - public,static,/**,resources
localhost:8080/
- webjars(不推荐)
-
优先级: resources > static(默认) > public (同样的js文件,在不同层级文件夹的访问优先度)
模板引擎Thymelea

前端交给我们的页面,是html页面,以前开发需要把html转成jsp页面,因为可以绑定后台数据输出, jsp也是个模板引擎,
springboot推荐使用thymeleaf,不推荐jsp
与其它模板引擎相比,Thymeleaf 最大的特点是能够直接在浏览器中打开并正确显示模板页面,而不需要启动整个 Web 应用。
只要需要使用thymeleaf(塞姆莉夫),导入对应的依赖就可以,将html放在templates目录下即可

在html页面取出一个简单的值:
<!--需要th:标签 可以接管html中的操作-->
<h1 th:text="${msg}"></h1>
模拟数据库信息
//部门dao
@Repository
public class DepartmentDao {

    private static Map<Integer, Department>departments = null;

    static {
        departments = new HashMap<Integer, Department>();//创建一个部门表
        departments.put(101,new Department(101,"教学部"));
        departments.put(102,new Department(102,"市场部"));
        departments.put(103,new Department(103,"调研部"));
        departments.put(104,new Department(104,"后勤部"));
        departments.put(105,new Department(105,"研发部"));

    }
    //获取所有部门信息
    public Collection<Department> getDepartments(){
        return departments.values();
    }
    //通过id的到部门
    public Department getDepartmentById(Integer id){
        return departments.get(id);
    }


    //员工dao
    @Repository
    public class EmployeeDao {

        //模拟数据库中的数据
        private static Map<Integer, Employee> employees = null;
        //员工有所属部门
        @Autowired
        private DepartmentDao departmentDao;

        static {
            employees = new HashMap<Integer, Employee>();//创建一个部门表
            employees.put(1001,new Employee(1001,"AA","[email protected]",0,new Department(101,"教学部")));
            employees.put(1002,new Employee(1002,"BB","[email protected]",1,new Department(102,"市场部")));
            employees.put(1003,new Employee(1003,"CC","[email protected]",0,new Department(103,"调研部")));
            employees.put(1004,new Employee(1004,"DD","[email protected]",1,new Department(104,"后勤部")));
            employees.put(1005,new Employee(1005,"EE","[email protected]",0,new Department(105,"研发部")));
        }

        //主键自增
        private static Integer initId = 1006;
        //增加一个员工
        public void save(Employee employee){
            if (employee.getId()==null){
                employee.setId(initId++);
            }
            employee.setDepartment(departmentDao.getDepartmentById(employee.getDepartment().getId()));
            employees.put(employee.getId(),employee);
        }
        //查询全部员工信息
        public Collection<Employee> getAll(){
            return employees.values();
        }
        //通过id查询员工
        public Employee getEmployeeById(Integer id){
            return employees.get(id);
        }
        //删除员工
        public void delete(Integer id){
            employees.remove(id);
        }}
i18n页面国际化配置
首页配置:
- 注意点,所有页面的静态资源都需要使用thymeleaf(塞姆莉夫))接管 头:
- 配置i18n文件,用.properties文件写,使用可视化界面

3. 路径如果乱码修改File Encodings默认编码格式为UTF-8
4. url使用@{},参数使用#{}
# 关闭模板引擎缓存
spring:
  thymeleaf:
    cache: false
#<button  type="submit">[[#{login.btn}]]</button>
#<input type="checkbox" value="remember-me" > [[#{login.Remember}]]
#<input type="password" th:placeholder="#{login.passwd}" required="">
  messages:
    basename: i18n.login
  #时间日期格式化
  mvc:
    date-format: yyyy-MM-dd
#更改访问路径 http://localhost:8080/zjt/
server:
  servlet:
    context-path: /zjt
- 如果需要按钮切换语言,需要自定义一个组件LocaleResolver
- 页面部分提供一个链接
<a class="btn btn-sm" th:href="@{/index.html(l='zh_CN')}">中文</a>
<a class="btn btn-sm" th:href="@{/index.html(l='en_US')}">English</a>
- java取值实现
public class MyLocaleResolver implements LocaleResolver {

 //解析请求
@Override
public Locale resolveLocale(HttpServletRequest request) {
   //获取请求中的语言参数
   String language = request.getParameter("l");
   //如果没有就使用默认的
   Locale locale = Locale.getDefault();
   //如果请求的链接携带了国际化参数
   if (! StringUtils.isEmpty(language)){
        //zh_CN
        String[] split = language.split("_");
        /国家,地区
        locale = new Locale(split[0], split[1]);
    }
    return locale;
}
- 将自己写的组件配置到spring容器@Bean
@Configuration
public class MyMvcConfig implements WebMvcConfigurer {
  @Override //重写默认跳转地址
  public void addViewControllers(ViewControllerRegistry registry) {
      registry.addViewController("/").setViewName("index");
      registry.addViewController("/index.html").setViewName("index");
  }
   //自定义国际化组件生效
   @Bean
    public LocaleResolver localeResolver(){
        return new MyLocaleResolver();
    }
}
登陆+拦截器
登录控制层
@Controller
public class LoginController {

    @RequestMapping("/user/login")
    public String login(
        @RequestParam("username")String username,
        @RequestParam("password")String password,
        Model model, HttpSession session){
        if (!StringUtils.isEmpty(username)&&"1".equals(password)){
            session.setAttribute("loginUser",username);
            return "redirect:/main.html";
        }else{
            model.addAttribute("msg","用户名和密码错误");
            return "index";
        }
    }
    //退出登录
    @RequestMapping("/user/logout")
     public String loginout(HttpSession session){
         session.invalidate();//让session失效
         return "redirect:/index.html";
     }
}
自定义拦截器
public class LoginHandlerInterceptor implements HandlerInterceptor {
    @Override
    public boolean preHandle(HttpServletRequest request, HttpServletResponse response, Object handler) throws Exception {
        //登陆成功之后应该有用户的session
        Object loginUser = request.getSession().getAttribute("loginUser");
        if (loginUser == null) {
            request.setAttribute("msg", "没有登陆,请先登录");
            request.getRequestDispatcher("/index.html").forward(request, response);
            return false;
        } else {
            return true;
        }
    }
}
自定义WebMvcConfigurer,使拦截器生效
@Configuration
public class MyMvcConfig implements WebMvcConfigurer {

    @Override
    public void addViewControllers(ViewControllerRegistry registry) {
        registry.addViewController("/").setViewName("index");
        registry.addViewController("/index.html").setViewName("index");
        registry.addViewController("/main.html").setViewName("dashboard");
    }
    //让拦截器生效注册到webmvc配置
    @Override
    public void addInterceptors(InterceptorRegistry registry) {
        registry.addInterceptor(new LoginHandlerInterceptor())
               .addPathPatterns("/**")//拦截全部
            .excludePathPatterns("/css/**","/js/**","/img/**","/","/index.html","/user/login");//忽略的请求
    }
}
thymeleaf模板页面接值
<!--如果msg的值为空 则提示错误-->
<p style="color: red" th:text="${msg}" th:if="${not #strings.isEmpty(msg)}"></p>
员工页面展示
-
提取公共页面
- th:fragment=“sidebar” 提取出来
- th:replace="~{commons/commons::sidebar}" 替换进去
- 如果要传递参数,可以直接使用()传参,接收判断即可!


2. 列表循环展示
<thead>
    <tr>
        <th>id</th>
        <th>lastName</th>
        <th>email</th>
        <th>gender</th>
        <th>department</th>
        <th>birth</th>
        <th>操作</th>
    </tr>
</thead>
<tbody>
    <tr th:each="emp:${emps}">
        <td th:text="${emp.getId()}"></td>
        <td th:text="${emp.getLastName()}"></td>
        <td th:text="${emp.getEmail()}"></td>
        <td th:text="${emp.getGender()==0 ? '女' : '男'}"></td>
        <td th:text="${emp.department.getDepartmentName()}"></td>
        <!-- #dates工具-->
        <td th:text="${#dates.format(emp.getBirth(),'yyyy-MM-dd HH:mm:ss' )}"></td>
        <td>
            <button class="btn btn-sm btn-primary">编辑</button>
            <button class="btn btn-sm btn-danger">删除</button>
        </td>
    </tr>
</tbody>

Druid是什么 德鲁伊
Druid是一个JDBC组件库,包括数据库连接池、SQL Parser等组件。
DruidDataSource是最好的数据库连接池。
Druid能够提供强大的监控和扩展功能。
- pom
  <!--Druid-->
<dependency>
    <groupId>com.alibaba</groupId>
    <artifactId>druid</artifactId>
    <version>1.1.10</version>
</dependency>
<!--log4j-->
<dependency>
    <groupId>log4j</groupId>
    <artifactId>log4j</artifactId>
    <version>1.2.17</version>
</dependency>
- application.yml中的Druid配置
spring:
  datasource:
    username: root
    password: root
    url: jdbc:mysql://localhost:3306/ssmbuild?serverTimezone=UTC&useUnicode=true&characterEncoding=utf-8
    driver-class-name: com.mysql.cj.jdbc.Driver
    type: com.alibaba.druid.pool.DruidDataSource
    # 初始化连接池个数
    initialSize: 5
    # 最小连接池个数——》已经不再使用,配置了也没效果
    minIdle: 2
    # 最大连接池个数
    maxActive: 20
    # 配置获取连接等待超时的时间,单位毫秒,缺省启用公平锁,并发效率会有所下降
    maxWait: 60000
    # 配置间隔多久才进行一次检测,检测需要关闭的空闲连接,单位是毫秒
    timeBetweenEvictionRunsMillis: 60000
    # 配置一个连接在池中最小生存的时间,单位是毫秒
    minEvictableIdleTimeMillis: 300000
    # 用来检测连接是否有效的sql,要求是一个查询语句。
    # 如果validationQuery为null,testOnBorrow、testOnReturn、testWhileIdle都不会起作用
    validationQuery: SELECT 1 FROM DUAL
    # 建议配置为true,不影响性能,并且保证安全性。
    # 申请连接的时候检测,如果空闲时间大于timeBetweenEvictionRunsMillis,执行validationQuery检测连接是否有效。
    testWhileIdle: true
    # 申请连接时执行validationQuery检测连接是否有效,做了这个配置会降低性能
    testOnBorrow: false
    # 归还连接时执行validationQuery检测连接是否有效,做了这个配置会降低性能
    testOnReturn: false
    # 打开PSCache,并且指定每个连接上PSCache的大小
    poolPreparedStatements: true

    maxPoolPreparedStatementPerConnectionSize: 20
    # 通过别名的方式配置扩展插件,多个英文逗号分隔,常用的插件有:
    # 监控统计用的filter:stat
    # 日志用的filter:log4j
    # 防御sql注入的filter:wall
    filters: stat,wall,log4j
    # 通过connectProperties属性来打开mergeSql功能;慢SQL记录
    connectionProperties: druid.stat.mergeSql=true;druid.stat.slowSqlMillis=5000
    # 合并多个DruidDataSource的监控数据
    useGlobalDataSourceStat: true
- DruidConfig配置类
@Configuration
public class DruidConfig {
    @Bean//对应application.yml的连库和Druid德鲁伊 配置
    @ConfigurationProperties(prefix = "spring.datasource")
    public DataSource druidDataSource(){
        return new DruidDataSource();
    }

    //后台监控 : 后台:http://localhost:8080/druid/index.html
    //因为springboot内置了servlet容器,所以没有web.xml,用ServletRegistrationBean替代
    @Bean
    public ServletRegistrationBean statViewServlet(){
        ServletRegistrationBean<StatViewServlet> servletBean = new ServletRegistrationBean<>(new StatViewServlet(), "/druid/*");
        //后台需要有人登陆,账号密码设置
        HashMap<String, String> initParameters = new HashMap<>();
        //控制台管理用户名 参数固定的 loginUsername loginPassword
        initParameters.put("loginUsername","admin");
        initParameters.put("loginPassword","1");
        //白名单,多个用逗号分割, 如果allow没有配置或者为空,则允许所有访问
        initParameters.put("allow","");
        servletBean.setInitParameters(initParameters);//初始化参数
        return servletBean;
    }

    //filtel
    @Bean
    public FilterRegistrationBean webStatFilter(){
        FilterRegistrationBean filterBean = new FilterRegistrationBean();
        filterBean.setFilter(new WebStatFilter());
        //可以过滤的请求
        HashMap<String, String> initParameters = new HashMap<>();
        //这些东西不进行统计
        initParameters.put("exclusions","*.js,*.css,/druid/*");
        filterBean.setInitParameters(initParameters);
        return filterBean;
    }
}


Springboot整合Mybaits
- yml
spring:
  datasource:
    username: root
    password: root
    url: jdbc:mysql://localhost:3306/ssmbuild?serverTimezone=UTC&useUnicode=true&characterEncoding=utf-8
    driver-class-name: com.mysql.cj.jdbc.Driver
mybatis:
  type-aliases-package: com.zjt.pojo
  mapper-locations: classpath:mybatis/mapper/*.xml
- springboot启动类
@SpringBootApplication.
//重要注解 扫描包下的mapper接口,或者用@Mapper在类上代替
@MapperScan("com.zjt.mapper")
public class Springboot05MybatisApplication {
    public static void main(String[] args) {
        SpringApplication.run(Springboot05MybatisApplication.class, args);
    }
}
- mapper.xml命名空间
<mapper namespace="com.zjt.mapper.UserMapper">