SSM框架中注解详解:
1、创建对象
在创建对象的类上面使用注解就可以实现。
创建对象有四个注解。
@Component
@Controller 表现层
@Service 业务层
@Repository 持久层
xml配置
<?xml version="1.0" encoding="UTF-8"?>
<beans xmlns="http://www.springframework.org/schema/beans"
    xmlns:xsi="http://www.w3.org/2001/XMLSchema-instance"
    xmlns:context="http://www.springframework.org/schema/context" xsi:schemaLocation="
        http://www.springframework.org/schema/beans http://www.springframework.org/schema/beans/spring-beans.xsd
        http://www.springframework.org/schema/context http://www.springframework.org/schema/context/spring-context.xsd">
        <!-- bean definitions here -->
    <!--
        开启注解的扫描,扫描类,方法,属性上面的注解
    -->
    <context:component-scan base-package="cn"></context:component-scan>
</beans>
1)@Component
Component注解说明:
作用:用于把对象 存入spring容器中
属性:value:用于指定bean的id。当我们不写时,它的默认值是当前类名,且首字母改小写。
注解创建bean对象举例:
@Component
public class AccountServiceImpl implements IAccountService {

    private IAccountDao accountDao;

    public AccountServiceImpl(){
        System.out.println("对象被创建了");
    }
    public void  saveAccount(){
        accountDao.saveAccount();
    }
}
指定id @Component*(*value=“accountServiceImpl”)
如果不设置id,就默认将类名首字母改为小写 为id
2)@Controller
用于表现层
3)@Service
业务层
4)@Repository
持久层
2、注入数据
他们的作用就和在xml配置文件中的bean标签中写一个标签的作用是一样的
与set方法注入相比,不仅不用写 set方法,而且bean.xml中也无需配置(如此例中UserService想注入UserDao,不用set方法,而且在bean.xml中配置UserService的时候不用在UserService的bean标签内配置UserDao)
1)@Autowired:
作用:自动按照类型注入。只要容器中有唯一的一个bean对象类型和要注入的变量类型匹配,就可以注入成功
如果ioc容器中没有任何bean的类型和要注入的变量类型匹配,则报错。
如果Ioc容器中有多个类型匹配时:
出现位置:
可以是变量上,也可以是方法上
细节:
在使用注解注入时,set方法就不是必须的了。
例:
public class UserService{
	@autowired
	private UserDao userDao;
}
2)@Qualifier:
作用:在按照类中注入的基础之上再按照名称注入。它在给类成员注入时不能单独使用。但是在给方法参数注入时可以(稍后我们讲)
属性:
value:用于指定注入bean的id。
在给类成员注入使不能单独使用,要加上@ Autowired
@Repository("accountDao1")
public class AccountDaoImpl implements IAccountDao {

    public  void saveAccount(){

        System.out.println("保存了账户1");
    }
}
@Repository("accountDao2")
public class AccountDaoImpl2 implements IAccountDao {

    public  void saveAccount(){

        System.out.println("保存了账户2");
    }
}
@Component(value="accountService")
public class AccountServiceImpl implements IAccountService {
    @Autowired
    @Qualifier("accountDao1")
    private IAccountDao accountDao;


    public void  saveAccount(){
        accountDao.saveAccount();
    }
}
public class Client {

    public static void main(String[] args) {
        //1.获取核心容器对象
        ApplicationContext ac = new ClassPathXmlApplicationContext("bean.xml");
        //2.根据id获取Bean对象
        IAccountService as  = (IAccountService)ac.getBean("accountService");
        as.saveAccount();
    }
}
Service中我们注入了accountDao1 因此执行client打印的是:保存了账户1
3)@Resource
作用:直接按照bean的id注入。它可以独立使用
属性:
name:用于指定bean的id。
以上三个注入都只能注入其他bean类型的数据,而基本类型和String类型无法使用上述注解实现。
另外,集合类型的注入只能通过XML来实现。
4)@Value
作用:用于注入基本类型和String类型的数据
属性:
value:用于指定数据的值。它可以使用spring中SpEL(也就是spring的el表达式)
SpEL的写法:${表达式}
3、改变bean作用范围
1)@Scope
他们的作用就和在bean标签中使用scope属性实现的功能是一样的
Scope
作用:用于指定bean的作用范围
属性:
value:指定范围的取值。常用取值:singleton prototype
public class Client {

    /**

     */
    public static void main(String[] args) {
        //1.获取核心容器对象
        ApplicationContext ac = new ClassPathXmlApplicationContext("bean.xml");
        //2.根据id获取Bean对象
        IAccountService as  = (IAccountService)ac.getBean("accountService");
        IAccountService as2  = (IAccountService)ac.getBean("accountService")
        System.out.println(as==as2);

    }
}
打印:true
是单例
将service改为:
@Service("accountService")
@Scope("prototype")
public class AccountServiceImpl implements IAccountService {
    @Resource(name="accountDao2")
    private IAccountDao accountDao;

    public void  saveAccount(){
        accountDao.saveAccount();
    }
}
打印就是false了
4、和生命周期相关(了解)
1)@PreDestroy
2)@PostConstruct
client
public class Client {
    public static void main(String[] args) {
        //1.获取核心容器对象
//        ApplicationContext ac = new ClassPathXmlApplicationContext("bean.xml");
        ClassPathXmlApplicationContext ac = new ClassPathXmlApplicationContext("bean.xml");

        //2.根据id获取Bean对象
        IAccountService as  = (IAccountService)ac.getBean("accountService");
        as.saveAccount();
        ac.close();
    }
}
AccountServiceImpl
@Service("accountService")

public class AccountServiceImpl implements IAccountService {

    @Resource(name="accountDao2")
    private IAccountDao accountDao;

    @PostConstruct
    public void  init(){
        System.out.println("初始化执行了");
    }

    @PreDestroy
    public void  destroy(){
        System.out.println("销毁执行了");
    }

    public void  saveAccount(){
        accountDao.saveAccount();
    }
}
打印:
初始化执行了
保存了账户2
销毁执行了
5、@Configuration
作用:指定当前类是一个配置类
细节:当配置类作为AnnotationConfigApplicationContext对象创建的参数时,该注解可以不写。
当我们想纯注解开发,不使用bean.xml配置文件的时候就可以使用该注解
6、@ComponentScan
作用:用于通过注解指定spring在创建容器时要扫描的包
属性:
value:它和basePackages的作用是一样的,都是用于指定创建容器时要扫描的包。
我们使用此注解就等同于在xml中配置了:
<context:component-scan base-package=“com.itheima”></context:component-scan>
7、@Bean
作用:用于把当前方法的返回值作为bean对象存入spring的ioc容器中
属性:
name:用于指定bean的id。当不写时,默认值是当前方法的名称
细节:
当我们使用注解配置方法时,如果方法有参数,spring框架会去容器中查找有没有可用的bean对象。
查找的方式和Autowired注解的作用是一样的
例:
@Configuration
@ComponentScan(basePackages = "com.itheima")
//相当于bean中的<context:component-scan base- package="com.itheima"></context:component-scan>
public class SpringConfiguration {
  /**
   * 创建一个QueryRunner对象
   * @param dataSource
   * @return
   */
  @Bean("runner")
  @Scope("prototype")
  public QueryRunner createQueryRunner(DataSource dataSource){
    return new QueryRunner(dataSource);
  }

  /**
   * 创建一个数据源对象
   * @return
   */
  @Bean("dataSource")
  public DataSource creatDataSource(){
    try {
      ComboPooledDataSource ds =new ComboPooledDataSource();
      ds.setDriverClass("com.mysql.jdbc.Driver");
      ds.setJdbcUrl("jdbc:mysql://localhost:3306/eesy");
      ds.setUser("root");
      ds.setPassword("root");
	return ds;
    } catch (Exception e) {
      throw new RuntimeException();
    }
  }
}
当配置类作为AnnotationConfigApplicationContext对象创建的参数时,该注解可以不写
public class AccountServiceTest {
  @Test
  public void testFindAll(){
    //1、获取容器
//    ApplicationContext ac= new ClassPathXmlApplicationContext(“bean.xml”);
    ApplicationContext ac=new AnnotationConfigApplicationContext(SpringConfiguration.class);
    //2、得到业务层对象
    IAccountService as = ac.getBean("accountService", IAccountService.class);
    //3、执行方法
    List<Account> accounts=as.findAllAccount();
    for (Account account : accounts) {
      System.out.println(account);
     /* Account{id=1, name='aaa', money=1000.0}
      Account{id=2, name='bbb', money=1000.0}
      Account{id=3, name='ccc', money=1000.0}*/
    }
  }
}
这时就可以不写Configuration注解
但当配置其他新类时,注解Configuration依然需要
新建类JdbcConfig
将SpringConfiguration中创建QueryRunner对象和数据源对象两个方法剪切到JdbcConfig中
SpringConfiguration:
//@Configuration
@ComponentScan({"com.itheima","config") //相当于bean中的<context:component-scan base-package="com.itheima"></context:component-scan>
public class SpringConfiguration {

}
JdbcConfig:
**
 * 和spring连接数据库的相关配置
 */
@Configuration
public class JdbcConfig {
  /**
   * 创建一个QueryRunner对象
   * @param dataSource
   * @return
   */
  @Bean("runner")
  @Scope("prototype")
  public QueryRunner createQueryRunner(DataSource dataSource){
    return new QueryRunner(dataSource);
  }

  /**
   * 创建一个数据源对象
   * @return
   */
  @Bean("dataSource")
  public DataSource creatDataSource(){
    try {
      ComboPooledDataSource ds =new ComboPooledDataSource();
      ds.setDriverClass("com.mysql.jdbc.Driver");
      ds.setJdbcUrl("jdbc:mysql://localhost:3306/eesy");
      ds.setUser("root");
      ds.setPassword("root");
return ds;

    } catch (Exception e) {
      throw new RuntimeException();
    }
  }
}
在测试类中创建容器时,传递该类,这样JdbcConfig中也不用加注解Configuration
SpringConfiguration:
//@Configuration
@ComponentScan({"com.itheima","config") //相当于bean中的<context:component-scan base-package="com.itheima"></context:component-scan>
public class SpringConfiguration {

}
JdbcConfig
/**
 * 和spring连接数据库的相关配置
 */
//@Configuration
public class JdbcConfig {
  /**
   * 创建一个QueryRunner对象
   * @param dataSource
   * @return
   */
  @Bean("runner")
  @Scope("prototype")
  public QueryRunner createQueryRunner(DataSource dataSource){
    return new QueryRunner(dataSource);
  }

  /**
   * 创建一个数据源对象
   * @return
   */
  @Bean("dataSource")
  public DataSource creatDataSource(){
    try {
      ComboPooledDataSource ds =new ComboPooledDataSource();
      ds.setDriverClass("com.mysql.jdbc.Driver");
      ds.setJdbcUrl("jdbc:mysql://localhost:3306/eesy");
      ds.setUser("root");
      ds.setPassword("root");
return ds;

    } catch (Exception e) {
      throw new RuntimeException();
    }
  }
}
AccountServiceTest
public class AccountServiceTest {

  @Test
  public void testFindAll(){
    //1、获取容器
//    ApplicationContext ac= new ClassPathXmlApplicationContext(SpringConfiguration.class);
    ApplicationContext ac=new AnnotationConfigApplicationContext(SpringConfiguration.class, JdbcConfig.class);
    //2、得到业务层对象
    IAccountService as = ac.getBean("accountService", IAccountService.class);
    //3、执行方法
    List<Account> accounts=as.findAllAccount();
    for (Account account : accounts) {
      System.out.println(account);
     /* Account{id=1, name='aaa', money=1000.0}
      Account{id=2, name='bbb', money=1000.0}
      Account{id=3, name='ccc', money=1000.0}*/
    }
  }
}
8、@Import
作用:用于导入其他的配置类
属性:
value:用于指定其他配置类的字节码。
当我们使用Import的注解之后,有Import注解的类就父配置类,而导入的都是子配置类
既不想扫描,也不想传递多个配置类,就可以使用这个注解
SpringConfiguration
//@Configuration
@ComponentScan({"com.itheima") //相当于bean中的<context:component-scan base-package="com.itheima"></context:component-scan>
@Import(JdbcConfig.class)
public class SpringConfiguration {

}
JdbcConfig
/**
 * 和spring连接数据库的相关配置
 */
//@Configuration 依然不用告诉这是配置类 因为这是SpringConfiguration的子配置类
public class JdbcConfig {
  /**
   * 创建一个QueryRunner对象
   * @param dataSource
   * @return
   */
  @Bean("runner")
  @Scope("prototype")
  public QueryRunner createQueryRunner(DataSource dataSource){
    return new QueryRunner(dataSource);
  }

  /**
   * 创建一个数据源对象
   * @return
   */
  @Bean("dataSource")
  public DataSource creatDataSource(){
    try {
      ComboPooledDataSource ds =new ComboPooledDataSource();
      ds.setDriverClass("com.mysql.jdbc.Driver");
      ds.setJdbcUrl("jdbc:mysql://localhost:3306/eesy");
      ds.setUser("root");
      ds.setPassword("root");
return ds;
    } catch (Exception e) {
      throw new RuntimeException();
    }
  }
}
AccountServiceTest
public class AccountServiceTest {

  @Test
  public void testFindAll(){
    //1、获取容器
//    ApplicationContext ac= new ClassPathXmlApplicationContext(SpringConfiguration.class);
    ApplicationContext ac=new AnnotationConfigApplicationContext(SpringConfiguration.class);
//也不用传递该类
    //2、得到业务层对象
    IAccountService as = ac.getBean("accountService", IAccountService.class);
    //3、执行方法
    List<Account> accounts=as.findAllAccount();
    for (Account account : accounts) {
      System.out.println(account);
     /* Account{id=1, name='aaa', money=1000.0}
      Account{id=2, name='bbb', money=1000.0}
      Account{id=3, name='ccc', money=1000.0}*/
    }
  }
}
9、@PropertySource
作用:用于指定properties文件的位置
属性:
value:指定文件的名称和路径。
关键字:classpath,表示类路径下
增加配置文件 分出driver、url username password
在resources下新建jdbcConfig.properties
jdbc.driver=com.mysql.jdbc.Driver
jdbc.url=jdbc:mysql://localhost:3306/eesy
jdbc.username=root
jdbc.password=root
在 SpringConfiguration添加注解
@ComponentScan({"com.itheima") //相当于bean中的<context:component-scan base-package="com.itheima"></context:component-scan>
@Import(JdbcConfig.class)
@PropertySource("classpath:jdbcConfig.properties")//如果jdbcConfig.properties在包内 jdbcConfig.properties前加路径
public class SpringConfiguration {

}
JdbcConfig中创建driver、url username password 并获取
/**
 * 和spring连接数据库的相关配置
 */
//@Configuration
public class JdbcConfig {
  @Value("${jdbc.driver}")
  private String driver;
  @Value("${jdbc.url}")
  private String url;
  @Value("${jdbc.username}")
  private String username;
  @Value("${jdbc.password}")
  private String password;

  /**
   * 创建一个QueryRunner对象
   * @param dataSource
   * @return
   */
  @Bean("runner")
  @Scope("prototype")
  public QueryRunner createQueryRunner(DataSource dataSource){
    return new QueryRunner(dataSource);
  }

  /**
   * 创建一个数据源对象
   * @return
   */
  @Bean("dataSource")
  public DataSource creatDataSource(){
    try {
      ComboPooledDataSource ds =new ComboPooledDataSource();
      ds.setDriverClass("driver");
      ds.setJdbcUrl("url");
      ds.setUser("username");
      ds.setPassword("password");
    } catch (Exception e) {
      throw new RuntimeException();
    }
  }
}
10、@before
前面测试类中每个方法都要获取容器和得到业务层对象
/**
 * 使用junit单元测试:测试我们的配置
 */
public class AccountServiceTest {
  private ApplicationContext ac;
  private IAccountService as;

  @Before
  public void init(){
    //1、获取容器
    ac=new AnnotationConfigApplicationContext(SpringConfiguration.class);
    //2、得到业务层对象
    as = ac.getBean("accountService", IAccountService.class);
  }

  @Test
  public void testFindAll(){
    //3、执行方法
    List<Account> accounts=as.findAllAccount();
    for (Account account : accounts) {
      System.out.println(account);
     /* Account{id=1, name='aaa', money=1000.0}
      Account{id=2, name='bbb', money=1000.0}
      Account{id=3, name='ccc', money=1000.0}*/
    }
  }
//以下每个方法都不用获取容器和创建业务层对象
}
11、@Runwith
@RunWith就是一个运行器
@RunWith(JUnit4.class)就是指用JUnit4来运行
@RunWith(SpringJUnit4ClassRunner.class),让测试运行于Spring测试环境
@RunWith(Suite.class)的话就是一套测试集合,
12、@ContextConfiguration
@ContextConfiguration这个注解通常与@RunWith(SpringJUnit4ClassRunner.class)联合使用用来测试
当一个类添加了注解@Component,那么他就自动变成了一个bean,就不需要再Spring配置文件中显示的配置了。把这些bean收集起来通常有两种方式,Java的方式和XML的方式。当这些bean收集起来之后,当我们想要在某个测试类使用@Autowired注解来引入这些收集起来的bean时,只需要给这个测试类添加@ContextConfiguration注解来标注我们想要导入这个测试类的某些bean。
比如我们在前面说到before注解时,我们是运行在测试环境下的,这对测试工程师来说很不友好,
如果我们不采用AnnotationConfigApplicationContext的方法获取容器获得IAccountService,而是采用自动注入的方式获取IAccountService,则会报错,如:
/**
 * 使用junit单元测试:测试我们的配置
 */
public class AccountServiceTest {
  @Autowired
  private IAccountService as;

  @Test
  public void testFindAll(){

    //3、执行方法
    List<Account> accounts=as.findAllAccount();
    for (Account account : accounts) {
      System.out.println(account);
     /* Account{id=1, name='aaa', money=1000.0}
      Account{id=2, name='bbb', money=1000.0}
      Account{id=3, name='ccc', money=1000.0}*/
    }
  }

  @Test
  public void testFindOne(){
    //3、执行方法
    Account accountById = as.findAccountById(1);
    System.out.println(accountById);
//    Account{id=1, name='aaa', money=1000.0}
  }

  @Test
  public void testSave(){
    Account account = new Account();
    account.setName("zhangsan");
    account.setMoney(12345f);

    //3、执行方法
    as.saveAccount(account);

  }

  @Test
  public void testUpdate(){

    //3、执行方法
    Account account = as.findAccountById(4);
    account.setName("lisi");
    account.setMoney(15688f);
    as.updateAccount(account);
  }

  @Test
  public void testDelete(){

    //3、执行方法
    as.deleteAccount(4);
  }

}
这是因为
* Spring整合junit的配置
* 1、导入spring整合junit的jar(坐标)
<dependency>
    <groupId>org.springframework</groupId>
    <artifactId>spring-test</artifactId>
    <version>5.0.2.RELEASE</version>
</dependency>
2、使用Junit提供的一个注解把原有的main方法替换了 替换成spring提供的
AccountServiceTest类前添加
@RunWith*(SpringJUnit4ClassRunner.class)*
3、告知spring的运行器,spring和ioc创建是基于xml还是注解的,并且说明位置
* @ContextConfiguration
* locations:指定xml文件的位置,加上classpath关键字,表示在类路径下
* classes:指定注解类所在地位置
* 当我们使用spring 5.x版本的时候,要求junit的jar必须是4.12及以上
这个案例中使用的是注解,所以:
@RunWith(SpringJUnit4ClassRunner.class)
@ContextConfiguration(classes = SpringConfiguration.class)
public class AccountServiceTest {
  @Autowired
  private IAccountService as;

  @Test
  public void testFindAll(){

    //3、执行方法
    List<Account> accounts=as.findAllAccount();
    for (Account account : accounts) {
      System.out.println(account);
     /* Account{id=1, name='aaa', money=1000.0}
      Account{id=2, name='bbb', money=1000.0}
      Account{id=3, name='ccc', money=1000.0}*/
    }
  }

  @Test
  public void testFindOne(){

    //3、执行方法
    Account accountById = as.findAccountById(1);
    System.out.println(accountById);
//    Account{id=1, name='aaa', money=1000.0}
  }

  @Test
  public void testSave(){
    Account account = new Account();
    account.setName("zhangsan");
    account.setMoney(12345f);

    //3、执行方法
    as.saveAccount(account);

  }

  @Test
  public void testUpdate(){

    //3、执行方法
    Account account = as.findAccountById(4);
    account.setName("lisi");
    account.setMoney(15688f);
    as.updateAccount(account);
  }

  @Test
  public void testDelete(){

    //3、执行方法
    as.deleteAccount(4);
  }

}
再例:
/**
 * 使用Junit单元测试:测试我们的配置
 */
@RunWith(SpringJUnit4ClassRunner.class)
@ContextConfiguration(locations = "classpath:bean.xml")//告知我们使用了Spring框架,并告知配置文件
public class AccountServiceTest {

  @Autowired
  private IAccountService as;

  @Test
  public  void testTransfer(){
    as.transfer("aaa","bbb",100f);
  }
}
13、AOP注解
1)@Aspect
2)@Pointcut
3)@Before
4)@AfterReturning
5)@AfterThrowing
6)@After
7)@Around
举例:
<?xml version="1.0" encoding="UTF-8"?>
<beans xmlns="http://www.springframework.org/schema/beans"
       xmlns:xsi="http://www.w3.org/2001/XMLSchema-instance"
       xmlns:aop="http://www.springframework.org/schema/aop"
       xmlns:context="http://www.springframework.org/schema/context"
       xsi:schemaLocation="http://www.springframework.org/schema/beans
        http://www.springframework.org/schema/beans/spring-beans.xsd
        http://www.springframework.org/schema/aop
        http://www.springframework.org/schema/aop/spring-aop.xsd
        http://www.springframework.org/schema/context
        http://www.springframework.org/schema/context/spring-context.xsd">

    <!-- 配置spring创建容器时要扫描的包-->
    <context:component-scan base-package="com.itheima"></context:component-scan>

    <!-- 配置spring开启注解AOP的支持 -->
    <aop:aspectj-autoproxy></aop:aspectj-autoproxy>
</beans>
package com.itheima.service.impl;

import com.itheima.service.IAccountService;
import org.springframework.stereotype.Service;

/**
 * 账户的业务层实现类
 */
@Service("accountService")//采用注解注入
public class AccountServiceImpl implements IAccountService {
    public void saveAccount() {
      System.out.println("执行了保存");
//      int i=1/0;
    }

  public void updateAccount(int i) {
    System.out.println("执行了更新"+i);
  }

  public int deleteAccount() {
    System.out.println("执行了删除");
    return 0;
  }
}
配置logger
package com.itheima.utils;

import org.aspectj.lang.ProceedingJoinPoint;
import org.aspectj.lang.annotation.*;
import org.springframework.stereotype.Component;

/**
 * 用于记录日志的工具类,它里面提供了公共的代码
 */
@Component("logger")
@Aspect//表示当前类是一个切面类
public class Logger {
  //就像xml的AOP配置中在bean中定义表达式一样,这里也可以定义表达式,简化 表达式内容和上一项目中说明一致
  @Pointcut("execution(* com.itheima.service.impl.*.*(..))")
  private void pt1(){}
  /**
   * 前置通知
   */
  @Before("pt1()")
  public  void beforePrintLog(){
    System.out.println("前置通知Logger类中的beforePrintLog方法开始记录日志了。。。");
  }

  /**
   * 后置通知
   */
  @AfterReturning("pt1()")
  public  void afterReturningPrintLog(){
    System.out.println("后置通知Logger类中的afterReturningPrintLog方法开始记录日志了。。。");
  }
  /**
   * 异常通知
   */
  @AfterThrowing("pt1()")
  public  void afterThrowingPrintLog(){
    System.out.println("异常通知Logger类中的afterThrowingPrintLog方法开始记录日志了。。。");
  }

  /**
   * 最终通知
   */
  @After("pt1()")
  public  void afterPrintLog(){
    System.out.println("最终通知Logger类中的afterPrintLog方法开始记录日志了。。。");
  }
}
package com.itheima.test;

import com.itheima.service.IAccountService;
import org.springframework.context.ApplicationContext;
import org.springframework.context.support.ClassPathXmlApplicationContext;

/**
 * 测试AOP的配置
 */
public class AopTest {

  public static void main(String[] args) {
    //1.获取容器
    ApplicationContext ac = new ClassPathXmlApplicationContext("bean.xml");
    //2.获取对象
    IAccountService as = (IAccountService)ac.getBean("accountService");
    //3.执行方法
    as.saveAccount();
  }
}
执行test打印:
前置通知Logger类中的beforePrintLog方法开始记录日志了。。。
执行了保存
最终通知Logger类中的afterPrintLog方法开始记录日志了。。。
后置通知Logger类中的afterReturningPrintLog方法开始记录日志了。。。
会发现顺序有问题
Service中添加异常 打印:
前置通知Logger类中的beforePrintLog方法开始记录日志了。。。
执行了保存
最终通知Logger类中的afterPrintLog方法开始记录日志了。。。
异常通知Logger类中的afterThrowingPrintLog方法开始记录日志了。。。
顺序也是有问题的
这是无法改变的,使用这种方式的通知顺序就是有问题
采用自己写的环绕通知:
注释掉前四个通知的注解
打开环绕通知的注解
package com.itheima.utils;

import org.aspectj.lang.ProceedingJoinPoint;
import org.aspectj.lang.annotation.*;
import org.springframework.stereotype.Component;

/**
 * 用于记录日志的工具类,它里面提供了公共的代码
 */
@Component("logger")
@Aspect//表示当前类是一个切面类
public class Logger {
  //就像xml的AOP配置中在bean中定义表达式一样,这里也可以定义表达式,简化 表达式内容和上一项目中说明一致
  @Pointcut("execution(* com.itheima.service.impl.*.*(..))")
  private void pt1(){}
  /**
   * 前置通知
   */
//  @Before("pt1()")
  public  void beforePrintLog(){
    System.out.println("前置通知Logger类中的beforePrintLog方法开始记录日志了。。。");
  }

  /**
   * 后置通知
   */
//  @AfterReturning("pt1()")
  public  void afterReturningPrintLog(){
    System.out.println("后置通知Logger类中的afterReturningPrintLog方法开始记录日志了。。。");
  }
  /**
   * 异常通知
   */
//  @AfterThrowing("pt1()")
  public  void afterThrowingPrintLog(){
    System.out.println("异常通知Logger类中的afterThrowingPrintLog方法开始记录日志了。。。");
  }

  /**
   * 最终通知
   */
//  @After("pt1()")
  public  void afterPrintLog(){
    System.out.println("最终通知Logger类中的afterPrintLog方法开始记录日志了。。。");
  }

  /**
   * 环绕通知
   * 问题:
   *      当我们配置了环绕通知之后,切入点方法没有执行,而通知方法执行了。
   * 分析:
   *      通过对比动态代理中的环绕通知代码,发现动态代理的环绕通知有明确的切入点方法调用,而我们的代码中没有。
   * 解决:
   *      Spring框架为我们提供了一个接口:ProceedingJoinPoint。该接口有一个方法proceed(),此方法就相当于明确调用切入点方法。
   *      该接口可以作为环绕通知的方法参数,在程序执行时,spring框架会为我们提供该接口的实现类供我们使用。
   *
   * spring中的环绕通知:
   *      它是spring框架为我们提供的一种可以在代码中手动控制增强方法何时执行的方式。
   */
  @Around("pt1()")
  public Object aroundPringLog(ProceedingJoinPoint pjp){
    Object rtValue = null;
    try{
      Object[] args = pjp.getArgs();//得到方法执行所需的参数

      System.out.println("Logger类中的aroundPringLog方法开始记录日志了。。。前置");

      rtValue = pjp.proceed(args);//明确调用业务层方法(切入点方法)

      System.out.println("Logger类中的aroundPringLog方法开始记录日志了。。。后置");

      return rtValue;
    }catch (Throwable t){
      System.out.println("Logger类中的aroundPringLog方法开始记录日志了。。。异常");
      throw new RuntimeException(t);
    }finally {
      System.out.println("Logger类中的aroundPringLog方法开始记录日志了。。。最终");
    }
  }
}
service中无异常打印:
Logger类中的aroundPringLog方法开始记录日志了。。。前置
执行了保存
Logger类中的aroundPringLog方法开始记录日志了。。。后置
Logger类中的aroundPringLog方法开始记录日志了。。。最终
service中有异常打印:
Logger类中的aroundPringLog方法开始记录日志了。。。前置
执行了保存
Logger类中的aroundPringLog方法开始记录日志了。。。异常
Logger类中的aroundPringLog方法开始记录日志了。。。最终
顺序正常
因为环绕通知中,我们自定义了他们执行的顺序,所以推荐使用环绕通知
14、@Select
@Select(“sql”)
在Mybatis框架中,基于注解配置时,加在持久层接口的方法前
15、@RequestMapping
RequestMapping是一个用来处理请求地址映射的注解,可用于类或方法上。用于类上,表示类中的所有响应请求的方法都是以该地址作为父路径。
示例
@Controller
@RequestMapping(value="/user")
public class UserController {
	@RequestMapping(value="/register")
	 public String register() {
	     return "register";
	 }
	 @RequestMapping(value="/login")
	 public String login() {
	     return "login";
	 }
如上代码,由于UserController类中加了value="/user"的@RequestMapping注解,因此所有相关路径都要加上"/user",此时方法被映射到如下请求ur地址:
http://localhost:8088/user/register
http://localhost:8088/user/login
各属性介绍
RequestMapping注解有六个属性,下面我们把她分成三类进行说明(下面有相应示例)。
1、 value, method;
value: 指定请求的实际地址,指定的地址可以是URI Template 模式;
method: 指定请求的method类型, GET、POST、PUT、DELETE等;
2、consumes,produces
consumes: 指定处理请求的提交内容类型(Content-Type),例如application/json, text/html;
produces: 指定返回的内容类型,仅当request请求头中的(Accept)类型中包含该指定类型才返回;
3、params,headers
params: 指定request中必须包含某些参数值时,才让该方法处理
headers:指定request中必须包含某些指定的header值,才能让该方法处理请求
1)value(或path)
指定请求的实际url
该伪代码中使用@RequestMapping注释value属性将URL映射到方法上。在这个例子中,将login映射到login方法上,使用如下url访问应用时将由hello方法进行处理:http://localhost:8088/user/login
由于value属性是@RequestMapping注释的默认属性,因此,如果只有唯一的属性,则可以省略属性名,即如下两个标注含义相同。
@RequestMapping(value="/hello")
@RequestMapping("/hello")
但如果有超过一个属性,就必须写上value属性名称。value属性的值也可以是一个空字符串,此时方法被映射到如下url请求:
http://localhost:8088/user
(1)普通的具体值。如value="/book"。
(2)含某变量的一类值。
@RequestMapping(value="/get/{bookId}")
public String getBookById(@PathVariable String bookId,Model model){
    model.addAttribute("bookId", bookId);
    return "book";
}
路径中的bookId可以当变量,@PathVariable注解即提取路径中的变量值。
(3)ant风格
@RequestMapping(value="/get/id?"):可匹配“/get/id1”或“/get/ida”,但不匹配“/get/id”或“/get/idaa”;
@RequestMapping(value="/get/id*"):可匹配“/get/idabc”或“/get/id”,但不匹配“/get/idabc/abc”;
@RequestMapping(value="/get/id/*"):可匹配“/get/id/abc”,但不匹配“/get/idabc”;
@RequestMapping(value="/get/id/**/{id}"):可匹配“/get/id/abc/abc/123”或“/get/id/123”,也就是Ant风格和URI模板变量风格可混用。
(4)含正则表达式的一类值
@RequestMapping(value="/get/{idPre:\d+}-{idNum:\d+}"):可以匹配“/get/123-1”,但不能匹配“/get/abc-1”,这样可以设计更加严格的规则。
可以通过@PathVariable 注解提取路径中的变量(idPre,idNum)
(5)或关系
@RequestMapping(value={"/get","/fetch"} )即 /get或/fetch都会映射到该方法上。
2)method
该属性用来指示该方法仅仅处理哪些HTTP请求方式。 GET、POST、PUT、DELETE等
如下伪代码:
@RequestMapping(value="/hello",method=RequestMethod.POST)
以上代码method=RequestMethod.POST表示该方法只支持POST请求,也可以同时支持多个HTTP请求。如下:
@RequestMapping(value="/hello",method={RequestMethod.POST,RequestMethod.GET})
若没有指定method属性值,则请求处理方法可以任意的请求HTTP方式。
3)consumes
指定处理请求的提交内容类型(Content-Type),例如application/json, text/html。
@Controller
@RequestMapping(value = "/pets", method = RequestMethod.POST, consumes="application/json")
public void addPet(@RequestBody Pet pet, Model model) {
    // implementation omitted
}
方法仅处理request Content-Type为“application/json”类型的请求。
4)produces
指定返回的内容类型,仅当request请求头中的(Accept)类型中包含该指定类型才返回。
@Controller
@RequestMapping(value = "/pets/{petId}", method = RequestMethod.GET, produces="application/json")
@ResponseBody
public Pet getPet(@PathVariable String petId, Model model) {
    // implementation omitted
}
方法仅处理request请求中Accept头中包含了"application/json"的请求,同时暗示了返回的内容类型为application/json;
5)params
指定request中必须包含某些参数值时,才让该方法处理。
@RequestMapping(params=“action=del”),请求参数包含“action=del”,如:http://localhost:8080/book?action=del
@Controller
@RequestMapping("/owners/{ownerId}")
public class RelativePathUriTemplateController {

  @RequestMapping(value = "/pets/{petId}", method = RequestMethod.GET, params="myParam=myValue")
  public void findPet(@PathVariable String ownerId, @PathVariable String petId, Model model) {
    // implementation omitted
  }
}
仅处理请求中包含了名为“myParam”,值为“myValue”的请求。
6)headers
指定request中必须包含某些指定的header值,才能让该方法处理请求。
@RequestMapping(value="/header/id", headers = “Accept=application/json”):表示请求的URL必须为“/header/id 且请求头中必须有“Accept =application/json”参数即可匹配。
@Controller
@RequestMapping("/owners/{ownerId}")
public class RelativePathUriTemplateController {

@RequestMapping(value = "/pets", method = RequestMethod.GET, headers="Referer=http://www.ifeng.com/")
  public void findPet(@PathVariable String ownerId, @PathVariable String petId, Model model) {
    // implementation omitted
  }
}
仅处理request的header中包含了指定“Refer”请求头和对应值为“http://www.ifeng.com/”的请求。
16、@RequestParam
1、作用
将请求参数绑定到你控制器的方法参数上(是springmvc中接收普通参数的注解)
2、语法
@RequestParam(value=”参数名”,required=”true/false”,defaultValue=””)
3、属性
- value:参数名
- required:是否包含该参数,默认为true,表示该请求路径中必须包含该参数,如果不包含就报错。
- defaultValue:默认参数值,如果设置了该值,required=true将失效,自动为false,如果没有传该参数,就使用默认值
4、测试环境
环境:jdk1.8 Tomcat8.5 idea2018 manven父工程子模块
步骤:
1、创建web工程、引入依赖
2、配置SpringMvc入口文件 --DispatcherServlet–为总调度、web.xml里配置
3、创建Springmvc.xml文件–理解为:适配器(这里不需要自已指定适配、springmvc会自动指定)–视图解析器
4、创建 业务处理器 Controller类
5、测试
5、工程结构

6、HelloController
package com.day01springmvc.controller;
import org.springframework.stereotype.Controller;
import org.springframework.web.bind.annotation.*;
import org.springframework.web.servlet.ModelAndView;

/**
 * @ Author     :ShaoWei Sun.
 * @ Date       :Created in 20:58 2018/11/16
 */
@Controller
@RequestMapping("hello")
public class HelloController2 {

    /**
     * 接收普通请求参数
     * http://localhost:8080/hello/show16?name=linuxsir
     * url参数中的name必须要和@RequestParam("name")一致
     * @return
     */
    @RequestMapping("show16")
    public ModelAndView test16(@RequestParam("name")String name){
        ModelAndView mv = new ModelAndView();
        mv.setViewName("hello2");
        mv.addObject("msg", "接收普通的请求参数:" + name);//接收普通的请求参数:linuxsir
        return mv;
    }

    /**
     * 接收普通请求参数
     * http://localhost:8080/hello/show17
     * url中没有name参数不会报错、有就显示出来
     * @return
     */
    @RequestMapping("show17")
    public ModelAndView test17(@RequestParam(value="name",required=false)String name){
        ModelAndView mv = new ModelAndView();
        mv.setViewName("hello2");
        mv.addObject("msg", "接收普通请求参数:" + name);//接收普通的请求参数:null
        return mv;
    }

    /**
     * 接收普通请求参数
     * http://localhost:8080/hello/show18?name=998 显示为998
     * http://localhost:8080/hello/show18?name 显示为hello
     * @return
     */
    @RequestMapping("show18")
    public ModelAndView test18(@RequestParam(value="name",required=true,defaultValue="hello")String name){
        ModelAndView mv = new ModelAndView();
        mv.setViewName("hello2");
        mv.addObject("msg", "接收普通请求参数:" + name);
        return mv;
    }

}
7、测试


17、@RequestBody
作用:
用于获取请求体内容。直接使用得到是key=value&key=value…结构的数据。
get请求方式不适用。
属性:
required:是否必须有请求体。默认值是:true。当取值为true时,get请求方式会报错。如果取值为false,get请求得到是null。
AnnoController
/**
 * 获取到请求体的内容
 * @return
 */
@RequestMapping("/testRequestBody")
public String testRequestBody(@RequestBody String body){
    System.out.println("执行了...");
    System.out.println(body);
    return "success";
}
Anno.jsp
<%--
Created by IntelliJ IDEA.
User: Administrator
Date: 2018/4/29
Time: 23:35
To change this template use File | Settings | File Templates.
--%>
<%@ page contentType="text/html;charset=UTF-8" language="java" %>
<html>
<head>
<title>Title</title>
</head>
<body>
<%--常用的注解--%>
<a href="anno/testRequestParam?name=哈哈">RequestParam</a>
<br>
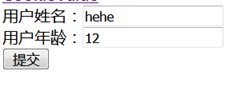
<form action="anno/testRequestBody" method="post">
用户姓名:<input type="text" name="username" /><br/>
用户年龄:<input type="text" name="age" /><br/>
<input type="submit" value="提交" />
</form>
</body>
</html>
值得注意的是,我们可以发现控制器中传的形参类型是String 而非 User 依然能打印出username和age,那Anno.jsp通过form 的action中的url传数据的时候,怎么知道是把他封装到user类中的呢?实际上他并没有封装到User中。只是简单地传输了键值对。即Anno.jsp中把username改为xingming age改为nianling依然可以传输数据:只是简单地传输了键值对xingming=hehe&nianling=20,并没有封装到实体类
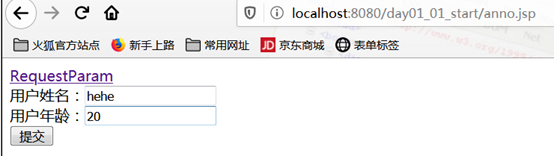
执行了…
username=hehe&age=20
18、@PathVaribale
作用:
用于绑定url中的占位符。例如:请求url中 /delete/{id},这个**{id}**就是url占位符。
url支持占位符是spring3.0之后加入的。是springmvc支持rest风格URL的一个重要标志。
属性:
value:用于指定url中占位符名称。
required:是否必须提供占位符。
AnnoController
/**
 * PathVariable注解
 * @return
 */
@RequestMapping(value="/testPathVariable/{sid}")
public String testPathVariable(@PathVariable(name="sid") String id){
    System.out.println("执行了...");
    System.out.println(id);
    return "success";
}
Anno.jsp
<%--
Created by IntelliJ IDEA.
User: Administrator
Date: 2018/4/29
Time: 23:35
To change this template use File | Settings | File Templates.
--%>
<%@ page contentType="text/html;charset=UTF-8" language="java" %>
<html>
<head>
<title>Title</title>
</head>
<body>
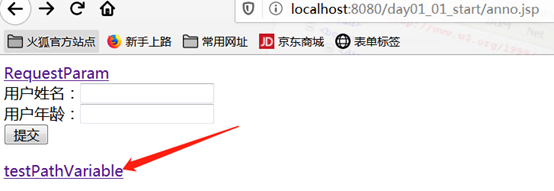
<%--常用的注解--%>
<a href="anno/testRequestParam?name=哈哈">RequestParam</a>
<br>
<form action="anno/testRequestBody" method="post">
用户姓名:<input type="text" name="username" /><br/>
用户年龄:<input type="text" name="age" /><br/>
<input type="submit" value="提交" />
</form>
<a href="anno/testPathVariable/10">testPathVariable</a>
<br>
</body>
</html>
点击跳转入门成功,并打印:
执行了…
10
19、@RequestHeader
作用:
用于获取请求消息头。
属性:
value:提供消息头名称
required:是否必须有此消息头
在实际开发中一般不怎么用。
AnnoController
/**
 * 获取请求头的值
 * @param header
 * @return
 */
@RequestMapping(value="/testRequestHeader")
public String testRequestHeader(@RequestHeader(value="Accept") String header, HttpServletRequest request, HttpServletResponse response) throws IOException {
    System.out.println("执行了...");
    System.out.println(header);
    // return "success";
    // response.sendRedirect(request.getContextPath()+"/anno/testCookieValue");
    return "redirect:/param.jsp";
}
Anno.jsp
<a href="anno/testRequestHeader">RequestHeader</a>
点击链接 打印:
执行了…
text/html,application/xhtml+xml,application/xml;q=0.9,image/webp,/;q=0.8
20、@CookieValue
作用:
用于把指定cookie名称的值传入控制器方法参数。
属性:
value:指定cookie的名称。
required:是否必须有此cookie。
AnnoController
/**
 * 获取Cookie的值
 * @return
 */
@RequestMapping(value="/testCookieValue")
public String testCookieValue(@CookieValue(value="JSESSIONID") String cookieValue){
    System.out.println("执行了...");
    System.out.println(cookieValue);
    return "success";
}
Anno.jsp
<a href="anno/testCookieValue">CookieValue</a>
打印:
执行了…
CEF80D1995D536D9F26E351D79CAE180
21、@ModelAttribute
-
作用
出现在方法上:表示当前方法会在控制器方法执行前先执行。
出现在参数上:获取指定的数据给参数赋值。 -
应用场景
当提交表单数据不是完整的实体数据时,保证没有提交的字段使用数据库原来的数据。
作用:
该注解是SpringMVC4.3版本以后新加入的。它可以用于修饰方法和参数。
出现在方法上,表示当前方法会在控制器的方法执行之前,先执行。它可以修饰没有返回值的方法,也可以修饰有具体返回值的方法。
出现在参数上,获取指定的数据给参数赋值。
属性:
value:用于获取数据的key。key可以是POJO的属性名称,也可以是map结构的key。
应用场景:
当表单提交数据不是完整的实体类数据时,保证没有提交数据的字段使用数据库对象原来的数据。
例如:
我们在编辑一个用户时,用户有一个创建信息字段,该字段的值是不允许被修改的。在提交表单数据是肯定没有此字段的内容,一旦更新会把该字段内容置为null,此时就可以使用此注解解决问题。
AnnoController
/**
 * ModelAttribute注解
 * @return
 */
@RequestMapping(value="/testModelAttribute")
public String testModelAttribute(){
    System.out.println("testModelAttribute执行了...");
    return "success";
}

@ModelAttribute
public void showUser(){
    System.out.println("showUser执行了...");

}
Anno.jsp
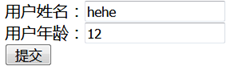
<form action="anno/testModelAttribute" method="post">
    用户姓名:<input type="text" name="uname" /><br/>
    用户年龄:<input type="text" name="age" /><br/>
    <input type="submit" value="提交" />
</form>

会先执行showUser方法,
打印:
showUser执行了…
testModelAttribute执行了…
AnnoController
给他传user来进行表单数据的封装,但表单中没有date数据
/**
 * ModelAttribute注解
 * @return
 */
@RequestMapping(value="/testModelAttribute")
public String testModelAttribute(User user){
    System.out.println("testModelAttribute执行了...");
    System.out.println(user);
    return "success";
}

@ModelAttribute
public void showUser(){
    System.out.println("showUser执行了...");

}
showUser执行了…
testModelAttribute执行了…
User{uname=‘hehe’, age=12, date=null}
可使用该注解:
当表单提交数据不是完整的实体类数据时,保证没有提交数据的字段使用数据库对象原来的数据。
例如:
我们在编辑一个用户时,用户有一个创建信息字段,该字段的值是不允许被修改的。在提交表单数据是肯定没有此字段的内容,一旦更新会把该字段内容置为null,此时就可以使用此注解解决问题。
AnnoController
/**
  * ModelAttribute注解
  * @return
  */
 @RequestMapping(value="/testModelAttribute")
 public String testModelAttribute(User user){
     System.out.println("testModelAttribute执行了...");
     System.out.println(user);
     return "success";
 }

 /**
  * 该方法会先执行
  */
 @ModelAttribute
 public User showUser(String uname){
     System.out.println("showUser执行了...");
     // 通过用户查询数据库(模拟)
     User user = new User();
     user.setUname(uname);
     user.setAge(20);
     user.setDate(new Date());
     return user;
 }
AnnoController
/**
  * ModelAttribute注解
  * @return
  */
 @RequestMapping(value="/testModelAttribute")
 public String testModelAttribute(@ModelAttribute("abc") User user){
     System.out.println("testModelAttribute执行了...");
     System.out.println(user);
     return "success";
 }

 /**
  * 该方法会先执行
  */
 @ModelAttribute
 public void showUser(String uname, Map<String,User> map){
     System.out.println("showUser执行了...");
     // 通过用户查询数据库(模拟)
     User user = new User();
     user.setUname(uname);
     user.setAge(20);
     user.setDate(new Date());
     map.put("abc",user);
 }
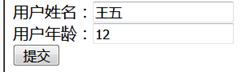
showUser执行了…
testModelAttribute执行了…
User{uname=‘王五’, age=12, date=Sat May 09 18:01:47 CST 2020}
22、@SessionAttribute
作用:
用于多次执行控制器方法间的参数共享。
属性:
value:用于指定存入的属性名称
type:用于指定存入的数据类型。
Anno.jsp
<a href="anno/testSessionAttributes">SessionAttributes</a>
AnnoController
/**
* SessionAttributes的注解
* @return
*/
@RequestMapping(value="/testSessionAttributes")
public String testSessionAttributes(Model model){
System.out.println("testSessionAttributes...");
// 底层会存储到request域对象中
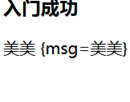
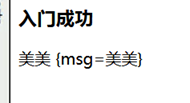
model.addAttribute("msg","美美");
return "success";
}
Success.jsp
isELIgnored=“false"的作用:如果设置为true,则 {requestScope},如果设置为false,会读取出来。Web容器默认isELIgnored="false”
<%@ page contentType="text/html;charset=UTF-8" language="java" isELIgnored="false" %>
<html>
<head>
    <title>Title</title>
</head>
<body>
  <h3>入门成功</h3>
  ${requestScope}
</body>
</html>
点击链接
跳到入门成功

AnnoController
注解加在类上
package cn.itcast.controller;
import cn.itcast.domain.User;
import org.springframework.stereotype.Controller;
import org.springframework.ui.Model;
import org.springframework.web.bind.annotation.*;
import javax.servlet.http.HttpServletRequest;
import javax.servlet.http.HttpServletResponse;
import java.io.IOException;
import java.util.Date;
import java.util.Map;
/**
* 常用的注解
*/
@Controller
@RequestMapping("/anno")
@SessionAttributes(value={"msg"}) // 把msg=美美存入到session域对中
public class AnnoController {
@RequestMapping("/testRequestParam")
public String testRequestParam(@RequestParam(name="name") String username){
System.out.println("执行了...");
System.out.println(username);
return "success";
}
/**
* 获取到请求体的内容
* @return
*/
@RequestMapping("/testRequestBody")
public String testRequestBody(@RequestBody String body){
System.out.println("执行了...");
System.out.println(body);
return "success";
}
/**
* PathVariable注解
* @return
*/
@RequestMapping(value="/testPathVariable/{sid}")
public String testPathVariable(@PathVariable(name="sid") String id){
System.out.println("执行了...");
System.out.println(id);
return "success";
}
/**
* 获取请求头的值
* @param header
* @return
*/
@RequestMapping(value="/testRequestHeader")
public String testRequestHeader(@RequestHeader(value="Accept") String header, HttpServletRequest request, HttpServletResponse response) throws IOException {
System.out.println("执行了...");
System.out.println(header);
// return "success";
// response.sendRedirect(request.getContextPath()+"/anno/testCookieValue");
return "redirect:/param.jsp";
}
/**
* 获取Cookie的值
* @return
*/
@RequestMapping(value="/testCookieValue")
public String testCookieValue(@CookieValue(value="JSESSIONID") String cookieValue){
System.out.println("执行了...");
System.out.println(cookieValue);
return "success";
}
/**
* ModelAttribute注解
* @return
*/
@RequestMapping(value="/testModelAttribute")
public String testModelAttribute(@ModelAttribute("abc") User user){
System.out.println("testModelAttribute执行了...");
System.out.println(user);
return "success";
}
/* @ModelAttribute
public void showUser(){
System.out.println("showUser执行了...");
}*/
/**
* 该方法会先执行
*/
@ModelAttribute
public void showUser(String uname, Map<String,User> map){
System.out.println("showUser执行了...");
// 通过用户查询数据库(模拟)
User user = new User();
user.setUname(uname);
user.setAge(20);
user.setDate(new Date());
map.put("abc",user);
}
/**
* SessionAttributes的注解
* @return
*/
@RequestMapping(value="/testSessionAttributes")
public String testSessionAttributes(Model model){
System.out.println("testSessionAttributes...");
// 底层会存储到request域对象中
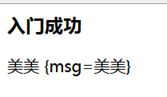
model.addAttribute("msg","美美");
return "success";
}
}
Success.jsp
<%@ page contentType="text/html;charset=UTF-8" language="java" isELIgnored="false" %>
<html>
<head>
    <title>Title</title>
</head>
<body>
  <h3>入门成功</h3>
  ${msg}
  ${sessionScope}

</body>
</html>
AnnoController
/**
* 获取值
* @param modelMap
* @return
*/
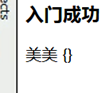
@RequestMapping(value="/getSessionAttributes")
public String getSessionAttributes(ModelMap modelMap){
System.out.println("getSessionAttributes...");
String msg = (String) modelMap.get("msg");
System.out.println(msg);
return "success";
}
Anno.jsp
<a href="anno/getSessionAttributes">SessionAttributes</a>

先点击第一个存值,在点击第二个取值
打印:
showUser执行了…
getSessionAttributes…
美美
AnnoController
/**
 * 清除
 * @param status
 * @return
 */
@RequestMapping(value="/delSessionAttributes")
public String delSessionAttributes(SessionStatus status){
    System.out.println("getSessionAttributes...");
    status.setComplete();
    return "success";
}
Anno.jsp
<a href="anno/delSessionAttributes">SessionAttributes</a>

先点击第一个存值,
点击第二个取值
点击第三个删除
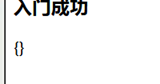
再次点击第二个取值