Props深入
children
- 作用 : 获取组件标签的 子节点
- 获取方式 :
this.props.children
<App>
  此处的内容,就是组件的 children,将来通过组件的 props.children 就可以获取到这些子节点了
</App>
props 校验
-
作用:规定组件props的类型约束, 减少开发中的错误
-
-
安装 :
yarn add prop-types -
导入 :
import Propypes from 'prop-types' -
给组件添加校验规则
// 要对某个组件里的某个属性进行校验
Child.propTypes = {
	// age 表示要校验的属性名称
	// number 表示类型是数字
	// isRequied 表示必填项
	age : PropTypes.number.isRequired,
  name : PropTypes.string,
  arr : PropTypes.array,
  fn : PropTypes.func,
  isOK : PropTypes.bool,
  // 任何可被渲染的元素(包括数字、字符串、元素或数组)
  // (或 Fragment) 也包含这些类型。
  optionalNode: PropTypes.node,
  // 你可以让你的 prop 只能是特定的值,指定它为 枚举类型。
  num : PropTypes.oneOf(['News', 'Photos']).isRequired,
  // 一个对象可以是几种类型中的任意一个类型
  optionalUnion: PropTypes.oneOfType([
    PropTypes.string,
    PropTypes.number
  ]).isRequired,
}
props的默认值
- 可以通过
组件.defaultProps = {}这样的方式来给组件添加默认值 - 默认值在用户没有传递该组件时会生效,如果用户传递了该属性,那么就会使用用户传递的属性了
// 默认值
Child.defaultProps = {
  age : 10
}
生命周期
- 生命周期图谱
- 图示:
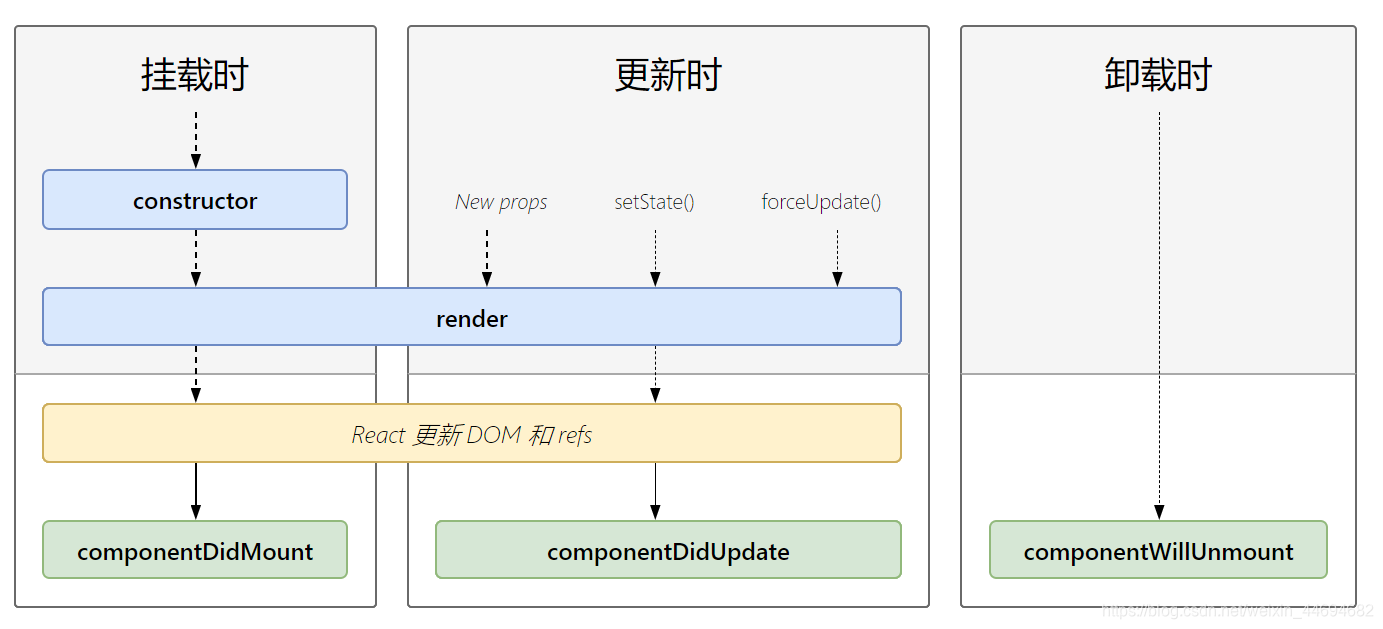
第一阶段 : 挂载阶段
- 触发时机 : 组件第一次被渲染的时候, 进入页面的时候触发
- 三个钩子函数
- constructor() : 初始化state
- render() : 渲染UI
- componentDidMount() : 1.操作DOM 2. 发送ajax请求
- 触发顺序 : constructor --> render --> componentDidMount
  // 类组件
  class Child extends React.Component {

    //1.1. 构造函数
    // 初始化数据
    constructor() {
      super()
      this.state = {
        name :'zs'
      }
      console.warn('constructor');
    }

    //1.2. 渲染UI
    render () {
      console.warn('render');

      return (
        <div>
          <p>哈哈 {this.state.name}</p>
        </div>
      )
    }

    //1.3. 挂载之后  渲染之后
    // 操作DOM ,发送ajax
    componentDidMount () {
      console.warn('componentDidMount');
    }
  }
第二阶段 : 更新阶段
- 执行顺序 : render --> componentDidUpdate
- 三种触发组件更新的方式
- setState() : 修改 state 的值
- new Props : 表示组件接收到一个新的 props 值。在父子组件关系中,当父组件中状态更新时,最新的 props 会自动传入到子组件中,从而触发子组件的重新渲染。不管是函数组件还是class组件,都会触发重新渲染
- forceUpdate() : 表示强制组件重新渲染 (一般不会用 知道就好)
- 注意点:
- 注意1 : componentDidUpdate 钩子函数中获取到的是 更新后的 DOM 内容
- 想获取之前的, 使用
componentDidUpdate (preProps,preState) { - 参数是
之前的props 和 state
- 想获取之前的, 使用
- 注意2 : 在 componentDidUpdate 钩子函数中,不能直接调用 setState() 否则,会递归渲染,造成死循环。如果要调用 setState(),应该放在一个 条件判断 中
class Parent extends React.Component {
  state = {
    pmsg :'撩妹'
  }
  render () {
    return <div>
      <button onClick={this.updateProps2Child}>按钮修改props</button>
      <Child msg={ this.state.pmsg }></Child>
    </div>
  }

  updateProps2Child = () => {

    // 演示2 : 修改父的state 其实就是修改 child 的props , 重新调用 child 的render
    this.setState({
      pmsg : '撩汉'
    })
  }
}

  //2. 类组件
  class Child extends React.Component {

    state = {
        name :'zs'
     }

    //2.1. 渲染UI
    render () {
      console.warn('render');

      return (
        <div>
          <p>哈哈 {this.state.name}</p>
          <p>父传过来的 : { this.props.msg }</p>
          <button onClick={this.updateName}>按钮</button>
        </div>
      )
    }

    //更新state 的name 数据
    updateName = () => {
       // 演示1 : setState 重新调用 render
       this.setState({
         name : 'ls'
       })

      // 演示3 : forceUpdate 重新调用 render
      this.forceUpdate()
    }

    // 2.2 组件更新
    // 上一次的 props 和  上一次的state
    componentDidUpdate (preProps,preState) {
      console.warn('组件更新之前的数据', preState);
      // this.state 当前最新的state
      console.warn('组件更新之后的数据',this.state);
      // 有条件的渲染 不然会造成死循环
      if(this.state.name !== preState.name) {
        this.setState({
          name : this.state.name
        })
      }
    }
  }
第三阶段 : 卸载阶段
componentWillUnmount:在组件卸载时会触发,也就是 组件从页面中消失的时候- 作用:执行清理工作
- 比如:清理掉 定时器、解绑手动绑定的事件 等
// 第一步 : 在父组件里 点击按钮, 把 子组件给销毁
class Parent extends React.Component {
	...
  render () {

    return <div>
      <button onClick={this.changeShow}>按钮修改props</button>
      { this.state.isShow && (<Child msg={ this.state.pmsg }></Child>) }
    </div>
  }

  changeShow = () => {
      // 点击按钮 子组件被销毁卸载
    this.setState({
      isShow : false
    })
  }
}

// 第二步 :  在 Child 组件里
componentDidMount () {

    //1. 开始定时器
    this.timerId = setInterval(() => {
        console.log('好嗨哟');
    }, 1000);
	//2. 给window注册鼠标触摸事件
    window.addEventListener('mousemove', this.handleMouseMove)
}

// 触摸事件处理函数
handleMouseMove = (e) => {
  console.log(e.clientX);
}

// 第三步 :  在将要卸载的钩子函数里 清除定时器和 移除鼠标移动事件
// 将要卸载
componentWillUnmount () {
    //1. 清除定时器
    clearInterval(this.timerId)
    //2. 移除鼠标触摸事件
    window.removeEventListener('mousemove',this.handleMouseMove)
}
render-props 和 高阶组件 的介绍
-
什么情况下 会使用这两种模式 ? 复用
-
当两个组件或者多个组件有一部分
state和操作 state 的方法相同或者相似的时候, 就可以将这些代码逻辑使用这两种模式来实现复用 -
目的 : 状态逻辑复用 ==> 通俗点说 : 另一种封装形式
-
要复用的内容为 :
- state
- 操作 state 的方法
-
注意
- 不管是高阶组件还是 render-props 模式, 都要将
状态逻辑封装在一个组件中 - 并且这个组件只提供状态和操作状态的方法逻辑
- 这个组件不提供要渲染的UI结构, 因为要渲染的内容不确定
- 不管是高阶组件还是 render-props 模式, 都要将
-
学习注意 :
- 思想重于代码
render-props 的使用
拷贝 Mouse.js 并简单介绍
- state : {x,y} 鼠标坐标
- 注册鼠标移动事件和移除 事件
- 移动事件吹函数 保存鼠标位置
演示1 : 鼠标位置
// 位置
// 1. 使用 mouse组件 添加一个render属性, 值类型为一个函数
// 2. 可以得到一个mouse 位置坐标
// 3. 通过return 什么, 页面就会显示什么
ReactDOM.render(<Mouse
                render={(mouse) => {
                  console.log(mouse);
                  return <h1>{mouse.x} - {mouse.y}</h1>
}}/>,document.getElementById('root'))
演示2 :移动猫
// 引入图片
import cat from './images/cat.png'

// 渲染
ReactDOM.render(<Mouse
                render={mouse => {

  return <img style={{ position : "absolute", left:mouse.x-64, top:mouse.y-64 }} src={cat} alt=''/>

} }/>,document.getElementById('root'))
总结使用共同步骤
- 1.给 Mouse 组件传递
render 属性( render属性的值 是一个函数 ) - 2.通过 render 函数属性的参数 来获取组件内部复用的状态 (比如 : 鼠标位置数据)
- 3 通过render函数属性的返回值来指定最终要渲染在 页面中的内容
####分析Mouse 组件内容
- Mouse 组件 只负责
- 提供 鼠标位置 state
- 提供操作数据位置的逻辑代码
- 注意 : Mouse 组价 自身不指定要渲染的内容, 因为 Mouse 组件自身要渲染的什么内容
- 实际上是由用户在使用该组件时指定的
- 思想 : Mouse 组件通过调用 props.render() 方法, 将组件内部的状态暴露到组件外部, 这样, 用户在使用该组件时, 就可以通过 render 属性的参数来获取到组件内部的状态了
// 封装 Mouse 组件 Mouse.js,
// 实现鼠标位置的复用
// 状态逻辑复用:1 state 2 操作状态
class Mouse extends React.Component {
  // 提供鼠标位置的状态
  state = {
    x: 0,
    y: 0
  }

  // 监听鼠标位置
  componentDidMount() {
    window.addEventListener('mousemove', this.handleMouseMove)
  }

  // 组件卸载时执行清理工作:解绑事件
  componentWillUnmount() {
    window.removeEventListener('mousemove', this.handleMouseMove)
  }

  // 更新鼠标位置
  handleMouseMove = e => {
    this.setState({
      x: e.clientX,
      y: e.clientY
    })
  }

  render() {
    // 通过 props 来获取到传递给组件的属性 render
    // 因为 render 是一个函数,所以,就可以调用
    // 在调用 render 函数时,将组件内部的状态,传递给 render 函数
    // 最终,通过 render 的形参,就可以在组件外部获取到组件内部的状态了
    // this.props.render(this.state)
    // return null

    // 通过 render 函数的返回值来指定要渲染的内容
    // 所以,在组件内部直接使用 render 函数的返回值来作为该组件要渲染的内容
    return this.props.render(this.state)
  }
}
使用 children 代替 render 属性
- 注意 : 不是该模式叫 render-props 模式, 就必须使用render 属性
- 实际上, 只要有一个属性来告诉组件要渲染什么内容, 其实这就是 render-props 模式了
- 推荐 : 使用 children 代替 render 属性
- 使用 children 演示位置和猫
// 1 . 位置
ReactDOM.render(<Mouse>
  {(mouse) => {
    return <p>{mouse.x} - { mouse.y }</p>        # +
   } }
</Mouse>, document.getElementById('root'))
// 2 . 猫
ReactDOM.render(<Mouse>
  {mouse => {
    return <img style={{ position:'absolute', left:mouse.x-64, top:mouse.y-64 }} src={cat} alt=""/>  											        # +
  }  }
</Mouse>, document.getElementById('root'))

// 3. Mouse.js 内部
render() {
  // 改为 children
  return this.props.children(this.state)
}
使用场景
- 场景1 : 之前的 Context 使用的就是这个模式
// 提供数据
<Provider value={ this.color } ></Provider>

// 消费数据/使用数据
<Consumer>
{ data => <span>--{data} </span>}
</Consumer>
- 场景2 : 动画插件 react-spring
- github地址
- 安装 :
yarn add react-spring - 使用 :
Render-props api ==> spring
// 引入
import {Spring} from 'react-spring/renderprops'

// 使用
ReactDOM.render(<Spring
  config={{ duration:4000 }}
  from={{ opacity: 0 }}
  to={{ opacity: 1 }}>
  {props => {
    console.log(props);

    return <div style={props}>hello</div>
  }}
</Spring>, document.getElementById('root'))
高阶组件的使用
- render-props 模式 和 高阶组件 都是 用来做复用的 : state 和 操作 state 的方法
高阶组件介绍
-
高阶组件 : HOC : High-Order Component
-
实际上就是一个函数, 这个函数能够接受一个参数组件, 然后,返回一个增强后的组件
-
参数组件 : 就是需要被包装的组件
-
返回的组件 : 增强后的组件, 这个组件中就是通过Props来接收到复用的状态逻辑的
-
思想 : 就是组件在增强的过程中, 传入了一些数据给 组件的 props
const 增强后的组件 = 高阶组件(被包装组件)
高阶组件使用演示
- 高阶组件的代码
// 这就是一个高阶组件
// 职责 : 1 提供鼠标位置状态 2 提供鼠标位置的方法
const withMouse = WrappedComponent => {
  class Mouse extends React.Component {
    // 鼠标位置状态
    state = {
      x: 0,
      y: 0
    }
    // 进入页面时,就绑定事件
    componentDidMount() {
      window.addEventListener('mousemove', this.handleMouseMove)
    }
    // 鼠标移动的事件处理程序
    handleMouseMove = e => {
      this.setState({
        x: e.clientX,
        y: e.clientY
      })
    }
    // 移除事件
    componentWillUnmount() {
      window.removeEventListener('mousemove', this.handleMouseMove)
    }
    render() {
      return <WrappedComponent {...this.state} />
      // return <WrappedComponent x={this.state.x} y={this.state.y} />
    }
  }
  return Mouse
}
演示1:创建位置组件
//1. 演示1 位置组件
const Position = props => {
  console.log(props) // 增强之前props是没有值的
  return <p>x:{props.x} y:{props.y}</p>
}

// 如何使用?
// 增强后 = withMouse(增强前)
HOC_Position =   withMouse(Position)

// 渲染
ReactDOM.render(<HOC_Position/>, document.getElementById('root'))
演示2 : 创建移动猫组件
//2.演示2 : 移动猫
const Cat = props => {
  console.log(props);

  return <img style={{ position:"absolute", left:props.x-64, top:props.y-64 }} src={cat} alt=""/>
}

// 使用高阶组件增强一下
HOC_Cat = withMouse(Cat)

// 渲染
ReactDOM.render(<HOC_Cat/>, document.getElementById('root'))
高阶组件分析
- 高阶组件名称 约定 以 with 开头
- 指定函数参数,参数应该以大写字母开头(作为要被包装的组件)
- 在函数内部创建一个类组件,提供复用的状态逻辑代码,并返回
- 在该组件中,渲染参数组件,同时将状态通过prop传递给参数组件
- 调用该高阶组件,传入要增强的组件,通过返回值拿到增强后的组件,并将其渲染到页面中
const withMouse = (WrappedComponent) => {
  class Mouse extends React.Component {
    ... 省略鼠标位置状态 和 操作鼠标位置的方法逻辑
    render() {
      return <WrappedComponent {...this.state} />      #  核心
    }
  }
  return Mouse
}
给高阶组件添加displayName (我们自己封装高阶组件)
- displayName:用于设置 react-dev-tools (浏览器中的react插件) 中组件的展示名称
- 注意:该属性仅仅用于设置展示名称,并不会对组件功能产生影响,所以,如果不想再 react-dev-tools 中进行区分,实际上,可以省略该设置。
- 演示 : 效果
// 同时渲染多个高阶组件的时候
ReactDOM.render(<div>
  <HocPosition/>
  <HocCat/>
</div>, document.getElementById('root'))

// 在 react-dev-tools 上面显示的是这样的
<Mouse>...</Mouse>
<Mouse>...</Mouse>

// 这样很不容易区分,所有需要添加displayName
- 如何 设置 displayName ?
const withMouse = (WrappedComponent) => {
  class Mouse extends React.Component {
    ... 省略鼠标位置状态 和 操作鼠标位置的方法逻辑
  }

  // 给高阶组件设置名称,将来在 react-dev-tools 工具中,能够区分到底是哪一个高阶组件包装的组件
  function getDisplayName(WrappedComponent) {                          # +
    return WrappedComponent.displayName || WrappedComponent.name
  }
  Mouse.displayName = getDisplayName(WrappedComponent)                 # +
  // 如果还想体现出来是高阶组价,就加个前缀
  Mouse.displayName = `WithMouse_${getDisplayName(WrappedComponent)}`  # +

  return Mouse
}
- 补充:
- 先获取被包装组件的 displayName ,如果没有就获取它的名字,如果再没有来个默认的最起码不会报错或者返回undefined
- WrappedComponent.displayName || WrappedComponent.name
给高阶组件传递属性 (我们自己封装高阶组件)
- 问题 : 如果给 高级组件传属性, 发现会丢失,
- 原因 : 高级组件内部给创建的Mouse组件内没有赋值属性. 即 高阶组件没有往下传递 Props
- 解决办法 : 渲染 WrappedComponent时, 将 state 和 this.props 一起传递给 Mouse组件
- 传递方法
// 如果多加了属性
<HocPosition name='jack'/>

// 高阶组价内部 :
const withMouse = (WrappedComponent) => {
  class Mouse extends React.Component {
    ... 省略鼠标位置状态 和 操作鼠标位置的方法逻辑

    render() {
      // 之前这里只传递给包装组件 state ,并没有传递props
      return <WrappedComponent {...this.state}  {...this.props}  />    # ++++
    }
  }
  return Mouse
}

// 使用
const Position = props => {
  // 通过 props 就可以获取到传递给高阶组件的属性了
  // ... 省略其他代码
}
setState() 的说明
异步更新数据
- setState() 是异步更新数据的
- 为什么是异步的 ?
- 因为 setState() 可能同时被调用多次,如果是同步的话,状态就会更新多次,
- 也就是页面要发生多次渲染,也就是发生多次重绘和重排,这样的话,会降低应用的性能。
state = {
    count: 0
}

console.log('前 :',this.state.count) // 0
this.setState({
    count: this.state.count + 1
})
 // for (var i = 0; i < 1000; i++) {
  //   this.setState({
  //     count: i
  //   })
  // }
console.log('后 :',this.state.count) // 0
setState 的第一种格式 : setState(stateChange, [callback])
-
格式 : setState( 对象, 回调 )
-
[官] : callback 它将在
setState完成合并并重新渲染组件后执行。 -
通常,我们建议使用
componentDidUpdate()来代替此方式。
this.setState({
    count : this,state.count + 1
},() => {
    console.log('这个回调函数会在状态更新后立即执行',this.state.count)
})
演示问题
- 代码
console.log('前', this.state.count) // 0
// 异步更新
this.setState({
  count: this.state.count + 1  // 以为是 1
})
// 异步更新  + 获取 结果
this.setState(
  {
    count: this.state.count + 1 // 以为是 2
  },
  () => {
    console.log(this.state.count) // 以为是 2 但是结果是1
  }
)
// 两次更新 发现结果还都是 1 ,
- 分析
# [官] 这种形式的 setState() 也是异步的,并且在同一周期内会对多个 setState 进行批处理。
# [官] 后调用的 setState() 将覆盖同一周期内先调用 setState 的值,因此商品数仅增加一次。
let newObj = Object.assign({}, obj, { age: 20 }, { age: 30 })

# [官] 如果后续状态取决于当前状态,我们建议使用 updater 函数的形式代替:
setState 的第二种格式 : setState(updater, [callback])
- 格式 : setState(函数式, 回调)
- 函数式 : 函数里面返回一个对象
 // 异步更新
// 这个为什么就可以了, 因为是通过参数获取的, 是 React 控制 的,,返回的就是上次更新的
this.setState((state, props) => {
    return {
        count: state.count + 1  // 拿到最新的 0 + 1 = 1
    }
})
// 异步更新  + 获取 结果
// 这个为什么就可以了, 因为是通过参数获取的, 是 React 控制 的,,返回的就是上次更新的
this.setState(
    (state, props) => {
        return {
            count: state.count + 1 //拿到最新的1 + 1 = 2
        }
    },
    () => {
        console.log(this.state.count) // 结果是2
    }
)
- 简写
// 也可以简写
this.setState((state) => ({
        count: state.count + 1  // 以为是 1
      })
 )
总结
// 第一种格式 :  setState(stateChnage, [callback])  ★
               setSrare(对象, 回调)

// 第二种格式 :setState(updater, [callback])  ★
              setSrare(函数式, 回调)

// 最常用的还是 第一种格式的简化操作  setState(stateChange)   ★★★
this.setState({
    count : this.state.count + 1
})
{
return {
count: state.count + 1 // 拿到最新的 0 + 1 = 1
}
})
// 异步更新 + 获取 结果
// 这个为什么就可以了, 因为是通过参数获取的, 是 React 控制 的,返回的就是上次更新的
this.setState(
(state, props) => {
return {
count: state.count + 1 //拿到最新的1 + 1 = 2
}
},
() => {
console.log(this.state.count) // 结果是2
}
)
- 简写

```js
// 也可以简写
this.setState((state) => ({
        count: state.count + 1  // 以为是 1
      })
 )
总结
// 第一种格式 :  setState(stateChnage, [callback])  ★
               setSrare(对象, 回调)

// 第二种格式 :setState(updater, [callback])  ★
              setSrare(函数式, 回调)

// 最常用的还是 第一种格式的简化操作  setState(stateChange)   ★★★
this.setState({
    count : this.state.count + 1
})