一、上代码
/*********
  Rui Santos
  Complete project details at https://RandomNerdTutorials.com/esp32-cam-take-photo-display-web-server/

  IMPORTANT!!!
   - Select Board "AI Thinker ESP32-CAM"
   - GPIO 0 must be connected to GND to upload a sketch
   - After connecting GPIO 0 to GND, press the ESP32-CAM on-board RESET button to put your board in flashing mode

  The above copyright notice and this permission notice shall be included in all
  copies or substantial portions of the Software.
*********/
#include "SD_MMC.h"            // SD Card ESP32
#include "WiFi.h"
#include "esp_camera.h"
#include "esp_timer.h"
#include "img_converters.h"
#include "Arduino.h"
#include "soc/soc.h"           // Disable brownour problems
#include "soc/rtc_cntl_reg.h"  // Disable brownour problems
#include "driver/rtc_io.h"
#include <ESPAsyncWebServer.h>
#include <StringArray.h>
#include <SPIFFS.h>
#include <FS.h>
#include <EEPROM.h>            // read and write from flash memory

// define the number of bytes you want to access
#define EEPROM_SIZE 1

// Replace with your network credentials
//const char* ssid = "Wifi24";
//const char* password = "*_888888_*";

// Create AsyncWebServer object on port 80
AsyncWebServer server(80);

boolean takeNewPhoto = false;

// Photo File Name to save in SPIFFS
#define FILE_PHOTO "/photo.jpg"

// OV2640 camera module pins (CAMERA_MODEL_AI_THINKER)
#define PWDN_GPIO_NUM     32
#define RESET_GPIO_NUM    -1
#define XCLK_GPIO_NUM      0
#define SIOD_GPIO_NUM     26
#define SIOC_GPIO_NUM     27
#define Y9_GPIO_NUM       35
#define Y8_GPIO_NUM       34
#define Y7_GPIO_NUM       39
#define Y6_GPIO_NUM       36
#define Y5_GPIO_NUM       21
#define Y4_GPIO_NUM       19
#define Y3_GPIO_NUM       18
#define Y2_GPIO_NUM        5
#define VSYNC_GPIO_NUM    25
#define HREF_GPIO_NUM     23
#define PCLK_GPIO_NUM     22

// Keep track of number of pictures
unsigned int pictureNumber = 0;

//Stores the camera configuration parameters
camera_config_t config;

const char index_html[] PROGMEM = R"rawliteral(
<!DOCTYPE HTML><html>
<head>
  <meta name="viewport" content="width=device-width, initial-scale=1">
  <style>
    body { text-align:center; }
    .vert { margin-bottom: 10%; }
    .hori{ margin-bottom: 0%; }
  </style>
</head>
<body>
  <div id="container">
    <h2>ESP32-CAM Last Photo</h2>
    <p>It might take more than 5 seconds to capture a photo.</p>
    <p>
      <button onclick="rotatePhoto();">ROTATE</button>
      <button onclick="capturePhoto()">CAPTURE PHOTO</button>
      <button onclick="location.reload();">REFRESH PAGE</button>
    </p>
  </div>
  <div><img src="saved-photo" id="photo" width="70%"></div>
</body>
<script>
  var deg = 0;
  function capturePhoto() {
    var xhr = new XMLHttpRequest();
    xhr.open('GET', "/capture", true);
    xhr.send();
  }
  function rotatePhoto() {
    var img = document.getElementById("photo");
    deg += 90;
    if(isOdd(deg/90)){ document.getElementById("container").className = "vert"; }
    else{ document.getElementById("container").className = "hori"; }
    img.style.transform = "rotate(" + deg + "deg)";
  }
  function isOdd(n) { return Math.abs(n % 2) == 1; }
</script>
</html>)rawliteral";

void setup() {
  // Serial port for debugging purposes
  Serial.begin(115200);

  // Connect to Wi-Fi
  //  WiFi.begin(ssid, password);
  //  while (WiFi.status() != WL_CONNECTED) {
  //    delay(1000);
  //    Serial.println("Connecting to WiFi...");
  //  }

  if (!autoConfig())
  {
    Serial.println("Start module");
    smartConfig();
  }

  if (!SPIFFS.begin(true)) {
    Serial.println("An Error has occurred while mounting SPIFFS");
    ESP.restart();
  }
  else {
    delay(500);
    Serial.println("SPIFFS mounted successfully");
  }

  // Print ESP32 Local IP Address
  Serial.print("IP Address: http://");
  Serial.println(WiFi.localIP());

  // Turn-off the 'brownout detector'
  WRITE_PERI_REG(RTC_CNTL_BROWN_OUT_REG, 0);


  //Initialize the camera
  Serial.print("Initializing the camera module...");
  configInitCamera();
  Serial.println("Ok!");

  //Initialize MicroSD
  Serial.print("Initializing the MicroSD card module... ");
  initMicroSDCard();

  // Route for root / web page
  server.on("/", HTTP_GET, [](AsyncWebServerRequest * request) {
    request->send_P(200, "text/html", index_html);
  });

  server.on("/capture", HTTP_GET, [](AsyncWebServerRequest * request) {
    takeNewPhoto = true;
    request->send_P(200, "text/plain", "Taking Photo");
  });

  server.on("/saved-photo", HTTP_GET, [](AsyncWebServerRequest * request) {
    request->send(SPIFFS, FILE_PHOTO, "image/jpg", false);
  });

  // Start server
  server.begin();

}

/**
   一键配网关键代码
*/
void smartConfig()
{
  WiFi.mode(WIFI_STA);
  Serial.println("\r\nWait for Smartconfig");
  delay(2000);
  // 等待配网
  WiFi.beginSmartConfig();

  while (1)
  {
    Serial.print(".");
    delay(500);
    if (WiFi.smartConfigDone())
    {
      Serial.println("SmartConfig Success");
      Serial.printf("SSID:%s\r\n", WiFi.SSID().c_str());
      Serial.printf("PSW:%s\r\n", WiFi.psk().c_str());
      WiFi.setAutoConnect(true);  // 设置自动连接
      break;
    }
  }

  Serial.println("");
  Serial.println("WiFi connected");
  Serial.print("IP address: " );
  delay(500);
  Serial.println(WiFi.localIP());
}

bool autoConfig()
{
  WiFi.begin();
  for (int i = 0; i < 5; i++)
  {
    int wstatus = WiFi.status();
    if (wstatus == WL_CONNECTED)
    {
      Serial.println("AutoConfig Success");
      Serial.printf("SSID:%s\r\n", WiFi.SSID().c_str());
      Serial.printf("PSW:%s\r\n", WiFi.psk().c_str());
      WiFi.printDiag(Serial);
      return true;
    }
    else
    {
      Serial.print("AutoConfig Waiting......");
      Serial.println(wstatus);
      delay(500);
    }
  }
  Serial.println("AutoConfig Faild!" );
  return false;
}

void configInitCamera() {
  config.ledc_channel = LEDC_CHANNEL_0;
  config.ledc_timer = LEDC_TIMER_0;
  config.pin_d0 = Y2_GPIO_NUM;
  config.pin_d1 = Y3_GPIO_NUM;
  config.pin_d2 = Y4_GPIO_NUM;
  config.pin_d3 = Y5_GPIO_NUM;
  config.pin_d4 = Y6_GPIO_NUM;
  config.pin_d5 = Y7_GPIO_NUM;
  config.pin_d6 = Y8_GPIO_NUM;
  config.pin_d7 = Y9_GPIO_NUM;
  config.pin_xclk = XCLK_GPIO_NUM;
  config.pin_pclk = PCLK_GPIO_NUM;
  config.pin_vsync = VSYNC_GPIO_NUM;
  config.pin_href = HREF_GPIO_NUM;
  config.pin_sscb_sda = SIOD_GPIO_NUM;
  config.pin_sscb_scl = SIOC_GPIO_NUM;
  config.pin_pwdn = PWDN_GPIO_NUM;
  config.pin_reset = RESET_GPIO_NUM;
  config.xclk_freq_hz = 20000000;
  config.pixel_format = PIXFORMAT_JPEG; //YUV422,GRAYSCALE,RGB565,JPEG

  // Select lower framesize if the camera doesn't support PSRAM
  if (psramFound()) {
    config.frame_size = FRAMESIZE_UXGA; // FRAMESIZE_ + QVGA|CIF|VGA|SVGA|XGA|SXGA|UXGA
    config.jpeg_quality = 10; //10-63 lower number means higher quality
    config.fb_count = 2;
  } else {
    config.frame_size = FRAMESIZE_SVGA;
    config.jpeg_quality = 12;
    config.fb_count = 1;
  }

  // Initialize the Camera
  esp_err_t err = esp_camera_init(&config);
  if (err != ESP_OK) {
    Serial.printf("Camera init failed with error 0x%x", err);
    return;
  }

  sensor_t * s = esp_camera_sensor_get();
  s->set_brightness(s, 0);     // -2 to 2
  s->set_contrast(s, 0);       // -2 to 2
  s->set_saturation(s, 0);     // -2 to 2
  s->set_special_effect(s, 0); // 0 to 6 (0 - No Effect, 1 - Negative, 2 - Grayscale, 3 - Red Tint, 4 - Green Tint, 5 - Blue Tint, 6 - Sepia)
  s->set_whitebal(s, 1);       // 0 = disable , 1 = enable
  s->set_awb_gain(s, 1);       // 0 = disable , 1 = enable
  s->set_wb_mode(s, 0);        // 0 to 4 - if awb_gain enabled (0 - Auto, 1 - Sunny, 2 - Cloudy, 3 - Office, 4 - Home)
  s->set_exposure_ctrl(s, 1);  // 0 = disable , 1 = enable
  s->set_aec2(s, 0);           // 0 = disable , 1 = enable
  s->set_ae_level(s, 0);       // -2 to 2
  s->set_aec_value(s, 300);    // 0 to 1200
  s->set_gain_ctrl(s, 1);      // 0 = disable , 1 = enable
  s->set_agc_gain(s, 0);       // 0 to 30
  s->set_gainceiling(s, (gainceiling_t)0);  // 0 to 6
  s->set_bpc(s, 0);            // 0 = disable , 1 = enable
  s->set_wpc(s, 1);            // 0 = disable , 1 = enable
  s->set_raw_gma(s, 1);        // 0 = disable , 1 = enable
  s->set_lenc(s, 1);           // 0 = disable , 1 = enable
  s->set_hmirror(s, 0);        // 0 = disable , 1 = enable
  s->set_vflip(s, 0);          // 0 = disable , 1 = enable
  s->set_dcw(s, 1);            // 0 = disable , 1 = enable
  s->set_colorbar(s, 0);       // 0 = disable , 1 = enable
}

void initMicroSDCard() {
  // Start Micro SD card
  Serial.println("Starting SD Card");
  if (!SD_MMC.begin()) {
    Serial.println("SD Card Mount Failed");
    return;
  }
  uint8_t cardType = SD_MMC.cardType();
  if (cardType == CARD_NONE) {
    Serial.println("No SD Card attached");
    return;
  }
}

// Check if photo capture was successful
bool checkPhoto( fs::FS &fs ) {
  File f_pic = fs.open( FILE_PHOTO );
  unsigned int pic_sz = f_pic.size();
  return ( pic_sz > 100 );
}

// Capture Photo and Save it to SPIFFS
void capturePhotoSaveSpiffs( void ) {
  camera_fb_t * fb = NULL; // pointer
  bool ok = 0; // Boolean indicating if the picture has been taken correctly

  do {
    // Take a photo with the camera
    Serial.println("Taking a photo...");

    fb = esp_camera_fb_get();
    if (!fb) {
      Serial.println("Camera capture failed");
      return;
    }

    // initialize EEPROM with predefined size
    EEPROM.begin(EEPROM_SIZE);
    pictureNumber = EEPROM.read(0) + 1;

    // Path where new picture will be saved in SD Card
    String path = "/picture" + String(pictureNumber) + ".jpg";

    // Save picture to microSD card
    fs::FS &fs = SD_MMC;
    File fileSd = fs.open(path.c_str(), FILE_WRITE);
    if (!fileSd) {
      Serial.println("Failed to open fileSd in writing mode");
    }
    else {
      fileSd.write(fb->buf, fb->len); // payload (image), payload length
      Serial.printf("Saved file to path: %s\n", path.c_str());
    }
    fileSd.close();

    // Photo file name
    Serial.printf("Picture file name: %s\n", FILE_PHOTO);
    File file = SPIFFS.open(FILE_PHOTO, FILE_WRITE);

    // Insert the data in the photo file
    if (!file) {
      Serial.println("Failed to open file in writing mode");
    }
    else {
      file.write(fb->buf, fb->len); // payload (image), payload length
      Serial.print("The picture has been saved in ");
      Serial.print(FILE_PHOTO);
      Serial.print(" - Size: ");
      Serial.print(file.size());
      Serial.println(" bytes");
    }
    // Close the file
    file.close();
    esp_camera_fb_return(fb);

    // check if file has been correctly saved in SPIFFS
    ok = checkPhoto(SPIFFS);
    if (ok) {
      EEPROM.write(0, pictureNumber);
      EEPROM.commit();
    }
  } while ( !ok );
}

void loop() {
  if (takeNewPhoto) {
    capturePhotoSaveSpiffs();
    takeNewPhoto = false;
  }
  delay(1);
}
二、刷入方式
1、接线方式
我用的是8266的usb转ttl的刷入工具,主要接最边上的3.3V,最边上的GND,UOR,UOT,然后这个中间的IO0和中间的GND在刷入过程中必须接在一起
接线参考以下连接
https://www.wandouip.com/t5i326347/
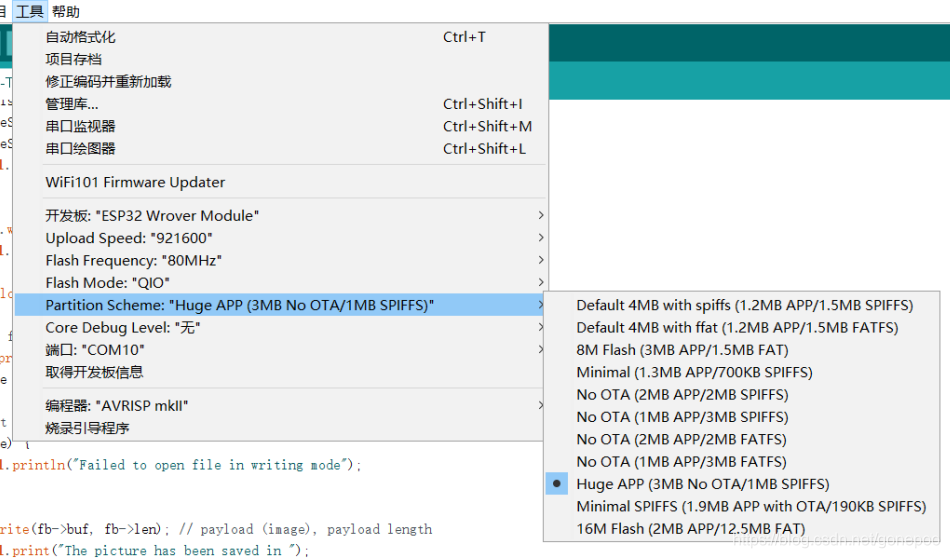
2、刷入要点
如下图所示:
3、常见问题
刷入完毕之后将中间的IO0和中间的GND分开即可运行,运行的时候,最好是接5V,接3.3V画质有条纹,如果刷入过程中一直....._____....._____....._____....._____....._____.....__,这个时候按一下上面的唯一按键RST,即可刷入
4、调试过程
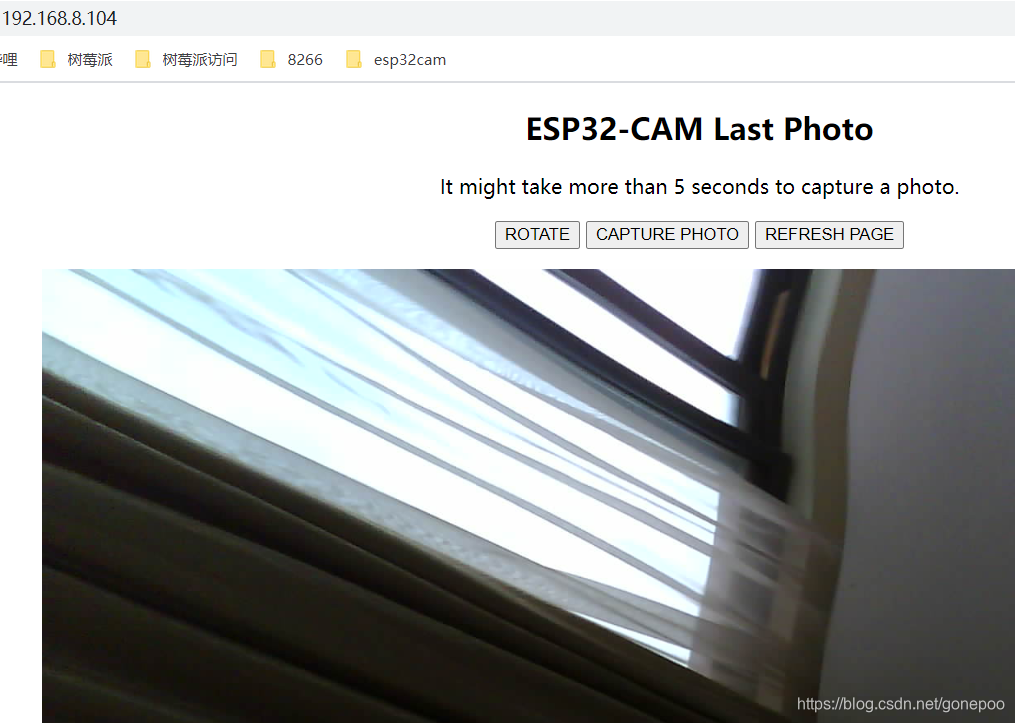
刷入完毕之后,将中间的GND和IO0连在一起的线松开一端即可,然后打开串口监视器,上图中有具体位置,如果一直没显示啥,RST按一下,看具体提示操作,首次需要用自动配网的app给esp32cam配置wifi账号密码,后面都不需要再配置了,然后可以在串口监视器看到如下内容,访问你对应得ip即可网页预览和拍照

三、参考链接
https://github.com/RuiSantosdotme/ESP32-CAM-Arduino-IDE
本人的代码是经过修改的,将存储到内存卡和这个网页拍照预览合并在一起了,同时加入了自动配网的功能,ios下载乐鑫的smartConfig自动配网的app,安卓的也有类似的,配过一次,永久不用再配,断电后自动重连Wifi