Linux网络综合布局
实验设计及拓扑图

实验设计步骤
- 三层交换机配置不同网段、划分vlan
- 路由器R1做NAT,easy ip及server服务器映射,是外网可以访问内网Web
- 路由器R2作为运营商端,配置server回程
- 使用云,连接虚拟机,配置内网web,内网NFS和SMB
- 外网同理,配置DNS和外网Web
【三层交换机】
sysname RSW1
vlan batch 10 20 30 50
int Vlanif10
ip add 192.168.10.1 24
int Vlanif20
ip add 192.168.20.1 24
int Vlanif30
ip add 192.168.30.1 24
int Vlanif50
ip add 11.0.0.2 30
int g0/0/1
port link-type access
port default vlan 50
int g0/0/2
port link-type access
port default vlan 10
int g0/0/3
port link-type access
port default vlan 20
int g0/0/4
port link-type access
port default vlan 30
int g0/0/5
port link-type access
port default vlan 40
ip route-static 0.0.0.0 0.0.0.0 11.0.0.1
【R1配置】
sysname R1
acl 3000
rule permit ip source 192.168.10.0 0.0.0.255
rule permit ip source 192.168.20.0 0.0.0.255
rule permit ip source 192.168.40.0 0.0.0.255
quit
int g0/0/0
ip add 201.0.0.1 30
nat static protocol tcp global 202.0.0.100 www inside 192.168.30.100 www
nat outbound 3000
quit
int g0/0/1
ip add 11.0.0.1 30
int g0/0/2
quit
ip route-static 0.0.0.0 0.0.0.0 201.0.0.2
ip route-static 192.168.10.0 24 11.0.0.2
ip route-static 192.168.20.0 24 11.0.0.2
ip route-static 192.168.30.0 24 11.0.0.2
【R2配置】
sysname R2
int g0/0/0
ip add 201.0.0.2 30
int g0/0/1
ip add 203.0.0.1 24
quit
ip route-static 202.0.0.100 32 201.0.0.1 ##对NAT映射的回程
【配置samba、nfs服务器】
虚拟机配置ip:192.168.30.10 网关192.168.30.1 VM1网卡
[root@localhost ~]# vi /etc/sysconfig/network-scripts/ifcfg-ens33
[root@localhost ~]# systemctl restart network
[root@localhost ~]# systemctl restart network
[root@localhost ~]# vi /etc/sysconfig/network-scripts/ifcfg-ens33
[root@localhost ~]# yum -y install samba
[root@localhost ~]# rpm -qa |grep samba
samba-common-tools-4.8.3-4.el7.x86_64
samba-client-libs-4.8.3-4.el7.x86_64
samba-common-4.8.3-4.el7.noarch
samba-4.8.3-4.el7.x86_64
samba-common-libs-4.8.3-4.el7.x86_64
samba-client-4.8.3-4.el7.x86_64
samba-libs-4.8.3-4.el7.x86_64
[root@localhost ~]# cd /etc/samba
[root@localhost samba]# ll
总用量 20
-rw-r--r--. 1 root root    20 10月 31 2018 lmhosts
-rw-r--r--. 1 root root   706 10月 31 2018 smb.conf
-rw-r--r--. 1 root root 11327 10月 31 2018 smb.conf.example
[root@localhost samba]# cd
[root@localhost ~]# cd /opt
[root@localhost opt]# mkdir t1 t2
[root@localhost opt]# ll
总用量 0
drwxr-xr-x. 2 root root 6 10月 31 2018 rh
drwxr-xr-x  2 root root 6 8月   6 15:10 t1
drwxr-xr-x  2 root root 6 8月   6 15:10 t2
[root@localhost opt]# useradd t1
[root@localhost opt]# useradd t2
[root@localhost opt]# useradd tom
[root@localhost opt]# useradd jack
[root@localhost opt]# chown t1:t1 t1 ##改变t1文件的属主和属组
[root@localhost opt]# chown t1:t1 t2
[root@localhost opt]# gpasswd -a tom t1 ##将tom用户加入到t1组
[root@localhost opt]# gpasswd -a jack t2 ##将Jack用户加入到t2组
[root@localhost opt]# ll
总用量 0
drwxr-xr-x.  2 root  root   6 10月 31 2018 rh
drwxr-xr-x   2 t1   tom   6 8月   6 15:10 t1
drwxr-xr-x   2 t1   jack   6 8月   6 15:10 t2
[root@localhost opt]# cd /etc/samba
[root@localhost samba]# ll
总用量 20
-rw-r--r--. 1 root root    20 10月 31 2018 lmhosts
-rw-r--r--. 1 root root   706 10月 31 2018 smb.conf
-rw-r--r--. 1 root root 11327 10月 31 2018 smb.conf.example
[root@localhost samba]# grep -v '^#|^$|^;' smb.conf > smb.conf1
[root@localhost samba]# mv smb.conf smb.conf.2020.8.6.bak
[root@localhost samba]# mv smb.conf1 smb.conf
[root@localhost samba]# vi smb.conf
[global]
        workgroup = SAMBA
        security = user
        passdb backend = tdbsam
        printing = cups
        printcap name = cups
        load printers = yes
        cups options = raw
[t1]
        comment = Samba
        path = /opt/t1
        public = no
        valid users = t1,tom
        write list = t1
[t2]
        comment = Samba
        path = /opt/t2
        public = no
        valid users = t2,tom
        write list = t2
[root@localhost opt]# pdbedit -a t1           ##创建smb用户t1并配置密码
[root@localhost opt]# pdbedit -a t2           ##创建smb用户t2并配置密码
[root@localhost opt]# pdbedit -a tom          ##创建smb用户tom并配置密码
[root@localhost opt]# pdbedit -a Jack         ##创建smb用户Jack并配置密码
[root@localhost opt]# chmod 750 t1            ##设置主可读可写,组只可读权限
[root@localhost opt]# chmod 750 t2            ##设置主可读可写,组只可读权限
[root@localhost opt]# ll
总用量 0
drwxr-xr-x. 2 root root 6 10月 31 2018 rh
drwxr-----  2 t1   tom  6 8月   6 15:10 t1
drwxr-----  2 t1   jack 6 8月   6 15:10 t2
[root@localhost samba]# systemctl start smb
[root@localhost samba]# systemctl stop firewalld
[root@localhost samba]# systemctl status firewalld
● firewalld.service - firewalld - dynamic firewall daemon
   Loaded: loaded (/usr/lib/systemd/system/firewalld.service; disabled; vendor preset: enabled)
   Active: inactive **(dead)**
     Docs: man:firewalld(1)
[root@localhost samba]# cd /opt
[root@localhost opt]# ll
总用量 0
drwxr-xr-x. 2 root root 6 10月  31 2018 rh
drwxr-xr-x  2 t1   t1  6 8月   6 15:10 t1
drwxr-xr-x  2 t1   t2  6 8月   6 15:10 t2
smb完成,接下来nfs
[root@localhost ~]# yum -y install nfs-utils
[root@localhost ~]# yum -y install rpcbind
[root@localhost ~]# cd /opt
[root@localhost opt]# mkdir www
[root@localhost opt]# vi /etc/exports
/opt/www        192.168.30.100(rw,sync,no_root_squash)
[root@localhost opt]# systemctl start nfs
[root@localhost opt]# systemctl start rpcbind
[root@localhost opt]# systemctl enable rpcbind
[root@localhost opt]# systemctl enable nfs
[root@localhost opt]# netstat -anpt | grep rpc
tcp        0      0 0.0.0.0:20048           0.0.0.0:*               LISTEN      12606/rpc.mountd
tcp        0      0 0.0.0.0:47612           0.0.0.0:*               LISTEN      12579/rpc.statd
tcp6       0      0 :::20048                :::*                    LISTEN      12606/rpc.mountd
tcp6       0      0 :::52569                :::*                    LISTEN      12579/rpc.statd
[root@localhost opt]# showmount -e
Export list for localhost.localdomain:
/opt/www 192.168.30.100
【内网WEb服务器】
虚拟机配置ip:192.168.30.100 网关192.168.30.1 VM1网卡
去web服务器挂载/opt/www目录
[root@localhost ~]# yum -y install httpd
[root@localhost ~]# yum -y install rpcbind ##访问需要安装RPC工具
[root@localhost ~]# yum -y install showmount
[root@localhost ~]# showmount -e 192.168.40.10
[root@localhost ~]# vi /etc/fstab
192.168.30.10:/opt/www /var/www/html nfs defaults,_netdev 0 0
【外网DNS】
虚拟机配置ip:203.0.0.3 网关203.0.0.1 VM3网卡
[root@localhost ~]# yum -y install bind bind-utils bind-chroot bind-libs
##安装4个软件包
[root@localhost ~]# vi /etc/named.conf
options {
        listen-on port 53 { 203.0.0.3; };
        listen-on-v6 port 53 { ::1; };
        directory       "/var/named";
        dump-file       "/var/named/data/cache_dump.db";
        statistics-file "/var/named/data/named_stats.txt";
        memstatistics-file "/var/named/data/named_mem_stats.txt";
        allow-query     { any; };
[root@localhost ~]# vi /etc/named.rfc1912.zones
zone "kgc.com" IN {
        type master;
        file "kgc.com.zone";
        allow-update { none; };
};
zone "51xit.com" IN {
        type master;
        file "51xit.com.zone";
        allow-update { none; };
};
[root@localhost named]# vi /var/named/kgc.com.zone
$TTL    1D
@       IN SOA  kgc.com.        admin.kgc.com. (
                                                0       ; serial
                                                1D      ; refresh
                                                1H      ; retry
                                                1W      ; expire
                                                3H )    ; minium
                NS      @
                A       203.0.0.4
www     IN      A       203.0.0.4
ftp     IN      CNAME   www
[root@localhost named]# vi /var/named/51xit.com.zone
$TTL    1D
@       IN SOA  51xit.com.        admin.51xit.com. (
                                                0       ; serial
                                                1D      ; refresh
                                                1H      ; retry
                                                1W      ; expire
                                                3H )    ; minium
                NS      @
                A       202.0.0.100
www     IN      A       202.0.0.100
ftp     IN      CNAME   www
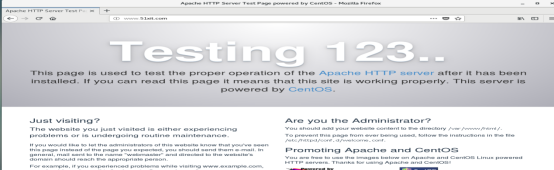
【外网WEB服务器】
虚拟机配置ip:203.0.0.4 网关203.0.0.1 VM3网卡
[root@localhost ~]# yum -y install httpd
[root@localhost ~]# systemctl start httpd
[root@localhost ~]# systemctl enable httpd
实验验证
smb登录验证

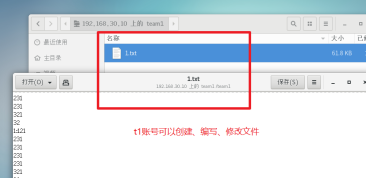

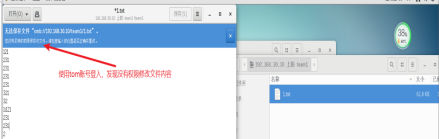
一、去samba服务器做测试
(1)先对外网DNS测试
[root@localhost ~]# vi /etc/resolv.conf
nameserver 203.0.0.3
[root@localhost ~]# nslookup www.51xit.com
Server:         203.0.0.3
Address:        203.0.0.3#53

Name:   www.51xit.com
Address: 202.0.0.100
[root@localhost ~]# nslookup www.kc.com
Server:         203.0.0.3
Address:        203.0.0.3#53

Name:   www.kc.com
Address: 203.0.0.4
(2)测试NFS
NFS服务器端
[root@localhost html]# ll /opt/www
total 4
-rwxr--r--. 1 root root 3454 Aug  6 23:43 lynx
内网WEB服务器端
[root@localhost html]# ll /var/www/html/
total 4
-rwxr--r--. 1 root root 3454 Aug  6 23:43 lynx
(3)再对内网web服务器测试
随便上传一个网页文件到/var/www/html目录下
[root@localhost html]# ll /var/www/html/
total 4
-rwxr--r--. 1 root root 3454 Aug  6 23:43 lynx

[root@localhost ~]# vi /etc/hosts
192.168.30.100  www.51xit.com
(4)测试外网服务器
[root@localhost ~]# vi /etc/resolv.conf
nameserver 203.0.0.3

二、使用外网WBE服务器图形界面的虚拟机测试内网WEB服务器
[root@localhost ~]# vi /etc/resolv.conf
nameserver 203.0.0.3
